background image

9

10

Child Restraint and Booster
Seat Description

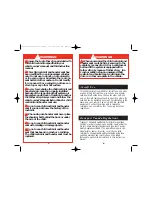
Rear-facing position;
Less than one year old and
between 2.3-14 kg (5-30 lbs)
and 48-81 cm (19-32 inches)
tall. Infant and infant restraint
are placed in the back seat and
face the rear of the vehicle.

NOTE:

Infants one year old

or less must be rear-facing.

Belt-positioning booster
seat;
18-36 kg. (40-80 lbs.) and 102-
132 cm. (40-52 inches) tall.
Child and booster seat are
placed in the back seat and face
the front of the vehicle.

Your child’s height, weight and age determine how your
child restraint should be placed in the vehicle and which
restraint should be used.

WARNING

!

Verify your child’s weight and height (do not
guess) before choosing the child restraint or
booster seat position.

Forward-facing position;
Over one year old and
between 10-18 kg. (22-40 lbs.)
and 74-102 cm. (29 -40 inches)
tall. Child and child restraint are
placed in the back seat and face
the front of the vehicle.

NOTE:

Children must be 1

year old or older for forward-
facing position.

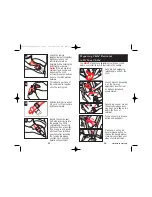
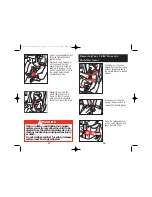
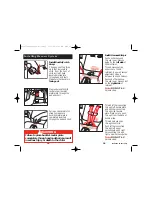
The locking clip is used to prevent the vehicle belt from
loosening in the event of a sudden stop or crash.
Before you put your child restraint in the vehicle, buckle
the lap/shoulder belt. Pull on the lap belt portion. If it
loosens or slips, you must either use a locking clip to
hold the seat belt tight or move child restraint to
another seating location.

Note:

A locking clip will not fix all types of seat belt
problems.

You do not need a locking clip when using this

seat as a belt-positioning booster.

Check vehicle owner’s manual if locking clip is

needed.

You will find the locking clip inserted on the

back of the child restraint.

A locking clip can only be used on a lap/shoulder

belt combination.

1

Thread the vehicle
lap/shoulder belt through
the correct belt path.
Buckle the vehicle seat
belt. Pull up on shoulder
part of belt until all slack is
removed and lap belt is
tight.

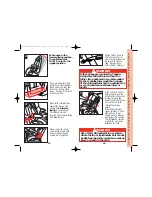
Locking Clip Installation

continued on next page.

4358-3434D Canada Elite Eng  3/17/08  9:05 AM  Page 15

Содержание Alpha Omega Elite/Luxe Deluxe 3-In-1 All Terrain

Страница 1: ...__ Locking Clip 2 50 X______ ______________ Tether Kit 9 99 X______ ______________ UAS Kit 24 99 X______ ______________ Instructions 0 00 X______ ______________ Merchandise Total ______________ Shippi...

Страница 2: ...efore You Begin Dorel Juvenile Group Consumer Relations Dorel Juvenile Group Inc Mailing address P O Box 2609 Columbus IN 47202 2609 Website www djgusa com Fax 1 800 207 8182 Telephone 1 800 544 1108...

Страница 3: ...O Recline Handle P Harness Adjustment Strap Q Removable Base R Rear Facing Belt Path Front IV A Shoulder Belt Positioning Guide B Tether Strap Adjuster Hook C Headrest Adjustment Bar D Locking Clip b...

Страница 4: ...lling seat pad 50 Warranty 51 Replacement part order form 54 Replacement part list 55 1 2 WARNINGS Failure to read understand and follow all instructions in this manual can result in serious injury or...

Страница 5: ...level to ground line For vehicles with no rear seats verify the vehicle owner s manual for location and installation of a child restraint and booster seat Do not remove the warning labels WARNINGS Nev...

Страница 6: ...st be replaced Transport Canada Road Safety Directorate regulates children s restraint systems and booster seats under the MotorVehicle Restraint Systems and Booster Cushion Safety Regulations RSSR Th...

Страница 7: ...e child restraint with the seat belt is just as secure Note UAS brackets cannot be installed in older vehicles 8 StoringYour Child Restraint and Booster Seat To protect your child restraint and booste...

Страница 8: ...and face the front of the vehicle NOTE Children must be 1 year old or older for forward facing position The locking clip is used to prevent the vehicle belt from loosening in the event of a sudden sto...

Страница 9: ...e vehicle belts together onto the locking clip 4 Position locking clip about 2 5 cm 1 in from vehicle belt s buckle plate continued on next page Preparing Child Restraint to FitYour Child 2 3 Push on...

Страница 10: ...is still incorrect call Consumer Relations for more detailed help Harness Guide 7 WARNING Do not mistake comfort for safety Harness system must be snugly adjusted Incorrect use of the harness system i...

Страница 11: ...ness straps just above buckle plates 2 Adjusting Harness Headrest Height Depending on your model the harness release lever may be under a flap on the pad in the front of restraint SecuringYour Child i...

Страница 12: ...Pull on harness adjustment strap to tighten harness system snugly Note A snug harness is not loose and lies flat against the child without sagging It does not press on the child s flesh or push the c...

Страница 13: ...p or down Make sure armrests lock into place after adjustment Adjusting Armrests Vehicles manufactured today already have the tether anchor hardware installed in the vehicle Refer to your owner s manu...

Страница 14: ...use From the opposite side push metal bar through until the bar is completely out A 1 Installing Base Underneath the base on right side move tab sideways Begin with rounded end of metal bar push thro...

Страница 15: ...arness strap pull harness completely out of lower harness guides 5 Note Remove the base see Removing Base section Harness must be removed when using the seat as a belt positioning booster seat 3 1 Loo...

Страница 16: ...clip Push left harness strap through left upper harness guide and right harness strap through right upper harness guide Note DO NOT twist harness strap 4 1 Install Buckle Crotch Strap Choose one of t...

Страница 17: ...strap loops onto splitter plate on the back of child restraint Note DO NOT twist harness strap WARNING Failure to install the harness system properly can result in serious injury or death to the child...

Страница 18: ...he covers through the upper harness slots To remove the harness covers you will have to unthread the harness system see Removing Harness System section remove harness covers and rethread harness syste...

Страница 19: ...rward you may use a tightly rolled towel or a foam noodle under the restraint s base where the vehicle s bench back meets the vehicle s bench seat continued on next page Rear Facing Child Restraint In...

Страница 20: ...allation with UAS Belt 2 3 14 kg 5 30 lb 48 81 cm 19 32 in continued on next page Thread vehicle seat belt under pad in front of crotch strap to the opposite side Buckle vehicle belt Note DO NOT PLACE...

Страница 21: ...e restraint s base where the vehicle s bench back meets the vehicle s bench seat 7 Rear Facing Child Restraint Installation with UAS Belt 2 3 14 kg 5 30 lb 48 81 cm 19 32 in continued on next page 3 R...

Страница 22: ...child restraint You may need to remove the base for narrow vehicle seats or airline use see Removing Base section Do not use the level to ground line on the shoulder belt positioning guide in the forw...

Страница 23: ...d in Canada Using this child restraint without the tether strap anchored as recommended by the manufacturer would be a misuse of the child restraint and in a sudden stop or crash could cause serious i...

Страница 24: ...il it locks in place Note If you were using the UAS belt for a rear facing installation it must be removed from the rear facing belt path before you begin Do not use the vehicle seat belt when using t...

Страница 25: ...tion with UAS Belt 10 18 kg 22 40 lb 74 102 cm 29 40 in 6 Place one knee in the child restraint and push down while pulling on the loose end of UAS belt to tighten Fasten tether hook to the tether anc...

Страница 26: ...only Reach under the seat and rotate the recline stand down Push up firmly until it locks in place 2 3 WARNING Do not use this booster seat if the midpoint of your child s ears is above the top of the...

Страница 27: ...moving Base section and remove buckle see Adjusting the Buckle section From the bottom of shell remove the small elastic straps From the back of shell remove the large elastic straps 1 2 continued on...

Страница 28: ...ll To install harness system see Installing harness system section and to install base see section on Installing base 7 From the front of the restraint remove the pad starting at the top of shell Make...

Страница 29: ...00 p m EST Monday through Thursday and from 7 00 a m to 4 30 p m on Friday Proof of purchase is required and shipping charges are the responsibility of the consumer Warranty Limitations This warranty...

Страница 30: ...Street Columbus IN 47201 7494 Fax to 1 800 207 8182 Website www djgusa com Please make money order payable to Dorel Juvenile Group Inc See next page forVisa or MasterCard payment We do not accept per...

Отзывы: