background image

50 Hz: G625 - G690 - G750XW/XF

OPERATION & MAINTENANCE MANUAL

50

60 Hz: G655 - G750 - G800 - G850XW/XF

3.

Operate the priming pump until the air is discharged
completely.

DANGER

Fuel  is  highly  inflammable.  Fire  may  occur  if  there
are naked flames or sparks near the engine when air
bleeding in the fuel circuit from the priming pump.

CAUTION

If any parts that contain a seal ring (copper seal ring,
rubber coating seal ring, etc.) are disassembled, then
replace the seal ring with a new one. Failure to do so
may  cause  leakage  in  the  fuel  filter  connections
preventing normal functioning.

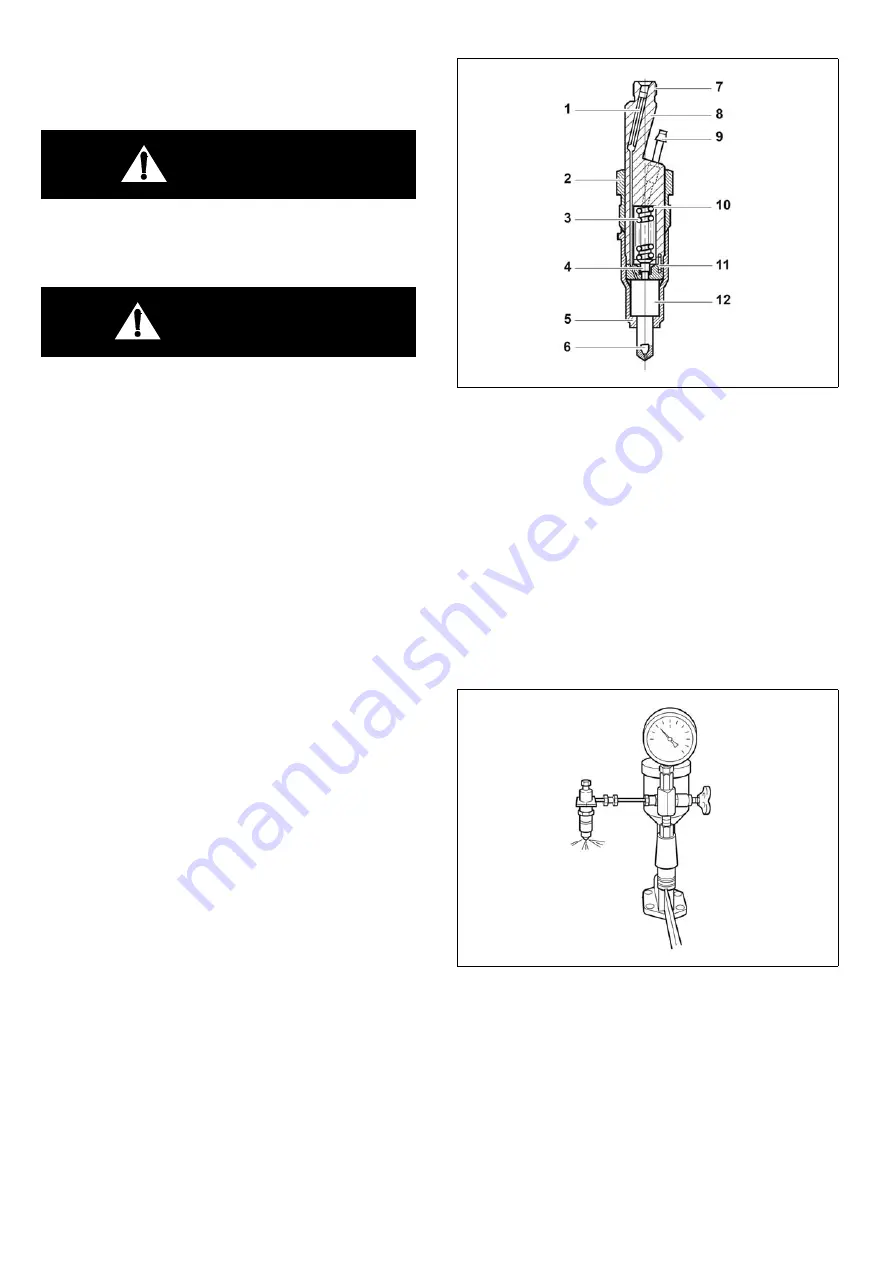
INJECTOR MAINTENANCE

The injectors are designed to spray the fuel delivered
by  the  injection  pump  directly  into  the  spherical
combustion chamber in the piston crown.

The  injector  consists  of  the  nozzle  and  the  nozzle
holder.

A copper gasket fitted to the injector ensures gas-tight
seating and good heat dissipation.

The  opening  pressure  of  the  nozzle  is  adjusted  by
means of shims at the compression spring.

FUEL INJECTION NOZZLE

1.

Install a nozzle to the nozzle tester.

2.

Check the fuel injection pressure. If the pressure does
not  satisfy  the  reference  value,  adjust  the  injection
pressure of the nozzle using an adjustment shim.

3.

Check  the  nozzle  spray  status.  If  it  is  defective,
replace the nozzle.

1. Rod type filter

7. Connect hole for fuel 

delivery

2. Cap nut

8. Nozzle holder

3. Compression spring

9. Connect tube for 

overflow

4. Compression pin

10. Shim

5. Cap nut for fixed nozzle

11. Pin

6. Nozzle

12. Nozzle bush

DV2213022A

DV2213023A

Содержание G625XF

Страница 1: ...60 Hz G655 G750 G800 G850XW XF OPERATION MAINTENANCE MANUAL Original Instruction This manual contains important safety information and must be made available to personnel who operate and maintain this machine 46689185_en_A_12 15 ...

Страница 2: ......

Страница 3: ...29 ALTERNATOR INSTALLATION MAINTENANCE 63 MAIN BREAKER OPERATION 83 WARRANTY CONDITIONS 105 REFERENCE INFORMATION Write the correct information for YOUR DIPP generator in the spaces below Always use these numbers when referring to your DIPP generator Doosan Benelux SA Drève Richelle 167 B 1410 Waterloo BELGIUM Generator Serial Number Engine Serial Number NOTES YOUR DIPP DEALER ADDRESS PHONE ...

Страница 4: ...50 Hz G625 G690 G750XW XF OPERATION MAINTENANCE MANUAL 4 60 Hz G655 G750 G800 G850XW XF ...

Страница 5: ...tlined below and examples of unapproved usage are also given however the company cannot anticipate every application or work situation that may arise IF IN DOUBT CONSULT SUPERVISION This machine has been designed and supplied for use only in the following specified conditions and applications Operation within the ambient temperature range specified in the GENERAL INFORMATION section of this manual...

Страница 6: ...50 Hz G625 G690 G750XW XF OPERATION MAINTENANCE MANUAL 6 60 Hz G655 G750 G800 G850XW XF ...

Страница 7: ...50 Hz G625 G690 G750XW XF OPERATION MAINTENANCE MANUAL 7 60 Hz G655 G750 G800 G850XW XF GENERAL DATA CONTENTS GENERAL DATA 8 ELECTRICAL DATA 8 ...

Страница 8: ...3191 Weight with fuel kg TBA TBA TBA TBA Weight without fuel kg 5450 6485 6485 6485 UNIT MODEL G625XW XF N A G690XW XF G750XW XF Prime Power Rating 400V 3Ø 0 8PF 50Hz 902 A 625 00 kVA 500 00 kW N A N A N A 996 A 690 00 kVA 552 00 kW 1083 A 750 00 kVA 600 00 kW Standby Power Rating 400V 3Ø 0 8PF 50Hz 996 A 690 00 kVA 552 00 kW N A N A N A 1097 A 760 00 kVA 608 00 kW 1198 A 830 00 kVA 664 00 kW Rate...

Страница 9: ...50 G800 G850XW XF SAFETY CONTENTS SAFETY DECALS 10 GRAPHIC FORM AND MEANING OF ISO SYMBOLS 10 SAFETY INSTRUCTIONS 13 EARTHING 14 IF USED AS ALTERNATE POWER SUPPLY 14 HAZARDOUS SUBSTANCE PRECAUTION 15 GENERAL INFORMATION 15 Electricity Materials Battery Radiator Transport ...

Страница 10: ...RNING Pressure control WARNING Corrosion risk WARNING Air gas flow or Air discharge WARNING Pressurised vessel WARNING Hot and harmful exhaust gas WARNING Flammable liquid Do not stand on any service valve or other parts of the pressure system Do not operate with the doors or enclosure open Do not use fork lift truck from this side Do not remove the Operating and Maintenance manual and manual hold...

Страница 11: ...Operation Maintenance manual WARNING Do not undertake any maintenance on this machine until the electrical supply is disconnected and the air pressure is totally relieved WARNING Consult the Operation Maintenance manual before commencing any maintenance Do not breathe the compressed air from this machine Do not exceed the trailer speed limit No naked lights Do not open the service valve before the...

Страница 12: ...nual before operation or maintenance of this machine is undertaken When parking use prop stand handbrake and wheel chocks Compressor oil filling Diesel fuel No open flame Parking brake Rough Service Designation Wet Location Operation Replace any cracked protective shield Oil drain Crush Warning No Water Coolant Fill No Flame Fill with fuel before start up ...

Страница 13: ...y time Follow all safety recommendations outlined in this manual to avoid injury to personnel DISCONNECT BATTERY BEFORE SERVICING CAUTION Exercise extreme caution when using booster battery To jump battery connect ends of one booster cable to the positive terminal of each battery Connect one end of other cable to the negative terminal of the booster battery and other end to a earth connection away...

Страница 14: ... is the responsibility of the operator when earthing is required by IEC 364 4 41 Protection Against Electric Shock and other local codes as applicable Several methods are employed to externally earth portable generator sets depending on the intended use and code requirements In all cases a continuous length of splice free copper cable no smaller than 10 mm2 shall be used for the external earth con...

Страница 15: ...table for use in flammable gas risk areas If such an application is required then all local regulations codes of practice and site rules must be observed To ensure that the machine can operate in a safe and reliable manner additional equipment such as gas detection exhaust spark arresters and intake shut off valves may be required dependant on local regulations or the degree of risk involved A wee...

Страница 16: ...mounts of engine lubricants or fuel are ingested Consult a doctor if engine lubricants or fuel are inhaled Never give fluids or induce vomiting if the patient is unconscious or having convulsions Safety data sheets for engine lubricants and fuel should be obtained from the lubricant supplier Battery Batteries contain corrosive liquid and produce explosive gas Do not expose to naked lights Always w...

Страница 17: ...IOR TO STARTING 18 STARTING 19 STOPPING 19 CONTROLLER 20 QUICKSTART GUIDE 20 STARTING THE ENGINE 20 STOPPING THE ENGINE 21 STOP RESET MODE 22 MANUAL MODE 23 STARTING SEQUENCE 23 ENGINE RUNNING 24 STOPPING SEQUENCE 24 TEST MODE 25 STARTING SEQUENCE 25 ENGINE RUNNING 26 STOPPING SEQUENCE 26 AUTOMATIC MODE 27 WAITING IN AUTO MODE 27 STARTING SEQUENCE 27 ENGINE RUNNING 28 STOPPING SEQUENCE 28 ...

Страница 18: ...specified maintenance tasks Ensure that the machine is positioned securely and on a stable foundation Any risk of movement should be removed by suitable means especially to avoid strain on any rigid discharge piping CONNECTING THE LOAD Make sure the wires are not cracked or damaged in any way Connect the proper phase wire to its corresponding bar L1 L2 L3 Mixing phases connections can result in eq...

Страница 19: ...ION Allow starter to cool for one minute between start attempts If engine shuts down diagnostic lamps will indicate the problem Correct the problem before continuing 6 Allow the engine to warm up for 3 to 5 minutes 7 Check the CONTROL Panel for proper voltages No RED diagnostic lamps should be glowing 8 With main breaker ON power is present and available for use 9 Close side doors for optimum cool...

Страница 20: ...INE NOTE The following descriptions detail the sequences followed by a module containing the standard factory configuration Always refer to your configuration source for the exact sequences and timers observed by any particular module in the field NOTE For further details see the section entitled OPERATING INSTRUCTIONS elsewhere in this manual Press the Manual Mode button followed by the Start but...

Страница 21: ...OPERATION MAINTENANCE MANUAL 21 60 Hz G655 G750 G800 G850XW XF STOPPING THE ENGINE NOTE For further details see the section entitled OPERATING INSTRUCTIONS elsewhere in this manual Select Stop Reset mode The generator is stopped ...

Страница 22: ...pressure When the engine has stopped it is possible to send configuration files to the module from DSE Configuration Suite PC software and to enter the Front Panel Editor to change parameters Any latched alarms that have been cleared are reset when Stop Reset Mode is entered The engine is not started when in Stop Reset Mode If remote start signals are given the input is ignored until Auto Mode is ...

Страница 23: ...d to be derived from the AC alternator output frequency but can additionally be measured from a Magnetic Pickup mounted on the flywheel or from the CANbus link to the engine ECU depending on module configuration Additionally rising oil pressure can be used to disconnect the starter motor but cannot detect underspeed or overspeed After the starter motor has disengaged the Safety On Delay timer acti...

Страница 24: ...ed To manually remove the load either Press the Open Generator DSE7110 MKII Only or Transfer to Mains DSE7120 MKII Only button Press the Auto Mode button to return to automatic mode The set observes all Auto Mode start requests and stopping timers before beginning the Auto Mode Stopping Sequence Press the Stop Reset Mode button to remove load and stop the generator Activation of an auxiliary input...

Страница 25: ...e derived from the AC alternator output frequency but can additionally be measured from a Magnetic Pickup mounted on the flywheel or from the CANbus link to the engine ECU depending on module configuration Additionally rising oil pressure can be used to disconnect the starter motor but cannot detect underspeed or overspeed After the starter motor has disengaged the Safety On Delay timer activates ...

Страница 26: ...rn to automatic mode The set observes all Auto Mode start requests and stopping timers before beginning the Auto Mode Stopping Sequence Press the Stop Reset Mode button to remove load and stop the generator Activation of an auxiliary input that has been configured to Generator Load Inhibit STOPPING SEQUENCE In Test Mode the set continues to run until either The Stop Reset Mode button is pressed Th...

Страница 27: ...e crank rest duration after which the next start attempt is made Should this sequence continue beyond the set number of attempts the start sequence is terminated and the display shows Fail to Start The starter motor is disengaged when the engine fires Speed detection is factory configured to be derived from the AC alternator output frequency but can additionally be measured from a Magnetic Pickup ...

Страница 28: ...and isn t just a short term removal Should another start request be made during the cooling down period the set returns on load If there are no starting requests at the end of the Return Delay timer the load is removed from the generator to the mains supply and the cooling timer is initiated The Cooling Down timer allows the set to run off load and cool sufficiently before being stopped This is pa...

Страница 29: ...COOLANT 41 CLEANING THE COOLING CIRCUIT 42 INTER COOLER 43 LUBRICATION SYSTEM 44 GENERAL INFORMATION 44 ENGINE OIL STANDARDS 44 ENGINE OIL CAPACITY 45 CHECKING THE ENGINE OIL 45 REPLACEMENT OF ENGINE OIL 46 REPLACEMENT OF ENGINE FILTER 46 FUEL SYSTEM 47 GENERAL INFORMATION 47 FUEL STANDARDS 47 WATER DRAINING FROM FUEL FILTER 48 REPLACING FUEL FILTER 48 PREVENTING FUEL CONTAMINATION 49 FUEL INJECTI...

Страница 30: ...IR FILTER ELEMENT 56 TURBOCHARGER 56 ROUTINE CHECK AND SERVING THE TURBOCHARGER 56 DISASSEMBLY AND CLEANING A TURBOCHARGER 56 CYLINDER BLOCK HEAD 57 VALVE CLEARANCE 57 ADJUSTING THE VALVE CLEARANCE 57 TIGHTENING CYLINDER HEAD BOLT 58 CYLINDER COMPRESSION PRESSURE 59 ELECTRIC SYSTEM 60 BATTERY 60 STARTER 60 OTHERS DRIVING SYSTEM 61 V BELT 61 ...

Страница 31: ...9 Injection timing BTDC 21 1 19 1 21 1 19 1 Dry weight kg 1 250 With fan Dimension L x W x H mm 1 592 x 1 389 x 1 223 With fan Flywheel housing SAE NO 1M Flywheel Clutch NO 14M No of teeth on flywheel 160 Cooling System Cooling method Fresh water forced circulation Coolant capacity litres Engine only Approx 21 With radiator Approx 79 Air on 43 C Approx 90 Air on 52 C Coolant flow rate litres min 6...

Страница 32: ... pump Type Mechanical type injection pump Capacity litres hr 630 Injection nozzle Type Multi hole 4 hole Opening pressure MPa 28 Fuel filter Full flow Cartridge type with water drain valve Fuel used Diesel fuel oil Intake Exhaust System Max back pressure kPa 5 9 Max intake air restriction kPa With clean filter element 2 16 With dirty filter element 6 23 Cylinder block head Valve system type Overhe...

Страница 33: ...ming BTDC 21 1 21 1 19 1 21 1 19 1 Dry weight kg 1 420 With fan Dimension L x W x H mm 1 738 X 1 389 X 1 258 With fan Flywheel housing SAE NO 1M Flywheel Clutch NO 14M No of teeth on flywheel 160 Cooling System Cooling method Fresh water forced circulation Coolant capacity litres Engine only Approx 23 With radiator Approx 114 Air on 43 C Approx 125 Air on 52 C Coolant flow rate litres min 660 660 ...

Страница 34: ...uel feed pump Type Mechanical type injection pump Capacity litres hr 630 Injection nozzle Type Multi hole Opening pressure MPa 28 Fuel filter Full flow Cartridge type with water drain valve Fuel used Diesel fuel oil Intake Exhaust System Max back pressure kPa 5 9 Max intake air restriction kPa With clean filter element 2 16 With dirty filter element 6 23 Cylinder block head Valve system type Overh...

Страница 35: ...gine as illustrated These numbers are required when requesting warranty and ordering parts EI6OM011 EI6OM012 Engine serial No example 3 PU126TI Serial No Production Year 2009 Engine Model Suffix EDIPA EDIPB Engine serial No example 2 P126TI series Serial No Production Year 2009 Engine Model Suffix EDIOA EDIOE Engine serial No example 1 DE12T Serial No Production Year 2009 Engine Model Suffix EBHOA...

Страница 36: ...n a well ventilate space Unless it is absolutely necessary do not perform inspection under an engine When carrying out engine inspection or maintenance ensure there are no naked flames within the vicinity of the machine Fuel oil or batteries may generate gas causing fire If inspecting the engine while it is running do not wear accessories such as necklaces rings watches or gloves Such accessories ...

Страница 37: ...0 200 400 800 1 600 3 200 1 Year 2 Year Coolant system Check of coolant level o V belt tension adjusting if necessary o Check of coolant hose clamp o Concentration of antifreeze solution o Replace V belt Cleaning of water jacket and radiator o Change of coolant Replace of coolant hose clamp Lubrication system Check of engine oil level o Engine exterior for loss of oil o Oil Separator for oil leaks...

Страница 38: ...mended Using unauthorized or remanufactured parts may cause critical damage and faults to engine for which Doosan shall not be held liable Check Points Daily Inspection interval Hours Remark First 50 200 400 800 1 600 3 200 1 Year 2 Year Fuel System Fuel lines for leaks o Drain Fuel filter Water separator o Check of fuel stop lever o Engine Clean fuel pre filter o o Replace Fuel filter Replace Wat...

Страница 39: ...adiator cap is opened to exchange or replenish coolant while the engine is overheated hot water will spurt out and may cause serious burns If it is absolutely necessary to open the radiator cap while the engine is overheated wrap the radiator cap with a cloth and slowly open the cap in two steps until the steam pressure has been released from the inside After the steam pressure has been completely...

Страница 40: ...d colour table 1 Compare the changed pink colour part A of the test sheet with the GLYOOL FREEZEPOINT End pad of the standard colour table on top of the container and confirm the concentration The concentration indication has to be within the colour scope of 33 50 2 The state of additives for anticorrosion is shown on the point where the colour of MOLYBDATE Middle pad on the standard colour table ...

Страница 41: ...a doctor immediately 3 Loosen the drain valve s located under the radiator to drain the coolant 4 Disassemble the coolant drain plug of the cylinder block and drain it to a container 5 Drain cooling water in the oil cooler 1 Loosen the drain plug A of the oil cooler cover and then drain cooling water CHARGING THE COOLANT 1 Ensure that the engine is cool 2 Open the radiator cap DANGER Never open th...

Страница 42: ...garding discard of coolant without observing the handling regulations will be punished CLEANING THE COOLING CIRCUIT If the internal coolant circuit is contaminated by corrosion or foreign substances the cooling effect is reduced The resistance in the coolant circuit may damage the mechanical seal of the coolant pump The reduced performance in the cooling circuit may be caused by use of incorrect t...

Страница 43: ...he intake air conditions Dirty air may contaminate and clog the cooling pins This results in reduced engine power or engine failure Always check the intake system for air leak damage or contamination of the air filter CAUTION To keep the optimum performance of the air cooler clean it regularly Air air intercooler with downstream radiator Combined radiator Cooling air Hot charge air from compressor...

Страница 44: ...g and wait for 5 10 minutes to allow the engine oil to flow back into the oil pan The engine oil level should indicate between the upper limit and the lower limit of the oil level gauge Engine oil should be periodically replaced based on the regular inspection table and the oil filter and the cartridge should be replaced as the engine oil is replaced ENGINE OIL STANDARDS Use the specified engine o...

Страница 45: ...llows foreign substances to get into the engine causing damage to the engine 3 Insert the oil level gauge and then remove it to check the engine oil level viscosity and contamination Replenish or replace the engine oil if required 1 Check the oil level every day using the oil level gauge 2 Check if the oil level is between the upper limit A and the lower limit B of the oil level gauge 3 If engine ...

Страница 46: ...engine oil immediately wash it with water soap or hand cleaners Do not clean skin with gasoline fuel thinner or solvent Apply a skin protective cream after cleaning from oil Do not put oil stained gloves or cloth in pockets WARNING Discard exchanged oil according to the regulations set forth by the relevant authorities Disposing of discharged oil into the ground sewers drains rivers or the sea wil...

Страница 47: ...equired select the proper fuel by referring to the fuel selection table below Low Sulfur Diesel NOTE High sulphur content in diesel fuel Doosan diesel fuel engines can be operated with fuels whose sulphur content is max 0 05wt Fuels with a sulphur content of 0 05wt are not permitted as they result in increased corrosion and greatly reduce the service life of engines The oil change intervals must b...

Страница 48: ...the plug excessively because it may damage the screw Check the fuel filter regularly and drain the water in the fuel filter If water enters the fuel system it will cause serious failure and may damage the fuel filter or reduce performance Water in the fuel system may stop the engine Use approved fuel only Use of non approved fuel may result in increased water in the fuel filter REPLACING FUEL FILT...

Страница 49: ...cations will void the warranty If the fuel injection pump is found to be damaged it should only be repaired by authorised personnel The adjustment and test of the fuel injection pump must be conducted using an appropriate tester CAUTION If any parts that contain a seal ring copper seal ring rubber coating seal ring etc are disassembled then replace the seal ring with a new one Failure to do so may...

Страница 50: ...e injection pump directly into the spherical combustion chamber in the piston crown The injector consists of the nozzle and the nozzle holder A copper gasket fitted to the injector ensures gas tight seating and good heat dissipation The opening pressure of the nozzle is adjusted by means of shims at the compression spring FUEL INJECTION NOZZLE 1 Install a nozzle to the nozzle tester 2 Check the fu...

Страница 51: ...an extraction system REMOVAL OF NOZZLE 1 Remove fuel injection pipe between nozzle holder and injection pump 2 Remove fuel return pipe 3 Loosen the Union screw A of nozzle holder with Nozzle plug socket EI 03004 0225 4 Remove nozzle holder with sealing from the cylinder head DV2213165A normal abnormal abnormal Engine Model Nozzle injection pressure Mpa DP180L DP180LBS 28 DP180LBF 28 DP180LAS 28 DP...

Страница 52: ...r full circumference Wash out dislodged carbon deposits and dirt Scrape needle seat with cleaning cutter Dip cutter in test oil before use The cutter can also be clamped in a lathe Polish needle seat with wooden cleaning tool by chucking the needle in a lathe at the pintle end Clean the spray holes of nozzles by chucking a cleaning needle of suitable diameter in the collet If the carbon deposits i...

Страница 53: ...l V groove of the flywheel housing sight hole is aligned with the injection timing degree of the engine 3 Ensure the mark on pointer provided in the injection pump corresponds with the matching mark FB on the flange surface of the drive gear by turning the flange in the oblong holes of the drive gear 4 Tighten the bolt M8 to specified torque 2 2 kgf m being careful not to move the drive gear 5 Onc...

Страница 54: ...LTER Air cleaner is mounted on the engine to purify the air for combustion The intervals at which the air cleaner requires servicing depend on the specific operating conditions encountered Clogged air filters may cause black smoke and reduce power A check should be made from time to time to see that the fastening elements securing the air cleaner to the intake manifold seal the connection tightly ...

Страница 55: ...m cleaning solvent for 10 minutes and then shake it back and forth for approximately 5 minutes 3 Rinse the element with clean water drain the water and then dry it at room temperature Fully dry the element before reassembling CAUTION Never use steam spray gasoline alkali or hot cleansing solution to clean the element 3 In an emergency temporarily clean the element by using the following method 1 T...

Страница 56: ... of the engine Regularly perform inspection and maintenance as specified in order to maintain turbocharger performance 1 Intake system The air filter should be carefully managed For a wet type air filter the intake resistance should be as small as possible 2 Exhaust system When exhaust gas leaks from the exhaust pipe or turbocharger joint supercharging efficiency is lowered Ensure there is no gas ...

Страница 57: ...pression TDC Top Dead Centre NOTE 1 Cylinder is located at the side near the cooling water pump NOTE In case of 8 12 cylinder engine 6 cylinder is positioned at the valve overlap when 1 cylinder is positioned at the compression TDC Top Dead Centre NOTE In case of 10 cylinder engine 7 cylinder is positioned at the valve overlap when 1 cylinder is positoned at the compression TDC Top Dead Centre 2 L...

Страница 58: ...ation retighten cylinder head bolts 1 to 4 in the order shown in the figure above by a further 90 1 4 revolution CAUTION The two outer screws intake and exhaust sides must not be retightened The cylinder head bolts to be retightened must not be loosened first but simply tightened by a further 90 1 4 revolution from their actual position Engine Model In valve Ex valve DP180L DP180LBS 0 25mm 0 35mm ...

Страница 59: ...der head bolts before re tightening Tighten them by turning by a further 90 1 4 revolution from their actual position 7 After 400 hours of operation turn the cylinder head bolts by a further 90 1 4 revolution CAUTION The two outside screws intake and exhaust side must not be retightened Do not loosen cylinder head bolts before re tightening Tighten them by turning by a further 90 1 4 revolution fr...

Страница 60: ...e immerse the starter motor s pinion gear and ring gear in the fuel wash them completely and apply grease again When cleaning the surrounding of engine ensure that no water enters the starter CAUTION Starter should be protected from humidity at all times Before working on the electrical system be sure to disconnect the ground wire minus wire of the battery Short circuit may occur while working on ...

Страница 61: ...dge of contact surface 2 is flush with the V belt 3 Slowly depress pad 3 until the spring can be heard to disengage This will cause the indicator 1 to move upwards NOTE If pressure is maintained after the spring has disengaged a false reading will be obtained 4 Read the tension value at the point that the top surface of indicator arm 1 intersects with the scale 5 Before taking readings ensure that...

Страница 62: ...the fixing bolt 1 and nut 2 5 To replace the V belt loosen the fixing bolts 1 and the lock nut 2 and push the tension pulley inwards by turning the adjusting bolt 3 counter clockwise 6 Loosen the mounting bolts B 7 Loosen the lock nut A 8 Adjust the nut C until the belt tension has correct tensions 9 Retighten the lock nut A and the mounting bolt B 10 To replace the belt loosen the lock nut and pu...

Страница 63: ...CHARACTERISTICS 66 ELECTRICAL CHARACTERISTICS 66 MECHANICAL CHARACTERISTICS 66 INSTALLATION 67 ASSEMBLY 67 CHECKS PRIOR TO FIRST USE 67 TERMINAL CONNECTION DIAGRAMS 68 COMMISSIONING 72 SETTING UP 72 SERVICING MAINTENANCE 73 SAFETY MEASURES 73 ROUTINE MAINTENANCE 73 BEARINGS 73 MECHANICAL DEFECTS 74 ELECTRICAL FAULTS 74 DISMANTLING REASSEMBLY 77 INSTALLATION MAINTENANCE OF THE PMG 79 TABLE OF CHARA...

Страница 64: ...understand the following symbols CAUTION Warning symbol for an operation capable of damaging or destroying the machine or surrounding equipment WARNING Warning symbol for general danger to personnel Warning symbol for electrical danger to personnel We wish to draw your attention to the following 2 safety measures which must be complied with a During operation do not allow anyone to stand in front ...

Страница 65: ...ixed on the machine see drawing Make sure that the nameplate on the machine conforms to your order So that you can identify your alternator quickly and accurately we suggest you fill in its specifications on the nameplate below STORAGE Prior to commissioning machines should be stored away from humidity 90 after a long period of storage check the machine insulation To prevent the bearings from beco...

Страница 66: ... Steel frame Cast iron end shields Greasable ball bearings Mounting arrangements IM 1201 MD 35 foot and flange mounted single bearing with SAE coupling disc IM 1001 B 34 double bearing with SAE flange and standard cylindrical shaft extension Drip proof machine self cooled Degree of protection IP 23 Mechanical options Protection against harsh environments Air inlet filter air outlet labyrinth seals...

Страница 67: ...n to turn the alternator or rotor The holes of the coupling discs should be aligned with the flywheel holes by cranking the engine Make sure the machine is securely bedded in position during coupling Check that there is lateral play on the crankshaft Double bearing coupling Semi flexible coupling Careful alignment of the machines is recommended checking that the lack of concentricity and paralleli...

Страница 68: ...ive grilles and housing are correctly in place the standard direction of rotation is clockwise as seen from the shaft end phase rotation in order 1 2 3 For anti clockwise rotation swap 2 and 3 the winding connection corresponds to the site operating voltage See later in this manual TERMINAL CONNECTION DIAGRAMS To modify the connection change the position of the stator cables on the terminals The w...

Страница 69: ...0 voltage detection 0 T3 220 V T2 Winding 50 Hz 60 Hz 6 380 415 380 480 7 415 440 8 380 416 R 450 voltage detection 0 T3 380 V T2 9 500 525 600 Winding 9 R 450 voltage detection transformer See specific diagram AREP or PMG Winding 50 Hz 60 Hz 6 220 240 220 240 7 240 254 8 220 240 R 450 voltage detection 0 T3 220 V T2 R 450 voltage detection 0 T3 220 V T1 Caution M point connection is a factory mod...

Страница 70: ...ge detection transformer See specific diagram AREP or PMG 6S 380 415 380 480 7S 415 440 8S 380 416 R 450 voltage detection 0 T3 380 V T2 9 500 525 600 Winding 50 Hz 60 Hz Operating phases L2 V L3 W single phase 6S 220 240 220 240 7S 240 254 8S 220 240 R 450 voltage detection 0 T3 220 V T2 Optional 6 wire terminal box with connector links for mounting protection and or measurement C Ts ...

Страница 71: ...erence suppression kit standard for CE marking Remote voltage potentiometer Connection of the optional current transformer Connections Black Black Black Blue White Voltage adjustment via remote potentiometer A D connection In 2 D conn Secondary 1 A Neutral link D connection In 4 D conn Secondary 1 A Neutral link 6 wire 12 wire ...

Страница 72: ... the terminal box is connected to the electrical earth circuit The earth terminal ref 28 is connected to the frame The connections inside the terminal box must never be subjected to stress due to cables connected by the user COMMISSIONING WARNING The machine can only be started up and used if the installation is in accordance with the regulations and instructions defined in this manual The machine...

Страница 73: ... trichlorethylene perchlorethylene trichloroethane or any alkaline products WARNING These operations must be performed at a cleaning station equipped with a vacuum system that collects and flushes out the products used The insulating components and the impregnation system are not at risk of damage from solvents Avoid letting the cleaning product run into the slots Apply the product with a brush sp...

Страница 74: ...rcuit Abnormal noise Alternator damaged by a significant impact followed by humming and vibration System short circuit Misparalleling Possible consequences Broken or damaged coupling Broken or bent shaft end Shifting and short circuit of main field Fan fractured or coming loose on shaft Irreparable damage to rotating diodes AVR surge suppressor Fault Action Effect Check Cause No voltage at no load...

Страница 75: ...too high Voltage correct at no load and too low when on load Run at no load and check the voltage between E and E on the AVR Voltage between E and EAREP PMG 10V Check the speed or LAM set too high Voltage between E and EAREP PMG 15V Faulty rotating diodes Short circuit in the revolving field coil Check the resistance Faulty exciter armature Voltage disappears during operation Check the AVR the sur...

Страница 76: ...te excitation Assembly A Connect a 12 V battery in series with a rheostat of approximately 50 ohms 300 W and a diode on both exciter field wires 5 and 6 Assembly B Connect a Variac variable power supply and a diode bridge on both exciter field wires 5 and 6 Both these systems should have characteristics which are compatible with the field excitation power of the machine see the nameplate 3 Run the...

Страница 77: ...ess to connections and the regulation system Access directly by removing the top of the cover 48 or the AVR access door 466 Replacing the NDE bearing on alternators connected to a diesel engine Remove the lid of the protective cover 48 and the AVR inspection door 466 Disconnect the AVR Take off the panels 367 and 368 and the grilles 254 and 255 Disconnect the stator connections T1 to T12 Remove th...

Страница 78: ...r 269 and the rear panel 365 Replace the connection plate assembly 281 270 Replace the connector link assembly 281 279 Replace the neutral link 278 Connect the stator connections T1 to T12 and the sensing wires Refit the panels 367 and 368 and the grilles 254 and 255 Reconnect the AVR Refit thelid of the protective cover 48 and the inspection door of the AVR 466 Reassembling the rotor On single be...

Страница 79: ...verage values Alternator 4 poles 50 Hz Standard winding No 6 400V for the excitation values The voltage and current values are given for no load operation and operation at rated load with separate field excitation All values are given to within 10 and may be changed without prior notification for exact values consult the test report Resistances of main windings at 20 C Average values for 6 winding...

Страница 80: ...ll access panels or covers ACCESSORIES Space heater for use when stopped The space heater must run as soon as the alternator stops It is installed at the rear of the machine Its standard power is 250W with 220V or 250W with 110V on request The power supply is present when the machine has stopped Temperature sensors with thermistors PTC These are thermistor triplets with a positive temperature coef...

Страница 81: ...G750XW XF OPERATION MAINTENANCE MANUAL 81 60 Hz G655 G750 G800 G850XW XF EXPLODED VIEW PARTS LIST AND TIGHTENING TORQUE LSA 49 1 SINGLE BEARING Optional 6 wire terminal box with connector links Hub turbine LSA 191 L 11 ...

Страница 82: ...aring retainer 78 1 Inner bearing retainer 79 1 Preloading wavy washer 90 1 Exciter field 91 4 Fixing screws M6 8 3 100 1 Exciter armature 107 1 Crescent support 172 Isolator Ref Qty Description Screw Ø Torque N m 177 2 AVR support stirrup 198 1 AVR 254 1 Right air intake guard 255 1 Left air intake guard 268 1 DE cross member 269 1 NDE cross member 270 3 Connection plate 277 3 or 4 Copper bar sup...

Страница 83: ...tion Durability 96 DRAW OUT OPERATION 97 Moving the breaker body from the CONN position to the TEST position 97 Moving the breaker body from the TEST position to the ISOLATED position 98 Moving the breaker body from the ISOLATED position to the removed position 98 PUTTING THE BREAKER BODY BACK INTO THE DRAW OUT CRADLE 98 Putting the breaker body back to the ISOLATED position 98 Moving the breaker ...

Страница 84: ...5 65 143 85 187 75 165 AC 440V 65 143 10 85 187 10 100 220 100 220 NK 7 AC 690V 50 115 65 153 14 75 179 AC 450V 65 153 10 85 201 10 14 100 245 For DC DC 600V 9 40 40 DC 250V Rated short time current CW kA rms 1 sec 65 85 100 100 Rated latching current kA 65 85 85 100 Endurance in number of ON OFF cycles 11 Mechanical with maintenance 30000 30000 30000 25000 20000 20000 15000 15000 Mechanical witho...

Страница 85: ...pends on the working and environmental conditions Refer to Maintenance Inspection and Parts Replacement 12 For both vertical and horizontal terminals 13 This manual covers draw out type ACBs 14 In applying or going to apply Frame size A 800 1250 1600 2000 2500 3200 4000 4000 Type AR208S AR212S AR216S AR220S AR325S AR332S AR440SB AR440S Connection method Line side Vertical horizontal or front termi...

Страница 86: ...For general feeder Between terminal group and ground AC2500V 1 minute 6kV 100MOhms For microload Between terminal group and ground AC2000V 1 minute 4kV 100MOhms Position switches Between terminal group and ground AC2000V 1 minute 4kV 100MOhms Overcurrent release Between terminal group and ground AC2000V 1 minute 4kV 100MOhms Undervoltage trip device Reverse power trip device Between terminal group...

Страница 87: ...2860 3100 3470 55 C 790 1070 1310 1750 2300 2690 2980 3350 60 C 740 1000 1230 1640 2150 2520 2870 3140 JEC 160 40 C standard ambient temperature 800 1100 1460 1740 2370 2610 2870 3230 45 C 800 1060 1400 1680 2280 2510 2750 3100 50 C 800 1010 1340 1600 2180 2400 2620 2970 55 C 770 960 1280 1530 2080 2290 2490 2830 60 C 730 920 1220 1450 1970 2170 2360 2690 Type and conductor size AR212H AR216H AR22...

Страница 88: ...rrier Gas exhaust port Main circuit terminal Draw out arm Draw out cradle rear view Breaker body rear view Fig 14 General view and parts designation ON OFF indicator Charge indicator Charging handle Rating nameplate Position indicator Draw out handle Control terminal block cover Lifting hole ø20mm Cover fixing screw Auxiliary switches Terminal block Body stopper Hook pin Body stopper shaft Rail st...

Страница 89: ...three padlocks can be installed 16 ON OFF cycle counter optional Reads the number of ON OFF cycles It counts a series of operations from close to open as one cycle 17 OCR cover Padlocking this plate prevents settings of overcurrent release 18 to be inadvertently changed Padlocks are not supplied Use padlocks with a 6 mm diameter shackle 18 Overcurrent release OCR This protective device is supplied...

Страница 90: ... through M4 screw terminals Fig 15 shows the control circuit terminals 39 Control terminal block cover optional Protects the position switches the control circuit terminals and the auxiliary switches from damage 40 Cover fixing screw Secures the control terminal block cover 41 Auxiliary switches optional Indicate the state of the ACB ON or OFF The auxiliary switches are available in 4C configurati...

Страница 91: ... available in three configurations as shown in Fig 16 49 Lifting hole ø20mm Allows lifting attachments or wire ropes to be used for lifting the ACB 50 Protrusion Refer to Operation Precautions 51 Draw out handle removable Use to draw out insert the breaker body from into the draw out cradle Vertical terminals Horizontal terminals Front terminals Fig 16 Main circuit terminals ...

Страница 92: ...CB Otherwise a fire could result If the ACB has the breaker fixing bolts make sure the bolts on both sides are securely tightened before using the ACB Loosened fixing bolts may cause a malfunction of the ACB in particular when it is installed in such an area that is subject to strong vibrations The ACBs are available in two types in terms of the closing spring charging method and the remote operat...

Страница 93: ...e closed with a sound The ON OFF indicator Fig 23 10 shows ON and the charge indicator Fig 23 1 shows DISCHARGED Electrical closing Press the ON switch shown in Fig 17 19 The latch release coil LRC Fig 17 19 will be excited and the ACB is closed with a sound The ON OFF indicator Fig 23 10 shows ON the charge indicator Fig 23 1 shows DISCHARGED and the charging motor starts charging the closing spr...

Страница 94: ...er 4 disengages from a semicircular pawl and rotates clockwise And charging cam 5 rotates counterclockwise so that charging lever 7 disengages from closing spring 6 and rotates counterclockwise Closing cam 8 is pushed up by charging lever 7 and rotates clockwise At this time each component is positioned as shown in Fig 26 Continued to Fig 25 Fig 25 Closing motion 2 Closing cam 8 rotating clockwise...

Страница 95: ...rotrudes downward from the shunt trip device SHT or the undervoltage trip device UVT For tripping operation by the overcurrent release OCR moving core 1 protrudes downward from the magnet hold trigger MHT and trip linkage 2 rotates counterclockwise Parts marked with an asterisk are trip pins To avoid superposition in the figure magnet hold trigger related parts are drawn in positions that are diff...

Страница 96: ...the CONN position to the Removed position and inserted back to the CONN position Draw out and insertion operation of more than 100 cycles could abrade the main circuit contacts resulting in an overheat of the contacts during energization 1 CONN position Position indicator 4 Removed position Position indicator 2 TEST position Position indicator 3 ISOLATED position Position indicator Draw out cradle...

Страница 97: ...on 1 Open the ACB If the ACB remains closed the draw out handle Fig 29 1 cannot be inserted 2 Loosen the breaker fixing bolts Fig 29 2 if used to unlock the breaker body Fig 29 3 3 Unlock the position lock lever Fig 29 14 if locked 4 Insert the draw out handle into the draw out handle insertion hole Fig 29 4 And slowly turn counterclockwise until the handle cannot be turned The position indicator ...

Страница 98: ...s sound does not mean a malfunction Do not leave the ACB body on the draw out rail pulled out 5 Use an optional lifter or lifting plate to transfer the breaker body Fig 29 3 to a safe place PUTTING THE BREAKER BODY BACK INTO THE DRAW OUT CRADLE Never touch live terminal parts Otherwise electric shock may result Do not leave the ACB body in the removed position The weight of the ACB may cause serio...

Страница 99: ...tion lock lever Fig 29 14 if locked 3 Insert the draw out handle into the draw out handle insertion hole Fig 29 4 And slowly turn clockwise until the handle cannot be turned The position indicator Fig 29 5 shows TEST The ACB cannot be closed as long as the draw out handle is in the draw out handle insertion hole To close the ACB e g for ON OFF testing remove the draw out handle Moving the breaker ...

Страница 100: ...eans that the breaker body is in the CONN TEST or ISOLATED position Breaker body position ACB state ON ACB state OFF Status of a contact Status of b contact CONN ON OFF OFF ON TEST ON OFF OFF ON ISOLATED ON OFF OFF ON Removed ON OFF OFF ON Breaker body position ACB state ON ACB state OFF Status of a contact Status of b contact CONN ON OFF OFF ON TEST ON OFF OFF ON ISOLATED ON OFF OFF ON Removed ON...

Страница 101: ...N OFF PROCEDURE 1 Open the OFF button cover shown in Fig 33 2 Raise the OFF lock tab and close the button cover 3 Lock the button cover using a padlock with ø6 shackle up to 3 padlocks can be used as shown in Fig 33 The OFF button is locked depressed which disables the ON button ON OFF button cover OFF button Padlock Fig 32 Locking the ON OFF button cover ON OFF button cover ON button ON OFF butto...

Страница 102: ...he draw out handle insertion hole i e the breaker position cannot be changed BREAKER FIXING BOLT SECURING PROCEDURE 1 Move the breaker body to the CONN position 2 Loosen the breaker fixing bolt shown in Fig 35 move the spring and flat washers close to the bolt head and push the bolt into the U notch of the grip 3 Tighten the breaker fixing bolt using the draw out handle This procedure is required ...

Страница 103: ...5 G750 G800 G850XW XF OCR COVER LOCKING PROCEDURE Lock the OCR cover using a padlock with ø6 shackle as shown in Fig 36 The OCR cover cannot be opened which prevents OCR settings from being changed Padlock Fig 36 Padlocking the OCR cover OCR cover OCR cover padlock hole ...

Страница 104: ...50 Hz G625 G690 G750XW XF OPERATION MAINTENANCE MANUAL 104 60 Hz G655 G750 G800 G850XW XF WIRING DIAGRAMS ...

Страница 105: ...ing engine tune up adjustments or slight defects which generally do not affect the reliability of the machine DOOSAN BENELUX SA EXCLUDES OTHER CONDITIONS WARRANTIES OR REPRESENTATIONS OF ALL KINDS EXPRESSED OR IMPLIED STATUTORY OR OTHERWISE EXCEPT THAT OF TITLE INCLUDING ALL IMPLIED WARRANTIES AND CONDITIONS RELATING TO MERCHANTABILITY SATISFACTORY QUALITY AND FITNESS FOR A PARTICULAR PURPOSE CORR...

Страница 106: ......

Отзывы: