


MAN05MGO5
INSTRUCTIONS JIB CRANE SERIES GBA - GBP
25
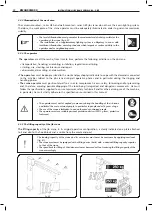
1. Once the solidification of the plinth has taken place, remove the protection from the threadings of the log bolts
and check that the tall nuts can be unscrewed without being forced, remove them and the related washers.
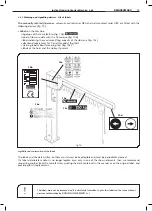
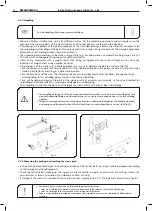
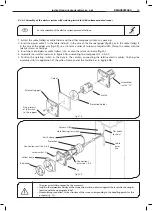
2. Insert, when needed, the electric cable
1
in the column resting on the floor and push it through the hole at the
end of the column, using this layout as follows:
a. In the case of cable
1
which comes out of the allocated tube (pipe) in the plinth, insert the cable directly
inside the column until it reaches the hole
2
at the end of the column (fig. 25)
b. In the case of cable
1
coming from the outside, push it into the column using a suitable fairlead
3
placed at
the bottom of the column, until it reaches the hole
2
at the top (fig. 26)
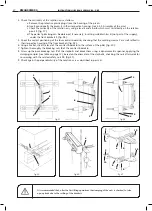
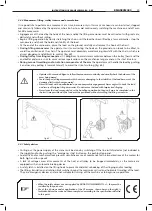
3. Set up the column without the arm, lifting it by the upper part with appropriate equipment having put it in the
sling as shown, assemble it on the foundation frame positioning the base plate
4
correctly and lining up the nuts
6,
subject to the interposition of the related flat washers
5
(fig. 27).
4. Check the verticality of the rotation axis as follows:
a. Remove the protective plastic plugs from the housing of the pivots.
b. Insert the pivots
7
provisionally in their respective housing (see 4.3.5 Assembly of the arm).
c. Check the verticality of the rotation axis, by using a level
,
and a bar which must be resting directly on
the rotation pivots
7
(fig. 28).
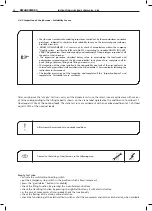
d. The perfect plumbing can be obtained, if necessary, inserting suitable shims
(not included in the supply),
corresponding to the log bolts, under the base plate (fig. 29).
5. Screw tight the nuts
6
using a dynamometric spanner, applying the clamping couples (see table on page 12)
based on the diameter of the logbolts, checking the nuts afterwards for unscrewing with the relative safety
nuts
(fig. 30).
Columnassembling:
It is recommended that, after the first lifting operations the clamping of the nuts is checked again, to take
upanyslackduetothebeddingoftheplinth.
fig.28
fig.29
fig.30
fig.25
fig.26
fig.27
2
3
6
4
7
8
6
9
1
1
7
7
7
5
2
1
KMAN05MG05


