background image

9. Start: 

button to start the central programme on screen.

10. Programme cycles: p

ress on the selected programme icon, the phases of the programme

will be displayed. Press on the icons in the right-hand vertical column to modify the different

parameters in each phase one by one. The modified values will not be saved for future

operations.

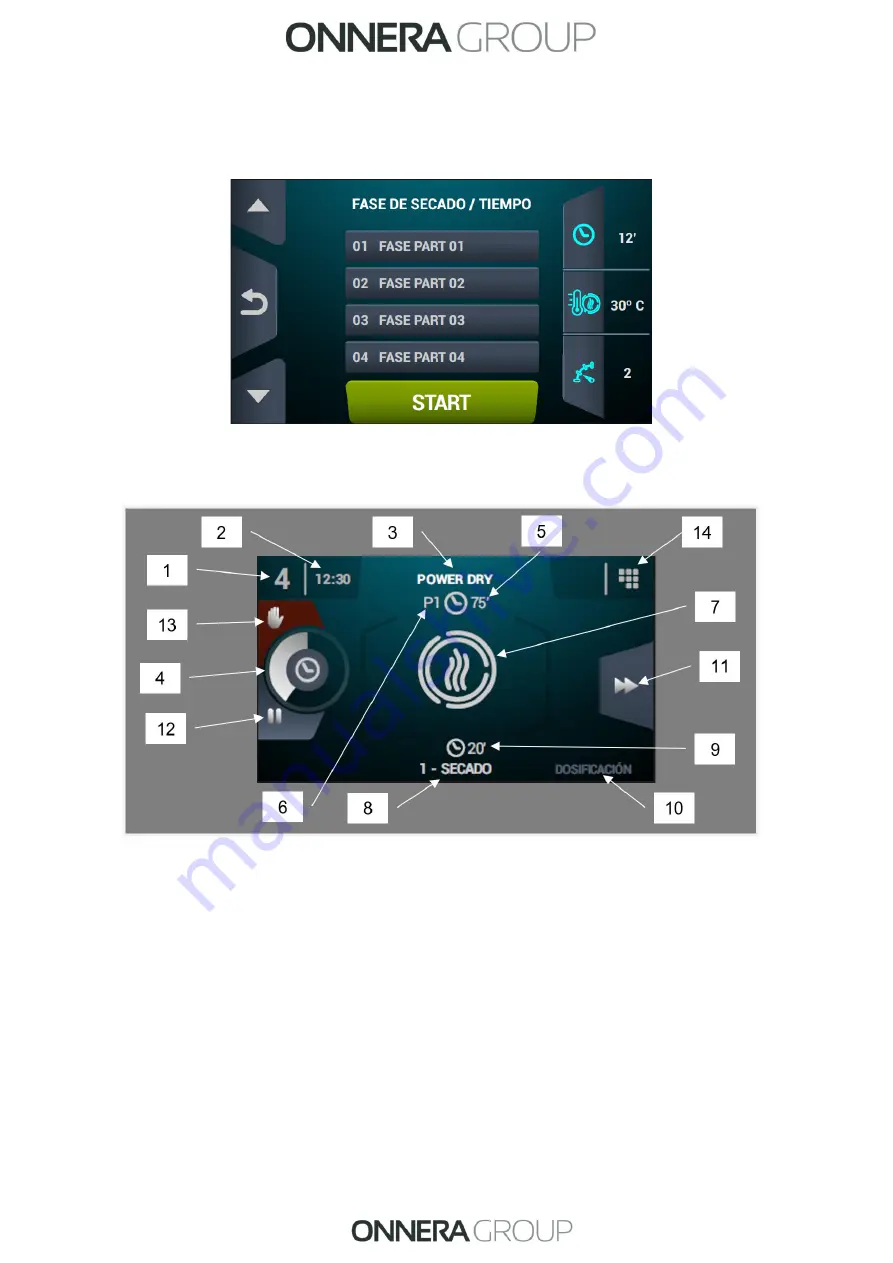
6.3.  OPL: RUN SCREEN 

1. Machine identifier
2. Time
3. Name of currently running programme
4. Programme progress indicator
5. Programme end value (time or humidity)
6. Programme  number:

  this  indicates  the  position  of  the  programme  in  the  list  of  selected

programmes (My Programmes).

7. State (drawing)

: animated illustration which shows what the dryer is doing.

8. Number and name of currently running cycle
9. Remaining cycle time
10. Next cycle: 

if the currently running cycle is the last, nothing is displayed.

11. Advance cycle

: button which allows you to advance to the next cycle.

12. Pause programme: 

once the programme has been paused, the button turns into an icon to

restart the programme (play).

13. Stop (stop/cancel programme)
14. Run menu

: access to the run menu, where the current drying parameters can be displayed

and modified.

32

Содержание UDLM-25

Страница 1: ...S TUMBLE DRYERS NOTICE D EMPLOI ET MAINTENANCE DOMUS S CHE LINGE GEBRAUCHS UND WARTUNGSANLEITUNG MANUALE D ISTRUZIONI E MANTENIMENTO MANUAL DE OPERA O E MANUTEN O SP 08 SP 10 UDTT 25 30 35 50 65 80 UD...

Страница 2: ...AT TO DO IF YOU SMELL GAS Do not try to light any appliance Do not touch any electrical switch do not use any phone in yor building Clear the room building or area of all occupants Immediately call yo...

Страница 3: ...Z UNE ODEUR DE GAZ Ne branchez pas d appareils Ne touchez aucun interrupteur lectrique n utilisez aucun t l phone dans votre immeuble Evacuez la pi ce immeuble ou zone de tous les occupants Appelez im...

Страница 4: ...ier Affichez bien en vue les instructions suivre si vous sentez une odeur de gaz Les informations publier seront obtenues en concertation avec le fournisseur de gaz local FOR YOUR SAFETY Do not store...

Страница 5: ...tion of the control of the machine 24 4 2 ELECTRONIC CONTROL 24 4 2 1 Information displayed with the indicator lights 25 4 2 2 Functions associated to the buttons 26 4 2 3 Self service mode 26 4 2 4 S...

Страница 6: ...NG RID OF THE MACHINE 45 1 INFORMATIONS RELATIVES LA S CURIT 46 2 CARACT RISTIQUES G N RALES 47 2 1 Vue d ensemble et dimensions 48 3 INSTALLATION 50 3 1 Outils 50 3 2 Mise en place 50 3 2 1 Transport...

Страница 7: ...les de la turbine 82 10 3 2 Courroies de transmission 82 10 4 Service technique 82 11 PROBL MES ET SOLUTIONS 82 11 1 Tableau de Probl me Cause Solution 82 12 INDICATIONS POUR LE RETRAIT ET L LIMINATIO...

Страница 8: ...water Stopping the dryer before it finishes the cycle is not recommended due to the risk of spontaneous combustion Removing the load as soon as the cycle has ended is recommended as this reduces the...

Страница 9: ...18 Lb kg 25 8 11 7 33 15 40 3 18 3 56 4 25 6 67 4 30 6 80 9 36 7 Capacity Rel 01 20 Lb kg 23 1 10 5 29 7 13 5 36 4 16 5 50 7 23 60 6 27 5 72 7 33 Production Lb h kg h 63 28 6 66 7 30 3 70 3 31 9 89 5...

Страница 10: ...G in mm 33 7 855 38 9 989 44 3 1125 49 4 1255 H in mm 28 9 735 28 9 735 28 9 735 28 9 735 I in mm 3 7 95 3 7 95 3 7 95 8 1 205 J in mm 32 3 821 32 3 821 32 3 821 33 9 862 K in mm 22 6 575 22 6 575 22...

Страница 11: ...8 985 G in mm 41 5 1054 47 6 1210 H in mm 37 7 957 37 7 957 I in mm 4 3 110 4 3 110 J in mm 26 8 680 26 8 680 K in mm 31 6 802 31 6 802 L in mm 69 6 1768 69 6 1768 M in mm 13 3 337 13 3 337 N in mm 7...

Страница 12: ...as not been damaged during transport The dryer must not be installed or stored in an area where it will be exposed to water and or weather If the machine must be stored for a long time cover it with i...

Страница 13: ...onstruction machine to be at least to the ceiling 12 in 305 mm side 0 in 0mm front 59 1 8 in 1 5 m and rear wall steam exit 24 in 610mm 3 2 3 Levelling Do not anchor the machine simply put it on a fla...

Страница 14: ...a pipe with a net diameter equal to the exterior diameter of the steam output pipe The extraction air should be taken outside the premises and must never be connected to other fluepipes already in us...

Страница 15: ...pipes use aluminium paper adhesive tape Avoid fastening these with sheet screws as this will result in a build up of fluff on the interior The pipe as it passes to the exterior or through cold zones s...

Страница 16: ...ly the necessary power The machine leaves the factory with the complete electrical installation therefore it will be sufficient to remove the cover located at the rear of the tumble dryer and connect...

Страница 17: ...in the burner correspond to the rating plate If not you should consult with the provider The dryer has spare injectors and a new rating plate in case it is necessary to install the appliance to operat...

Страница 18: ...R CHECKING THE INLET GAS PRESSURE PROCEDURE 1 Connect the gas input to the E connection 2 Loosen the bolt in opening A of the valve one turn in an anti clockwise direction 3 Connect the pressure gauge...

Страница 19: ...or even to install the appliance ready for operation with another type of approved gas please call the technical service to make the change Please follow the instructions below to replace the injecto...

Страница 20: ...gas inlet the pressure it must be between 8 0 1 99 and 13 0 3 23 in wc kPa 7 Remove the manometer pipe 8 Tighten bolt A 9 Loosen the bolt in opening B of the valve one turn in an anti clockwise direc...

Страница 21: ...fully checked When the machine has been modified to work with a type of gas other than Specified on the nameplate it will be necessary to place the three labels that correspond to the new technical da...

Страница 22: ...tarted In case of failed ignition controller will try to re ignite for number of times If no successful ignition after programmed number of retrials flame lockout error will be indicated The number of...

Страница 23: ...e of the correct injector as outlined in injector replacement for proper combustion Once the adjustment has been carried out correctly the flame should have the following appearance as indicated in th...

Страница 24: ...perature probe and activates or deactivates the heater element to adjust the temperature Time control is internally carried out in the microprocessor In OPL mode two keys can be used to increase or de...

Страница 25: ...ection for further information 6 Temperature LED High temperature lit High temperature selected LED Medium temperature lit Medium temperature selected LED Low temperature lit Low temperature selected...

Страница 26: ...6 5 Medium In self service mode this does not have any effect 6 5 Low The High drying temperature is selected Machine stopped 2 Off 1 The Medium drying temperature is selected Operating 2 Green 1 The...

Страница 27: ...0 001101 130 011101 290 101101 450 111101 610 001110 140 011110 300 101110 460 111110 Value according to console 001111 150 011111 310 101111 470 111111 Self recognition mode Only technical operators...

Страница 28: ...pressed together for 10 seconds the accumulated balance will reset to 0 If these keys are pressed together after the 2 minutes it will not have any effect Parameter edition it is possible to modify ce...

Страница 29: ...rm mode which permits a progressive reduction of the internal temperature of the dryer and the fabrics to prevent damage to the materials and prevent burns This cooling lasts 10 minutes After this tim...

Страница 30: ...ates The control can be configured for operation in OPL mode or in self service mode For self service machines inserting and turning the control holder key gives the option to enter in Credit Mode whi...

Страница 31: ...aximum programme temperature 6 Programme number in the list of favourite programmes 7 Drying time or final relative humidity of the programme in minutes or RH there are two options for establishing th...

Страница 32: ...time or humidity 6 Programme number this indicates the position of the programme in the list of selected programmes My Programmes 7 State drawing animated illustration which shows what the dryer is d...

Страница 33: ...ts is displayed 6 4 SELF SERVICE SELECTION SCREEN 1 BUTTONS In the self service machines to run a programme it is always necessary to insert the required money first either in coins or using alternati...

Страница 34: ...programme ratio Press a programme button to go to Selection Screen 2 Payment On completion of a programme the machine returns directly to this screen As mentioned above the machines can be configured...

Страница 35: ...default setting is disabled It can be activated using the HUD display menu Note In Credit mode the icon displayed here can be used to access the Run menu in the same way as in OPL 7 CONFIGURATION To...

Страница 36: ...hich must be on 4 Rotation reversal seconds if this is activated ON it is possible to select the rotation time in clockwise and anti clockwise directions independently 5 Drum rotation speed 6 Air inpu...

Страница 37: ...available programmes for display on the Main screen of the programme library Programme library list of predetermined programmes created by the user 7 2 Configure system The Touch control has multiple...

Страница 38: ...vice programmable time during which it is possible to cancel a programme without losing the available credit Currency only self service Drying prices by programme only self service Price programming b...

Страница 39: ...E Mode When the machine is in WAIT mode proceed as follows 1 Select the required programme by pressing above the programme button If there are more than four programmes use the side arrows to display...

Страница 40: ...ntion of the programme press the tick Self service Mode o Push STOP key 8 o A confirmation message will be requested To return to the current programme press the cross and to confirm the detention of...

Страница 41: ...e machine enters an alarm mode which permits a progressive reduction of the internal temperature of the dryer and the fabrics to prevent damage to the materials and prevent burns This cooling lasts 10...

Страница 42: ...drum transmission 21 Low pressure pressostat activated B02 only for heat pump 9 NTC1 probe disconnected or out of range drum temperature 22 High excess pressure P03 only for heat pump 10 Maintenance...

Страница 43: ...e as handles and once the drawer has been released pull the catches outwards until reaching the limit The drawer is fitted with telescopic guides to allow it to be pulled out far enough so that the fi...

Страница 44: ...ct your technical service to carry out this operation 10 4 Technical service If you need to contact the technical service or replacement parts you can send an email to us servicelaundry onneragroup co...

Страница 45: ...lease contact our After Sales service 12 INDICATIONS FOR REMOVING AND GETTING RID OF THE MACHINE Only European Union This machine is marked with the symbol that appears below This symbol means that in...

Страница 46: ...ur Il est d conseill d arr ter le s che linge avant la fin du cycle en raison du risque de combustion spontan e existant Il est conseill de d charger le s che linge juste la fin du cycle car cela r du...

Страница 47: ...0 11 65 330 16 24 460 19 42 550 23 3 660 Capacit Rel 01 18 Lb kg 25 8 11 7 33 15 40 3 18 3 56 4 25 6 67 4 30 6 80 9 36 7 Capacit Rel 01 20 Lb kg 23 1 10 5 29 7 13 5 36 4 16 5 50 7 23 60 6 27 5 72 7 33...

Страница 48: ...55 38 9 989 44 3 1125 49 4 1255 H po mm 28 9 735 28 9 735 28 9 735 28 9 735 I po mm 3 7 95 3 7 95 3 7 95 8 1 205 J po mm 32 3 821 32 3 821 32 3 821 33 9 862 K po mm 22 6 575 22 6 575 22 6 575 22 6 575...

Страница 49: ...5 1054 47 6 1210 H po mm 37 7 957 37 7 957 I po mm 4 3 110 4 3 110 J po mm 26 8 680 26 8 680 K po mm 31 6 802 31 6 802 L po mm 69 6 1768 69 6 1768 M po mm 13 3 337 13 3 337 N po mm 7 178 7 178 O po mm...

Страница 50: ...doit pas tre install ou stock dans un endroit o il sera expos l eau et ou aux intemp ries N installez ou ne conservez le s che linge en aucun cas en plein air Si la machine est arr t e pendant un cert...

Страница 51: ...tion combustible doivent tre d au moins au plafond 12 po 305 mm c t 0 po 0 mm avant 59 1 8 po 1 5 m et paroi arri re sortie de vapeur 24 po 610mm 3 2 3 Mise niveau Ne fixez pas la machine posez la sim...

Страница 52: ...canalis l ext rieur gr ce un raccord de tuyau dont le diam tre net correspond au diam tre ext rieur du tuyau de sortie de bu es situ dans la partie inf rieure arri re de la machine L air vacu doit tr...

Страница 53: ...le moins de coudes possible Pour unir les diff rents coudes et tubes utiliser du ruban adh sif en papier d aluminium viter leur fixation avec des vis t le cela entra nerait une accumulation de peluche...

Страница 54: ...puissent assurer la puissance n cessaire La machine quitte l usine avec une installation lectrique compl te Par cons quent il suffira d enlever le couvercle situ l arri re du s che linge et de relier...

Страница 55: ...ent la plaque signal tique Sinon vous devriez consulter le fournisseur La s cheuse dispose d injecteurs de rechange et d une nouvelle plaque signal tique au cas o il serait n cessaire d installer l ap...

Страница 56: ...ou inf rieures 1 2 psi 3 5 kPa INSTRUCTIONS POUR V RIFIER LA PRESSION D ENTR E DU GAZ PROC DURE 1 Connectez l entr e de gaz la connexion E 2 Desserrer le boulon de l ouverture A de la vanne d un tour...

Страница 57: ...ur fonctionner avec un autre type de gaz homologu veuillez alors contacter le service technique pour effectuer la modification Veuillez suivre les indications suivantes pour remplacer les injecteurs O...

Страница 58: ...a pression d entr e de gaz elle doit tre comprise entre 8 0 1 99 and 13 0 3 23 en wc kPa 7 Retirez le tuyau du manom tre 8 Serrer le boulon A 9 D vissez la vis de l orifice B de la vanne d un tour dan...

Страница 59: ...oigneusement v rifi s Lorsque la machine a t modifi e pour fonctionner avec un type de gaz autre que indiqu sur la plaque signal tique il faudra placer les trois tiquettes qui correspondent les nouvel...

Страница 60: ...rrecte En cas de demande de chaleur valide la s quence d allumage d marre En cas d chec de l allumage le contr leur essaiera de se rallumer plusieurs fois Si aucun allumage n est r ussi apr s le nombr...

Страница 61: ...nt tous les 1000 pieds 305 m au dessus du niveau de la mer Chaque gaz et pression d entr e diff rents ont besoin d un r glage correct de la pression du br leur et l utilisation de l injecteur correct...

Страница 62: ...a sonde de temp rature et active ou d sactive l l ment chauffant pour r guler la temp rature Le contr le temporel est r alis de fa on interne dans le microprocesseur En mode OPL vous pouvez augmenter...

Страница 63: ...informations 6 Temp rature Voyant LED temp rature lev e allum Temp rature lev e s lectionn e Voyant LED temp rature moyenne allum Temp rature moyenne s lectionn e Voyant LED temp rature basse allum Te...

Страница 64: ...6 5 Basse La temp rature de s chage s lectionn e est lev e Machine l arr t 2 teint 1 La temp rature de s chage s lectionn e est Moyenne En cours de fonctionnement 2 Vert 1 La temp rature de s chage s...

Страница 65: ...10 001110 140 011110 300 101110 460 111110 Valeur selon console 001111 150 011111 310 101111 470 111111 Mode autoreconnaissance techniciens uniquement Remarque un 0 signifie positionner l interrupteur...

Страница 66: ...ure basse et lev e pendant 10 secondes le solde accumul sera r initialis 0 Si vous appuyez sur cette combinaison apr s 2 minutes elle sera sans effet Modification de param tres il est possible de modi...

Страница 67: ...de la temp rature interne du s che linge et des fibres afin d viter d endommager les mat riaux et les br lures Ce refroidissement dure 10 minutes apr s quoi la machine s arr te mais l alarme reste ac...

Страница 68: ...tivation des diff rentes entr es et sorties du syst me La communication avec l utilisateur s effectue par l interm diaire d un cran tactile indiquant les tats de la machine La commande peut tre config...

Страница 69: ...blanchisserie 3 Logo 4 Heure 5 Date 6 Mod le type de chauffage et version de logiciel En appuyant n importe o sur l cran vous serez redirig vers L cran principal 6 2 OPL CRAN PRINCIPAL 1 Identificate...

Страница 70: ...En cliquant sur les ic nes de la colonne verticale de droite les diff rents param tres de chaque phase pourront tre modifi s un un Les valeurs modifi es ne seront pas sauvegard es pour de futures ex c...

Страница 71: ...Stop arr ter annuler le programme 14 Menu ex cution acc s au menu d ex cution o les param tres pourront tre affich s et modifi s en cours de s chage Voir diter consignes valeurs r elles en cliquant s...

Страница 72: ...place du prix indiquant que le programme est activ pour tre ex cut Si d autres pi ces sont introduites la dur e disponible sera mise jour en fonction du rapport dur e suppl mentaire prix de chaque pro...

Страница 73: ...icateur de progression de programme 6 tat dessin anim du processus 7 Phase en cours d ex cution 8 Stop arr ter le programme 9 Pause mise en pause temporaire du programme 10 Dur e suppl mentaire de s c...

Страница 74: ...1 Gestion de programmes Biblioth que de phases dans ce dossier toutes les phases disponibles sont stock es par d faut mais vous pourrez galement en cr er de nouvelles personnalis es ou diter celles ex...

Страница 75: ...dosage sera ex cut lorsque cette temp rature est atteinte 2 Temps de dosage secondes dur e pendant laquelle la machine lib re le parfum 3 Dur e d agitation du dosage minutes dur e pendant laquelle la...

Страница 76: ...chage intelligent adaptation de la vitesse kit de contr le de l humidit requis Activer d sactiver la fonctionnalit antiplis la fin du cycle de s chage si le linge n est pas extrait de la machine le p...

Страница 77: ...VICE Lorsque la machine est EN VEILLE proc dez comme suit 1 S lectionner le programme souhait en cliquant sur le bouton du programme En cas de plus de 4 programmes en appuyant sur les fl ches lat rale...

Страница 78: ...appuyez sur la coche Mode libre service o Appuyer la touche STOP 8 o Un message de confirmation vous sera demand Pour revenir au programme en cours appuyez sur la croix et pour confirmer la suppressio...

Страница 79: ...riaux et les br lures Ce refroidissement dure 10 minutes apr s quoi la machine s arr te mais l alarme reste activ e jusqu ce qu elle soit annul e correctement Vous pouvez annuler ce refroidissement du...

Страница 80: ...rature tambour 22 Surpression pressostat haute pression P03 Pour pompe chaleur uniquement 10 Avis de maintenance 23 Surchauffe d charge B04 Pour pompe chaleur uniquement 11 Protection contre les ince...

Страница 81: ...fois d verrouill es le tiroir sortez le jusqu ce qu il atteigne la but e Le tiroir a une glissi re t lescopique qui permet un parcours suffisant afin que le filtre soit enti rement accessible Pour un...

Страница 82: ...du moteur ou de l axe du tambour Veuillez contacter votre service technique pour r aliser cette op ration 10 4 Service technique Si vous avez besoin de contacter le service technique ou besoin des pi...

Страница 83: ...bl me persiste veuillez contacter notre service apr s vente Dans tout autre cas n h sitez pas contacter notre service apr s vente 12 INDICATIONS POUR LE RETRAIT ET L LIMINATION DE LA MACHINE Uniquemen...

Отзывы: