


44
Appendix IV Configuration & Setup
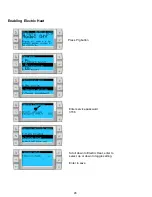
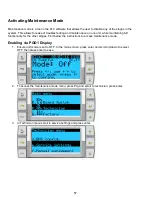
Setting Time and Date
Press Prg button
Scroll to Clock/Scheduler and press
enter
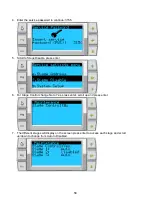
Press enter, notice the cursor flashes on the date field
mm/dd/yyyy.
Use the up and/or down keys to select the correct month. Hit
enter the press up and/or down to select the correct day.
Press enter to select the year and/or up down buttons to
select the correct year.
Press enter again and the cursor drops down to the
“Hour”
field.
Use the up and down keys to select the correct hour, then
minute
Cursor goes back to the “Clock” title. Settings have been saved
and you can exit to main screen. Daylight Saving is enabled by
default. Scroll down from the clock screen if you wish to disable.
Содержание VARC 48
Страница 20: ...18 Appendix I Touchscreen Navigation MAIN PAGE Figure 15 CHILLER ENABLE Figure 16...
Страница 21: ...19 CHILLER SETPOINTS Figure 17...
Страница 22: ...20 Figure 18 CHILLER STAGE Figure 19...
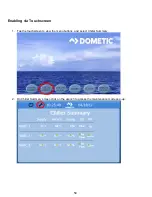
Страница 24: ...22 TRENDS Figure 21 Figure 22...
Страница 25: ...23 ACTIVE ALARMS Figure 23 ALARM HISTORY Figure 24...
Страница 26: ...24 ALARM HELP Figure 25 Figure 26...
Страница 27: ...25 REMOTE SUPPORT Figure 27 REMOTE ENABLE Figure 28...
Страница 28: ...26 REMOTE CONFIGURATION Figure 29...
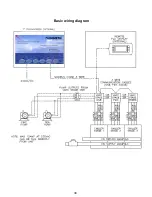
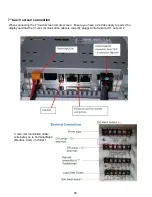
Страница 41: ...39 Basic wiring diagram...
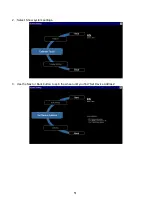
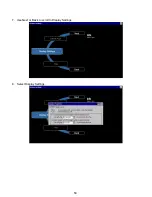
Страница 55: ...53 7 Use Next or Back to scroll to Display Settings 8 Select Display Settings...
Страница 69: ...67 VARC Standard Wiring Diagram Figure...
Страница 70: ...68 NOTES...
Страница 71: ...69 NOTES...


