4
Table 3
WELDING THICKNESS (mm)
Ø ELECTRODE (mm)
1,5 ÷ 3
3 ÷ 5
5 ÷ 12
≥ 12
2
2,5
3,25
4
Table 4
Ø ELECTRODE (mm)
CURRENT (A)
1,6
2
2,5
3,25
4
30 ÷ 60
40 ÷ 75
60 ÷ 110
95 ÷ 140
140 ÷ 190
Usage norms
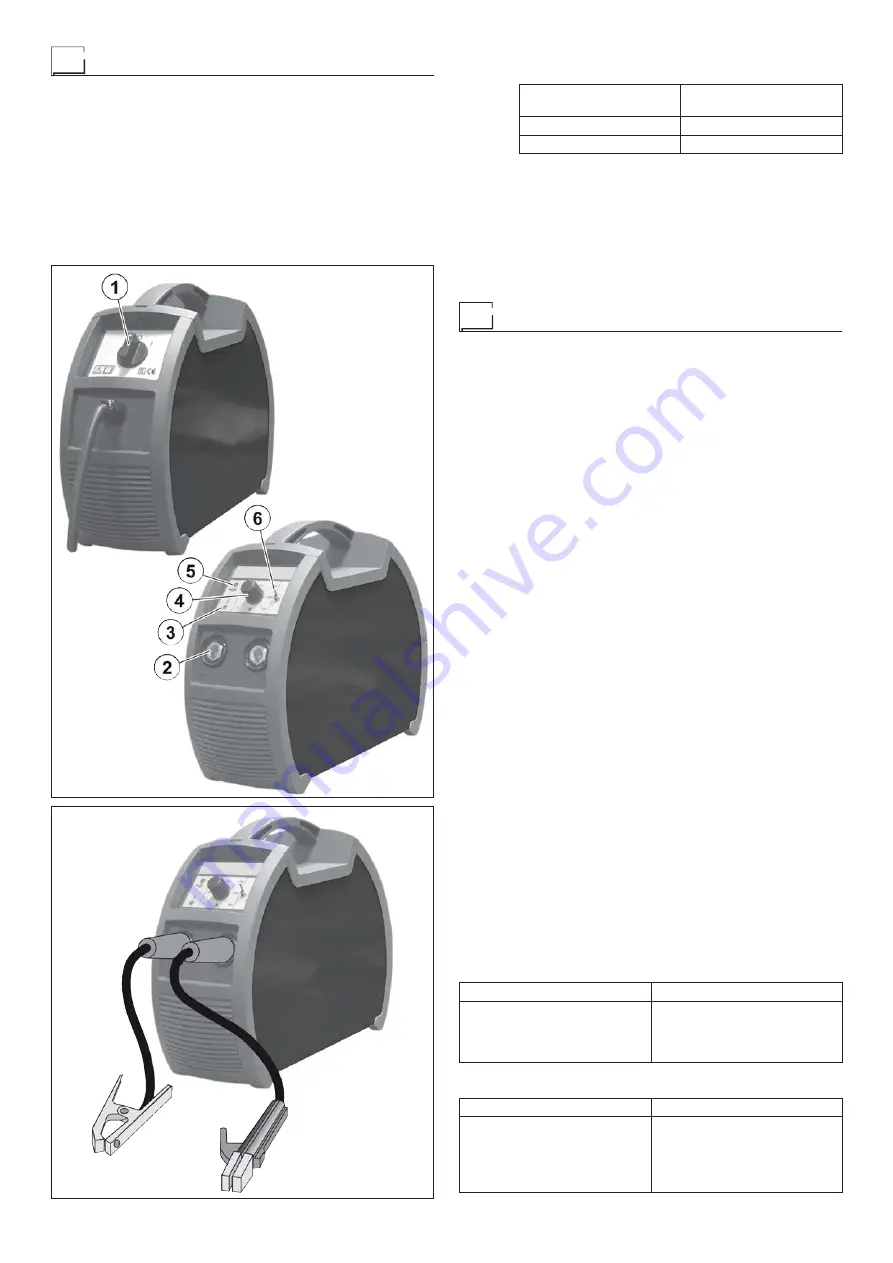
CONTROL APPARATUS (Fig. A)
Pos. 1
Supply switch. In the “O” position the welding power
source is off.
Pos. 2
Rapid connection attachments of the electrode holder
and earth holder gripper.
Pos. 3
Yellow THERMOSTAT LED. When this LED switches on
it indicates that the trip switch has tripped because you
are working beyond the work cycle. Wait for a few min-
utes before starting to weld again.
Pos. 4
Welding current adjust potentiometer.
FIG. B
FIG. A
Pos. 5
Two-colour LED (red - green) signalling the presence of
voltage at the welding clamps (LST).
LED colour
Voltage at the welding
clamps
Red
U2 > 35
Green
U2 ≤ 35
Pos. 6
Selector 3 weld procedures:
•
ELECTRODE -
For welding using basic and “cellu-
lose” electrodes with a “Hot Start” and “Arc Force”
device.
•
Cr-Ni ELECTRODE -
For stainless steel welding with
special soft-arc characteristics.
•
TIG -
For TIG welding with thermal controlled (TCS)
“Lift” type striking reducing tungsten inclusions to a
minimum and allowing to also strike on sharp edges.
MMA electrode welding (Fig. B)
Electrode welding is used for welding most metals (various types
of steels, etc.) using rutilic, basic, and cellulosic electrodes with
diameters from 1.6 mm to 4.0 mm.
1) Connecting the welding cables:
Disconnect the machine from the mains power supply and con-
nect the welding cables to the output terminals (Positive and
Negative) of the welding power source, attaching them to the
clamp and earth with the polarity specified for the type of elec-
trode being used (Fig. B). Always follow the electrode manu-
facturer’s instructions. The welding cables must be as short
as possible, they must be near to one another, positioned at
or near floor level.
2) Adjust the welding current using the potentiometer (Pos. 4,
Fig. A).
3) Turn the process selector (Pos. 6, Fig. A) to the ELECTRODE
position (for welding using basic and “cellulose” electrodes
with a “Hot Start” and “Arc Force” device) or Cr-Ni ELEC-
TRODE (for welding stainless steel with special characteris-
tics to achieve a softer arc).
4) Start the welding power source by selecting position 1 on the
line switch (Pos. 1, Fig. A).
5) The green LED (Pos 5, Fig A) shows that the VRD function is
active.
6) To “deactivate” the VRD device and therefore start to weld,
follow this simple procedure: First touch the workpiece with
the electrode, then detach it and ignite the arc within a MAX
of
0,3
seconds, otherwise if this time is exceeded the VRD de-
vice starts and prevents welding.
Strike the arc to melt the electrode, the coating of which forms
a protective residue. Then continue welding by moving the
electrode from left to right, inclining it by about 60° compared
with the metal in relation to the direction of welding.
During welding the VRD LED may turn RED, which does not
indicate any malfunction on the welding power source, but that
the VRD device has been deactivated to allow welding.
PART TO BE WELDED
The part to be welded must always be connected to earth in order
to reduce electromagnetic emission. Much attention must be af-
forded so that the earth connection of the part to be welded does
not increase the risk of accident to the user or the risk of damage
to other electric equipment. When it is necessary to connect the
part to be welded to earth, you should make a direct connection


