background image

Digital Projection 

E-Vision 6500 Series  

A Tour Of The Menus 

Operating Guide

Page 42

Rev D July 2014

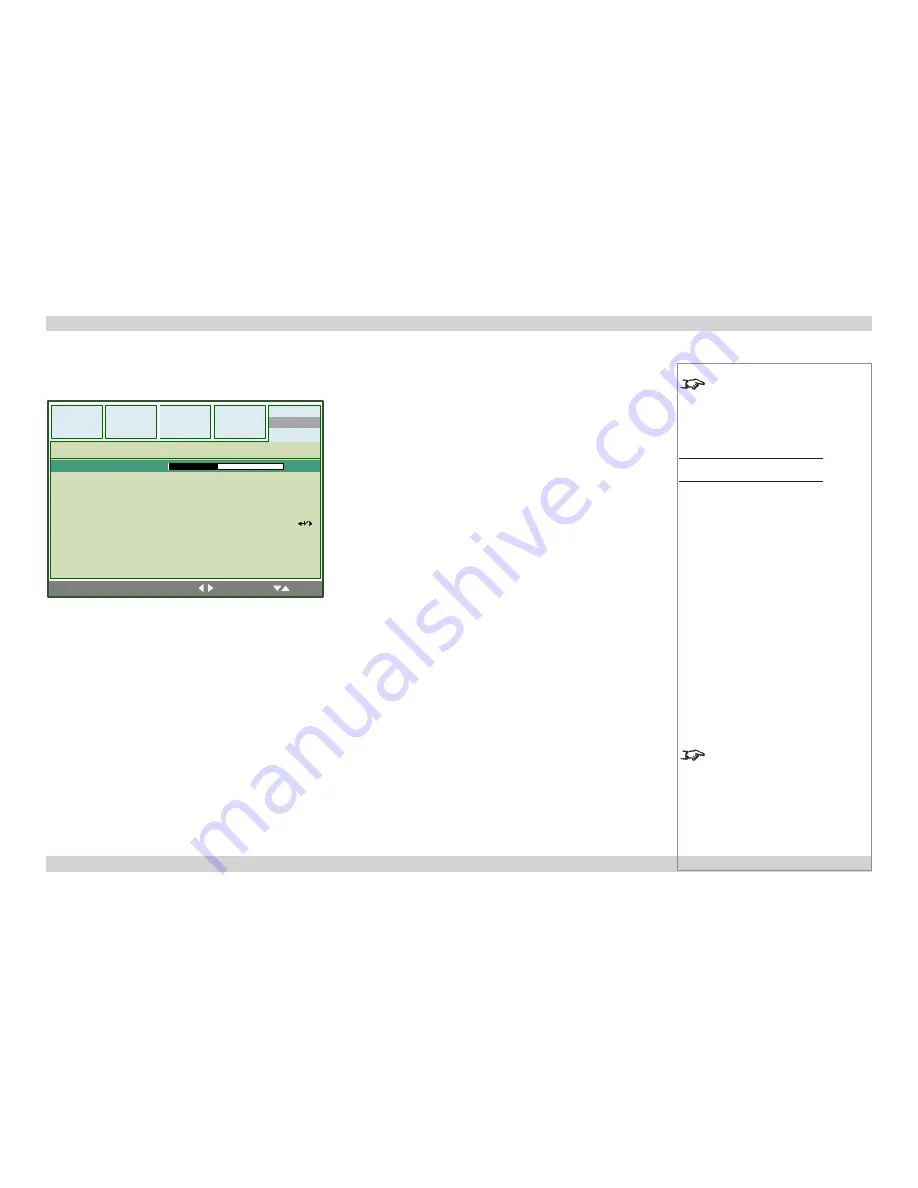
Advance Setting

Keystone

• 

 Set the slider to correct for any vertical keystone distortion.

Image Resizing

• 

 Set this to correct for any image distortion when keystone correction is being used.

Filter Message

• 

Select a Filter Message 

time interval

 from the list, or select 

Off

.

LAN/RS232C

• 

Select from 

LAN

 or 

RS232C

 as the remote connection used for external control of the projector.

Communication Speed

• 

Sets the Serial Port (RS232) baud rate. Longer cable connections may require lower speeds.

Notes

  See also 

Using the Menus

, earlier 

in this guide and 

Menu Map

, later in 

this guide.

Installation Menu

Advance Setting submenu

  Only one remote connection can be 

used at any one time.

MENU = END

|

SEL/ADJ.

|

SEL.

Setup

Video

Installation

Signal

Picture

Keystone

Image Resizing
Filter Message
LAN/RS232C
Network

Advance Setting

LAN

0

0

10000H

Communication Speed

9,600

Installation menu

 continued

Содержание E-Vision 6500 Series

Страница 1: ...T GUIDE CONNECTION GUIDE OPERATING GUIDE REMOTE COMMUNICATIONS GUIDE 114 758D L E N S S H IF T Z O O M F O C U S M E N U E N TE R R E TU R N S O U R C E PO W ER W AR NI NG LA M P1 LA M P2 A U TO E Vis...

Страница 2: ...llowed WARNING this symbol indicates that there is a danger of physical injury to yourself and or damage to the equipment unless the instructions are closely followed NOTE this symbol indicates that t...

Страница 3: ...applications BrilliantColor for increased system brightness DynamicBlack for improved black levels in dark scenes Frame sequential 3D support at up to 120Hz with support for DLP Link glasses synchroni...

Страница 4: ...E SCREEN AND PROJECTOR 9 OPERATING THE PROJECTOR 10 Switching the projector on 10 Selecting an input signal or test pattern 10 Input signal 10 Test pattern 10 Adjusting the lens 11 Zoom 11 Focus 11 Sh...

Страница 5: ...Serial control input 23 Wired remote control connection 23 LAN connection 24 OPERATING GUIDE 25 USING THE REMOTE CONTROL 27 USING THE MENUS 28 Navigating the menus 28 Submenus 29 Sliders 29 Selecting...

Страница 6: ...p Mode 41 Projection Mode 41 Fan Mode 41 Test Pattern 41 Advance Setting 42 Communication Speed 42 Network 43 Reset 44 Information 44 MENU MAP 45 REMOTE COMMUNICATIONS GUIDE 49 INTRODUCTION 51 RS232 C...

Страница 7: ...4 E Vision 6500 Series High Brightness Digital Video Projector INSTALLATION AND QUICK START GUIDE L E N S S H IF T Z O O M F O C U S M E N U E N TE R R E TU R N S O U R C E PO W ER W AR NI NG LA M P1...

Страница 8: ...hanging The Lens Lamps And Color Wheel 6 Removing the lens 6 Fitting the lens 6 Changing the lamp 7 Changing the color wheel 8 Positioning The Screen And Projector 9 Operating The Projector 10 Switchi...

Страница 9: ...se you ever need to ship your Projector Only one power cable dependent on the destination territory will be supplied with the projector Remote control 112 377 User Manual on disc 115 759 Important Inf...

Страница 10: ...tem see the Operating Guide The air filters should be cleaned or changed regularly depending on the installation environment The filters should be changed at the same time as the lamp is changed The p...

Страница 11: ...INPUT and AUTO SYNC buttons on the remote control The Power indicator will show amber when in standby and green when the projector is on and will flash when the projector is warming up or cooling down...

Страница 12: ...se lever and turn the lens anti clockwise 3 Remove the lens Fitting the lens 1 Position the lens so that the label marked O is at the top push in the lens release lever and and gently insert the lens...

Страница 13: ...dule 3 Pull firmly upwards on the handle to remove the lamp module 4 Insert a new lamp module 5 Fasten the screws 6 Replace the lamp compartment cover 1 2 3 Notes Always allow the lamp to cool for 5 m...

Страница 14: ...2 Unscrew the four captive screws securing the color wheel 3 Remove the color wheel 4 Insert a new color wheel 5 Fasten the screws 6 Replace the lamp compartment cover 4 5 6 3 2 1 Notes Always allow t...

Страница 15: ...he projector to a ceiling mount optional accessory Notes Always allow the lamp to cool for 5 minutes before disconnecting the power moving the projector Ensure that there is at least 50cm 20in of spac...

Страница 16: ...projector The signal should be automatically detected by the projector and should be displayed within a two or three seconds If more than one signal is connected then select the image you want to dis...

Страница 17: ...adjust the position of the image or press the LENS SHIFT button on the remote control then use and to adjust the position of the image Adjusting the image Orientation Use the Projection Mode settings...

Страница 18: ...onfirm your intention to switch off The lamp will go off and the Power indicator on the control panel will flash amber for a few seconds whilst the lamp cools The Power indicator on the control panel...

Страница 19: ...July 2014 E Vision 6500 Series High Brightness Digital Video Projector CONNECTION GUIDE L E N S S H IF T Z O O M F O C U S M E N U E N TE R R E TU R N S O U R C E PO W ER W AR NI NG LA M P1 LA M P2 A...

Страница 20: ...s 18 Screen Trigger 18 USB Service Port 18 Wired Remote Control 18 RS232 18 LAN 18 Wiring Details 19 Signal inputs and outputs 19 Monitor video output VGA 19 Computer 1 video input analog computer VGA...

Страница 21: ...he RCA phono connectors Video or S Video Connect a composite video cable to the single RCA phono connector or an S Video cable to the 4 pin mini DIN Monitor Out Connect an analog monitor VGA cable to...

Страница 22: ...80 50 1125 28 13 1080i60 1920 x 1080 60 1125 33 75 1080p50 1920 x 1080 50 1125 56 25 1080p60 1920 x 1080 60 1125 67 5 COMPUTER 480p 640 x 480 59 9 526 31 5 VGA72 640 x 480 72 8 521 37 9 VGA75 640 x 48...

Страница 23: ...GA120 1280 x 720 120 1 772 92 7 WXGA60 1280 x 768 59 9 798 47 8 WXGA60 1280 x 800 59 8 831 49 7 WXGA75 1280 x 800 74 9 838 62 8 WXGA120 1280 x 800_RB 119 9 847 101 6 WXGA60 1360 x 768 60 795 47 7 WXGA...

Страница 24: ...nk commands The PJLink specification can be downloaded from http pjlink jbmia or jp english click on the Specifications link The LAN IP Address of the projector can be set by using the Network submenu...

Страница 25: ...ound 7 B Ground 8 G Ground 9 5v 10 Digital Ground V Sync DDC 11 unused 12 SDA 13 H Sync 14 V Sync 15 SCL Computer 2 video input RGBHV RGsB or YCbCr 5 x 75 ohm BNC RGBHV RGsB YCbCr Green Green Sync Y B...

Страница 26: ...23 TMDS Clock 24 TMDS Clock Hot plug detect HPD is fully DVI compliant DVI sources detect the presence of a display device by providing 5V on pin 14 and looking for 5V on pin 16 Whenever the projecto...

Страница 27: ...500 Series Wiring Details Connection Guide 21 Rev D July 2014 Component video input 3 x RCA Phono YCbCr YPbPr Cr Pr Y Y Cb Pb Notes For full details of all input settings see the Advanced menu in the...

Страница 28: ...Guide 22 Rev D July 2014 Video input 1 x RCA Phono Composite Video S Video input 4 pin mini DIN 1 Y Ground 2 C Ground 3 Luminance Y 4 Chrominance C pin view of female connector Notes For full details...

Страница 29: ...able used to connect the projector to a computer RX 2 3 TX TX 3 2 RX GND 5 5 GND Wired remote control connection 3 5mm mini jack Tip Not connected Ring Signal Sleeve Ground pin view of female connecto...

Страница 30: ...e crossed 1 White Orange stripe White Green stripe 1 2 Orange Green 2 3 White Green stripe White Orange stripe 3 4 Blue Blue 4 5 White Blue stripe White Blue stripe 5 6 Green Orange 6 7 White Brown st...

Страница 31: ...July 2014 E Vision 6500 Series High Brightness Digital Video Projector OPERATING GUIDE L E N S S H IF T Z O O M F O C U S M E N U E N TE R R E TU R N S O U R C E PO W ER W AR NI NG LA M P1 LA M P2 A...

Страница 32: ...l menu 35 Horizontal and Vertical Position Phase Clock 35 Reset 35 Resolution 35 Auto Sync 35 Video menu 36 Overscan 36 Video System 36 Video Setup 36 Closed Caption 36 Setup menu 37 Auto Search 37 Au...

Страница 33: ...ailable video input signals PICTURE opens the Picture menu AUTO SYNC Projector will re synchronise with the current input signal ASPECT select from a list of available aspect ratios OVERSCAN select fr...

Страница 34: ...screen display OSD press MENU Notes Some menu options and controls may not be available due to settings in other menus These will be shaded grey on the actual menu Remote control Projector control pan...

Страница 35: ...and controls may not be available due to settings in other menus These will be shaded grey on the actual menu Submenus Select a submenu using and then open the submenu by pressing ENTER The name of t...

Страница 36: ...ge will be made immediately Notes Some menu options and controls may not be available due to settings in other menus These will be shaded grey on the actual menu Some parameters are changed by selecti...

Страница 37: ...d grey on the actual menu In this example use or to move the green highlight to No or Yes then press ENTER to confirm your selection Editing fields Some features require a text or numeric field to be...

Страница 38: ...ettings in the Picture Menu except Picture Mode and Signal Type to their factory defaults When the warning message appears use or to move the green highlight to YES or NO then press ENTER to confirm y...

Страница 39: ...nu Signal Type Set this to Auto except when the projector has problems selecting between RGB YCrCb and YPrPb Color Temperature Set this to suit the specification of the input source or to improve the...

Страница 40: ...n detection Noise Reduction Select a Noise Reduction level as required Dynamic Black Set this to On or Off as required Notes The Film Mode setting is available only for interlaced signals on the Video...

Страница 41: ...some signals on the Computer 1 Computer 2 and Component inputs Auto Sync Set this to On if you want the projector to automatically synchronise with the input signal Set this to Off if the settings are...

Страница 42: ...tem setting is available only for signals on the Video and S Video inputs The Video Setup setting is available only for 480i signals on the Computer 1 Computer 2 and Component inputs and NTSC3 58 sign...

Страница 43: ...ected Set this to Off if you want the projector to go into Standby mode when the mains is connected In this case the projector will not start up until the POWER button is pressed on the control panel...

Страница 44: ...will be displayed with a 4 3 aspect ratio fitting the full height and or width of the screen depending on the resolution of the projector 16 9 the image will be displayed with a 16 9 aspect ratio fit...

Страница 45: ...urrently saved image use Delete Wall Color Set this to suit the projection screen Digital Zoom Enlarge a section of the image Notes See also Using the Menus earlier in this guide and Menu Map later in...

Страница 46: ...ctor status messages to be displayed Setup menu Advance Setting submenu continued Notes See also Using the Menus earlier in this guide and Menu Map later in this guide Setup Menu Advance Setting Subme...

Страница 47: ...Front Rear Ceiling Front or Ceiling Rear as required Fan Mode Set this to Normal High or Up Down as required Select High to compensate for reduced air density at higher altitudes Select Up Down if th...

Страница 48: ...ct from LAN or RS232C as the remote connection used for external control of the projector Communication Speed Sets the Serial Port RS232 baud rate Longer cable connections may require lower speeds Not...

Страница 49: ...made manually DHCP Client Set DHCP Client to On if the IP Address is to be assigned by a DHCP server or Off if it is to be set here IP Address Subnet Mask Gateway and DNS If DHCP is set to Off Edit t...

Страница 50: ...o zero When the warning message appears use or to select YES or NO then press ENTER SELECT to confirm your selection Information The final submenu gives information about the projector eg Notes Do NOT...

Страница 51: ...k On Off Reset Projector will ask for confirmation before restoring all settings in this menu except Picture Mode and Signal Type to factory defaults SIGNAL Horizontal Position Vertical Position Phase...

Страница 52: ...t Aspect Ratio Normal Full 4 3 16 9 Native Advance Setting Security Lock Disable Password Keypad Lock Yes No Image Capture Save image Delete image Wall Color Off Whiteboard Blackboard Digital Zoom Mes...

Страница 53: ...S Communication Speed 38 400 19 200 9 600 Apply Projector will ask for confirmation before applying the above changes Reset All Reset Projector will ask for confirmation before restoring all settings...

Страница 54: ...Digital Projection E Vision 6500 Series OPERATING GUIDE This page is intentionally left blank...

Страница 55: ...2014 E Vision 6500 Series High Brightness Digital Video Projector REMOTE COMMUNICATIONS GUIDE L E N S S H IF T Z O O M F O C U S M E N U E N TE R R E TU R N S O U R C E PO W ER W AR NI NG LA M P1 LA M...

Страница 56: ...mmands 52 Header code 52 Examples 52 The commands 53 Command Group 00 53 Command Group 01 53 Command Group 02 54 Command Group 03 54 Command Group 04 Remote Control buttons 55 PJLink 57 Settings 57 Ho...

Страница 57: ...described in this guide All of the projector s features can be controlled via a LAN connection using the industry standard PJLInk commands For more information about this see PJLink later in this guid...

Страница 58: ...tor return result in ascii P hex 56 39 39 53 30 30 30 31 0D projector return result in hex 50 Set brightness to 25 ascii V99 S 0101 25 CR projector return result in ascii P hex 56 39 39 53 30 31 30 31...

Страница 59: ...34 0D Get Lamp1 Hours Pn F V99G0005 56 39 39 47 30 30 30 35 0D Get Air filter timer n 0 999999 Pn F V99S0006 56 39 39 53 30 30 30 36 0D System Reset P F V99G0007 56 39 39 47 30 30 30 37 0D Get System...

Страница 60: ...0D Select S Video P F V99S0206 56 39 39 53 30 32 30 36 0D Select DVI P F V99G0220 56 39 39 47 30 32 32 30 0D Get Current Source 0 RGB 1 BNC 2 Component 3 Video 4 S Video 5 DVI Pn F Command Group 03 A...

Страница 61: ...V99S0402 56 39 39 53 30 34 30 32 0D OFF P F V99S0403 56 39 39 53 30 34 30 33 0D Focus P F V99S0404 56 39 39 53 30 34 30 34 0D Focus P F V99S0405 56 39 39 53 30 34 30 35 0D Zoom P F V99S0406 56 39 39 5...

Страница 62: ...V99S0420 56 39 39 53 30 34 32 30 0D ASPECT P F V99S0423 56 39 39 53 30 34 32 33 0D OVERSCAN P F V99S0424 56 39 39 53 30 34 32 34 0D FREEZE P F V99S0425 56 39 39 53 30 34 32 35 0D 3D MODE P F V99S0426...

Страница 63: ...LAN IP Address lanconf html into the address bar then press the Enter key The embedded webpage shown here should appear Settings Host Name Up to 60 alpha numeric characters can be entered Press the A...

Страница 64: ...the Enter key The embedded webpage shown here should appear Power ON STANDBY Click on the buttons to turn the projector On or into Standby mode Picture controls Click on the and controls to adjust the...

Отзывы: