background image

3

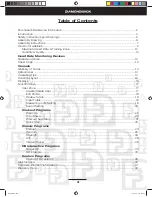
Table of Contents

Purchaser’s Reference Information ........................................................................................................2
Introduction .................................................................................................................................................4
Safety Instructions and Warnings ............................................................................................................5
Assembly Drawing .....................................................................................................................................6
Assembly Instructions ................................................................................................................................7
Workout Guidelines ....................................................................................................................................9

Maximum Heart Rate & Training Zone ............................................................................................10
Quantity & Quality ................................................................................................................................10

Heart Rate Monitoring Devices

Pulse Hand Grips ......................................................................................................................................12
Chest Strap ................................................................................................................................................12

Console 

Glossary of Terms .....................................................................................................................................12
Default User ...............................................................................................................................................13
Operating Tips ...........................................................................................................................................13
Console Layout .........................................................................................................................................15
Displays .......................................................................................................................................................16
Function Keys.............................................................................................................................................17

User Zone .............................................................................................................................................17

Create/Delete User .......................................................................................................................17
Edit Profi le .......................................................................................................................................18
Review Totals .................................................................................................................................18
Clear Totals .....................................................................................................................................19
Measuring Units Setting ...............................................................................................................19
Sound Setting 

.......................................................................................................................19

Workout Programs


Warm Up ........................................................................................................................................20
Cool Down .....................................................................................................................................20
Workout Summary ........................................................................................................................21
Quick Start .....................................................................................................................................22

Classic Programs


Manual ............................................................................................................................................23
Random .........................................................................................................................................25
Strength .........................................................................................................................................26
Hill ....................................................................................................................................................28
Interval Trainer ...............................................................................................................................29

HR Interactive Programs

Target HR .......................................................................................................................................32
HR Intervals ...................................................................................................................................33

Custom Programs


Custom 1 & Custom 2 .................................................................................................................35

Maintenance .............................................................................................................................................40
Domestic Warranty information .............................................................................................................41
Warranty Card ..........................................................................................................................................43

1000Sr OM.indd   3

1000Sr OM.indd   3

7/7/2008   2:27:54 PM

7/7/2008   2:27:54 PM

Содержание 1000SR

Страница 1: ...Location Serial Number Sticker Dealer Name _________________________________________________________________________________________ Dealer Address _______________________________________________________________________________________ Dealer Telephone Number _____ ____________________________________________________________________ Dealer Contact Name _____________________________________________...

Страница 2: ...Console Layout 15 Displays 16 Function Keys 17 User Zone 17 Create Delete User 17 Edit Profile 18 Review Totals 18 Clear Totals 19 Measuring Units Setting 19 Sound Setting 19 Workout Programs Warm Up 20 Cool Down 20 Workout Summary 21 Quick Start 22 Classic Programs Manual 23 Random 25 Strength 26 Hill 28 Interval Trainer 29 HR Interactive Programs Target HR 32 HR Intervals 33 Custom Programs Cust...

Страница 3: ... high value equip ment has grown to a full line of cardio equipment including treadmills ellipticals and stepper as well as bikes including innovative step thru recumbents You can count on your Diamondback equipment to provide years of pleasure and improvement in your fitness level The solid construction and techno savvy electronics are guaranteed to provide you with the ultimate workout experienc...

Страница 4: ... proper functioning of your equipment do not install attachments or accessories not pro 1 vided or recommended by Diamondback Fitness Keep your hands and feet away from all moving parts 2 Before beginning any exercise program consult your physician 3 Always wear proper clothing and shoes when exercising 4 User weight is not to exceed 325 lbs 148 kilograms on the 1000Sr 5 Keep children away from eq...

Страница 5: ...6 Assebly Drawing 1000Sr OM indd 6 1000Sr OM indd 6 7 7 2008 2 27 54 PM 7 7 2008 2 27 54 PM ...

Страница 6: ...olts Insert and tighten four M8 x 16mm flat head bolts into the side of the mast d Snap console mast cover into top of sidecase e Fasten the handlebar on to the console mast by sliding the bracket in the middle of the handlebar 2 2 over the bolt holes in the console mast Be careful not to move the bracket around too much on the mast to avoid scratching the mast Secure the handlebar to the mast wit...

Страница 7: ...seat track by turning the c adjustment knob clockwise Do not overtighten as this may prevent the seat from sliding along the track Hold the adjustment knob in position with one wrench while you re tighten the seat roller nut d with the second wrench Repeat steps a d above with the middle seat roller adjustment on the left side of the seat frame e The seat should now slide easily along the seat tra...

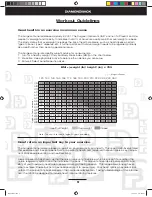
Страница 8: ...26 27 29 31 32 34 36 37 39 40 5 8 18 20 21 23 24 26 27 29 30 32 34 35 37 38 5 10 17 19 20 22 23 24 26 27 29 30 32 33 35 36 6 0 16 18 19 20 22 23 24 26 27 28 30 31 33 34 6 2 15 17 18 19 21 22 23 24 26 27 28 30 31 32 6 4 15 16 17 18 20 21 22 23 24 26 27 28 29 30 6 6 14 15 16 17 19 20 21 22 23 24 25 27 28 29 6 8 13 14 15 17 18 19 20 21 22 23 24 25 26 28 Healthy Weight Overweight Obese Note This chart...

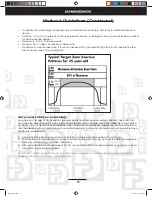
Страница 9: ...e of fitness It is calculated as a percentage of your maximum heart rate estimated as 220 minus your age It is most effective to train at your target heart rate between 60 and 85 of your maximum heart rate Maximum Heart Rate Training Zone To calculate your maximum heart rate and find your training zone use the following formula An example has been provided below based on a 35 year old person 220 A...

Страница 10: ...eople who have diabetes or high blood pressure a family history of heart disease high cholesterol or have lead a sedentary lifestyle should pro tect themselves with a medical check up and a stress test preferably administered during exercise by a healthcare professional Always stretch before your workout to loosen muscles and afterwards to Cool Down 1 The first few minutes of your workout should b...

Страница 11: ...itoring equip ment or there is other electronics nearby such as TV Radio The receiver of the wireless ECG system is built into the console unit of the Diamondback 1000Sr equip ments While using heart rate control modes the computer monitors the exact measurement of and control over the activity if the heart Heart rate frequency is displayed while the computer continually compares heart rate to the...

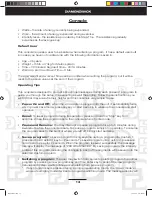
Страница 12: ... start operation Reset To reset a program during its operation press and hold the Stop key for 2 seconds When the program resets the console returns to idle mode Pause and Resume You may interrupt or pause a program for up to 5 minutes during a workout before the console resets To pause a program simply stop pedaling To resume the program back to the point of where you left off simply start pedali...

Страница 13: ...and distance will continue accumulating Intensity adjustment During a program the user may press Level Up Down key to adjust the resistance level Note Resistance adjustments are not allowed in any Heart rate interactive program If Level Up Down key is pressed the message display will show INTENSITY 1 to indicate the current level and updates accordingly MAX HR Age 220 minus age It is recommended t...

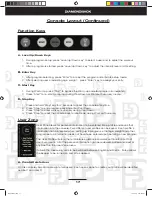
Страница 14: ...phanumeric message display Program keys User Zone Key Dot Matrix display Pulse Indicator Custom Program Keys Data Display Select Key Function Keys 1000Sr OM indd 15 1000Sr OM indd 15 7 7 2008 2 27 59 PM 7 7 2008 2 27 59 PM ...

Страница 15: ...teractive progrmas the LED represents the Max HR 0 100 Message Workout data Display B During a program setup this display will scroll messages to guide you through the setup process 1 During workout it also acts as a data display window and displays four types of workout data at 2 the same time As soon as the program is started it will display Time Resistance Level Pulse and Calories You may press...

Страница 16: ...l Down 3 Press Stop to reset the console back to Idle Mode during Workout Summary 4 User Zone User Zone allows for personal information to be entered into a profile and saves that information into the console Two different user profiles can be saved Each profile s information can be recalled when setting up a program so that age weight and other program set up information does not have to be enter...

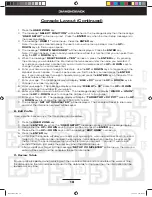
Страница 17: ...nge the number to your weight Enter your Warm Up and Cold Down time The message display will display 9 WU CD 3 MIN press the UP or DOWN keys to change the number from 1 to 5 minutes Enter your Target HR The message display will display 10 TARGET HR XX PCT press the UP or DOWN keys to change the number FROM 60 to 85 The message 11 SET UP COMPLETED will be displayed The console will reset to idle mo...

Страница 18: ...when the Yes is blinking and the totals will reset to 0 Use the UP or DOWN keys to change the Yes to No Pressing the Enter key when No is blinking will not reset your totals After pressing the 6 ENTER key the Console will also reset to Idle mode Measuring Units Setting E The measuring unit can be changed between English and Metric Press the 1 USER ZONE key When the 2 USER SETUP message comes on in...

Страница 19: ...light up Adjustment Intensity level 1 Press Level UP or DOWN key to adjust the intensity level from 1 5 only Start key could be pressed to skip the warm up and execute the program immediately Ending the Program When 3 minutes or the specified time in your profile duration is up or START key is pressed Warm Up will end and the program will execute The message display will flash a message STARTING P...

Страница 20: ...s or specified time in your profile duration is up or STOP key is pressed Cool Down will end and enter Workout Summary The message display will flash a message WORKOUT SUMMARY and the Summary will be displayed Pause Reset Switch Re Start or Save a program See Console Operating Tips section for details pages 13 14 Workout Summary Getting Started For your convenience your unit incorporates a Workout...

Страница 21: ...ing Started A Quick Start program is for someone who wants to bypass the setup mode and start their workouts right away By picking Quick Start program you are accepting the default values for age weight and workout time Beginning the Program During idle mode the message window displays a message SELECT A PROGRAM To begin this program press START key once Program Default Values Age 35 years Weight ...

Страница 22: ...he message display flashes MANUAL and PRESS ENTER it indicates you are about to select the Manual program Press the ENTER Key to enter program setup mode The message display will take you through the program setup mode step by step as below The message display will flash SELECT USER and then it will display the most recently used profile Use the UP or DOWN key to find your profile then When your p...

Страница 23: ...will show TIME 1HR 00MIN instead After time adjustment the message display will switch to display c SET UP COMPLETED then PRESS START Press START key to begin this program During the Program Once the Enter or Start key is pressed the Warm Up will be active See Warm Up section for details After Warm Up is over your program will start Displays Once the program is started the message display will tur...

Страница 24: ...ssage display will switch to display c SET UP COMPLETED then PRESS START Press START key to begin this program Or if you have not created a profile or do not wish to use one of the created profiles after the message SELECT USER press UP or DOWN key until the message DEFAULT USER comes up then press ENTER key then Enter Age 1 The message window will flash a message of a ENTER AGE then AGE 35 with t...

Страница 25: ... display will flash a message PROGRAM ENDED COOL DOWN See Cool Down for details Pause Reset Switch Re Start or Save a program See Console Operating Tips section for details pages 13 14 Strength Getting Started The Strength program gradually increases the workload over time This will strengthen not only your heart but also the major muscle groups which are doing the work Beginning the Program Durin...

Страница 26: ...e number blinking WEIGHT 70 KG for metric system You may press b UP or DOWN key to adjust the weight After weight adjustment the message display will switch to display c PRESS ENTER to indicate next step Press ENTER to accept and enter Time adjustment Enter your workout time 3 The message window will flash a message of a ENTER TIME then TIME 30 MIN and the 30 will be blinking You may press b UP or...

Страница 27: ...message display will flash SELECT USER and then it will display the most recent used profile Use the UP or DOWN key to find your profile then When your profile comes up press 1 ENTER key Enter your workout time 2 The message window will flash a message of a ENTER TIME then TIME 30 MIN and the 30 will be blinking You may press b UP or DOWN key to adjust the time When the time setting reaches 60 min...

Страница 28: ...ve See Warm Up section for details After Warm Up is over your program will start Displays Once the program is started the message display will turn into workout data display and display Time Level Pulse Calories Press DATA SELECT key to the right of the display to switch the date display to display RPM Speed Distance Watts Adjustment Press Level UP or DOWN key to adjust the intensity level from L1...

Страница 29: ...e message SELECT USER press UP or DOWN key until the message DEFAULT USER comes up then press ENTER key then Enter Age 1 The message window will flash a message of a ENTER AGE then AGE 35 with the number blinking You may press b UP or DOWN keys to adjust the age After age adjustment the message display will switch to display c PRESS ENTER to indicate next step Press ENTER to accept and enter Weigh...

Страница 30: ...dot matrix window will update the intensity profile accordingly as well Ending the Program When program time is up or STOP key is pressed this program will end and Cool Down will be active The message display will flash a message PROGRAM ENDED COOL DOWN See Cool Down for details Pause Reset Switch Re Start or Save a program See Console Operating Tips section for details pages 13 14 HR Interactive ...

Страница 31: ...up press 1 ENTER key Enter your workout time 2 The message window will flash a message of a ENTER TIME then TIME 30 MIN and the 30 will be blinking You may press b UP or DOWN key to adjust the time When the time setting reaches 60 minutes the display will show TIME 1HR 00MIN instead After time adjustment the message display will switch to display c SET UP COMPLETED then PRESS START Press START key...

Страница 32: ...isplay and display Time Level Pulse Calories Press DATA SELECT key to the right of the display to switch the date display to display RPM Speed Distance Watts Adjustment Press Level UP or DOWN key to adjust the Target HR The dot matrix window will update the Max HR profile accordingly Ending the Program When program time is up or STOP key is pressed this program will end and Cool Down will be activ...

Страница 33: ...sage SELECT USER press UP or DOWN key until the message DEFAULT USER comes up then press ENTER key then Enter Age 1 The message window will flash a message of a ENTER AGE then AGE 35 with the number blinking You may press b UP or DOWN keys to adjust the age After age adjustment the message display will switch to display c PRESS ENTER to indicate next step Press ENTER to accept and enter Weight adj...

Страница 34: ...d adjust accordingly The dot matrix window will update the Max HR of Work phase profile accordingly Ending the Program When program time is up or STOP key is pressed this program will end and Cool Down will be active The message display will flash a message PROGRAM ENDED COOL DOWN See Cool Down for details Pause Reset Switch Re Start or Save a program See Console Operating Tips section for details...

Страница 35: ...ll show TIME 1HR 00MIN instead After time adjustment the message display will switch to display c SET UP COMPLETED then PRESS START Press START key to begin this program Or if you have not created a profile after the message SELECT USER press UP or DOWN key until the message DEFAULT USER comes up then press ENTER key then Enter Age 1 The message window will flash a message of a ENTER AGE then AGE ...

Страница 36: ... the section of that program for details Adjustment The adjustments that can be done will depend on the type of program saved see the section of that program for details Ending the Program When program time is up or STOP key is pressed this program will end and Cool Down will be active The message display will flash a message PROGRAM ENDED COOL DOWN See Cool Down for details Pause Reset Switch Re ...

Страница 37: ...38 Notes 1000Sr OM indd 38 1000Sr OM indd 38 7 7 2008 2 28 11 PM 7 7 2008 2 28 11 PM ...

Страница 38: ...39 Notes 1000Sr OM indd 39 1000Sr OM indd 39 7 7 2008 2 28 11 PM 7 7 2008 2 28 11 PM ...

Страница 39: ...l break in service which must be performed after the first 8 to 10 hours of use Un tightened pedal cranks may become loose causing damage which may void the warranty After exercising always wipe down your unit Perspiration that continuously settles on frame pads or casing may eventually cause rust or damage to the unit Damage resulting from lack of proper mainte nance will not be covered under war...

Страница 40: ...he end user e g mail order or Internet sales without a service contract purchased through the dealer voids the Warranty Warranty Registration Warranty commitments are valid only with a completed Warranty card that is returned within 15 days from the date of purchase and includes the product serial number Registration is available at www dia mondbackfitness com Proof of purchase from Diamondback s ...

Страница 41: ...ies and any implied warranties of merchantability or fitness for a particular purpose created hereby are limited to the same duration as the express Warranty herein Raleigh America Inc shall not be liable for any incidental or consequential damages Some states do not allow the exclusion or limitations of implied warranties incidental or consequential so the above limitations and exclusions may not...

Страница 42: ...ning phone No _____________________ Dealer Store Name ____________________________________________________________ Address _______________________________________________________________________ City ___________________________________State ________________ Zip _______________ Model _________________________________Serial No ______________________________ Purchase Date ____________________________...

Отзывы: