English
8
OPERATION
WARNING: To reduce the risk of serious personal
injury, turn light off, remove battery pack and
disconnect from the AC outlet before making any
adjustments, removing/installing attachments
or accessories, and before cleaning.
WARNING: Do not cover the lens during
operation.
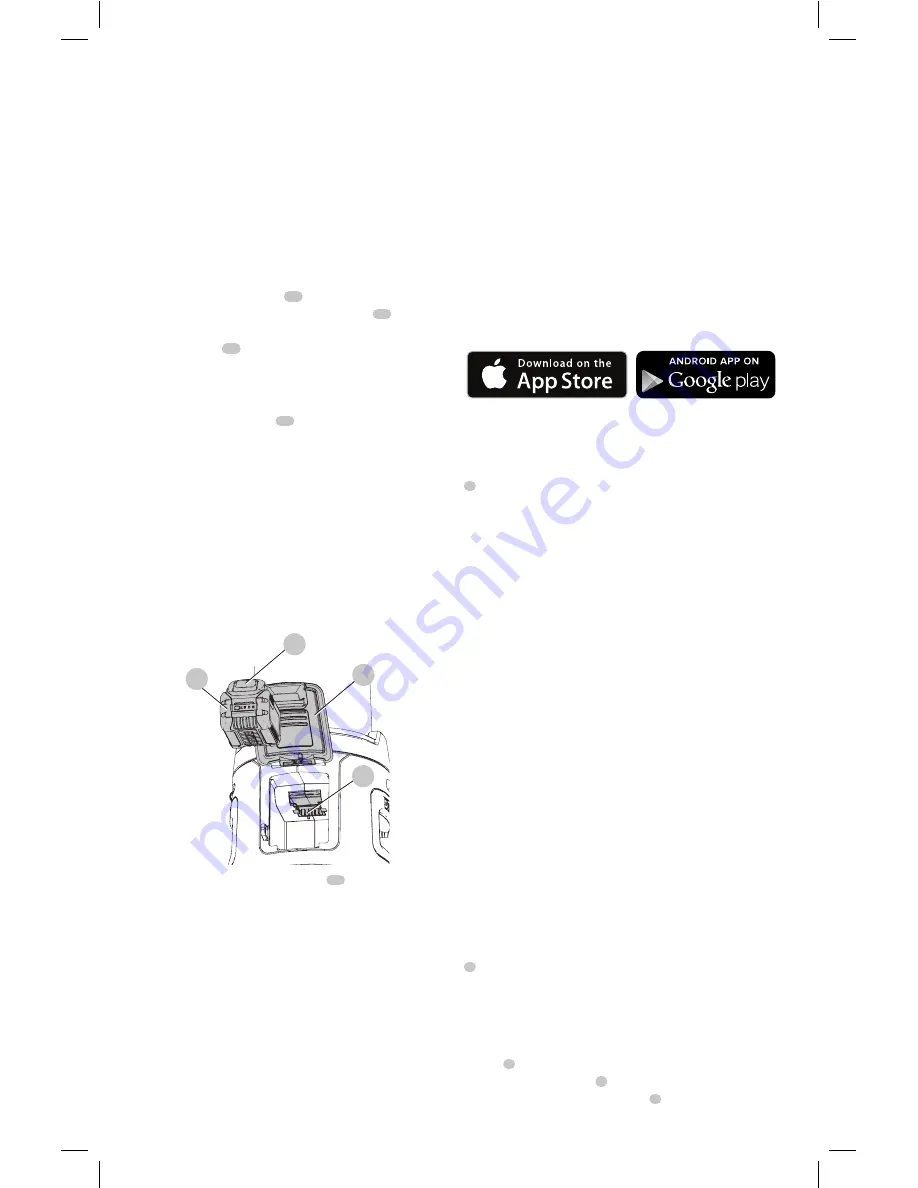
Installing and Removing Battery Packs
(Fig. D)
1. To install the battery pack
17
into the area light/
charger, lift the battery compartment door
14
, align the
battery pack with the rails inside the area light's battery
compartment
19
and slide it in until the battery pack
is firmly seated. Ensure that it does not disengage, then
close the door.
2. To remove the battery pack from the area light/charger,
press the release button
18
on the battery pack and
firmly pull the battery pack out.
Charging a Battery in the Area Light/
Charger (Fig. D)
1. Attach an extension cord to the area light, then plug
the area light/charger into an appropriate outlet before
inserting battery pack.
nOTE:
The area light/charger will not charge a battery
unless the light is plugged into an AC outlet.
2. To install the battery pack, refer to
Installing and
Removing Battery Packs.
Fig. D
14
17
18
19
3. The red (charging) indicator light (
15
, Fig. A) will blink
continuously indicating that the charging process
has started.
4. The completion of charge will be indicated by the red
(charging) indicator light remaining ON continuously.
The battery pack is fully charged and may be used at
this time or left in the area light/charger.
nOTE:
To ensure maximum performance and life of lithium-
ion battery packs, charge the battery pack fully before
first use.
D
e
WALT Tool Connect™
This area light is capable of connecting with mobile
devices that support Bluetooth® Smart (or Bluetooth® 4.0)
technology. (To see if your mobile device is compatible,
visit:
http://www.bluetooth.com/Pages/Bluetooth-Smart-
Devices-List.aspx)
D
e
WALT
Tool Connect™ is an optional application for your
smart device (such as a smart phone or tablet) that can
connect and control your area light.
nOTE:
The Bluetooth® word mark and logos are registered
trademarks owned by the Bluetooth®, SIG, Inc. and any use
of such marks by
D
e
WALT
is under license. Other trademarks
and trade names are those of their respective owners.
nOTE:
The Tool Connect™ App is governed by separate
terms and conditions available for viewing through the
mobile application.
step 1:
Download the
D
e
WALT
Tool Connect™
application at:
step 2:
Follow the instructions in the app to create your
Tool Connect™ account.
step 3:
Connect your area light with the
D
e
WALT
Tool
Connect™ app first by pressing the Tool Connect™ button
7
on the front of the light until it begins to blink. Then go
to the Home screen of the app and select "+ Tool." The area
light can only be connected to one Tool Connect™ account
at a time.
step 4:
Once the connection is established, you will be
prompted to give the product an individual name as well as
confirm that you would like to register the product on your
D
e
WALT
.com account.
CAUTION:
When using the scheduler, ensure
the illuminated area is free of personnel before a
scheduled turn off.
For more information on
D
e
WALT
Tool Connect™
functionality and features, please call 1–800–4-
D
e
WALT
(1–800–433–9258), visit
www.
D
e
WALT
.com
or view the
FAQ page and help screens located inside the mobile
application.
Using and Controlling the Area Light
(Fig. A)
nOTE:
For best results, make sure your battery pack is
fully charged. Refer to
Charging a Battery in the Area
Light/Charger.
On/Off Button (Fig. A)
CAUTION: Do not stare into area light lens.
Serious eye injury could result.
To turn both halves of the light on, press the on/off button
2
. To turn them both off, press the on/off button again.
Light Levels
The area light has 10 brightness levels. Maximum brightness
for DC operation is 3000 lm. Maximum brightness for AC
operation is 7000 lm. You can press the brightness up
button
3
to increase the brightness level or press the
brightness down button
4
to lower the brightness. Press
and hold the brightness up button
3
to go directly to


