background image


System requirements   

5


© DESIGNA Verkehrsleittechnik GmbH 

DESIGNA SMART MOVE_Installation_110_ENG.docx 


System requirements 


5.1 

Technical requirements 

The following technical requirements are necessary to ensure successful 

operation of the SMART MOVE system.  
The operator should operate the parking management system via a 

DESIGNA CLOUD application or using an on-premise solution with a 

system version X20 or higher. If no CLOUD solution is used, a DSL 

connection with a fixed IP address is required as well as a firewall or 

router.  
Users require a smartphone (version iOS 9.0 / Android 6.0 or higher), 

equipped with Bluetooth (version 4.0 LE), and a mobile phone 

connection. 


5.2 

SQL database configuration 


The SQL database is configured by your DESIGNA Support. 


SySDataConfig 

The following settings must be carried out in the SySDataConfig: 
ConfigToken:  

QINKK_URL  
ConfigValue: 

https://designaqinkk.westeurope.cloudapp.azure.com:8890/qinkk/160/

ServiceDBeaconREST.svc/Callers/


5.3 

System software 

In order to be able to use the SMART MOVE app, the data of the app 

user, e.g. email address, must be stored in the WinOperate system 

software. Further, to set up the app user in the system software, it is 

necessary for the operator to be given the appropriate user rights in the 

rights management. 


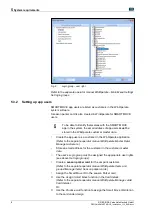
5.3.1  Setting up the login group 

In order for the system software operator to set up the app user, the 

logged-in operator must be assigned to the appropriate login group in the 

rights management that has the user right to assign the app user to the 

SMART MOVE function. 


In the login group of the logged-in operator, activate the user right 

Items and groups/ Assign Smart Move.


Содержание SMART MOVE

Страница 1: ...Installation Instructions D E S I G N A SM A RT M O V E V e r s i o n 1 1 0 ...

Страница 2: ...a retrieval system or translated into any language in any form by any means without the written permission of DESIGNA Verkehrsleittechnik GmbH COPYRIGHT 2020 DESIGNA Verkehrsleittechnik GmbH Urheberrechtlich geschützt Jede Verwertung außerhalb der engen Grenzen des Urheberrechtsgesetzes ist ohne Zustimmung der DESIGNA Verkehrsleittechnik GmbH unzulässig Dies gilt insbesondere für Vervielfältigunge...

Страница 3: ...are 7 5 3 1 Setting up the login group 7 5 3 2 Setting up app users 8 6 TECHNICAL DATA 10 7 CONFIGURING BEACONS 10 8 INSTALLING BEACONS IN THE LANE 11 8 1 Installation 12 8 1 1 Installing the beacon box on the entrance exit control terminal 13 8 1 2 Connecting the beacon box on the entrance exit control terminal 15 8 1 3 Example Installing the beacon in the DCT casing body 16 8 1 4 Connecting the ...

Страница 4: ... and be readily available to staff at all times DESIGNA eCademy Discover information about courses further documents and all the latest news in the DESIGNA eCademy After registering you can download the operating instructions and further documents in the electronic read only media format 1 2 Explanation of signal words and symbols Safety messages Following signal words are used to identify the saf...

Страница 5: ...uctions specified in warnings List 1 Step by step instructions Instructions without fixed sequence Result of the action italic Italic text refers to a component in a figure or a different chapter of these instructions or related instructions 1 3 Customer service service Your DESIGNA Service is available to you for technical information For the address see invoice delivery note or imprint In order ...

Страница 6: ...rior registration The beacons installed in the car parks communicate with the SMART MOVE app on your smart device via Bluetooth Low Energy 2 2 Warnings and occupational health and safety Always observe the following warnings to reduce health hazards and to avoid hazardous situations Electric voltage DANGER Danger of death due to electric shock Contact with live components may result in death Insta...

Страница 7: ...n radiate radio frequency energy and if not installed and used in accordance with the instructions may cause harmful interference to radio communications However there is no guarantee that interference will not occur in a particular installation If this equipment does cause harmful interference to radio or television reception which can be determined by turning the equipment off and on the user is...

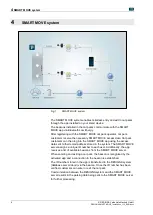
Страница 8: ...og into the SMART MOVE app using the access data sent to their email address stored in the system The SMART MOVE server assigns a unique ID number to each user Additionally the app receives a list of available beacons from the SMART MOVE server When entering and exiting a car park the beacon is recognised by the activated app and a connection to the beacon is established The ID number stored in th...

Страница 9: ...figured by your DESIGNA Support SySDataConfig The following settings must be carried out in the SySDataConfig ConfigToken QINKK_URL ConfigValue https designaqinkk westeurope cloudapp azure com 8890 qinkk 160 ServiceDBeaconREST svc Callers 5 3 System software In order to be able to use the SMART MOVE app the data of the app user e g email address must be stored in the WinOperate system software Fur...

Страница 10: ...ata 1 Create the app user as a customer in the WinOperate application Refer to the separate operator manual WinOperate Master Data Manage customers 2 Store an email address for the customer in the customer master data 3 The user s Login group must be assigned the appropriate user rights see above Set login groups 4 Create a season parker card for the car park customer Refer to the separate operato...

Страница 11: ...ee above Using the Assign function the SMART MOVE server generates a unique identification number ETC number for the season parker card When setting up the app car park customers register with their email address see separate manual SMART MOVE parking app After subsequent comparison with the SMART MOVE server the season parker card with the assigned identification number can be found via the email...

Страница 12: ... before it is configured and tested for the customer This ensures the beacon is always ready for use upon delivery Configuration The beacon on the terminal and the beacon in the DCT column are equipped with the latest firmware at the factory As part of the factory configuration the beacons receive a unique identification number This identification number is subsequently used by the app to recognis...

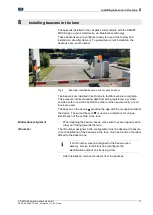
Страница 13: ...m being registered e g when vehicles enter or exit one behind the other or when several entry or exit lanes are used The beacon on the device 1 provides the app with the recognition data of the device The second beacon 2 is used as a reference for unique identification of the vehicle in the lane Bidirectional alignment When aligning the beacon boxes make sure they are opposite each other and facin...

Страница 14: ...ropriate installation can cause severe injuries Installation has to be carried out by electrical technicians or DESIGNA electrical technicians or electrical technicians of DESIGNA trained and authorized dealers and partners Prior to work ensure that there is sufficient assembly space Pay attention to tidiness and cleanness at the assembly site Loosely stacked or lying around components and tools a...

Страница 15: ... and installed on the side of the device facing the barrier Power is supplied by the device Fig 5 Beacon box on device Holes on the entrance exit control terminal 1 Drill three holes in the device see figure below Two holes for installation on the device One hole for the cable duct Fig 6 Beacon box installation on entrance exit control terminal holes dimensions in mm 2 Open the beacon box to screw...

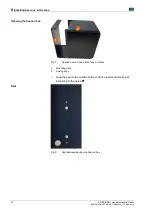
Страница 16: ...A SMART MOVE_Installation_110_ENG docx Opening the beacon box Fig 7 Opened beacon box without any contents 1 Mounting plate 2 Casing body 3 Glue the seal to the outside of the entrance exit control terminal according to the holes 1 Seal Fig 8 Seal between device and beacon box ...

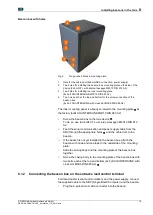
Страница 17: ...UNK M3X10 DIN 963 A2 4 Screw the beacon box to the lane device 2 To do so use two bolts CYL with internal hexagon M4X12 DIN 912 A2 5 Feed the serial communication and power supply cable from the SBC through the appropriate holes 1 and the cable duct to the beacon 6 If the beacon is not yet installed in the beacon box attach the beacon with hook and loop tape to the underside of the mounting plate ...

Страница 18: ...ctor into the preconfigured port on the SBC 3 Connect the open ends of the cable to the 5V supply of the SBC green cable 5V brown cable GND 8 1 3 Example Installing the beacon in the DCT casing body The second beacon box is located in the DCT casing body Power is supplied by a battery Fig 11 Beacon in DCT casing body 1 Attach the beacon box with hook and loop tape behind the acrylic glass panel of...

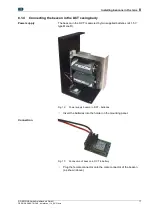
Страница 19: ...e DCT casing body Power supply The beacon in the DCT is powered by two supplied batteries 2x 1 5 V type Mono D Fig 12 Power supply beacon in DCT batteries Insert the batteries into the holder on the mounting panel Connection Fig 13 Connection of beacon in DCT to battery Plug the female connector onto the male connector of the beacon as shown above ...

Страница 20: ...etrofitting the IN and OUT devices with SMART MOVE It is possible to subsequently integrate SMART MOVE into your parking system To do so you require the corresponding licence You can request the license and the software update via the WinOperate application The devices are then configured for SMART MOVE through the appropriate software update Requesting a licence 1 In WinOperate open the Car park ...

Страница 21: ... in reverse order to that described for installation see Section 7 1 Installation 2 Disassemble the device into its individual parts For decommissioning and disassembly refer to the separate operator manuals of the devices 9 4 Disposal The SMART MOVE components consist of recyclable materials After correct disassembly separate recyclable materials according to their typology and recycle them ...

Страница 22: ... overview 20 DESIGNA Verkehrsleittechnik GmbH DESIGNA SMART MOVE_Installation_110_ENG docx 10 Version overview Version 1 00 07 2020 KS Creation of the document Version 1 10 09 2020 KS Adaptation to German version ...

Страница 23: ...Version overview 10 DESIGNA Verkehrsleittechnik GmbH 21 DESIGNA SMART MOVE_Installation_110_ENG docx ...

Отзывы: