manualshive.com logo in svg
background image

                                                                                                        -9 -                                           

For more information, visit www.desatech.com


DECORATIVE FACING 


  Any non-combustible material may be used for facing (glass, 

tile, brick, etc.) as long as the proper clearances are observed 

(Refer to the section on Clearances).  Louvered openings must 

not be obstructed and the louver assembly must remain 

removable for servicing. 

Use only heat-resistant, non-combustible mortar or adhesive 

when securing facing material. 


NOTE: Combustible material, such as wood, that has been 

fireproofed is NOT considered non-combustible. 


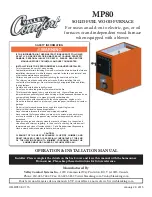
TERMINATION CAP AND TRANSITION BOX 

ASSEMBLY 

The termination cap must be twist-locked to the top of the 

transition box as shown below. 


ATTACHING TRANSITION BOX TO CHIMNEY 
 

Read these instructions thoroughly. Each installation is unique 

therefore careful planning is required. 


MASONRY CHIMNEY 

• 

Attach the masonry adapter to the chimney. Make 

sure the flex pipes are protruding out of the chimney 

for easy connection to the transition box. 

• 

Attach the flex pipes to the transition box with six 

sheet metal screws. Place the transition box over the 

adapter and secure with sheet metal screws. Refer to 

the figure below. 


• 

Maximum chimney size with transition adapter is 

13”x13”. Seal openings to prevent any water leakage. 


DESA CHIMNEY 


1. Attach the DESA chimney adapter to the listed factory built 

chimney.  Make sure the 3” flex pipes are protruding for easy 

connection to the transition box. 

2. Attach flex pipes to the transition box.  Secure flex pipes 

with three sheet metal screws. 

3. Secure transition box to the adapter with sheet metal 

screws. 

4. Seal openings to prevent leakage.  


STEP 1

STEP 3

STEP 2

SCREWS

(SIX)

3" PIPES

TRANSITION

BOX

VERTICAL

TERMINATION CAP

TERMINATION CAP 

PIPE

3" FLEX

INSERT

TOP

PIPE

COLLAR

SCREW

(SIX)

FLEX PIPE 


MASONRY CHIMNEY 


DESA CHIMNEY AND ADAPTOR

Содержание GW30B

Страница 1: ...valuable In addition to instructing you on how to install and maintain your appliance it also contains information that will enable you to obtain replacement parts or accessory items when needed Keep...

Страница 2: ...WITCH PG 4 5 GAS SUPPLY TESTING HOOK UP PG 5 6 SURROUND ASSEMBLY PG 6 8 PILOT ADJUSTMENT PG 7 9 GLASS PANEL REMOVAL PG 7 8 11 LOG INSTALLATION PG 8 12 BURNER FLAME ADJUSTMENT PG 8 13 TERMINATION CAP P...

Страница 3: ...in the absence of local codes with the National Electrical Code ANSI NFPA 70 1987 and CSA C22 2 Canadian Electrical Code for Canada The installation must conform to local codes or in the absence of lo...

Страница 4: ...high traffic areas or near furniture and draperies 2 Never obstruct the front opening of the appliance or the flow of combustion and ventilation air Keep control compartments accessible 3 Do not loca...

Страница 5: ...ated at the upper right corner of the surround as shown in the figure below Wires and toggle switches are supplied with the appliance 3 The wires must be routed through the lower right side of the ins...

Страница 6: ...owever consider installing an extra shut off valve outside the appliance s enclosure check with local codes where it can be accessed more conveniently with a key through a wall In conformance with loc...

Страница 7: ...hanging through the chimney attach each flex to the appropriate pipe of the insert The pre marked flex pipe is attached over the left pipe Exhaust Tighten the clamp over the flex pipe Repeat the proce...

Страница 8: ...stance of 3 8 to 1 2 from the pilot flame as shown below GLASS PANEL REMOVAL AND LOG SET INSTALLATION Before proceeding make sure gas control valve is in the OFF position 1 To open the louver assembly...

Страница 9: ...r switch is not fully depressed Replace the louver assembly in the reverse order of step 1 BURNER REMOVAL BEFORE PROCEEDING MAKE SURE THE ENTIRE UNIT IS COOL Remove the louver assembly Open the four l...

Страница 10: ...MASONRY CHIMNEY Attach the masonry adapter to the chimney Make sure the flex pipes are protruding out of the chimney for easy connection to the transition box Attach the flex pipes to the transition b...

Страница 11: ...ar appliance may be found on the rating plate located inside the appliance Refer to the parts list and diagrams when ordering replacement parts for your appliance Repair parts or accessory items may b...

Страница 12: ...11 For more information visit www desatech com...

Страница 13: ...res defective Pilot flame maybe too low or blowing high causing the valve safety to drop out Check to see if you have gas supply Hold regulator control valve in the PILOT position for 2 or 3 minutes t...

Страница 14: ...13 For more information visit www desatech com ACCESSORY PARTS LIST...

Страница 15: ...following qualifications 1 The gas appliance must be installed as per the DESA installation instructions and local building codes The use of components manufactured by others with this DESA gas appli...

Отзывы: