background image

SecurAccess SIP PMR – User Guide EN


33

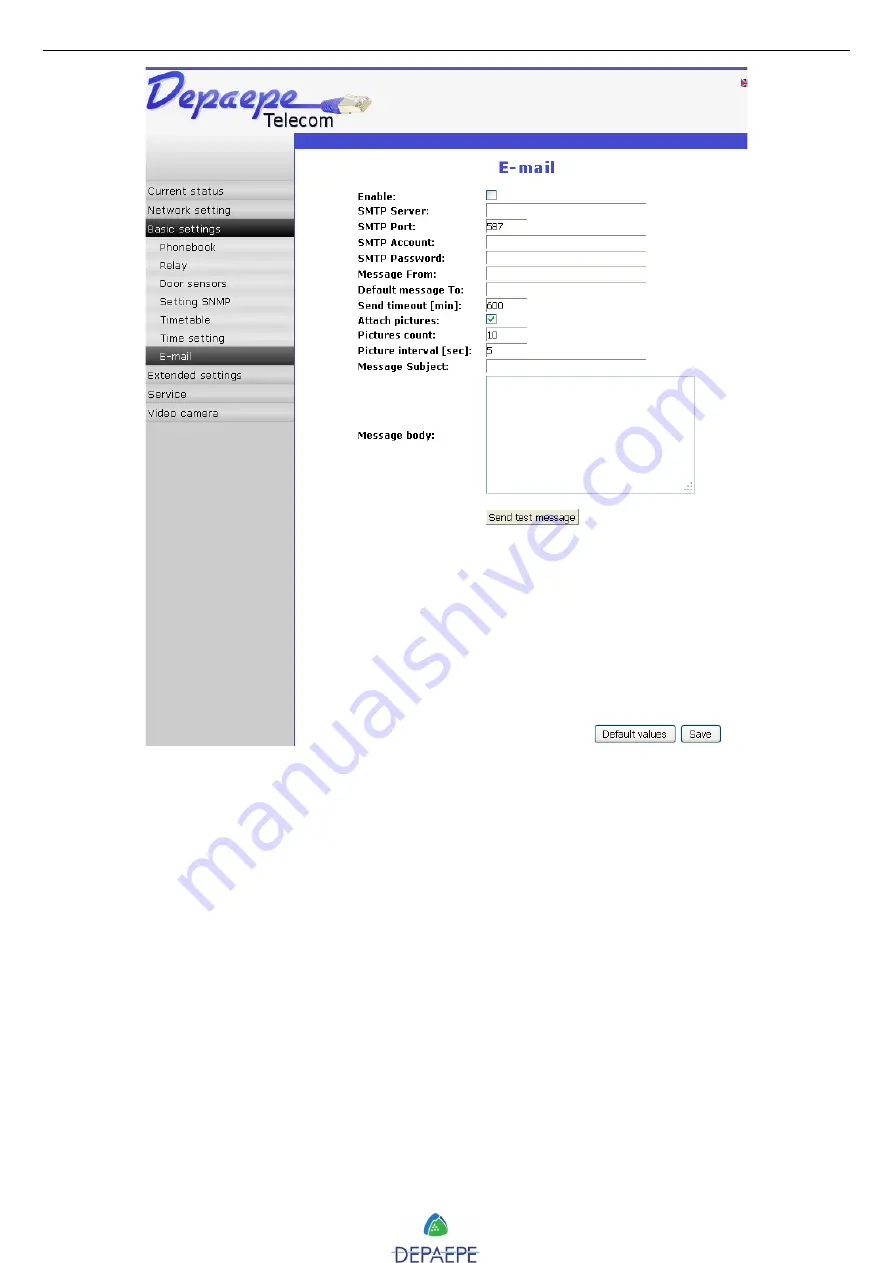
Enable

: mark to activate e-mails sending.

SMTP server: 

enter SMTP server IP address or domain name.

SMTP Port: 

only adjust in case of non-regular SMTP server setting. Usual value is 25.

SMTP account: 

if SMTP server authentication is required, enter the name for registration to this

server. Otherwise, leave this field empty.

SMTP password: 

password for registration to SMTP server.

Message from: 

e-mail sender to be mentioned in sent e-mails.

Default message to: 

e-mail address of the main recipient or a notified, for control message 

sending too.

Send timeout (min): 

period for which the doorphone will try to send an e-mail.

Attach pictures: 

mark to enable the attachment of one or more pictures taken during the 

ringing tone or the conversation.

Pictures count: 

enter the pictures number to be attached to an e-mail.

Pictures interval (sec): 

period between two pictures.

Message subject and body: 

enter the contents for sending message.

Click on ‘Send test message’ button to test settings.

Click on 

‘Save’

 button to save modifications.

Содержание 27112017

Страница 1: ...Ref 27112017 This product is designed and manufactured in France It can be connected to VoIP and ToIP servers This product is Hearing Aid Compatible Depaepe Tel 33 0 1 30 25 81 60 Fax 33 0 1 39 98 61...

Страница 2: ...H ACTIVATION 18 3 6 LOCAL DOOR LATCH ACTIVATION 18 3 7 VIDEO MONITORING 19 3 8 HEARING AID INDUCTION COIL 19 4 GENERAL PROGRAMMING 19 4 1 STANDARD SETTINGS 19 4 2 STANDARD FACTORY SETTINGS OVERVIEW 20...

Страница 3: ...TTINGS 38 6 5 VIDEO CODECS 39 6 6 VIDEO STREAMING 40 7 SERVICES 41 7 1 REBOOT 41 7 2 SAVE OR RESTORE CONFIGURATION 41 7 3 RESET TO FACTORY SETTINGS 42 7 4 FIRMWARE UPDATE 43 7 5 LOGFILE 43 7 6 G729 LI...

Страница 4: ...or a remote monitoring thanks to its built in camera with an IP videophone or with the dedicated PC software can adjust video and lightning settings for the camera and audio settings Those features do...

Страница 5: ...r thanks to the dedicated PC software Only the second relay can be used as a dry contact for driving an alarm an external camera a light or an auxiliary ringer 2 exit buttons can be connected to activ...

Страница 6: ...SecurAccess SIP PMR User Guide EN 6 COMPACT models without keypad Fixing screw Fixing screw Camera Loudspeaker Enlightened icons Dialling button Microphone...

Страница 7: ...SecurAccess SIP PMR User Guide EN 7 With or without keypad models Fixing screw Fixing screw Camera Loudspeaker Enlightened icons Dialling buttons Microphone Keypad Door button keypad model...

Страница 8: ...nsors Dialling buttons Programming switch 2x door latch relays 3 contacts NC Com NO RJ45 Ethernet Micro SD card Power supply 12V OUT Power supply 12V IN Installation line connection and configuration...

Страница 9: ...thernet Dialling buttons 2x exit button sensors 2x door latch relays 3 contacts NC Com NO Power supply 12V OUT Door button keypad model Installation line connection and configuration should be done by...

Страница 10: ...are here after is required Those ports are designed to be connected on a TRT3 TNV 3 network in accordance with EN 60950 amendments 1 to 11 specifications These two ways of power must not be simultane...

Страница 11: ...en disconnected contact Up to 60VA and 2A maximum TRT3 TNV 3 access Exit buttons sensors The SecurAccess SIP PMR is equipped with 2 relays sensors see pages 8 and next for connecting 2 exit buttons an...

Страница 12: ...SecurAccess SIP PMR User Guide EN 12 2 2 Drilling plan COMPACT models without keypad In mm Compact wall drilling plan...

Страница 13: ...SecurAccess SIP PMR User Guide EN 13 COMPACT models without keypad In mm Compact flush mount layout...

Страница 14: ...SecurAccess SIP PMR User Guide EN 14 With or without keypad models In mm Wall drilling plan...

Страница 15: ...SecurAccess SIP PMR User Guide EN 15 With or without keypad models In mm Flush mount layout...

Страница 16: ...off hook simply press any of the off hook memory buttons The unit will automatically turn to speakerphone mode and the number stored into its memory if any will be dialled out once the unit has been c...

Страница 17: ...dress replace by Eg 192 168 92 100 192 168 92 100 or speed dialling to call simply dial a speed dial number thanks to the keypad the unit will automatically turn to speakerphone mode and the 1st store...

Страница 18: ...vate door latches by clicking on key buttons in the bottom right corner of the screen To install and to set the dedicated Depaepe software for PC please see 8 Video pop up for PC p 44 Note a SecurAcce...

Страница 19: ...R is equipped with an induction coil so that a person wearing a hearing device can hear the conversation loudspeaker out This feature is permanently enabled no adjustment is required 4 General program...

Страница 20: ...Yes Timetable None Relay mode monostable Delay time 0 Run time 5 Source Relay 1 Synchronize delay 0 Active on call ignore Active button on http Yes Relay 2 Enable No Timetable None Relay mode monostab...

Страница 21: ...he IP address is 192 168 1 250 Your computer has to be on the same network segment that your phone in order to access to the setting page Contact your network administrator if you have any doubt 4 3 1...

Страница 22: ...isplay name the firmware version the buttons number options keypad camera the micro SD card the MAC address the IP address the SIP mode or P2P the registration status 4 3 2 Password web port and video...

Страница 23: ...to obtain valid network settings IP address Network mask Networks gateway DNS etc IP address if the doorphone cannot be connected to a DHCP server you must manually enter the network settings in this...

Страница 24: ...tion provided by IAP Password password for SIP server registration provided by IAP Send register mark to activate if necessary for Registration server and SIP server fields If you do not mark do not f...

Страница 25: ...and can be modified Enable SNMP mark to activate this protocol Community enter the SNMP user Admin address enter client IP address or domain name Variables in MIB tree set of organized informations ab...

Страница 26: ...8 programmable off hook and dialling buttons For each of the buttons numbers to be dialled when depressing one of them are stored in numbered forms from 1 to 8 called Phonebook E g button n 1 phonebo...

Страница 27: ...to field in the upper blue banner You can proceed in the same way for phonebooks of the other dialling buttons up to the tab 8 4 4 1 To simply dial one phone number To access dialling buttons phoneboo...

Страница 28: ...out the 1 call number field entry the phone number to be dialled when depressing the dialling button Note 1 in SIP server mode doorphone connected to a PABX if needed insert a 0 or a 9 before to dial...

Страница 29: ...g buttons phonebooks according to calendars timetables These calendars are weekly Every day of the week is configurable according to 3 active intervals We can create and name up to 10 different timeta...

Страница 30: ...ialling mode the same action is performed and so on Via the Extended settings page select Doorphone The doorphone page will appear and the Keyboard mode setting can be modified In the Keyboard mode se...

Страница 31: ...ext p27 To access another phonebook page click on the desired tab number or enter its number in the Goto field in the upper blue banner Note the first 8 phonebook forms from 1 to 8 allow to program th...

Страница 32: ...ick on Save button to save modifications To create or access another timetable page click on the desired tab number in the upper blue banner The used timetables are to be specified in fields of dialli...

Страница 33: ...e mail sender to be mentioned in sent e mails Default message to e mail address of the main recipient or a notified for control message sending too Send timeout min period for which the doorphone will...

Страница 34: ...y Timetable activate deactivate the relay by timetable control In the drop down menu select the timetable name you want to assign to the relay or None for no timetable control Relay mode Monostable th...

Страница 35: ...enter twice the same code in Code fields one for each of the sources On Off activation deactivation of the code with its source Timetable activate deactivate the code by timetable control In the drop...

Страница 36: ...ark to deactivate incoming calls on the doorphone Ringing cycles count enter number from 1 to 9 setting for chain dialling It defines the repetition number up to 9 times of the dialling sequence of ph...

Страница 37: ...y default Daylight upper threshold adjusted by default IP VarioBell Number of buttons on basic module Expansion buttons count Keyboard connected Click on Save button to save modifications 6 2 Audio se...

Страница 38: ...ustic tones volume Relay running tone volume the loudspeaker volume can be increased during the relay 1 is activated in dB Click on Save button to save modifications 6 3 Audio codecs Via the Extended...

Страница 39: ...ct the image quality Brightness Contrast Colour Hue Gamma can be adjusted Power line frequency select the scan rate of the doorphone camera Sharpness Backlight compensation can be adjusted Note camera...

Страница 40: ...ing The SecurAccess SIP PMR video streaming can be permanently watched You can enable the video in H264 from the doorphone with the RTSP protocol on port 554 To receive this video you need some regula...

Страница 41: ...SP server video or audio or video audio Multicast address enter IP address that allows RTP packets sending to selected multicast address JPEG image quality enter video coding quality in Click on Save...

Страница 42: ...one IP settings and restore those by default by switching from OFF to ON the switch 2 located on the PCB see 4 1 p 19 and then reboot the doorphone disconnect and reconnect the Ethernet cable PoE or t...

Страница 43: ...se the firmware file then click on Save button to perform the update Click on Save button to start the upgrade 7 5 Logfile Via the Service page select Logfile Start enhanced log click on Start button...

Страница 44: ...y watch or only during call activity the doorphone video 8 1 Installation Network the SecurAccess SIP PMR doorphone and the host computer shall be connected to the same network In P2P mode the doorpho...

Страница 45: ...vate the door latch relay n 1 to activate the door latch relay n 2 application icon in the taskbar 8 3 Configuration Web interface description DoorPhone IP 1 up to 4 fill out fields to be connected to...

Страница 46: ...on its icon will display the video In SIP server mode the doorphone must be registered in SIP In software settings menu you had to enter the doorphone IP address the user name login and the password T...

Страница 47: ...5 and IK09 Working temperature range 20 C up to 50 C Celsius Door latch relay contact 60VA 2A max External voltage supply 12V DC 1000 mA PoE IEEE 802 3af Current consumption 520mA with 12V external vo...

Страница 48: ...mutual recognition of their conformity as well as the harmonised standards 3 1 a articles for health and safety of user EN 60950 3 1 b articles for electro magnetic compatibility EN 55022 et EN 55024...

Страница 49: ...warranty policy Depaepe Telecom does not warrant that the SecurAccess SIP PMR will perform perfectly with all the equipments available on the market The warranty only applies if the product is instal...

Отзывы: