


8
Connecting the RS-422/485 Adapter to the PowerScout
High voltage MAY BE PRESENT. Risk of electric shock. Life threatening voltages may be present.
Qualified personnel only.
Haute tension peut être présente. Risque de choc électrique. Tensions dangereuses peuvent
être présentes. Personnel qualifié uniquement.
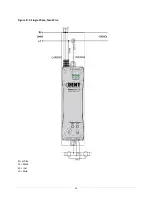
To complete the connection between the PowerScout and the computer, the three wires coming from
the RS-422/485 adapter are plugged into the PowerScout.
1.
Insert each white ferrule into the appropriate RS-422/485 connection on the PowerScout. The
red wire inserts in (+), the black wire in (-) and the green wire in GND.
USB
connector
port
Ferrule connectors
Figure III-2: RS-422/485 Adapter
This completes connecting the PowerScout to the computer using the RS-422/485 adapter.
-
+
GND
Содержание PowerScout 3
Страница 19: ...15 Figure IV 1 Single Phase Two Wire N white L1 black L2 red L3 blue ...
Страница 20: ...16 Figure IV 2 Single Phase Three Wire N white L1 black L2 red L3 blue ...
Страница 21: ...17 Figure IV 3 Three Phase Three Wire Delta N white L1 black L2 red L3 blue ...
Страница 22: ...18 Figure IV 4 Three Phase Four Wire Wye N white L1 black L2 red L3 blue ...
Страница 23: ...19 Figure IV 5 Three Phase Four Wire Delta N white L1 black L2 red L3 blue ...


