Dell S2810dn Скачать руководство пользователя страница 186

186

Loading Print Media

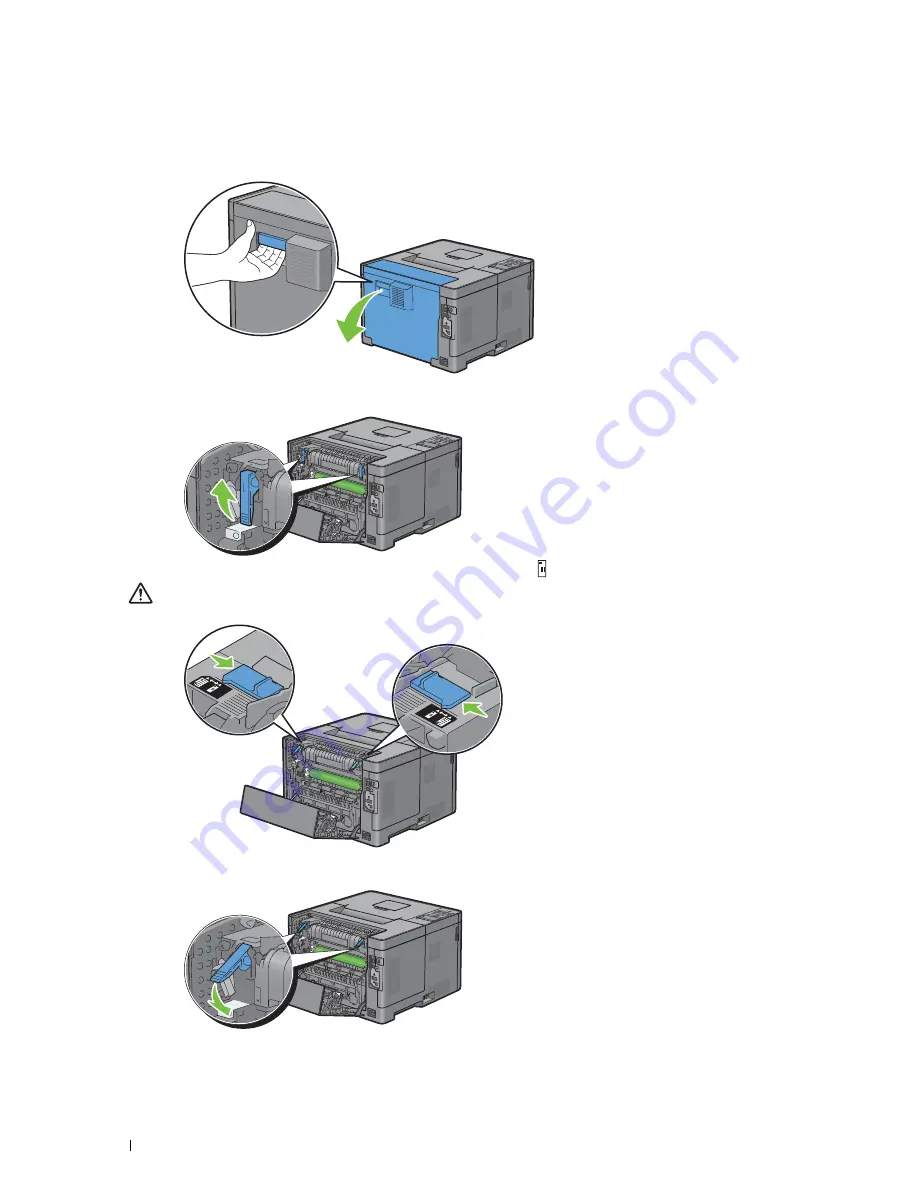
To Set the Printer to the Envelope Mode

1

Pull the rear cover handle to open the rear cover. 

2

Lift the levers on both sides of the fusing unit.

3

Slide the envelope switches on both sides of the fusing unit to the 

 position.


WARNING: 

The fusing unit is hot. Do not touch it, doing so may cause burns.

4

Press down the levers on both sides of the fusing unit.

Содержание S2810dn

Страница 1: ...Dell Smart Printer S2810dn User s Guide Regulatory model Dell S2810dn ...

Страница 2: ......

Страница 3: ... 20 Math Library 20 libtiff 20 Zlib 21 1 Dell Smart Printer S2810dn User s Guide 23 Conventions 23 2 Finding Information 25 3 Product Features 27 4 About the Printer 29 Front and Rear Views 29 Front View 29 Rear View 30 Space Requirements 31 Operator Panel 31 Additional Components 32 Optional Accessories 32 Non bundled Items 32 Securing the Printer 32 Ordering Supplies 33 ...

Страница 4: ...ter Configuration Web Tool 50 Reconfiguring the Wireless Settings Using Dell Printer Easy Install 51 Reconfiguring the Wireless Settings Using Configuration Tool 51 6 Connecting Your Printer 53 Turning on the Printer 54 Configuring Initial Settings on the Operator Panel 54 Connecting to a Computer or a Network 56 Connecting to a Computer Using the USB Cable Direct Connection 56 Connecting to a Net...

Страница 5: ... 79 Installing the Drivers and Software 79 Adding a Printer on Mac OS X 10 5 Mac OS X 10 6 OS X 10 7 OS X 10 8 OS X 10 9 or OS X 10 10 79 Configuring Settings 80 11 Installing Printer Drivers on Linux Computers CUPS 83 Operation on Red Hat Enterprise Linux 6 Desktop 83 Setup Overview 83 Installing the Printer Driver 83 Setting Up the Queue 83 Setting the Default Queue 84 Specifying the Printing Op...

Страница 6: ...rs or Names 94 Printing a Panel Settings Report 94 Changing the Language 95 When Using the Operator Panel 95 When Using the Tool Box 95 Setting the Power Saver Timer Option 95 13 Dell Printer Configuration Web Tool 97 Overview 97 Setting Up the Dell Printer Configuration Web Tool 98 Setting Up From Web Browser 98 Setting Up From Operator Panel 98 Starting the Dell Printer Configuration Web Tool 99...

Страница 7: ...ngs 107 Print Server Settings 116 Copy Printer Settings 131 Print Volume 132 Tray Settings 133 14 Understanding the Printer Menus 135 Report List 135 Printer Settings 135 Panel Settings 135 PCL Fonts List 135 PCL Macros List 135 PS Fonts List 135 PDF Fonts List 135 Job History 135 Error History 135 Print Meter 136 Demo Page 136 Stored Documents 136 Printing a Report List Using the Operator Panel 1...

Страница 8: ...el Lock 173 Resetting Defaults 173 When Using the Operator Panel 173 15 Print Media Guidelines 175 Paper 175 Recommended Paper 175 Unacceptable Paper 175 Selecting Paper 175 Selecting Pre Printed Media and Letterheads 176 Selecting Pre Punched Paper 176 Envelopes 177 Labels 177 Storing Print Media 178 Identifying Print Media and Specifications 178 Supported Paper Sizes 179 Supported Paper Types 17...

Страница 9: ...PF 190 Using the MPF 190 Linking Trays 190 Printing 191 17 Printing 193 Tips for Successful Printing 193 Tips on Storing Print Media 193 Avoiding Paper Jams 193 Sending a Job to Print 193 Canceling a Print Job 194 Canceling a Job From the Operator Panel 194 Canceling a Job From a Computer Running Windows Operating System 194 Duplex Printing 195 Duplex Printing With Duplex Unit 195 Using Booklet Pr...

Страница 10: ... Cloud Print Service 206 Registering the Printer to the Google Cloud Print Service 207 Sharing the Printer Using the Google Cloud Print Service 208 Canceling Registration to Google Cloud Print 208 Printing via Google Cloud Print 208 Printing a Report Page 209 Printer Settings 209 Using the Operator Panel to Change the Printer Settings 210 Using the Dell Printer Configuration Web Tool to Change the...

Страница 11: ...tes 227 Managing Certificates 227 Preparing to Manage Certificates 227 Creating and Download a Certificate Signing Request CSR 228 Importing a Digital Certificate 229 Setting a Digital Certificate 229 Confirming the Settings of a Digital Certificate 230 Deleting a Digital Certificate 230 Exporting a Digital Certificate 231 Setting the Features 231 Setting the SSL use Server Certificate HTTP IPP 23...

Страница 12: ...he Status of Supplies 245 Conserving Supplies 245 Ordering Supplies 245 Storing Print Media 246 Storing Consumables 246 Replacing the Toner Cartridge 247 Removing the Toner Cartridge 247 Installing a Toner Cartridge 248 Replacing the Drum Cartridge 249 Removing the Drum Cartridge 249 Installing a Drum Cartridge 249 Replacing the Fusing Unit the Transfer Unit and the Retard Roller 252 Replacing the...

Страница 13: ...Unit 273 If status code 050 130 appears 273 Clearing Paper Jams From the Duplexer 275 If status code 050 131 appears 276 Clearing Paper Jams From the Regi Roll 276 If status code 050 142 appears 277 Clearing Paper Jams From the Optional 550 Sheet Feeder 279 If status code 050 132 appears 279 Clearing Paper Jams From the Trays 282 When status code 050 134 appears 282 When status code 050 133 appear...

Страница 14: ...05 Jam Alignment Problems 305 The top and side margins are incorrect 306 Images are skewed 306 Tray1 Optional 550 Sheet Feeder Misfeed Jam 307 MPF Misfeed Jam 308 Regi Jam Exit Sensor On JAM 308 Exit Jam Exit Sensor Off JAM 309 Tray1 Optional 550 Sheet Feeder Multi feed Jam 309 MPF Multi feed Jam 310 Noise 310 Digital Certificate Problems 311 Problems With Installed Optional Accessories 312 Wi Fi ...

Страница 15: ...Template Last Updated 2 7 2007 Contents 15 Recycling Information 316 Contacting Dell 316 ...

Страница 16: ...16 Contents Template Last Updated 2 7 2007 ...

Страница 17: ...17 Before Beginning Notes Cautions and Warnings 19 1 Dell Smart Printer S2810dn User s Guide 23 2 Finding Information 25 3 Product Features 27 4 About the Printer 29 ...

Страница 18: ...18 ...

Страница 19: ...es may be used in this document to refer to either the entities claiming the marks and names or their products Dell Inc disclaims any proprietary interest in trademarks and trade names other than its own About License XML Paper Specification XPS This product may incorporate intellectual property owned by Microsoft Corporation The terms and conditions upon which Microsoft is licensing such intellec...

Страница 20: ...91 Communications of the ACM jpeg documents gz tells where to obtain the JPEG standard and documents about JPEG related file formats jfif ps gz is a PostScript file of the JFIF JPEG File Interchange Format format specification jfif txt gz is a plain text transcription of the JFIF specification it s missing a figure so use the PostScript version if you can TIFFTechNote2 txt gz is a draft of the pro...

Страница 21: ...ermission is granted to anyone to use this software for any purpose including commercial applications and to alter it and redistribute it freely subject to the following restrictions 1 The origin of this software must not be misrepresented you must not claim that you wrote the original software If you use this software in a product an acknowledgment in the product documentation would be appreciate...

Страница 22: ...22 Notes Cautions and Warnings ...

Страница 23: ...ned using Microsoft Windows 7 unless stated otherwise Conventions The following describe the meaning of the symbols and fonts used in this manual Bold texts Names of hardware button on the operator panel Screen names on the LCD panel Menus commands windows or dialog boxes displayed on the computer screen Texts in Courier New font Menus and messages displayed on the LCD panel Characters entered fro...

Страница 24: ...24 Dell Smart Printer S2810dn User s Guide ...

Страница 25: ... Read and follow all safety instructions in the Important Information prior to setting up and operating your printer Express Service Code and Service Tag The Express Service Code and Service Tag are located inside the front cover of your printer Latest drivers for my printer Documentation for my printer Go to dell com support Answers to technical service and support questions dell com support prov...

Страница 26: ...26 Finding Information ...

Страница 27: ...per by setting from the printer driver This feature helps save paper Using the Stored Print Feature Stored Print The Stored Print feature allows you to temporarily store your print data in the printer memory so you can print it later When printing confidential jobs use the number pad to enter the password You can effectively manage your time when you print confidential data or large volume data at...

Страница 28: ...28 Product Features ...

Страница 29: ...10dn Front and Rear Views Front View NOTE Extend the output tray extension to prevent the printed paper from falling off the printer 1 Operator Panel 5 Optional 550 Sheet Feeder Tray2 2 Output Tray Extension 6 Toner Cartridge 3 Multipurpose Feeder MPF 7 Drum Cartridge 4 Tray1 8 Front Cover 3 4 5 7 6 8 1 2 ...

Страница 30: ... Printer Rear View 1 Left Side Cover 7 Chute 2 Power Switch 8 Duplex Unit 3 Ethernet Port 9 Transfer Unit 4 USB Port 10 Fusing Unit 5 Wireless Adapter Socket 11 Rear Cover 6 Power Connector 1 2 4 3 5 6 8 9 10 11 7 ...

Страница 31: ...nd optional accessories and for proper ventilation Operator Panel For more information on the operator panel see About the Operator Panel 400 mm 15 75 inches 273 mm 10 75 inches 400 mm 15 75 inches 438 mm 17 24 inches 600 mm 23 62 inches 400 mm 15 75 inches 410 mm 16 14 inches 100 mm 3 94 inches ...

Страница 32: ...owing items are required for connecting the printer to a computer or a network Please purchase them as needed USB cable Ethernet cable Securing the Printer To protect your printer from theft you can use the optional Kensington lock Attach the Kensington lock to the security slot on your printer For details see the operating instructions supplied with the Kensington lock Security Slot Security Slot...

Страница 33: ...annot find the icon on your desktop a Right click DLRMM EXE under x abc Dell Printers Additional Color Laser Software Reorder where x abc is the location where the printer software is installed b Choose Send To from the drop down menu and then click Desktop create shortcut on the submenu The Dell Supplies Management System window appears You can also launch the Dell Supplies Management System by c...

Страница 34: ...34 About the Printer ...

Страница 35: ...nal Accessories 37 6 Connecting Your Printer 53 7 Setting the IP Address 61 8 Loading Paper 65 9 Installing Printer Drivers on Windows Computers 67 10 Installing Printer Drivers on Macintosh Computers 79 11 Installing Printer Drivers on Linux Computers CUPS 83 ...

Страница 36: ...36 ...

Страница 37: ...isconnect all cables from the rear of the printer before starting this task NOTE The Software and Documentation disc also contains video instructions In the main menu window of Dell Printer Easy Install click Installation Video 1 Ensure that the printer is turned off and then disconnect all cables from the rear of the printer 2 Remove the tape and the bag holding the screws NOTE Save the screws as...

Страница 38: ...les at the bottom of the printer Gently lower the printer onto the optional 550 sheet feeder WARNING Two people are required to lift the printer WARNING Be careful not to pinch your fingers when lowering the printer onto the optional 550 sheet feeder 9 Secure the optional 550 sheet feeder to the printer by tightening the two screws provided with the feeder using a coin or similar object ...

Страница 39: ...ter unplug the power cable and re install the optional 550 sheet feeder 15 After loading paper in the optional 550 sheet feeder specify the paper type from the operator panel a Press the Menu button b Press the button until Tray Settings is highlighted and then press the Set button c Press the button until Tray 2 is highlighted and then press the Set button d Press the button until Paper Type is h...

Страница 40: ... and Printers 2 Right click the printer icon of the Dell Printer S2810dn and then select Printer properties 3 Click the Configuration tab and then select Bi Directional Setup 4 Select Get Information from Printer and then click OK 5 Click Apply and then click OK 6 Close the Devices and Printers dialog box Windows Vista Windows Vista x64 1 Click Start Control Panel Hardware and Sound Printers 2 Rig...

Страница 41: ...ect Bi Directional Setup 4 Select Get Information from Printer and then click OK 5 Click Apply and then click OK 6 Close the Devices and Printers dialog box Windows Vista Windows Vista x64 1 Click Start Control Panel Hardware and Sound Printers 2 Right click the printer icon of the Dell Printer S2810dn and then select Properties 3 Click the Configuration tab and then select Bi Directional Setup 4 ...

Страница 42: ...he Dell Printer S2810dn and then select Printer properties 3 Click the Device Setting tab and then select Available in Tray2 drop down menu 4 Click Apply and then click OK 5 Close the Devices and Printers dialog box Windows 7 Windows 7 x64 Windows Server 2008 R2 x64 1 Click Start Devices and Printers 2 Right click the printer icon of the Dell Printer S2810dn and then select Printer properties 3 Cl...

Страница 43: ...s adapter is installed you cannot use IEEE 802 1x authentication and or the Ethernet port for a wired connection Verifying the Contents of the Box Item Specification Connectivity Technology Wireless Compliant Standards IEEE 802 11b 802 11g and 802 11n Bandwidth 2 4 GHz Data Transfer Rate IEEE 802 11n 65 Mbps IEEE 802 11g 54 48 36 24 18 12 9 and 6 Mbps IEEE 802 11b 11 5 5 2 and 1 Mbps Security 64 4...

Страница 44: ...dapter with the four holes and insert the adapter NOTE Ensure that the adapter is fully inserted and secured 4 Turn on the printer NOTE If a message displays telling you to make initial setup on the LCD panel always do as instructed 5 Print the printer settings report to confirm that the wireless adapter is installed correctly For details about how to print a printer settings report see Report Lis...

Страница 45: ... wireless router supports WPS 3 WPS 2 0 compliant WPS 2 0 works on access points with the following encryption types Mixed mode PSK WPA PSK AES WPA2 PSK AES WPA PSK TKIP Open No Security NOTE The optional wireless adapter must be installed on the printer For information on how to install a wireless adapter see Installing the Optional Wireless Adapter NOTE If Panel Lock Control is set to Enable you...

Страница 46: ...Software and Documentation disc provided with the printer into your computer The Dell Printer Easy Install program launches automatically 2 Click Main Menu 3 Click Change 4 Select Configure the Wi Fi settings and then click Next 5 Follow the on screen instructions and configure the wireless settings of the printer ...

Страница 47: ...he message Please wait WPS Setting is displayed and start the WPS PBC on the wireless LAN access point Registrar within 2 minutes 8 When the WPS operation is successful and the printer is rebooted wireless LAN connection setting is completed WPS PIN The PIN code of WPS PIN can only be configured from the operator panel NOTE WPS PIN Wi Fi Protected Setup Personal Identification Number is a method t...

Страница 48: ...t System screen appears 9 Turn off the printer and turn it on again to apply the settings Wireless LAN connection setting is complete Manual SSID Setup 1 Press the Menu button 2 Press the button until Admin Settings is highlighted and then press the Set button 3 Press the button until Network is highlighted and then press the Set button 4 Press the button until Wi Fi is highlighted and then press ...

Страница 49: ...ion Web Tool NOTE For details about using WPA Enterprise AES WPA2 Enterprise AES or Mixed Mode Enterprise see Using Digital Certificates 1 Ensure that the printer is turned off and the wireless adapter is connected to the printer 2 Connect the printer to the network with an Ethernet cable For details about how to connect the Ethernet cable see Connecting to a Computer or a Network 3 Turn on the pr...

Страница 50: ...e Optional Wireless Adapter 1 Check the IP address of the printer For details about how to check the IP address of the printer see Verifying the IP Settings 2 Launch the Dell Printer Configuration Web Tool by entering the IP address of the printer in your web browser 3 Click Print Server Settings 4 Click Print Server Settings tab 5 Click Wi Fi 6 Change the wireless settings of the printer 7 Reboot...

Страница 51: ...pears 4 Select Configure the Wi Fi settings and then click Next 5 Follow the on screen instructions and change the wireless setting of the printer Reconfiguring the Wireless Settings Using Configuration Tool 1 Click Start All Programs Dell Printers Dell Smart Printer S2810dn Configuration Tool The Configure Printer window of the Dell Printer Easy Install program appears 2 Select Configure the wire...

Страница 52: ...52 Installing Optional Accessories ...

Страница 53: ...to a computer or device the following specification must be met for each of the connection type Connection type Connection specifications Ethernet 10 Base T 100 Base TX 1000 Base T Wireless optional IEEE 802 11b 802 11g 802 11n USB USB 2 0 1 Ethernet port 2 USB port 3 Wireless adapter socket 1 2 3 ...

Страница 54: ...ge time zone clock date and time when you turn on the printer for the first time When you turn the printer on the wizard screen to perform the initial setup appears on the operator panel Follow the steps below to set the initial settings NOTE If you do not start configuring the initial settings the printer automatically restarts in 3 minutes After that you can set the following initial setup by en...

Страница 55: ...Belgrade Berlin Bratislava Brussels Budapest Copenhagen Douala Libreville Luanda Madrid Paris Prague Rome Sarajevo Skopje Stockholm Tunis Vienna Warsaw Zagreb Windhoek UTC 02 00 Amman Athens Beirut Bucharest Cairo Damascus Harare Helsinki Istanbul Jerusalem Johannesburg Kaliningrad Kiev Kinshasa Minsk Nicosia Riga Sofia Tripoli Palestine UTC 03 00 Addis Ababa Aden Antananarivo Baghdad Comoro Islan...

Страница 56: ...e sure to turn off the printer Connecting to a Computer Using the USB Cable Direct Connection A local printer is a printer which is directly connected to your computer using the USB cable If your printer is connected to a network instead of your computer skip this section and go to Connecting to a Network Using the Ethernet Cable 1 Connect the smaller USB connector into the USB port at the rear of...

Страница 57: ...printer based on the connection method between the computer and the printer and install the drivers and software to your computer Before starting the basic setup make sure that the printer is turned off and ensure the cable connection as follows To set up the printer using the wireless connection connect the optional wireless adapter and disconnect the Ethernet cable from the printer The printer w...

Страница 58: ... the screen and then click Search Type Run in the search box click Apps for Windows 8 and Windows Server 2012 only and then click Run Type D setup_assist exe where D is the drive letter of the optical drive and then click OK 2 Turn on the printer 3 Wait until the screen changes or click Next Follow the instructions displayed on the screen 4 Click Finish to exit the wizard when the Ready to Print s...

Страница 59: ...ter The Dell Printer Easy Install program launches automatically 2 Click Main Menu The Main Menu screen appears 3 Turn on the printer 4 Click Setup 5 Follow the instructions displayed on the screen 6 Click Finish to exit the wizard when the Ready to Print screen appears 7 Eject the Software and Documentation disc ...

Страница 60: ...60 Connecting Your Printer ...

Страница 61: ...considered as an advanced function and is normally done by a system administrator NOTE When you assign an IP address manually in IPv6 mode use the Dell Printer Configuration Web Tool To display the Dell Printer Configuration Web Tool use the link local address To confirm the link local address print a printer settings report and check the Link Local Address under Network Wired or Network Wireless ...

Страница 62: ...work is highlighted and then press the Set button 4 Press the button until TCP IP is highlighted and then press the Set button 5 Press the button until IPv4 is highlighted and then press the Set button 6 Press the button until Get IP Address is highlighted and then press the Set button 7 Press the button until Panel is highlighted and then press the Set button NOTE If the message This Setting Beco...

Страница 63: ...ton until Gateway Address is highlighted and then press the Set button 17 Repeat steps 10 to 12 to set the Gateway Address 18 Turn off the printer and then turn it on again When Using the Tool Box 1 Click Start All Programs Dell Printers Dell Smart Printer S2810dn Tool Box The Tool Box opens 2 Click the Printer Maintenance tab 3 Select TCP IP Settings from the list at the left side of the page The...

Страница 64: ...d on the operator panel Verifying the Settings Using Printer Settings Report 1 Print the printer settings report For details about how to print a printer settings report see Report List 2 Verify the correct IP address subnet mask and gateway address are listed in the printer settings report under Network Wired or Network Wireless If the IP address shows 0 0 0 0 the factory default an IP address ha...

Страница 65: ...ocumentation disc also contains video instructions In the main menu window of Dell Printer Easy Install click Installation Video 1 Pull the tray out of the printer about 200 mm 2 Hold the tray with both hands and remove it from the printer 3 Adjust the paper guides NOTE Extend the front side of the tray when you load Legal size paper ...

Страница 66: ... tray by pinching the length guide and sliding it until it rests lightly against the edge of the paper 7 After confirming that the guides are securely adjusted insert the tray into the printer NOTE If the front side of the tray is extended the tray protrudes when it is inserted into the printer 8 On the operator panel press the or button until the desired paper size is highlighted and then press t...

Страница 67: ... Start Control Panel 3 Select System and Security 4 Click Allow a program through Windows Firewall 5 Click Change settings Allow another program 6 Check Browse 7 Type D setup_assist exe where D is the drive letter of the optical drive in the File name text box and then click Open 8 Click Add and then click OK Starting Dell Printer Easy Install 1 Insert the Software and Documentation disc provided ...

Страница 68: ... then click Run Type D setup_assist exe where D is the drive letter of the optical drive and then click OK 2 Click Main Menu The main menu window appears USB Cable Connection Setup NOTE If you are connecting the printer to a network see Network Connection Setup For installing PCL and PS printer driver 1 Start the Dell Printer Easy Install program following the procedures shown in Starting Dell Pri...

Страница 69: ...the wizard when the Ready to Print screen appears If you want to verify installation click Print Test Page before clicking Finish For installing XML Paper Specification XPS printer driver NOTE XML Paper Specification XPS driver is supported on the following operating systems Windows Vista Windows Vista 64 bit Edition Windows Server 2008 Windows Server 2008 64 bit Edition Windows Server 2008 R2 Win...

Страница 70: ... 11 As the driver installation is completed click Print a test page to verify installation 12 Click Finish Windows Server 2008 or Windows Server 2008 64 bit Edition NOTE You must log in as an administrator 1 Extract the following zip file to your desired location D Drivers XPS Win_7Vista XPS V3_S2810dn zip where D is the drive letter of the optical drive 2 Click Start Control Panel Hardware and So...

Страница 71: ...do not share your printer select Do not share this printer If you share your printer select Share this printer so that others on your network can find and use it 12 Click Next Installation starts 13 As the driver installation is completed click Print a test page to verify installation 14 Click Finish Windows 8 Windows 8 64 bit Edition Windows 8 1 Windows 8 1 64 bit Edition Windows Server 2012 or W...

Страница 72: ... following the procedures shown in Starting Dell Printer Easy Install 2 In the main menu window of Dell Printer Easy Install click Connect 3 Select Wireless or Ethernet Connection and then click Next 4 Select the printer you want to install from the printer list and then click Next If the target printer is not displayed on the list click the Refresh button to refresh the list or click add printer ...

Страница 73: ...ification XPS driver is supported on the following operating systems Windows Vista Windows Vista 64 bit Edition Windows Server 2008 Windows Server 2008 64 bit Edition Windows Server 2008 R2 Windows 7 Windows 7 64 bit Edition Windows 8 Windows 8 64 bit Edition Windows 8 1 Windows 8 1 64 bit Edition Windows Server 2012 and Windows Server 2012 R2 Windows Vista or Windows Vista 64 bit Edition 1 Extrac...

Страница 74: ...extracted folder in step 1 10 Click OK 11 Select your printer name and click Next 12 To change the printer name enter the printer name in the Printer name box and then click Next To use this printer as the default printer select the Set as the default printer check box and then click Next 13 If you do not share your printer select Do not share this printer If you share your printer select Share th...

Страница 75: ...r 5 Select printer or click The printer that I want isn t listed When you select your printer go to step 8 When you click The printer that I want isn t listed go to step 6 6 Select Add a printer using a TCP IP address or host name and then click Next 7 Select TCP IP Device from Device type and enter the IP address for Hostname or IP address and then click Next If the User Account Control dialog bo...

Страница 76: ...re this printer so that others on your network can find and use it Click Next 13 As the driver installation is completed click Print a test page to verify installation To use this printer as the default printer select the Set as the default printer check box 14 Click Finish Use the Dell Printer Configuration Web Tool to monitor the status of your network printer without leaving your desk You can v...

Страница 77: ...ers 2 Right click the printer icon and select Sharing 3 Click Change sharing options The message Windows needs your permission to continue appears 4 Click Continue 5 Select the Share this printer check box and then type a name in the Share name text box 6 Click Additional Drivers and select the operating systems of all network clients that print to the printer 7 Click OK Windows Server 2008 or Win...

Страница 78: ...browse Network or My Network Places Find the host name of the server and the shared name you assigned to the printer After you have checked that the printer is shared use methods such as Windows Point and Print to use the shared printer from a network client NOTE If the OS bit editions 32 64 bit edition differ between a print server and a client computer you need to manually add the printer driver...

Страница 79: ...hen click OK For OS X 10 7 10 8 OS X 10 9 and OS X 10 10 Type the administrator s name and password and then click Install Software 11 When the installation is complete click Close Adding a Printer on Mac OS X 10 5 Mac OS X 10 6 OS X 10 7 OS X 10 8 OS X 10 9 or OS X 10 10 When Using a USB connection 1 Turn on the printer 2 Connect the USB cable between the printer and the Macintosh computer The pr...

Страница 80: ... X 10 7 and OS X 10 8 Open the System Preferences and click Print Scan For OS X 10 9 and OS X 10 10 Open the System Preferences and click Printers Scanners 4 Click the Plus sign select Add Printer or Scanner Add Other Printer or Scanner for OS X 10 7 and select Default For Mac OS X 10 5 and Mac OS X 10 6 just click the Plus sign and select Default 5 Select the printer connected via Bonjour from th...

Страница 81: ...click Options Supplies 3 For Mac OS X 10 5 Mac OS X 10 6 OS X 10 7 and OS X 10 8 Select Driver and select the options that have been installed in the printer and then click OK For OS X 10 9 and OS X 10 10 Select Options and select the options that have been installed in the printer and then click OK ...

Страница 82: ...82 Installing Printer Drivers on Macintosh Computers ...

Страница 83: ... Specify the printing options Installing the Printer Driver 1 Select Applications System Tools Terminal 2 Type the following command in the terminal window For the 32 bit architecture For the 64 bit architecture The printer driver is installed Setting Up the Queue To execute printing you must set up the print queue on your workstation For Red Hat Enterprise Linux 6 Desktop 1 Open the URL http loca...

Страница 84: ... queue in the print dialog box However sometimes you can print only from the default queue depending on the application for example Mozilla In these cases before you start printing set queue you want to print to as the default queue For information on specifying the default queue see Setting the Default Queue Setting the Default Queue 1 Select Applications System Tools Terminal 2 Type the followin...

Страница 85: ...p 11 Setup Overview SUSE Linux Enterprise Desktop 11 1 Install the printer driver 2 Set up the print queue 3 Specify the default queue 4 Specify the printing options Installing the Printer Driver 1 Select Computer More Applications and select GNOME Terminal on the Application Browser 2 Type the following command in the terminal window For the 32 bit architecture su Type the administrator password ...

Страница 86: ...rotocol from Access Network Printer or Printserver Box via d Type the IP address of the printer in IP Address or Host Name e Select Dell in the Select the printer manufacturer drop down menu f Click OK The Add New Printer Configuration dialog box appears g Select Dell Printer S2810dn vx x PS Dell Dell_Printer S2810dn ppd gz from the Assign Driver list NOTE You can specify the printer name in Set N...

Страница 87: ... and select Printer The Printer Configurations dialog box opens 4 Click Edit A dialog box to modify the specified queue opens 5 Confirm that the printer you want to set is selected in the Connection list 6 Select the Default Printer check box 7 Confirm the settings and click OK Specifying the Printing Options You can specify the printing options such as 2 sided printing 1 Open a web browser 2 Type...

Страница 88: ... for the same model 4 Type the following command in the terminal window The printer driver is uninstalled Operation on Ubuntu 12 04 LTS Setup Overview 1 Install the printer driver 2 Set up the print queue 3 Specify the default queue 4 Specify the printing options Installing the Printer Driver 1 Click Dash Home and enter terminal in the Search text box 2 Click Terminal in the Applications category ...

Страница 89: ...me of the printer in the Name box in the Add Printer window and click Continue You can optionally specify the location and description of the printer for further information If you want to share the printer select the Share This Printer check box 7 Select Dell from the Make menu and click Continue 8 Select Dell Printer S2810dn vXXXX PS from the Model menu and click Add Printer The setup is complet...

Страница 90: ... Click the desired setting item specify the required settings and click Set Default Options The message Printer xxx default options have been set successfully appears The setting is complete Uninstalling the Printer Driver 1 Click Dash Home and enter terminal in the Search text box 2 Click Terminal in the Applications category of the search results 3 Type the following command in the terminal wind...

Страница 91: ...91 Using Your Printer 12 Operator Panel 93 13 Dell Printer Configuration Web Tool 97 14 Understanding the Printer Menus 135 15 Print Media Guidelines 175 16 Loading Print Media 181 ...

Страница 92: ...92 ...

Страница 93: ...button Moves the cursor or highlight up or down 4 button Moves the cursor or highlight right or left 5 Cancel button Cancels active or pending jobs 6 Number Pad Enters numbers and characters 7 Power Saver button Enters or exits the Power Saver mode When the machine is not used for a while it enters the Power Saver mode to reduce power consumption When the Power Saver mode is active the Power Saver...

Страница 94: ...ou enter the password or when you setup wireless network Number Pad Letters and Numbers Changing Numbers or Names If you make a mistake while entering a number press the Cancel button to delete the last digit or character Then enter the correct number or character Printing a Panel Settings Report The panel settings report shows current settings for the printer menus For details about how to print ...

Страница 95: ...sleep mode NOTE If Panel Lock Control is set to Enable you need to enter the four digit password to enter the Admin Settings menu NOTE Power Off Timer feature is available only in certain regions NOTE When the printer is connected to a network via Ethernet or Wireless and Power Off Timer is set to Auto Detect the printer will not turn off automatically To use the Power Off Timer feature with a net...

Страница 96: ...96 Operator Panel ...

Страница 97: ...he printer needs supplies or intervention To fill out printer inventory reports requiring the asset tag number of all the printers in your area use the Printer Information feature in the Dell Printer Configuration Web Tool Enter the IP address of each printer on the network to display the asset tag number The Dell Printer Configuration Web Tool feature also allows you to change the printer setting...

Страница 98: ... the Language list For example Italian Italy it IT Spanish Traditional Sort es ES tradnl German Germany de DE French France fr FR English United States en US Danish da DK Dutch Netherlands nl NL Norwegian Bokmal no Swedish sv SE Setting the IP Address of the Printer to Non Proxy 1 Select Internet Options from the Tools menu 2 Click LAN Settings under Local Area Network LAN Settings in the Connecti...

Страница 99: ...Print Volume Printer Information Tray Settings E Mail Server Settings Overview Set Password Online Help Order Supplies at Contact Dell Support at Printer Status Use the Printer Status menu to get immediate feedback on the printer supply status When the toner cartridge is running low click the order supplies link on the first screen to order a new toner cartridge Printer Jobs Use the Printer Jobs m...

Страница 100: ...rent memory and engine code levels Tray Settings Use the Tray Settings menu to get information about the paper type and size for each tray E Mail Server Settings Overview Use the E Mail Server Settings Overview menu to setup E Mail Server access and receive e mail when the printer needs supplies or intervention To be notified type your name or the name of the key operator in the e mail list box Se...

Страница 101: ...p frame 1 Product Name Displays the product name of the printer 2 IPv4 Displays the IP address of the printer IPv6 3 Location Displays location of the printer The location can be changed in the Basic Information section on the Print Server Settings page 4 Contact Person Displays the name of the printer administrator The name can be changed in the Basic Information section on the Print Server Setti...

Страница 102: ...tings Links to the Printer Settings Report menu 4 Print Server Settings Links to the Print Server Reports menu 5 Copy Printer Settings Links to the Copy Printer Settings menu 6 Print Volume Links to the Print Volume menu 7 Printer Information Links to the Printer Status menu 8 Tray Settings Links to the Tray Settings menu 9 E Mail Server Settings Overview Links to the Print Server Settings menu 10...

Страница 103: ... the prompts displayed in the dialog box The default user name is admin and the default password is left blank NULL You can change only the password in the Set Password page in the Security menu The user name cannot be changed See Set Password for more information Details of the Menu Items 1 Refresh Button Receives the current printer configuration and updates the latest information in the right f...

Страница 104: ...tem Settings Network Settings USB Settings PCL Settings PS Settings PDF Settings Secure Settings Printer Maintenance Paper Density Adjust Transfer Unit Adjust Fusing Unit Adjust Density Chart Clean Developer Clean Transfer Unit Reset Defaults Initialize PrintMeter Storage 1 Non Dell Toner Adjust Altitude StaticMemory Ctr Ghost Control Clock Settings Web Link Customization ...

Страница 105: ...rint Proxy Server Wi Fi 2 Wi Fi Direct 2 Reset Print Server Security Set Password SSL TLS IPsec 802 1x 3 IP Filter IPv4 Copy Printer Settings Copy Printer Settings Copy Printer Settings Copy Printer Settings Report Print Volume Print Volume Print Volume Dell AccessControl Tray Settings Tray Settings 1 This item is available only when RAM Disk is enabled 2 This item is available only when the print...

Страница 106: ...there is some paper in the tray but the quantity is unknown Add Paper Indicates that there is no paper in the tray Capacity Displays the maximum capacity of the paper tray Size Displays the size of paper in the tray Output Tray Status OK Indicates that the tray is available Capacity Displays the maximum capacity of the paper tray Cover Status Closed Indicates that the cover is closed Open Indicate...

Страница 107: ...tings page to display the current settings of the printer menus ID Displays the job ID Job Name Displays the file name of the job being processed Owner Displays the name of the job owner Host Name Displays the name of the host computer Job Status Displays the status of the job being processed Host I F Displays the status of the host interface Job Submitted Time Displays the date when the job was s...

Страница 108: ...Page Stored Documents 1 Click Start to print the Stored Documents list 1 This item is available only when RAM Disk is enabled Power Saver Time Sleep Sets the time taken by the printer to enter Sleep mode after it finishes a job Power Saver Time Deep Sleep Sets the time taken by the printer to enter Deep Sleep mode after it has entered Sleep mode Power Saver Time Power Off Timer 1 Sets the time tak...

Страница 109: ... stops abnormally Default Paper Size Sets the default print paper size Print ID Sets where to print the user ID on the output paper Print Text Sets whether the printer outputs PDL data which is not supported by the printer as text when the printer receives it Banner Sheet Insert Position Sets where to insert a banner sheet in the output Banner Sheet Specify Tray Sets from which tray a banner sheet...

Страница 110: ...g as the default for all print jobs Font Sets the font from the list of registered fonts Symbol Set Sets a symbol set for the specified font Font Size Sets the font size for scalable typographic fonts Font Pitch Sets the font pitch for scalable mono spaced fonts Form Line Sets the number of lines in a page Quantity Sets the number of copies to print Image Enhance Sets whether to enable the Image E...

Страница 111: ...rinted PS Job Time out Sets the execution time for one PostScript 3 Compatible job Paper Select Mode Sets the way to select the tray for the PostScript 3 Compatible mode Quantity Sets the number of copies 2 Sided Print Sets whether to print on both sides of a sheet of paper Print Mode Sets a print mode PDF Password Sets a password Re enter PDF Password Confirms the set password Collation Sets whet...

Страница 112: ...lock Settings and Web Link Customization pages Paper Density Purpose To specify the paper density Values Login Error Displays how many times an administrator can attempt to log in to Panel Lock Set Available Time Allows you to set the available time period for the Print function Start Time Sets the start time of the available time period for the Print function End Time Sets the end time of the ava...

Страница 113: ... roller for cover paper within the range of 5 to 10 Covers Thick 164 216 g m2 Sets the reference voltage setting for the transfer roller for thick cover paper within the range of 5 to 10 Rough Surface Sets the reference voltage setting for the transfer roller for Rough Surface paper within the range of 5 to 10 Label Sets the reference voltage setting for the transfer roller for labels within the r...

Страница 114: ...density level lighter than the original Lighter2 Lighter3 Pitch Chart Print Prints a full halftone page Also prints a page to check the pitch A total of two pages are printed Full Page Solid Print Prints a chart of the full page solid 1 Sided Prints a chart on one side of the paper 2 Sided Prints a chart of the full page solid on both sides of the paper Alignment Chart Print Prints a chart to chec...

Страница 115: ...pecify the altitude of the location where the printer is installed The discharge phenomenon for charging the photo conductor varies with barometric pressure Adjustments are performed by specifying the altitude of the location where the printer is being used StaticMemory Ctr Purpose To widen the print gap not to leave toner streak on the next page Reset Defaults and restart printer Click Start to r...

Страница 116: ...ports The Print Server Reports tab includes the Print Server Setup Page and the E Mail Server Setup Page Print Server Setup Page Displays the current settings of TCP IP Transmission Control Protocol Internet Protocol and printing ports Date Format Sets the date format YYYY MM DD MM DD YYYY or DD MM YYYY Time Format Sets the time format 24 Hour Clock or 12 Hour Clock Time Zone Sets the time zone Se...

Страница 117: ...trator and service center Administrator E Mail Address Sets the contact address of the printer administrator and service center Asset Tag Number Enters the asset tag number for the printer Dell Printer Configuration Web Tool Settings Auto Refresh Automatically refreshes the contents of the status display pages Auto Refresh Interval Sets the time interval for refreshing the contents of the status d...

Страница 118: ...le SNTP Google Cloud Print Sets whether to enable Google Cloud Print 1 This item is available only when the printer is connected using an Ethernet cable TCP IP Settings IP Mode Sets the IP mode Host Name Sets the host name IPv4 IP Address Mode Sets the method for acquiring the IP address Manual IP Address When an IP address is being set manually the IP is allocated to the printer using the format ...

Страница 119: ... IPv6 Select the check box to enable dynamic updates to DNS Auto Generate Search List Select the check box to automatically generate the search list Search Domain Name Sets the search domain name Up to 255 alphanumeric characters periods and hyphens can be used If you need to specify more than one domain name separate them using a comma or semicolon Time out Sets the time out period between 1 and ...

Страница 120: ...again to confirm it Connection Time Out Sets the connection time out period from 1 to 1 000 seconds HTTP Port Number Sets the port number to 80 or from 8000 to 9999 Simultaneous Connections Displays the maximum number of simultaneous connections CSRF Protection Displays the CSRF Protection setting Connection Time Out Sets the connection time out period from 1 to 255 seconds Telnet Password Sets th...

Страница 121: ...phens underscores and at symbols can be used If specifying more than one address separate them using commas POP User Password 1 Sets the POP3 account password using up to 31 alphanumeric characters Re enter POP User Password 1 Confirms the set password Reply Address Designates the reply e mail address sent with each E mail Alert SMTP Server Connection Displays the status of the SMTP server connect...

Страница 122: ...Protocol Select the check box to enable the SNMP v3 protocol Edit SNMP v3 Properties Click to display the SNMP v3 page and to edit the setting of SNMP v3 protocol from the page You can click this item only when SSL communication is enabled Community Name Community Name Read only 1 Sets the community name to access read only data using up to 31 alphanumeric characters The default Read Community is ...

Страница 123: ... ffff IP socket mmmmm is a variable value between 0 and 65535 Authenticate Error Trap Select the check box to notify Authenticate Error Trap 1 The default value can be changed by using Dell Printer Configuration Web Tool 2 This item is available only when Wi Fi Direct is set to Enable Administrator Account Account Enabled Select the check box to enable the administrator account User Name Enters th...

Страница 124: ...rver and your printer AirPrint Enable AirPrint Click to enable the printer for AirPrint Bonjour Name Enters the name that is to be displayed as an AirPrint printer Location Sets the location of the printer Geo Location Sets the physical location of the printer IPP Authentication Basic Authentication Select the check box to enable the basic authentication scheme User Name Enter the user name Passwo...

Страница 125: ...for the proxy server Re enter Password Confirms the set password Wi Fi Settings SSID Sets the name that identifies the wireless network Up to 32 alphanumeric characters can be entered Network Type Sets the network type from either Ad Hoc or Infrastructure MAC Address Displays the MAC address of the wireless adapter for the printer Link Channel Displays the channel number of the wireless connection...

Страница 126: ...ed through the wireless network only when WEP 128bit or WEP 64bit is selected for Encryption Re enter WEP Key 3 Enters the WEP key 3 again to confirm it WEP Key 4 Sets the WEP key set used through the wireless network only when WEP 128bit or WEP 64bit is selected for Encryption Re enter WEP Key 4 Enters the WEP key 4 again to confirm it Transmit Key 5 Key Sets the transmit key type from the list W...

Страница 127: ...sing WPS SSID Character string following DIRECT Specifies a name to identify the Wi Fi Direct network Up to 32 alphanumeric characters can be entered DIRECT cannot be changed Passphrase Displays the passphrase Confirm it when entering the passphrase into your Wi Fi mobile device IP Address Displays the IP address of the Wi Fi Direct Subnet Mask Displays the subnet mask Paired Device Displays the n...

Страница 128: ...e from the page Certificate Management 2 Click to display the Certificate Management page and to manage a security certification from the page Delete All Certificates Click to delete all the certificates Generate Self Signed Certificate Public Key Method Select the public key method of the self signed certificate Size of Public Key Select the size of public key Issuer Enter the issuer of SSL self ...

Страница 129: ...ent page or SSL TLS page Issued To Displays the device to certificate Issuer Displays the issuer to certificate Serial Number Displays the serial number of the device Public Key Method Displays the public key method Size of Public Key Displays the size of public key Valid From Displays the time the certificate is valid Valid Until Displays the time the certificate is invalid Status Displays whethe...

Страница 130: ...ss to connect to Remote peers IPv6 address Sets the IP address to connect to Non IPsec communication policy Allows communication with a device which does not support IPsec Configure 802 1x Enable IEEE 802 1x Select the check box to enable IEEE 802 1x authentication Authentication Method EAP MD5 Selects the authentication method to use for IEEE 802 1x authentication EAP MS CHAPv2 PEAP MS CHAPv2 Log...

Страница 131: ...f the Access List row 2 5 Enter 0 0 0 0 in the Address field and 0 0 0 0 in the Address Mask field 6 Select Accept 7 Click Apply New Settings Enabling and Disabling Printing from Network Addresses You can enable printing from the 192 168 network address and disable printing from the 192 168 200 network address The example below describes how to enable printing from the 192 168 200 10 IP address 1 ...

Страница 132: ...o be displayed by clicking Print Volume in the left frame Values Dell AccessControl Purpose To specify which users have access to printing and to limit print volume per user Values Printer Page Count Displays the total number of pages printed since the printer was shipped from the factory Paper Used Displays the number of pages printed for each paper size AccessControl Mode Off Enables to print th...

Страница 133: ...y 1 Paper Size Sets the size of paper loaded in tray1 Tray 1 Paper Type Sets the type of paper loaded in tray1 Tray 1 Custom Paper Size Y Sets the length of custom size paper loaded in tray1 Tray 1 Custom Paper Size X Sets the width of custom size paper loaded in tray1 Tray 1 Display Popup Sets whether to display a popup message that prompts the user to set the paper size and type when the paper i...

Страница 134: ...134 Dell Printer Configuration Web Tool ...

Страница 135: ...r Settings Purpose To print a list of the current user default values the installed options the amount of installed print memory and the status of printer supplies Panel Settings Purpose To print a detailed list of all the settings of the printer menus PCL Fonts List Purpose To print a sample of the available PCL fonts PCL Macros List Purpose To print the information on the downloaded PCL macro PS...

Страница 136: ...s the button until the desired report or list is highlighted and then press the Set button The selected report or list is printed Printing a Report List Using the Tool Box 1 Click Start All Programs Dell Printers Dell Smart Printer S2810dn Tool Box The Tool Box opens 2 Ensure that the Printer Setting Reports tab is open 3 Select Reports from the list at the left side of the page The Reports page a...

Страница 137: ...ault paper size Values mm series inch series Auto MPF Tray1 Tray2 1 1 This item is available only when the optional 550 sheet feeder is installed A4 1 A5 B5 Letter Folio Legal Statement Executive Envelope 10 Monarch DL C5 Postcard JPN Custom Size 1 Denotes country specific factory default value Letter 1 Folio Legal Statement A4 A5 B5 ...

Страница 138: ... and graphics parallel to the short edge of the paper Landscape Prints text and graphics parallel to the long edge of the paper 2 Sided Print Off Does not print on both sides of a sheet of paper On Prints on both sides of a sheet of paper Binding Edge Flip on Long Edge Prints on both sides of a sheet of paper to be bound by long edge Flip on Short Edge Prints on both sides of a sheet of paper to b...

Страница 139: ...queOlv Bd ITC A G Go Bk CourierPS Bd AntiqueOlv It ITC A G Go Dm CourierPS Ob GaramondAntiqua ITC A G Go BkOb CourierPS BdOb Garamond Hlb ITC A G Go DmOb C39 Narrow Garamond Krsv ITCBookman Lt C39 Regular GaramondKrsvHlb ITCBookmanDm C39 Wide Marigold ITCBookman LtIt OCR A Albertus Md ITCBookmanDm It OCR B Albertus XBd N C Schbk Roman Line Printer Arial N C Schbk Bd ROMAN 8 DESKTOP ISO 69 ISO L1 P...

Страница 140: ...changed NOTE The Font Pitch menu is only displayed for fixed or mono spaced fonts Form Line Purpose To set the number of lines in a page Values mm series inch series The printer sets the amount of space between each line vertical line spacing based on the Form Line and Orientation menu items Select the correct Orientation before changing Form Line See also Orientation 12 00 Sets the values in incr...

Страница 141: ... visual appearance Values Hex Dump Purpose To help isolate the source of a print job problem With Hex Dump selected all data sent to the printer is printed in hexadecimal and character representation Control codes are not executed Values Draft Mode Purpose To save toner by printing in the draft mode The print quality is reduced when printing in the draft mode Values 1 Sets the value in increments ...

Страница 142: ... Disable after using the barcode mode PDF Use the PDF menu to change printer settings that only affect the PDF jobs NOTE Values marked by an asterisk are the factory default menu settings Off The line termination command is not added CR CR LF LF FF FF Add LF The LF command is added CR CR LF LF LF FF FF Add CR The CR command is added CR CR LF CR LF FF CR FF CR XX The CR and LF commands are added CR...

Страница 143: ...1 Sets the value in increments of 1 Available Range 1 999 1 Sided Prints on one side of a sheet of paper Flip on Long Edge Prints on both sides of a sheet of paper to be bound by long edge Flip on Short Edge Prints on both sides of a sheet of paper to be bound by short edge Normal For documents with normal sized characters High Quality For documents with small characters or thin lines or documents...

Страница 144: ... Report Purpose To specify whether the contents of the errors concerning PostScript 3 Compatible page description language are printed The change becomes effective after the printer is turned off and then on again Values NOTE Instructions from the PS driver override the settings specified on the operator panel A4 1 Letter 1 Auto 1 The default paper size is displayed Auto 100 No Zoom Booklet 2 Page...

Страница 145: ...ult menu settings Wi Fi NOTE When the optional wireless adapter is attached and the Ethernet cable is disconnected Wi Fi is displayed Purpose To confirm or specify wireless network settings Values Status Purpose To confirm the wireless communication status Values Off Job time out does not occur On 1 minute An error concerning the PostScript 3 Compatible page description language occurs if processi...

Страница 146: ...ption type of Mixed mode PSK Mixed mode PSK automatically selects the encryption type from either WPA PSK TKIP WPA PSK AES or WPA2 PSK AES Passphrase Entry Specifies the passphrase of alphanumeric characters from 8 to 63 WPA2 PSK AES Select to configure the wireless settings with the encryption type of WPA2 PSK AES PassPhrase Entry Specifies the passphrase of alphanumeric characters from 8 to 63 h...

Страница 147: ...to Automatically resolves the group role for Wi Fi Direct Group Owner Sets the printer as the Group Owner when using Wi Fi Direct Setting the printer to become the group owner makes it possible for devices to discover this printer The SSID of the printer will be then displayed in the list of wireless networks on your Wi Fi mobile device Device Name Specifies the printer name that identifies the Wi...

Страница 148: ...T Half Uses 10BASE T Half duplex 10BASE T Full Uses 10BASE T Full duplex 100BASE TX Half Uses 100BASE TX Half duplex 100BASE TX Full Uses 100BASE TX Full duplex 1000BASE T Full Uses 1000BASE T Full duplex IP Mode Dual Stack Uses both IPv4 and IPv6 to set the IP address IPv4 Mode Uses IPv4 to set the IP address IPv6 Mode Uses IPv6 to set the IP address IPv4 Get IP Address AutoIP Sets the IP address...

Страница 149: ...e Disables the LPD port Enable Enables the Line Printer Daemon LPD port Port9100 Disable Disables the Port9100 port Enable Enables the Port9100 port FTP Disable Disables the FTP port Enable Enables the FTP port IPP Disable Disables IPP port Enable Enables IPP port SMB TCP IP Disable Disables SMB TCP IP port Enable Enables SMB TCP IP port WSD Print Disable Disables Web Services on Devices WSD port ...

Страница 150: ...rpose To delete all certificates of the printer After executing this function and rebooting the printer all certificates are deleted PS Data Format Purpose To specify PostScript3 Compatible communication protocol you can configure the PS Data Format settings The change becomes effective after the printer is turned off and then on again Values Google Cloud Print Disable Disables Google Cloud Print ...

Страница 151: ...ration display language and job log auto print settings NOTE Values marked by an asterisk are the factory default menu settings TBCP Used when the communication protocol supports both ASCII and binary data to switch between them according to the specified control code Binary Used when no special processing is required for data Disable Disables the USB interface Enable Enables the USB interface Aut...

Страница 152: ...inter the printer cannot be turned back on automatically To turn the printer back on physically turn the power switch of the printer to On Auto Reset Purpose To automatically reset the settings to the default settings and return to the standby mode after you do not specify any settings for the specified time Sleep 10 minutes Specifies the time taken by the printer to enter Sleep mode after it fini...

Страница 153: ...0 seconds Set Date Time Time Zone Sets the time zone Date Sets the date depending on the Date Format settings Time Sets the time Date Format Sets the date format YYYY MM DD MM DD YYYY or DD MM YYYY Time Format 12H Sets the time in 12 hour format 24H Sets the time in 24 hour format Control Panel Off Does not emit a tone when the operator panel input is correct On Emits a tone when the operator pane...

Страница 154: ...hen a problem occurs Out of Paper Off Does not emit a tone when the printer runs out of paper On Emits a tone when the printer runs out of paper Low Toner Alert Off Does not emit a tone when the toner is low On Emits a tone when the toner is low Auto Clear Alert Off Does not emit a tone 5 seconds before the printer performs auto clear On Emits a tone 5 seconds before the printer performs auto clea...

Страница 155: ...ts A4 size jobs on Letter size paper if A4 size paper is not available in the paper trays and vice versa Letter size job on A4 size paper 1 Depending on the printer setting the printer will continue to print on existing media of a different size or prompt the user to select from the following Delete Job Supply with correct media Off 1 Does not print A5 size jobs on Statement size paper or Statemen...

Страница 156: ...t print the user ID Top Left Prints the user ID on the top left of the page Top Right Prints the user ID on the top right of the page Bottom Left Prints the user ID on the bottom left of the page Bottom Right Prints the user ID on the bottom right of the page Off Does not print the received data On Prints the received data as text data Insert Position Off Does not print the banner sheet Front Inse...

Страница 157: ... of memory to the RAM disk file system in increments of 20 MB Available Range 20 320 MB Off No tray size substitute accepted Larger Size Substitutes paper of next largest size When there is no larger paper size the printer substitutes paper of nearest size Nearest Size Substitutes paper of nearest size Use MPF Substitutes paper from the MPF Print Off Does not set the time when printing is availabl...

Страница 158: ...sk weekly Monthly Sets the recurrence to delete the files stored as Secure Print monthly Weekly Setting Monday Sets the day of the week to delete the files stored as Secure Print Tuesday Wednesday Thursday Friday Saturday Sunday Monthly Setting 1 Day Sets the day of the month to delete the files stored as Secure Print in the RAM disk Available Range 1 28 days Off Does not limit access to printing ...

Страница 159: ...window when the print job is started without setting to the envelope mode Values Disable Does not print on both sides of letterhead Enable Prints on both sides of letterhead Off Does not show the alert message when the toner is low On Shows the alert message when the toner is low Disable Disables firmware updates Enable Enables firmware updates Off Does not print on other paper sizes in other pape...

Страница 160: ...ice code Paper Density Purpose To specify paper density settings Values Adjust Transfer Unit NOTE The print quality changes depending on the setting values you select for this item Purpose To specify the transfer roller voltage adjustment for each paper type Values Plain Light Normal Plain 0 Sets the transfer roller voltage in increments of 1 The default settings may not give the best output on al...

Страница 161: ... Available Range Lighten 5 to Darken 10 Plain 0 Sets the fusing unit temperature in increments of 1 The default settings may not give the best output on all paper types When the printed paper has curled try to lower the temperature When the toner does not fuse on the paper properly try to increase the temperature Available Range Lighten 3 to Darken 3 Plain Thick 0 Available Range Lighten 3 to Dark...

Страница 162: ...Available Range Lighten 3 to Darken 3 Darken 1 to 3 Adjusts the density level darker than the normal setting Normal 0 Works well with standard typed or printed documents Lighten 1 to 3 Adjusts the density level lighter than the normal setting Pitch Chart Print Prints a full halftone page Also prints a page to check the pitch A total of two pages are printed Full Page Solid 1 Sided Specifies to pri...

Страница 163: ...o initialize its life counter Clear Job History Purpose To clear the job history of all finished jobs Clear Storage NOTE Clear Storage feature is available only when RAM Disk is set to On Purpose To clear all files stored as Secure Print Private Mail Box Print Public Mail Box Print Proof Print and Stored Print in the RAM disk Values Non Dell Toner Purpose To use toner cartridge of another manufact...

Страница 164: ... page Values Ghost Control Purpose To reduce negative ghost Values Secure Settings Use the Secure Settings menu to set a password to limit access to the menus This prevents items from being changed accidentally NOTE Values marked by an asterisk are the factory default menu settings See also Panel Lock Panel Lock Purpose To set a limited access to Admin Settings with a password and to set or change...

Страница 165: ...l Disable Disables password protection for Admin Settings Enable Enables password protection for Admin Settings Change Password 1 0000 9999 Sets or changes the password required to access Admin Settings 1 This item is available only when Panel Lock Control is set to Enable Off Does not allow an administrator to log in after one error entry attempt On 5 Sets the number of error entry attempts allow...

Страница 166: ...ed Uses the paper size and paper type set from the operator panel Driver Specified Uses the paper size and paper type set on the printer driver Manual When the print job is started the printer pauses the job and shows the screen to prompt the user to load the paper of the specified size and type To continue the job check that the specified paper is loaded and select Continue and then press the Set...

Страница 167: ... 13 Legal 8 5 x 14 Statement 5 5 x 8 5 A4 210 x 297 mm A5 148 x 210 mm B5 182 x 257 mm Executive 7 3 x 10 5 Postcard JPN 100 x 148 mm Custom Size Paper Type Plain Plain Thick Covers 106 163 g m2 Covers Thick 164 216 g m2 Rough Surface Labels Recycled Postcard JPN Letterhead Preprinted Prepunched Color Display Popup Off Does not display a popup message that prompts to set Paper Type and Paper Size ...

Страница 168: ...e To specify the paper loaded in the optional 550 sheet feeder Values 1 Denotes country specific factory default value Paper Size mm series A4 A5 B5 Letter Folio Legal Statement Executive Custom Size inch series Letter Folio Legal Statement A4 A5 B5 Executive Custom Size Paper Type Plain Plain Thick Covers 106 163 g m2 Covers Thick 164 216 g m2 Rough Surface Label Recycled Letterhead Preprinted Pr...

Страница 169: ...hen paper is loaded in the optional 550 sheet feeder 1 Denotes country specific factory default value 1st Priority MPF Sets the MPF as the first priority Tray 1 Sets tray1 as the first priority Tray 2 Sets the optional 550 sheet feeder as the first priority 2nd Priority 1 MPF Sets the MPF as the second priority Tray 1 Sets tray1 as the second priority Tray 2 Sets the optional 550 sheet feeder as t...

Страница 170: ...nts from print memory after printing them Delete Deletes all documents from print memory document n 2 Print and Delete Deletes the specified document from print memory after printing it Delete Deletes the specified document from print memory 1 This item is available only when the multiple print jobs are stored 2 The document name is displayed The save date and time are displayed if the document na...

Страница 171: ...This item is available only when the multiple print jobs are stored 2 The document name is displayed The save date and time are displayed if the document name is not specified Select User ID All Documents 1 Print Prints all documents and saves them in memory Use PC Settings Sets the number of copies specified on the printer driver Input Number of Copies Sets the number of copies Print and Delete D...

Страница 172: ...ribed below allows you to reset the password Turn off the printer Then while holding the Menu button turn on the printer Perform steps 7 and 8 8 Re enter the password to confirm the password that you entered and then press the Set button The password has been changed Select User ID All Documents 1 Print Prints all documents and saves them in memory Use PC Settings Sets the number of copies specifi...

Страница 173: ...the current password and then press the Set button The setting has been changed Resetting Defaults After executing this function and rebooting the printer all the menu parameters are reset to their default values The following menu parameters are exceptions and are not reset Network settings Panel Lock settings and password Login Error settings Set Available Time settings Secure Job Expiration set...

Страница 174: ...174 Understanding the Printer Menus ...

Страница 175: ...vendor to determine whether the paper you have chosen is acceptable for laser printers It is recommended that you try a sample first before buying large quantities of any print media When choosing any print media you should consider the weight fiber content and color Unacceptable Paper The following paper types are not recommended for use with the printer Chemically treated paper used to make copi...

Страница 176: ... paper printed with heat resistant inks designed for use in xerographic copying machines The ink must withstand temperatures of 225 C 437 F without melting or releasing hazardous emissions Use inks that are not affected by the resin in the toner or the silicone in the fusing unit Inks that are oxidation set or oil based should meet these requirements latex inks might not If you are in doubt contac...

Страница 177: ...insert the envelope with the flaps closed or open and the short edge of the envelope facing into the printer The print side must be facing up See Loading Envelopes in the MPF for instructions on loading envelopes Use one envelope size during a print job Ensure that the humidity is low because high humidity more than 60 and the high printing temperatures may seal the envelopes For best performance ...

Страница 178: ...hat have adhesive to the edge of the sheet It is recommended that zone coating of the adhesive is done at least 1 mm 0 04 inches away from edges Adhesive material contaminates your printer and could void your warranty WARNING Otherwise a jam occurs in the printer and contaminate your printer and your cartridge with adhesive As a result could void your printer and cartridge warranties Storing Print...

Страница 179: ...N C5 162 x 229 mm Y N N N Postcard JPN 100 x 148 mm Y Y N N Custom 1 2 Y Y Y Y 1 Custom width 76 2 mm 3 0 inches to 215 9 mm 8 5 inches for the MPF and tray1 139 7mm 5 5 icnches to 215 9mm 8 5 inches for the optional 550 sheet feeder length 127 0 mm 5 0 inches to 355 6 mm 14 00 inches for the MPF and tray1 210mm 8 27 inches to 355 6mm 14 inches for the optional 550 sheet feeder 2 XML Paper Specifi...

Страница 180: ... 80 90 105 Covers 106 163 Covers Thick 164 216 Rough surface 106 163 Inkjet printer paper cannot be used Labels 106 163 Inkjet printer paper cannot be used Envelope 91 105 Recycled 60 105 Japanese Postcard 190 Inkjet printer paper cannot be used Letterhead 60 90 Preprinted 60 90 Prepunched 60 90 Color 60 90 ...

Страница 181: ...at the optional 550 sheet feeder can handle are Width 139 7 mm 5 5 inches to 215 9 mm 8 5 inches Length 210 mm 8 27 inches to 355 6 mm 14 00 inches Loading Print Media in Tray1 and the Optional 550 Sheet Feeder This section describes how to load letterhead For details about loading print media other than letterhead see Loading Paper NOTE To avoid paper jams do not remove the tray while printing is...

Страница 182: ...e MPF cover 2 Slide the width guides to the edge of the tray The width guides should be fully extended Print media source Print side Page orientation Tray1 and optional 550 sheet feeder Face up Letterhead enters the printer first MPF Face up Letterhead enters the printer first ...

Страница 183: ...PF 5 On the operator panel press the or button until the desired paper size is highlighted and then press the Set button 6 Press the or button until the desired paper type is highlighted and then press the Set button Loading Small Print Media in the MPF When loading small print media such as monarch envelope or the user specified print media whose feed direction length is 191 6 mm or less in the M...

Страница 184: ...de the width guides to the edge of the tray The width guides should be fully extended 4 Pull up the length guide and slide it toward MPF cover until it stops 5 Load the print media into the MPF with the recommended print side facing up so that the top edge of the print media enters the printer first ...

Страница 185: ... then press the Set button Printing on Envelopes Envelope Mode To print on envelopes with better print quality set the printer to the envelope mode When the printer is set to the envelope mode Ready Envelope is displayed NOTE Print jobs can be done on envelopes even when the printer is not set to the envelope mode To get the better print results set the printer to the envelope mode NOTE When the p...

Страница 186: ...handle to open the rear cover 2 Lift the levers on both sides of the fusing unit 3 Slide the envelope switches on both sides of the fusing unit to the position WARNING The fusing unit is hot Do not touch it doing so may cause burns 4 Press down the levers on both sides of the fusing unit ...

Страница 187: ...a 187 5 Close the rear cover 6 Confirm that Ready Envelope is displayed on the LCD panel To Cancel the Envelope Mode 1 Pull the rear cover handle to open the rear cover 2 Lift the levers on both sides of the fusing unit ...

Страница 188: ... panel instead of Ready Envelope Loading Envelopes in the MPF Use the following guidelines when loading envelopes in the MPF CAUTION Never use envelopes with windows coated linings or self stick adhesives These lead to paper jams and can cause damage to the printer NOTE If you do not load envelopes in the MPF right after they have been removed from the packaging they may bulge To avoid jams press ...

Страница 189: ... length guide Load the envelopes in the short edge feed orientation with the flaps closed and the print side up Ensure that the flaps come at the right when you face towards the printer C5 Load the envelopes in the short edge feed orientation with the flaps open or closed and the print side up Ensure that the flaps come at the bottom with the flaps open or at the top with the flaps closed when you...

Страница 190: ...PF Also avoid pressing down or applying excessive force on it The icons on the MPF show how to load the MPF with paper and how to turn an envelope for printing Linking Trays The printer automatically links the trays when you load the same size and type of print media in them The first tray will be utilized until the media runs out and then the next tray will be used NOTE The print media should be ...

Страница 191: ...191 Printing 17 Printing 193 ...

Страница 192: ...192 ...

Страница 193: ...f the printer When you choose Print from an application a window representing the printer driver opens Select the appropriate settings for the specific job that you are sending to print Print settings selected from the driver override the default menu settings selected from the operator panel or Tool Box You may need to click Preferences from the initial Print box to see all of the available syste...

Страница 194: ...ress the Delete key Canceling a Job From the Desktop 1 Click Start Devices and Printers For Windows Vista Click Start Control Panel Hardware and Sound Printers For Windows Server 2008 Click Start Control Panel Printers For Windows Server 2008 R2 Click Start Devices and Printers For Windows 8 Windows 8 1 On the Desktop screen right click the bottom left corner of the screen and then click Control P...

Страница 195: ...2 On the Desktop screen right click the bottom left corner of the screen and then click Control Panel Hardware Devices and Printers 2 Right click the printer and select Printing Preferences The General tab appears 3 From Paper Source select the paper tray For PCL driver Select from Auto Tray1 Tray2 or MPF For PS driver Select from Automatically Select Tray1 Tray2 or MPF 4 From Duplex select Flip o...

Страница 196: ... is available when The RAM disk is enabled in the printer menu RAM Disk is set to Available in the printer driver Flip on Long Edge Assumes binding along the long edge of the page left edge for portrait orientation and top edge for landscape orientation The following illustration shows long edge binding for portrait and landscape pages Flip on Short Edge Assumes binding along the short edge of the...

Страница 197: ... the password can print them at a more convenient time from the operator panel This feature can be used to print confidential documents The stored jobs remain in the memory until you delete them from the operator panel Public Mail Box Print You can store print jobs without a password in the memory Any user can print them at a more convenient time from the operator panel The stored jobs remain in t...

Страница 198: ...m the operator panel NOTE Secure Print and Private Mail Box Print require specifying a password for confidentiality NOTE If a document name is not assigned to your print job in the printer driver the job s name will be identified using the printer s time and date of submission to distinguish it from other jobs you have stored under your name Printing the Stored Jobs 1 Press the Menu button 2 Press...

Страница 199: ...terisks to ensure confidentiality If you enter an invalid password the message Wrong Password Re enter appears Wait 3 seconds or press the Set button or Cancel button to return to the screen for entering the password When you enter a valid password you have access to all print jobs matching the user ID and password you entered The print jobs matching the password you entered appear on the screen Y...

Страница 200: ...rinter Driver Using the Add Printer Wizard 1 Click Start Devices and Printers Start Control Panel Hardware and Sound Printers for Windows Vista and Windows Server 2008 For Windows 8 Windows 8 1 Windows Server 2012 and Windows Server 2012 R2 On the Desktop screen right click the bottom left corner of the screen and then click Control Panel Hardware and Sound Hardware for Windows Server 2012 Windows...

Страница 201: ...nt documents photos or e mail on your Wi Fi mobile devices directly without a wireless access point NOTE Wi Fi Direct is available when the optional wireless adapter is installed NOTE Only printing function is available via the Wi Fi Direct network NOTE The maximum number of devices that can be connected via the Wi Fi Direct network is 3 NOTE You cannot connect your mobile device to the Internet v...

Страница 202: ...ter s SSID and then tap Connect d Enter the passphrase and then tap Next The mobile device will connect to the printer For Windows 7 a Click the network icon on the taskbar b Click the printer s SSID and then click Connect c Enter the passphrase and then click OK d Click Cancel to exit the Set Network Location window The mobile device will connect to the printer For Windows Vista a Click Start Con...

Страница 203: ...hen press the Set button 4 Press the button until Wi Fi Direct is highlighted and then press the Set button 5 Press the button until Paired Device is highlighted and then press the Set button 6 Press the Set button to select the device name 7 Press the button until Disconnect is highlighted and then press the Set button 8 Press the button until Start is highlighted and then press the Set button Re...

Страница 204: ...le Printing The Dell Smart Printer S2810dn supports printing from a variety of mobile devices Android OS Download the Dell Document Hub app for free from Google Play Easy to use and navigate the Dell Document Hub app enables direct printing of photos documents web content and more to supported Dell printers on a Wi Fi Wi Fi Direct or Ethernet network Scan the QR Code for quick access to the releva...

Страница 205: ...1 as an example 1 Open your email photo web page or document you want to print 2 Tap the action icon 3 Tap Print 4 Select your printer and set printer options 5 Tap Print Printing With Google Cloud Print By registering the printer to your Google account you can use the Google Cloud Print service to print from the Google Chrome browser without installing the printer drivers to your device You can a...

Страница 206: ...hlighted and then press the Set button 6 Ensure that Enable is highlighted and then press the Set button 7 When the message This Setting Becomes Effective after Restart is displayed press the Back button 8 Turn off the printer and turn it on again to apply the settings When using the Dell Printer Configuration Web Tool 1 Launch the Dell Printer Configuration Web Tool by entering IP address of the ...

Страница 207: ...hen the Dell Printer Configuration Web Tool opens go to the pages in the Print Server Settings tab Click Register This Device to Google Cloud Print in Google Cloud Print A sheet with a URL for the Google Cloud Print printer registration web site is printed 3 From the web browser of your computer visit the Google web site and sign in with your Google account Visit the Google Cloud Print registratio...

Страница 208: ...anage under the Google Cloud Print menu NOTE If a message is displayed to request you to sign in to Chrome click sign in and sign in to Chrome 5 Click Manage for the printer you want to share 6 In the Google Cloud Print window click Share 7 In the window to specify the printer sharing enter the Google accounts of the users you want to invite to share the printer and click Share NOTE When the invit...

Страница 209: ...ter in your local network In this case select your printer in Local Destinations 4 Click Print Printing a Report Page You can print a variety of settings for your printer including printer settings panel setting and font list For details about how to print reports or lists see Report List Printer Settings You can change most of the print settings from the application you are printing from If your ...

Страница 210: ...e Printer Settings If your printer is connected to the network you can change the printer settings from your web browser If you are a network administrator you can clone the system settings of one printer to one or all the printers on the network Type the IP address of your printer in your web browser Choose Printer Settings from the topics list From the Printer Settings tab select the System Sett...

Страница 211: ...211 Know Your Printer 18 Understanding Your Printer Software 213 19 Using Digital Certificates 227 20 Understanding Printer Messages 235 21 Specifications 239 ...

Страница 212: ...212 ...

Страница 213: ...inter S2810dn Dell Supplies Management System The Dell Supplies Management System window appears 2 Select your printer from the Select Printer Model list 3 If you are ordering from the web a Select a URL from the Select Reorder URL list b Click Visit Dell printer supplies ordering web site NOTE When you cannot get information from the printer automatically by two way communication a window prompti...

Страница 214: ...install the Dell software follow the instructions below 1 Insert the Software and Documentation disc provided with the printer into your computer The Dell Printer Easy Install program launches automatically 2 Click Main Menu 3 Click Connect Select Software and Documentation and then click Next 4 Follow the on screen instructions To open the Quick Launch Utility window 1 Click Start All Programs De...

Страница 215: ...ams or low toner Ordering Supplies Allows you to access the web site to order supplies Before Installing the Status Monitor Widget Operating systems Mac OS X 10 5 Mac OS X 10 6 OS X 10 7 OS X 10 8 OS X 10 9 OS X 10 10 Network protocols and interfaces LPR Socket 9100 Bonjour USB 2 0 and 1 1 When connecting with multiple printers of the same model via USB cables only the printer recognized first can...

Страница 216: ...n in the upper left corner of the Printer Status window Printer Status Window When the Status Monitor Widget is activated the Printer Status window appears on Dashboard Printer Status Message Area Displays a message of the current printer status NOTE The Status Monitor Widget automatically obtains the printer information at the updated interval that can be specified in Preferences Also the printer...

Страница 217: ...d Order Supplies button Click this button to display the Order window To hide the Order window click Order Supplies again Info i button Click this button to open Preferences NOTE The info i button appears on the lower right corner of the window when the cursor is over the Printer Status window The info i button is a standard used across all widgets Order Window This window provides you with the in...

Страница 218: ...s clicked Order By Phone Phone number list Displays a list of available phone numbers that you can call to order Dell printer supplies Update phone contacts when rebooting check box Select this check box to regularly update the phone number list Dell and the Environment Click the hyperlink to access the web site about recycling Preferences To open Preferences 1 Click the info i button in the Print...

Страница 219: ...aracters can be entered Get Tag button Click this button to obtain the service tag NOTE You cannot retrieve the service tag when the printer is connected via USB cable done button Click this button to return to the Printer Status window Status Monitor Console for Linux Status Monitor Console is a printer utility that promotes efficient use of the printer through the exchange of information between...

Страница 220: ...nix Printing System Installing the Status Monitor Console 1 Activate the terminal and log in as a super user 2 Type the following rpm command in the terminal window On Red Hat Enterprise Linux 6 Desktop or SUSE Linux Enterprise Desktop 11 On Ubuntu 12 04 LTS Starting the Status Monitor Console 1 Click Dell Printers Status Monitor Console The Printer Selection window appears For more information on...

Страница 221: ...tings window Details button Click this button to open the Printer Status window If a non supported printer is selected it opens the Dell Printer Configuration Web Tool For details on the Dell Printer Configuration Web Tool see Dell Printer Configuration Web Tool Refresh button Click this button to update the information of printers Close button Click this button to close the Printer Selection wind...

Страница 222: ...than 9 The toner level is unknown Estimated Toner Level image Keeps you informed about the amount of toner that remains Toner Alert Displays an alert message when the remaining toner is low empty or unknown Order Online Order Supplies Online button Click this button to access the web site for ordering Dell printer supplies This button appears when the amount of toner becomes less than 30 Refresh b...

Страница 223: ...nter supplies Select a URL address to use when the Order Supplies Online button is clicked Regular URL http Accessories us dell com sna PrinterSeg aspx Premier URL http premier dell com Order by Phone To order Dell printer supplies by phone call the following Select your country with phone number from the list and call the displayed telephone number to order supplies Update phone contacts when reb...

Страница 224: ...w appears Update of status Printer Status is regularly updated check box Select the check box to enable disable the printer status to be updated by the specified interval Update interval text box Specify the update interval of the printer status Port Number Settings Port Number Specify the port number in the Port Number text box to open the setting page of your printer in a web browser Protocol Se...

Страница 225: ...Understanding Your Printer Software 225 Order URL Select Reorder URL The selected URL address is set as default web site for the Select Reorder URL in the Dell Supplies Management System window ...

Страница 226: ...226 Understanding Your Printer Software ...

Страница 227: ...ates This section describes how to manage digital certificates as follows Preparing to Manage Certificates Creating and Download a Certificate Signing Request CSR Importing a Digital Certificate Setting a Digital Certificate Confirming the Settings of a Digital Certificate Deleting a Digital Certificate Exporting a Digital Certificate Preparing to Manage Certificates Before managing digital certif...

Страница 228: ...displayed after generating the self signed certificate and then click Restart Printer 11 Repeat steps 2 to 4 to display the SSL TLS page after restarting the printer 12 Confirm that the HTTP SSL TLS Communication column is set to Enable Creating and Download a Certificate Signing Request CSR NOTE To download a CSR from the printer you must set up HTTPS communication For details see Setting HTTPS C...

Страница 229: ...8 Click Browse of File Name and select the file to be imported 9 Click Import to import the certificate Setting a Digital Certificate NOTE To manage digital certificates you must set up HTTPS communication For details see Preparing to Manage Certificates 1 Launch Dell Printer Configuration Web Tool a Open the web browser b Enter the IP address of your printer in the web browser See Dell Printer Co...

Страница 230: ... Digital Certificate NOTE To manage digital certificates you must set up HTTPS communication For details see Preparing to Manage Certificates 1 Launch Dell Printer Configuration Web Tool a Open the web browser b Enter the IP address of your printer in the web browser See Dell Printer Configuration Web Tool 2 Select Print Server Settings 3 Click the Security tab 4 Select SSL TLS 5 Click Certificate...

Страница 231: ...o display the Certificate List page NOTE If the list includes more than 20 certificates click Next to display the next page 9 Select the certificate to be exported 10 Click Certificate Details to display the Certificate Details page 11 To export the selected certificate click Export This Certificate Setting the Features You can set various security features using digital certificates See the follo...

Страница 232: ...Certificate 2 Set the digital certificate for wireless LAN server or root certificate a Launch Dell Printer Configuration Web Tool b Select Print Server Settings c Click the Security tab d Select SSL TLS e Click Certificate Management to display the Certificate Management page f Select Trusted Certificate Authorities within Category g Select Wireless LAN Server from the Certificate Purpose list h ...

Страница 233: ...llowing from the Encryption list of Secure Settings WPA Enterprise AES WPA2 Enterprise AES Mixed Mode Enterprise NOTE WPA Enterprise AES WPA2 Enterprise AES or Mixed Mode Enterprise becomes available only when the following steps are set correctly Importing a Digital Certificate Setting a Digital Certificate Confirming the Settings of a Digital Certificate e Set EAP Identity of WPA Enterprise f Se...

Страница 234: ...ertificate List This setting is not necessary if you do not need to specify the order for the certificates i Click Display the List to display the Certificate List page j The certificate displayed with an asterisk as Valid in the Validity column is the certificate associated with the use purpose and actually used 4 Set WPA Enterprise for PEAPV0 MS CHAPV2 EAP TTLS PAP or EAP TTLS CHAP a Launch Dell...

Страница 235: ...ter Remove the used fusing unit and install a new fusing unit For more information about replacing the fusing unit see Replacing the Fusing Unit the Transfer Unit and the Retard Roller 010 377 Turn off the printer Confirm that the fusing unit is correctly installed and turn on the printer Contact customer support if this failure is repeated For more information about installing the fusing unit see...

Страница 236: ...rred while using the Wireless LAN WPA Enterprise or WPA2 Enterprise Ask your system administrator to connect the printer with a wired network initialize the wireless settings import the wireless certificate and set WPA Enterprise or WPA2 Enterprise again 016 720 Error relating to PDL emulation problems has occurred Change the Print Mode setting in the Graphics tab of the printer driver Contact cus...

Страница 237: ...artridge For more information about installing a drum cartridge see Replacing the Drum Cartridge 093 426 The time to replace the toner cartridge is coming soon Prepare the new toner cartridge 093 922 Open the front cover and pull out the toner cartridge Shake it five or six times and reinstall it For more information about replacing the toner cartridge see Replacing the Toner Cartridge 093 933 Rem...

Страница 238: ...238 Understanding Printer Messages ...

Страница 239: ...X 10 10 Red Hat Enterprise Linux 6 Desktop 32 64bit SUSE Linux Enterprise Desktop 11 32 64bit and Ubuntu 12 04 LTS 32 64bit Power Supply This condition is equivalent to Network standby mode the power consumption in this condition is that all wired network ports are connected and all wireless network ports are activated Dimensions Height 273 mm 10 75 inches Width 410 mm 16 14 inches Depth 438 mm 17...

Страница 240: ...ing systems Microsoft Windows Server 2003 Windows Server 2003 x64 Windows Server 2008 Windows Server 2008 x64 Windows Server 2008 R2 x64 Windows Vista Windows Vista x64 Windows 7 Windows 7 x64 Windows 8 Windows 8 x64 Windows 8 1 Windows 8 1 x64 Windows Server 2012 Windows Server 2012 R2 Mac OS X 10 5 Mac OS X 10 6 OS X 10 7 OS X 10 8 OS X 10 9 OS X 10 10 Red Hat Enterprise Linux 6 Desktop 32 64bit...

Страница 241: ...tion specifications and symbols 1 Ethernet 10Base T 100Base TX 1000Base T 2 USB USB 2 0 3 Wireless adapter socket IEEE 802 11b 802 11g 802 11n Item Description Print resolution 600 dpi x 600 dpi Print speed Simplex Black White 35 ppm Letter A4 Duplex Black White 24 ppm Letter A4 Paper size A4 B5 A5 B6 A6 Letter Executive Folio 8 5 x 13 Statement Legal Envelope 10 Monarch DL C5 Japanese postcard 1 ...

Страница 242: ...802 11g and 802 11n Bandwidth 2 4 GHz Data transfer rate IEEE 802 11n 65 Mbps IEEE 802 11g 54 48 36 24 18 12 9 and 6 Mbps IEEE 802 11b 11 5 5 2 and 1 Mbps Security 64 40 bit key 128 104 bit key WEP WPA PSK TKIP AES WPA2 PSK AES WPA Enterprise TKIP AES 1 WPA2 Enterprise AES 1 Wi Fi Protected Setup WPS 2 Push Button Configuration PBC Personal Identification Number PIN Wireless mode Infrastructure Ad...

Страница 243: ...243 Maintaining Your Printer 22 Maintaining Your Printer 245 23 Clearing Jams 267 ...

Страница 244: ...244 ...

Страница 245: ... launch the Dell Printer Configuration Web Tool and click the Order Supplies at to order consumables for your printer You can also order consumables by the following method 1 Click Start All Programs Dell Printers Dell Smart Printer S2810dn Dell Supplies Management System The Dell Supplies Management System window appears 2 Select your printer from the Select Printer Model list 3 If you are orderi...

Страница 246: ...rectly on the floor If you store individual packages of print media out of the original carton ensure that they rest on a flat surface so the edges do not buckle or curl Do not place anything on top of the print media packages Storing Consumables Store consumables in their original packaging until you need to use them Do not store consumables in Temperatures greater than 40 C 104 F An environment ...

Страница 247: ...sing accessories parts or components not supplied by Dell WARNING Never throw used toner cartridge into fire The residual toner could explode resulting in burns and injuries WARNING Do not shake the used toner cartridge This may cause toner spills Removing the Toner Cartridge NOTE Ensure that you remove all the paper from the MPF and close the MPF cover before removing the toner cartridge 1 Grasp ...

Страница 248: ...cartridge five or six times to distribute the toner evenly 3 Make sure that the two tabs of the toner cartridge align with the grooves on the printer and then insert it into the printer until it clicks into place 4 Grasp the toner cartridge lock lever and then pull it down until it stops 5 Close the front cover ...

Страница 249: ...y deteriorate Removing the Drum Cartridge 1 Grasp the grips on both sides of the front cover and then pull it down to open 2 Grasp the handle on the front of the drum cartridge and then pull it out halfway with one hand 3 Hold both sides of the drum cartridge with your hands and then pull it out completely Installing a Drum Cartridge 1 Unpack a new drum cartridge CAUTION The protective cover of th...

Страница 250: ...idge and then push and install the drum cartridge until it stops 4 To remove the toner cartridge from the old drum cartridge grasp the toner cartridge lock lever and then raise it upward to unlock 5 Grasp the handle on the toner cartridge and then pull it out of the old drum cartridge WARNING Do not shake the toner cartridge This may cause toner spills WARNING Keep the removed toner cartridge on a...

Страница 251: ...rum cartridge in the printer Make sure that the two tabs of the toner cartridge align with the grooves on the printer and then insert it into the printer until it clicks into place 7 Grasp the toner cartridge lock lever and then pull it down until it stops 8 Close the front cover ...

Страница 252: ... WARNING Before performing any of the following procedures read and follow the safety instructions in the Important Information Replacing the Fusing Unit WARNING Before performing any of the following procedures read and follow the safety instructions in the Important Information Removing the Fusing Unit 1 Turn off the printer and wait for 40 minutes 2 Pull the rear cover handle to open the rear c...

Страница 253: ... a Fusing Unit 1 Unpack a new fusing unit 2 Remove the packing material from the fusing unit 3 Insert the fusing unit into the printer until it clicks NOTE Hold both sides of the fusing unit with your hands NOTE Make sure that the fusing unit is firmly set in the slots and cannot be moved easily 4 Lower the two gray levers to lock the fusing unit ...

Страница 254: ...ides of the transfer unit inward and then lift it out of the printer Installing a Transfer Unit 1 Unpack a new Transfer Unit 2 Hold the Transfer Unit by both its ends 3 Push the both ends of the Transfer Unit inward put it on the Duplex Unit and then rotate the Transfer Unit forward ...

Страница 255: ...other and then press the two tabs on Transfer Unit inward to lock 5 Close the rear cover Removing the Retard Roller in Tray1 1 Pull tray1 out of the printer about 200 mm 2 Hold tray1 with both hands and remove it from the printer NOTE Be sure to remove all the paper from tray1 before removing the retard roller ...

Страница 256: ...er with the other hand 4 Slide the retard roller to the left to remove it from tray1 Installing a Retard Roller in Tray1 1 Unpack a new retard roller 2 Hold the both ends of the new retard roller and attach it by sliding the two axles of the retard roller into the holes on tray1 NOTE Be careful not to touch the rubber rollers ...

Страница 257: ... tray into the printer and push until it stops NOTE After replacing the fusing unit be sure to initialize its life counter by following the instructions in the accompanying manual Cleaning Inside the Printer Clean the feed roller inside the printer if print media does not feed correctly 1 Turn off the printer and disconnect the power cable NOTE The data in the memory are cleared when the printer i...

Страница 258: ...our Printer 2 Gently pull open the MPF cover 3 Grasp both sides of the MPF and then pull the MPF from the printer 4 Pull tray1 out of the printer about 200 mm 5 Hold tray1 with both hands and remove it from the printer ...

Страница 259: ...oistened with water 7 Insert tray1 into the printer and push until it stops NOTE Do not use excessive force on the tray Doing so could damage the tray or the inside of the printer 8 Insert the MPF into the printer push until it stops and close the cover MPF Feed Roller Tray1 Feed Roller ...

Страница 260: ...oving the printer If the optional 550 sheet feeder is not fixed securely to the printer it may fall to the ground and cause injuries For details on how to uninstall the optional 550 sheet feeder see Removing the Optional 550 Sheet Feeder 1 Turn off the printer and disconnect the power cord interface cable and any other cables NOTE The data in the memory are cleared when the printer is turned off 2...

Страница 261: ...r unplug the power cable and disconnect all cables from the rear of the printer before starting these tasks 1 Ensure that the printer is turned off and then disconnect all cables from the rear of the printer 2 Remove any paper loaded on the MPF 3 Grasp both sides of the MPF and then pull it out of the printer 4 Pull the tray1 out of the printer about 200 mm ...

Страница 262: ...e printer 6 Remove the two screws joining the printer and the optional 550 sheet feeder by unscrewing them with a coin or similar object 7 Gently lift the printer off the optional 550 sheet feeder and place it on a level surface WARNING Two people are required to lift the printer ...

Страница 263: ...the printer and push until it stops CAUTION Do not use excessive force on the tray Doing so could damage the tray or the inside of the printer 9 Insert the MPF into the printer 10 Re connect all cables into the rear of the printer and turn on the printer ...

Страница 264: ...m the back of the printer before starting these tasks 1 Ensure that the printer is turned off 2 Turn the screw on the left side cover counterclockwise to remove it 3 Slide the left side cover towards the rear of the printer 4 Open the left side cover completely 5 Remove the wireless adapter from the printer by releasing the adapter s hook while pushing the wireless adapter towards the front of the...

Страница 265: ...Maintaining Your Printer 265 6 Close the left side cover and then slide it towards the front of the printer 7 Turn the screw clockwise 8 Turn on the printer ...

Страница 266: ...266 Maintaining Your Printer ...

Страница 267: ...ed damp or curled print media Flex fan and straighten print media before you load it If a jam occurs with print media try feeding one sheet at a time through the multipurpose feeder MPF Do not use print media that you have cut or trimmed yourself Do not mix print media sizes weights or types in the same print media source Ensure that the recommended print side is face up when you insert the print ...

Страница 268: ...attempt to clear any jams using tools or instruments This may permanently damage the printer The following illustration shows where paper jams may occur along the print media path 1 Fusing Unit 2 Regi Roll 3 Duplex Unit 4 Optional 550 Sheet Feeder 5 Tray1 6 MPF 6 5 4 3 2 1 ...

Страница 269: ...yed on the LCD panel you must clear all print media from the print media path 1 Remove any paper loaded on the MPF 2 Grasp both sides of the MPF and then pull it out of the printer 3 Pull tray1 out of the printer about 200 mm 4 Hold tray1 with both hands and remove it from the printer ...

Страница 270: ...270 Clearing Jams 5 Pull the rear cover handle to open the rear cover 6 Remove the jammed paper 7 Insert tray1 into the printer and push until it stops 8 Insert the MPF into the printer ...

Страница 271: ...esolve the error displayed on the LCD panel you must clear all print media from the print media path 1 Open the MPF cover or remove the remaining documents from the MPF 2 Grasp both sides of the MPF and then pull the MPF from the printer 3 Pull tray1 out of the printer about 200 mm ...

Страница 272: ...learing Jams 4 Hold tray1 with both hands and remove it from the printer 5 Pull the rear cover handle to open the rear cover 6 Remove the jammed paper 7 Insert tray1 into the printer and push until it stops ...

Страница 273: ... cover 9 Close the rear cover 10 Press the Set button Clearing Paper Jams From the Fusing Unit NOTE To resolve the error displayed on the LCD panel you must clear all print media from the print media path If status code 050 130 appears 1 Pull the rear cover handle to open the rear cover ...

Страница 274: ...Do not touch it doing so may cause burns 3 If the document is jammed under the fusing unit remove the jammed document from under the fusing unit 4 If the document is jammed above the fusing unit raise the tab of the inner part and turn it to open 5 Remove the jammed document from above the fusing unit ...

Страница 275: ... surface the roll made with sponge of the Transfer Unit Scratches dirt or oil from your hands on the roll of the Transfer Unit may reduce print quality CAUTION Protect the drum of the drum cartridge against bright light If the rear cover remains open for more than 3 minutes print quality may deteriorate NOTE To resolve the error displayed on the LCD panel you must clear all print media from the pr...

Страница 276: ...ouches or scratches the surface the roll made with sponge of the Transfer Unit Scratches dirt or oil from your hands on the roll of the Transfer Unit may reduce print quality CAUTION Protect the drum of the drum cartridge against bright light If the rear cover remains open for more than 3 minutes print quality may deteriorate NOTE To resolve the error displayed on the LCD panel you must clear all ...

Страница 277: ... appears 1 Open the MPF or remove the remaining documents from the MPF 2 Grasp both sides of the MPF and then pull the MPF from the printer 3 Pull tray1 from the printer about 200 mm 4 Hold tray1 with both hands and remove it from the printer ...

Страница 278: ...move the jammed paper from the regi roll 7 Insert the tray1 into the printer and push until it stops NOTE Do not use excessive force on the tray Doing so could damage the tray or the inside of the printer 8 Insert the MPF into the printer push until it stops and close the MPF ...

Страница 279: ...resolve the error displayed on the LCD panel you must clear all print media from the print media path If status code 050 132 appears 1 Open the MPF or remove the remaining documents from the MPF 2 Grasp both sides of the MPF and then pull the MPF from the printer 3 Pull tray1 from the printer about 200 mm ...

Страница 280: ...Jams 4 Hold tray1 with both hands and remove it from the printer 5 Pull the optional 550 sheet feeder from the printer about 200 mm 6 Hold the optional 550 sheet feeder with both hands and remove it from the printer ...

Страница 281: ...81 7 Pull the rear cover handle to open the rear cover 8 Remove the jammed paper 9 Insert the optional 550 sheet feeder into the printer and push until it stops 10 Insert tray1 into the printer and push until it stops ...

Страница 282: ...h until it stops and close the MPF 12 Close the rear cover Clearing Paper Jams From the Trays When status code 050 134 appears 1 Open the MPF or remove the remaining documents from the MPF 2 Grasp both sides of the MPF and then pull the MPF from the printer ...

Страница 283: ...t 200 mm 4 Hold tray1 with both hands and remove it from the printer 5 Remove the jammed paper 6 Insert tray1 into the printer and push until it stops NOTE Do not use excessive force on the tray Doing so could damage the tray or the inside of the printer ...

Страница 284: ...til it stops and close the MPF 8 Press the Set button When status code 050 133 appears 1 Open the MPF or remove the remaining documents from the MPF 2 Grasp both sides of the MPF and then pull the MPF from the printer 3 Pull tray1 from the printer about 200 mm ...

Страница 285: ...ray1 with both hands and remove it from the printer 5 Pull the optional 550 sheet feeder from the printer about 200 mm 6 Hold the optional 550 sheet feeder with both hands and remove it from the printer 7 Remove the jammed paper ...

Страница 286: ...rt the optional 550 sheet feeder into the printer and push until it stops 9 Insert tray1 into the printer and push until it stops 10 Insert the MPF into the printer push until it stops and close the MPF 11 Press the Set button ...

Страница 287: ...287 Troubleshooting 24 Troubleshooting Guide 289 ...

Страница 288: ...288 ...

Страница 289: ...nu Problem Action Menu settings changed from the operator panel have no effect Settings in the software program the printer driver or the printer utilities are overriding the settings made on the operator panel Problem Action Job did not print or incorrect characters printed Ensure that the top menu appears on the LCD panel before you send a job to print Press the Menu button to return to the top ...

Страница 290: ... MPF Do not force print media into the MPF when you load it otherwise it may skew or buckle Ensure that the print media is not curled Face the recommended print side up See Loading Print Media in Tray1 and the Optional 550 Sheet Feeder for more information Turn the print media over or around and try printing again to see if feeding improves Do not mix print media types Do not mix reams of print me...

Страница 291: ...ick Maintenance on the Printer Maintenance tab b Ensure that the On check box under Non Dell Toner is selected Does this solve your problem The task is complete Go to action 3 3 Disable the Toner Saver in the printer driver a On the Others tab ensure that Off is selected in the Toner Saver drop down menu Does this solve your problem The task is complete Go to action 4 4 The print media surface may...

Страница 292: ...e and the drum cartridge b After you refresh the toner in the drum cartridge Press the Menu button c Select Report List Demo Page The demo page is printed Does this solve your problem The task is complete Go to action 8 8 Replace the drum cartridge a Replace the drum cartridge See Replacing the Drum Cartridge b After you replace the drum cartridge Press the Menu button c Select Report List Demo Pa...

Страница 293: ...u button c Select Report List Demo Page The demo page is printed Does this solve your problem The task is complete Go to action 5 5 Replace the fusing unit the transfer unit and the retard roller a Replace the fusing unit the transfer unit and the retard roller See Replacing the Fusing Unit the Transfer Unit and the Retard Roller b After you replace the fusing unit the transfer unit and the retard...

Страница 294: ...ve your problem The task is complete Go to action 8 3 The toner cartridge may be low or need to be replaced Confirm the amount of toner left in the toner cartridge a Check the toner level in the Status tab in the Status Monitor b Replace the toner cartridge as necessary Does this solve your problem The task is complete Go to action 4 4 If you are using a non Dell brand toner cartridge enable the N...

Страница 295: ...his solve your problem The task is complete Contact Dell Action Yes No 1 The toner cartridge may be low or need to be replaced Confirm the amount of toner left in the toner cartridge a Check the toner level in the Status tab in the Status Monitor b Replace the toner cartridge as necessary Does this solve your problem The task is complete Go to action 2 2 If you are using non Dell brand toner cartr...

Страница 296: ...rum Cartridge b After you replace the drum cartridge click Chart Print on the Diagnosis tab c Click Pitch Configuration Chart The Pitch Configuration Chart is printed Does this solve your problem The task is complete Contact Dell 3 Replace the fusing unit the transfer unit and the retard roller a Replace the fusing unit the transfer unit and the retard roller See Replacing the Fusing Unit the Tran...

Страница 297: ...cartridge d Launch the Tool Box and click Chart Print on the Diagnosis tab e Click Pitch Configuration Chart The Pitch Configuration Chart is printed Does this solve your problem The task is complete Go to action 2 2 Replace the drum cartridge a Replace the drum cartridge See Replacing the Drum Cartridge b After you replace the drum cartridge Press the Menu button c Select Report List Demo Page Th...

Страница 298: ... Increase the voltage See Adjust Transfer Unit The task is complete Go to action 3 3 Replace the drum cartridge a Replace the drum cartridge See Replacing the Drum Cartridge b After you replace the drum cartridge Press the Menu button c Select Report List Demo Page The demo page is printed Does this solve your problem The task is complete Contact Dell ABC DEF A A AB A A A A A A A A A AB B B B B B ...

Страница 299: ... 2b Lower the transfer unit voltage a Press the Menu button and select Admin Settings Maintenance Adjust Transfer Unit b Decrease the voltage See Adjust Transfer Unit Does this solve your problem The task is complete Go to action 3 2c Increase the transfer unit voltage a Press the Menu button and select Admin Settings Maintenance Adjust Transfer Unit b Increase the voltage See Adjust Transfer Unit...

Страница 300: ...ight fatigue pattern using the Pitch Configuration Chart a Launch the Tool Box and click Chart Print on the Diagnosis tab b Click Pitch Configuration Chart The Pitch Configuration Chart is printed Does the pattern on the output match with that on the Pitch Configuration Chart Go to action 2 Contact Dell 2 If the cause of the trouble is identified as the drum cartridge replace the drum cartridge Se...

Страница 301: ...mo page is printed Does this solve your problem The task is complete Contact Dell 3 Replace the drum cartridge a Replace the drum cartridge See Replacing the Drum Cartridge b After you replace the drum cartridge click Report on the Printer Setting Reports tab c Click Demo Page The demo page is printed Does this solve your problem The task is complete Contact Dell Action Yes No 1 If the printer is ...

Страница 302: ...de to High Quality in the printer driver a On the Graphics tab select High Quality from Print Mode Does this solve your problem The task is complete Go to action 3 3 Enable Bitmap Smoothing in the printer driver a On the Others tab set Bitmap Smoothing under Items to On Does this solve your problem The task is complete Go to action 4 4 Enable Print Page Mode in the printer driver a On the Others t...

Страница 303: ...e Replacing the Drum Cartridge b After you replace the drum cartridge click Chart Print on the Diagnosis tab c Click Pitch Configuration Chart The Pitch Configuration Chart is printed Does this solve your problem The task is complete Contact Dell 3 Replace the fusing unit the transfer unit and the retard roller a Replace the fusing unit the transfer unit and the retard roller See Replacing the Fus...

Страница 304: ...nsure that the printer is set to the envelope mode See Printing on Envelopes Envelope Mode Does this solve your problem The task is complete Go to action 3 3 Check the wrinkle Is the wrinkle within 30 mm of the four edges of the envelope This type of wrinkle is considered normal Your printer is not at fault Go to action 4 4 Load the envelopes in the MPF properly For details see Loading Envelopes i...

Страница 305: ...am MPF Misfeed Jam Regi Jam Exit Sensor On JAM Exit Jam Exit Sensor Off JAM Tray1 Optional 550 Sheet Feeder Multi feed Jam MPF Multi feed Jam Action Yes No 1 Adjust the paper guides properly Does this solve your problem The task is complete Go to action 2 2 When you use the MPF reverse the paper and then try again When you use any of the trays change the paper and then try again Does this solve yo...

Страница 306: ...action 3 3 Ensure that the margins are set correctly on the application being used Does this solve your problem The task is complete Contact Dell Action Yes No 1 Adjust the paper guides properly Does this solve your problem The task is complete Go to action 2 2 Use any of the trays in place of the MPF Does this solve your problem The task is complete Go to action 3 3 Replace the print media with t...

Страница 307: ...ace paper one sheet at a time Does this solve your problem The task is complete Go to action 3b 2d Ensure that the print media is not curled Does this solve your problem The task is complete Go to action 3a 2e Is the print media damp Go to action 3c Go to action 3a 3a Fan the print media Does this solve your problem The task is complete Go to action 3b 3b Wipe the retard roller in tray1 or the opt...

Страница 308: ...roblem The task is complete Go to action 3c 2e Is the print media damp Go to action 3d Go to action 3a 3a Fan the print media Does this solve your problem The task is complete Go to action 3b 3b Wipe the retard roller in the MPF with a cloth moistened with water Does this solve your problem The task is complete Go to action 4b 3c If the envelope is deformed correct it or use another envelope Does ...

Страница 309: ...ansfer unit and the retard roller See Replacing the Fusing Unit the Transfer Unit and the Retard Roller b After you replace the fusing unit Launch the Tool Box c Click Chart Print on the Diagnosis tab d Click Pitch Configuration Chart The Pitch Configuration Chart is printed Does this solve your problem The task is complete Contact Dell Action Yes No 1 Ensure that tray1 or the optional 550 sheet f...

Страница 310: ...the number of print media to be loaded to the MPF Does this solve your problem The task is complete Contact Dell Action Yes No 1 Replace the fusing unit the transfer unit and the retard roller a Replace the fusing unit the transfer unit and the retard roller See Replacing the Fusing Unit the Transfer Unit and the Retard Roller b After you replace the fusing unit the transfer unit and the retard ro...

Страница 311: ...set with Certificate Details The validity period is invalid The validity period of the certificate is invalid Confirm whether the time setting of the machine is correct and whether the validity period of the certificate has expired The certificate path is invalid The certificate chain path validation of the imported certificate may not be correctly validated Confirm whether all of the high level c...

Страница 312: ... feeder Ensure the 550 sheet feeder is correctly installed on the printer Re install the feeder See Removing the Optional 550 Sheet Feeder and Installing the Optional 550 Sheet Feeder Ensure the print media is loaded correctly See Loading Print Media in Tray1 and the Optional 550 Sheet Feeder for more information Wireless Adapter Ensure the wireless adapter is securely inserted to the correct slot...

Страница 313: ...313 Appendix Appendix 315 ...

Страница 314: ...314 ...

Страница 315: ...als is provided by the original manufacturer including those purchased and or installed through Software Peripherals DellWare ReadyWare and Custom Factory Integration CFI DellPlus Online Services You can learn about Dell products and services on the following websites www dell com www dell com ap Asian Pacific countries only www dell com jp Japan only www euro dell com Europe only www dell com la ...

Страница 316: ...m recyclingworldwide Contacting Dell You can access Support for Home at dell com support Select your region enter the Service Tag of your printer and click Submit to access help tools and information You can contact Dell electronically using the following addresses World Wide Web www dell com www dell com ap Asian Pacific countries only www dell com jp Japan only www euro dell com Europe only www ...

Отзывы: