background image

Adding and Replacing Parts

113

FILE LOCATION:  C:\Documents and Settings\reggie_davis\Desktop\Projects-07\BEN\Source\parts.fm

D E L L   C O N F ID E N T IA L   –   P R E L IM I N A RY   1 / 2 5/ 0 7   –   F O R  PR O O F   O N LY

Coin-Cell Battery


CAUTION: 

Before performing the following procedures, follow the safety instructions in your 

Product 

Information Guide

.


NOTICE: 

To avoid electrostatic discharge, ground yourself by using a wrist grounding strap or by periodically 

touching a connector on the back panel of the computer.


NOTICE: 

To avoid damaging the system board, you must remove the main battery before you begin working inside 

the computer.

1

Follow the procedures in "Before You Begin" on page 95.

2

Remove the hinge cover (see "Hinge Cover" on page 100).

3

Remove the keyboard (see "Keyboard" on page 101).

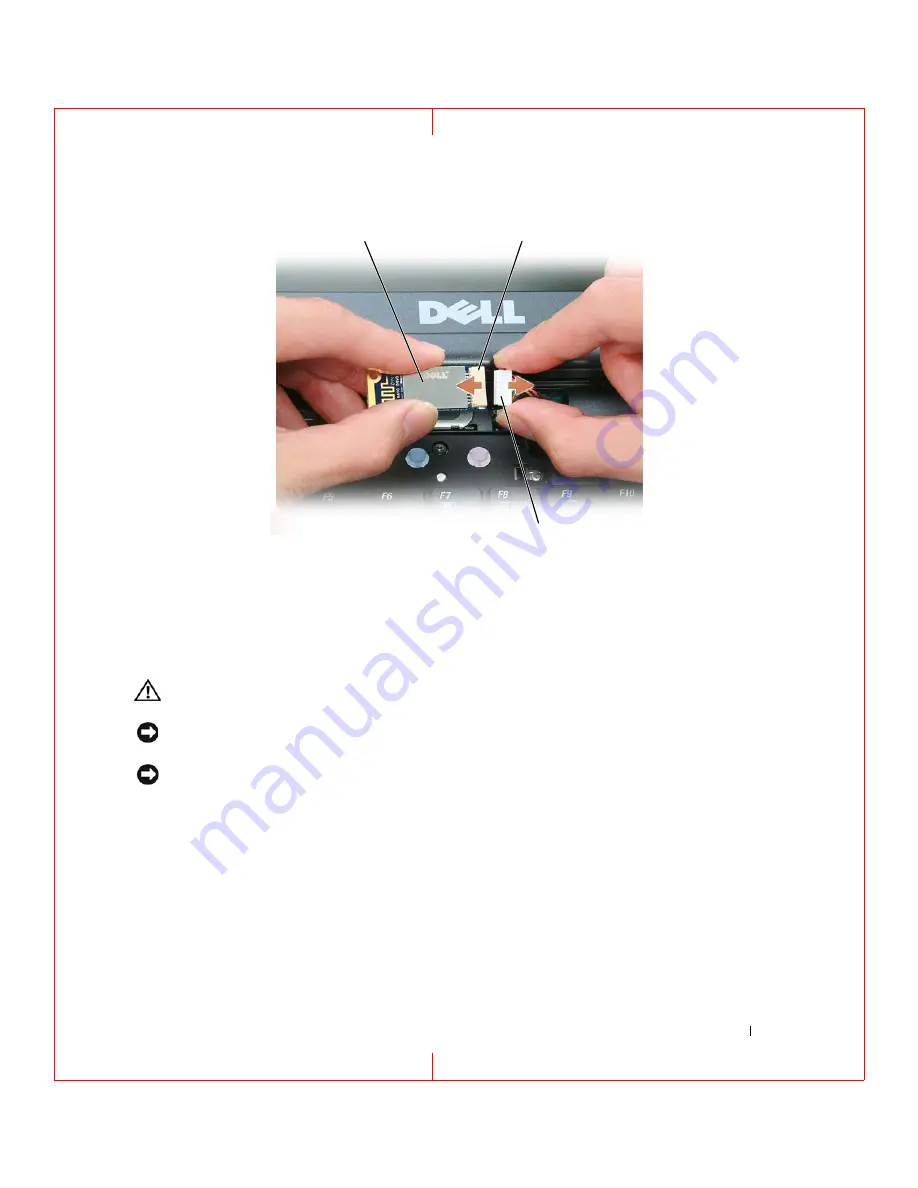
1

card

2

card connector

3

card cable 

connector

3

2

1

Содержание Precision M65

Страница 1: ... l l c o m FILE LOCATION C Documents and Settings reggie_davis Desktop Projects 07 BEN Source title fm DELL CONFIDENTIAL PRELIMINARY 1 25 07 FOR PROOF ONLY Template Last Updated 7 01 2005 Dell Precision Mobile Workstation M65 User s Guide ...

Страница 2: ...e ____________________ Information in this document is subject to change without notice 2006 Dell Inc All rights reserved Reproduction in any manner whatsoever without the written permission of Dell Inc is strictly forbidden Trademarks used in this text Dell the DELL logo Inspiron Dell Precision Dimension XPS OptiPlex Latitude PowerEdge PowerVault PowerApp ExpressCharge and Dell OpenManage are tra...

Страница 3: ...ide View 17 Right Side View 20 Back View 21 Bottom View 24 3 Using a Battery Battery Performance 27 Checking the Battery Charge 28 Dell QuickSet Battery Meter 28 Microsoft Windows Power Meter 28 Charge Gauge 28 Low Battery Warning 29 Conserving Battery Power 29 Power Management Modes 29 Standby Mode 29 Hibernate Mode 30 Configuring Power Management Settings 31 Charging the Battery 31 Replacing the...

Страница 4: ...ustomizing the Touch Pad and Track Stick 36 Changing the Track Stick Cap 36 5 Using Multimedia Playing CDs or DVDs 37 Adjusting the Volume 38 Volume Control Window 38 Volume Control Buttons 38 Adjusting the Picture 38 6 Using the Display Adjusting Brightness 39 Switching the Video Image 39 Setting Display Resolution and Refresh Rate 39 Dual Independent Display Mode 40 Swapping Primary and Secondar...

Страница 5: ... to Establish a Mobile Broadband Network Connection 48 Checking Your Mobile Broadband Network Card 48 Connecting to a Mobile Broadband Network 48 Enabling Disabling the Dell Mobile Broadband Network Card 49 Managing Your Network Settings Through the Dell QuickSet Location Profiler 49 Dell Wi Fi Catcher Network Locator 49 Internet Connection Firewall 50 8 Using Cards Card Types 51 Card Blanks 51 Ex...

Страница 6: ...vice 63 Dell Diagnostics 63 When to Use the Dell Diagnostics 63 Starting the Dell Diagnostics From Your Hard Drive 63 Starting the Dell Diagnostics From the Drivers and Utilities CD 64 Dell Diagnostics Main Menu 64 Dell Support Utility 66 Accessing the Dell Support Utility 66 Clicking the Dell Support Icon 66 Double Clicking the Dell Support Icon 66 Drive Problems 67 CD and DVD drive problems 67 H...

Страница 7: ...lems 77 Power Problems 77 Ensuring Sufficient Power for Your Computer 78 Docking Power Considerations 78 Printer Problems 78 Scanner Problems 79 Sound and Speaker Problems 79 No sound from integrated speakers 79 No sound from external speakers 80 No sound from headphones 80 Touch Pad or Mouse Problems 80 Video and Display Problems 81 If the display is blank 81 If the display is difficult to read 8...

Страница 8: ...ing Drivers 89 Reinstalling Drivers and Utilities 89 Resolving Software and Hardware Incompatibilities 91 Restoring Your Operating System 91 Using Microsoft Windows XP System Restore 91 Using the Operating System CD 93 93 14 Adding and Replacing Parts Before You Begin 95 Recommended Tools 95 Turning Off Your Computer 95 Before Working Inside Your Computer 95 Hard Drive 96 Returning a Hard Drive to...

Страница 9: ...rnal Card With Bluetooth Wireless Technology 111 Coin Cell Battery 113 15 Dell QuickSet 16 Specifications 17 Getting Help Obtaining Assistance 125 Online Services 125 AutoTech Service 126 Automated Order Status Service 126 Support Service 126 Problems With Your Order 127 Product Information 127 Returning Items for Warranty Repair or Credit 127 Before You Call 127 Contacting Dell 128 18 19 Appendix...

Страница 10: ...ocuments and Settings reggie_davis Desktop Projects 07 BEN Source bookTOC fm DELL CONFIDENTIAL PRELIMINARY 1 25 07 FOR PROOF ONLY CDs and DVDs 147 Macrovision Product Notice 148 FCC Notice U S Only 148 FCC Class B 148 Glossary 151 ...

Страница 11: ... and drivers are already installed on your computer You can use the CD to reinstall drivers see Reinstalling Drivers and Utilities on page 89 or to run the Dell Diagnostics see Dell Diagnostics on page 63 Readme files may be included on your CD to provide last minute updates about technical changes to your computer or advanced technical reference material for technicians or experienced users NOTE ...

Страница 12: ...nformation Guide Service Tag and Express Service Code Microsoft Windows License Label Service Tag and Microsoft Windows License These labels are located on the bottom of your computer Use the Service Tag to identify your computer when you use support dell com or contact technical support It is recommended that you keep a copy of the Service Tag in a secure location in case your computer is lost or...

Страница 13: ... of your Dell computer The software automatically detects your computer and operating system and installs the updates appropriate for your configuration Dell Support Website support dell com NOTE Select your region to view the appropriate support site NOTE Corporate government and education customers can also use the customized Dell Premier Support website at premier support dell com To download N...

Страница 14: ...d may not ship with your computer The operating system is already installed on your computer To reinstall your operating system use the optional Operating System CD see Restoring Your Operating System on page 91 After you reinstall your operating system use the Drivers and Utilities CD ResourceCD to reinstall drivers for the devices that came with your computer NOTE The color of your CD varies bas...

Страница 15: ... PRELIMINARY 1 25 07 FOR PROOF ONLY About Your Computer Front View 1 display latch 8 touch pad track stick buttons 2 display 9 track stick 3 power button 10 keyboard status lights 4 device status lights 11 volume control buttons 5 speakers 2 12 mute button 6 keyboard 13 ambient light sensor 7 touch pad 1 5 2 10 7 11 4 12 3 6 8 13 9 ...

Страница 16: ...ng the Display on page 39 POWER BUTTON Press the power button to turn on the computer or exit a power management mode see Power Management Modes on page 29 NOTICE To avoid losing data turn off your computer by performing a Microsoft Windows operating system shutdown rather than by pressing the power button If the computer stops responding press and hold the power button until the computer turns of...

Страница 17: ...rmation TOUCH PAD TRACK STICK BUTTONS Provide the functionality of a mouse See Touch Pad on page 35 for more information NOTE If you ordered the optional fingerprint reader with your computer the reader is located between the touch pad buttons AMBIENT LIGHT SENSOR ALS Helps to control display brightness For more information see Using the Ambient Light Sensor on page 41 Turns on when you turn on th...

Страница 18: ...ONLY KEYBOARD STATUS LIGHTS The green lights located above the keyboard indicate the following VOLUME CONTROL BUTTONS Press these buttons to adjust the volume MUTE BUTTON Press this button to turn off the volume Turns on when the numeric keypad is enabled Turns on when the uppercase letter function is enabled Turns on when the scroll lock function is enabled 9 A ...

Страница 19: ... from overheating CAUTION Do not block push objects into or allow dust to accumulate in the air vents Do not store your Dell computer in a low airflow environment such as a closed briefcase while it is running Restricting the airflow can damage the computer or cause a fire NOTE The computer turns on the fan when the computer gets hot Fan noise is normal and does not indicate a problem with the fan...

Страница 20: ...r is disabled You can use the system setup program to enable the sensor For information on transferring data see Windows Help the Help and Support Center or the documentation that came with your infrared compatible device WIRELESS SWITCH Turns on off wireless devices such as Wi Fi and internal cards with Bluetooth technology and scans for Wi Fi networks For more information about scanning for wire...

Страница 21: ...etwork found Flashing yellow Error Off No signal found PC CARD SLOT Supports one PC Card such as a modem or network adapter The computer ships with a blank installed in the slot For more information see Using Cards on page 51 SMART CARD SLOT Supports one smart card see Smart Cards on page 55 1 off position 2 on position 3 momentary position 4 Wi Fi Catcher light off Disables wireless devices on En...

Страница 22: ... about fm DELL CONFIDENTIAL PRELIMINARY 1 25 07 FOR PROOF ONLY Right Side View MEDIA BAY Supports a floppy drive optical drives or a second battery or second hard drive see Using Multimedia on page 37 USB CONNECTORS 1 media bay 2 USB connectors 2 Connect USB devices such as a mouse keyboard or printer 1 2 ...

Страница 23: ...amaging the computer do not plug a telephone line into the network connector USB CONNECTOR 1 network connector RJ 45 5 serial connector 2 USB connector 6 video connector 3 powered USB connector 7 AC adapter connector 4 modem connector RJ 11 8 air vents Connects the computer to a network The two lights next to the connector indicate status and activity for wired network connections For information ...

Страница 24: ...dapter to the computer Connects USB 2 0 compliant devices such as a mouse keyboard or printer Can also be used for peripherals that require more than 5 V of power If you ordered the optional internal modem connect the telephone line to the modem connector For information on using the modem see the online modem documentation supplied with your computer see Finding Information on page 9 Connects ser...

Страница 25: ... disconnect the AC adapter cable from the computer grasp the connector not the cable itself and pull firmly but gently to avoid damaging the cable When you wrap the AC adapter cable ensure that you follow the angle of the connector on the AC adapter to avoid damaging the cable AIR VENTS The computer uses an internal fan to create airflow through the vents which prevents the computer from overheati...

Страница 26: ...compartment that contains the second memory module see Memory on page 103 DOCKING DEVICE CONNECTOR Lets you attach your computer to the Media Base or other docking device See the Dell documentation that came with your docking device for more information FAN AIR VENTS The computer uses an internal fan to create airflow through the fan air vents which prevents the computer from overheating NOTE The ...

Страница 27: ...ENTIAL PRELIMINARY 1 25 07 FOR PROOF ONLY CAUTION Do not block push objects into or allow dust to accumulate in the air vents Do not store your computer in a low airflow environment such as a closed briefcase while it is running Restricting the airflow can damage the computer or cause a fire HARD DRIVE Stores software and data ...

Страница 28: ...26 About Your Computer FILE LOCATION C Documents and Settings reggie_davis Desktop Projects 07 BEN Source about fm DELL CONFIDENTIAL PRELIMINARY 1 25 07 FOR PROOF ONLY ...

Страница 29: ... You can install an optional second battery in the media bay to significantly increase operating time Operating time is significantly reduced when you perform operations including but not limited to the following Using optical drives Using wireless communications devices PC Cards ExpressCards media memory cards or USB devices Using high brightness display settings 3D screen savers or other power i...

Страница 30: ...ickSet right click the icon in the taskbar and click Help Microsoft Windows Power Meter The Windows Power Meter indicates the remaining battery charge To check the Power Meter double click the icon on the taskbar If the computer is connected to an electrical outlet a icon appears Charge Gauge By either pressing once or pressing and holding the status button on the charge gauge on the battery you c...

Страница 31: ... a pop up window warns you when the battery charge is approximately 90 percent depleted You can change the settings for the battery alarms in QuickSet or the Power Options Properties window See Configuring Power Management Settings on page 31 for information about accessing QuickSet or the Power Options Properties window Conserving Battery Power Perform the following actions to conserve battery po...

Страница 32: ...ntering hibernate mode NOTICE You cannot remove devices or undock your computer while your computer is in hibernate mode Your computer enters hibernate mode if the battery charge level becomes critically low To manually enter hibernate mode Click Start Turn off computer press and hold Shift and then click Hibernate or Depending on how you set the power management options in the Power Options Prope...

Страница 33: ...uter is connected to an electrical outlet the computer checks the battery charge and temperature If necessary the AC adapter then charges the battery and maintains the battery charge If the battery is hot from being used in your computer or being in a hot environment the battery may not charge when you connect the computer to an electrical outlet The battery is too hot to start charging if the lig...

Страница 34: ...tery bay latch release on the bottom of the computer until the release clicks 4 Using the tab on the battery lift the battery out of the computer To replace the battery place the battery in the bay and press down until the battery bay latch release clicks Storing a Battery Remove the battery when you store your computer for an extended period of time A battery discharges during prolonged storage A...

Страница 35: ...ternal keyboard Each key on the keypad has multiple functions The keypad numbers and symbols are marked in blue on the right of the keypad keys To type a number or symbol hold down Fn and press the desired key To enable the keypad press Num Lk The light indicates that the keypad is active To disable the keypad press Num Lk again Key Combinations System Functions Battery Ctrl Shift Esc Opens the Ta...

Страница 36: ...tegrated display only not on an external monitor Fn Esc Activates a power management mode You can reprogram this keyboard shortcut to activate a different power management mode using the Advanced tab in the Power Options Properties window see Configuring Power Management Settings on page 31 Fn F1 Puts the computer into hibernate mode Dell QuickSet is required see Dell QuickSet on page 115 Windows ...

Страница 37: ...of your finger to allow you to move the cursor on the display Use the touch pad and touch pad buttons as you would use a mouse NOTE If you ordered the optional fingerprint reader with your computer the reader is located between the touch pad buttons To move the cursor lightly slide your finger over the touch pad To select an object lightly tap once on the surface of the touch pad or use your thumb...

Страница 38: ...settings 1 Click Start Control Panel Printers and Other Hardware Mouse For information about the Control Panel see Windows Help and Support Center on page 11 2 In the Mouse Properties window Click the Device Select tab to disable the touch pad and track stick Click the Pointer tab to adjust touch pad and track stick settings 3 Click OK to save the settings and close the window Changing the Track S...

Страница 39: ...Ds 1 Press the eject button on the front of the drive 2 Pull out the tray 3 Place the disc label side up in the center of the tray and snap the disc onto the spindle NOTE If you use a module that shipped with another computer you need to install the drivers and software necessary to play DVDs or write data For more information see the Drivers and Utilities CD the Drivers and Utilities CD is option...

Страница 40: ... drag the bar in the Volume Control column and slide it up or down to increase or decrease the volume For more information on volume control options click Help in the Volume Control window Volume Control Buttons You can adjust the volume with the volume control buttons on your computer See volume control buttons on page 16 Adjusting the Picture If an error message notifies you that the current res...

Страница 41: ...ntegrated display only not on an external monitor Switching the Video Image When you start the computer with an external device such as an external monitor or projector attached and turned on the image may appear on either the computer display or the external device Press Fn F8 to switch the video image between the display only the external device only or the display and the external device simult...

Страница 42: ... TV or projector to the computer 2 Click Start Control Panel Display Settings NOTE If you choose a resolution or color palette that is higher than the display supports the settings adjust automatically to the closest supported values For more information see your operating system documentation 3 Click the monitor 2 icon Extend my Windows desktop onto this monitor Apply 4 Change Screen resolution t...

Страница 43: ... sets the display brightness to the minimum level The ALS is disabled when your computer is shipped to you If you enable the ALS and then use any of the display brightness key combinations the ALS is disabled and the display brightness is increased or decreased accordingly Dell QuickSet allows you to enable or disable the ALS feature You can also adjust maximum and minimum brightness settings that...

Страница 44: ...42 Using the Display FILE LOCATION C Documents and Settings reggie_davis Desktop Projects 07 BEN Source display fm DELL CONFIDENTIAL PRELIMINARY 1 25 07 FOR PROOF ONLY ...

Страница 45: ...e that it is securely attached 2 Connect the other end of the network cable to a network connection device or a network wall connector NOTE Do not use a network cable with a telephone wall connector 3 Connect the other end of the network cable to a network connection device or a network wall connector NOTE Do not use a network cable with a telephone wall connector Network Setup Wizard The Microsof...

Страница 46: ...set up a WLAN you need High speed broadband Internet access such as cable or DSL A broadband modem that is connected and working A wireless router or access point A wireless network card for each computer that you want to connect to your WLAN A network cable with the network RJ 45 connector Checking Your Wireless Network Card Depending on what you selected when you purchased your computer the comp...

Страница 47: ...ting information Install the required software according to the manufacturer s instructions 3 Shut down your computer and any other wireless enabled computers in the vicinity through the Start menu 4 Disconnect your broadband modem power cable from the electrical outlet 5 Disconnect the network cable from the computer and the modem NOTE Wait for a minimum of 5 minutes after disconnecting your broa...

Страница 48: ... See Wireless Local Area Network WLAN on page 44 for more information about how to prepare for connecting your computer to a WLAN Your wireless network card requires specific software and drivers for connecting to a network The software is already installed NOTE If the software is removed or corrupted follow the instructions in the user documentation for your wireless network card Verify the type ...

Страница 49: ...e you have configured your computer for the wireless network that you selected another pop up notifies you that your computer is connected to that network Thereafter whenever you log on to your computer within the range of the wireless network that you selected the same pop up notifies you of the wireless network connection NOTE If you select a secure network you must enter a WEP or WPA key when p...

Страница 50: ... or on the CD that accompanied your card if purchased separately from your computer If the utility is corrupted or deleted from your computer see the Dell Mobile Broadband Card Utility user s guide for instructions The user s guide is available through the Windows Help and Support Center or on the CD that accompanied your card if you purchased it separately from your computer To access the Help an...

Страница 51: ...the switch to the on position to enable the switch and the Dell Mobile Broadband card For information about the wireless switch positions see wireless switch on page 18 To monitor the status of your wireless device see Monitoring the Status of Wireless Network Connections Through Dell QuickSet on page 47 Managing Your Network Settings Through the Dell QuickSet Location Profiler The QuickSet Locati...

Страница 52: ...trol WiFi network connections For more information on the Wi Fi Catcher Network Locator and to enable the feature through QuickSet see the Dell QuickSet Help To access the Help file right click the icon in the taskbar Internet Connection Firewall The Internet Connection Firewall provides basic protection from unauthorized access to the computer while the computer is connected to the Internet The f...

Страница 53: ...k on page 53 Extended Cards An extended card for example a wireless network adapter is longer than a standard card and extends outside the computer Follow these precautions when using extended PC or ExpressCards Protect the exposed end of an installed card Striking the end of the card can damage the system board Always remove an extended card before you pack the computer in its carrying case Insta...

Страница 54: ...es most cards and automatically loads the appropriate device driver If the configuration program tells you to load the manufacturer s drivers use the floppy disk or CD that came with the PC Card ExpressCard 1 Hold the card with its orientation symbol pointing into the slot and the top side of the card facing up The latch may need to be in the in position before you insert the card 2 Slide the card...

Страница 55: ...C Card slot For information about using the PC Card slot see PC Card on page 51 Removing a Card or Blank CAUTION Before you begin any of the procedures in this section follow the safety instructions in your Product Information Guide NOTICE Click the icon in the taskbar to select a card and stop it from functioning before you remove it from the computer If you do not stop the card in the configurat...

Страница 56: ...54 Using Cards FILE LOCATION C Documents and Settings reggie_davis Desktop Projects 07 BEN Source cards fm DELL CONFIDENTIAL PRELIMINARY 1 25 07 FOR PROOF ONLY ...

Страница 57: ...n see the instructions included with the device NOTICE Before you buy an antitheft device ensure that it will work with the security cable slot on your computer Smart Cards NOTE The smart card feature may not be available on your computer About Smart Cards Smart cards are portable credit card shaped devices with internal integrated circuits The top surface of the smart card usually contains an emb...

Страница 58: ... detects the card To install a smart card 1 Hold the card so that the gold contact pad is facing upward and pointing toward the smart card slot 2 Slide the smart card into the smart card slot until the card is completely seated in its connector The smart card protrudes approximately 1 2 inch from the slot The smart card slot is located below the PC Card slot If you encounter too much resistance do...

Страница 59: ...penManage Client Instrumentation version 7 3 or later must be installed on the computer for system administrators to assign passwords remotely Using a Primary System Password The primary system password allows you to protect the computer from unauthorized access Access User Accounts from the Control Panel to create user accounts and add or change passwords After assigning a primary password you mu...

Страница 60: ...ard Drive Password The hard drive password helps protect the data on your hard drive from unauthorized access You can also assign a password for an external hard drive if one is being used that can be the same as or different from the password for the primary hard drive After assigning a hard drive password you must enter it each time you turn on the computer and each time you restore the computer...

Страница 61: ...file In the event of these backups being incomplete lost or damaged Dell will be unable to assist in the recovery of encrypted data Enabling the TPM Feature 1 Enable the TPM software a Restart the computer and press F2 during the Power On Self Test to enter the system setup program b Select Security TPM Security and press Enter c Under TPM Security select On d Press Esc to exit the setup program e...

Страница 62: ...ude the Service Tag in your description of the computer Ask that a case number be assigned and write down the number along with the name address and phone number of the law enforcement agency If possible obtain the name of the investigating officer NOTE If you know where the computer was lost or stolen call a law enforcement agency in that area If you do not know call a law enforcement agency wher...

Страница 63: ...ge 73 and run the Dell Diagnostics before you contact Dell for technical assistance It is recommended that you print these procedures before you begin NOTICE The Dell Diagnostics works only on Dell computers NOTE The Drivers and Utilities CD is optional and may not ship with your computer Start the Dell Diagnostics from either your hard drive or from the Drivers and Utilities CD also known as the ...

Страница 64: ... completes successfully you receive the message Booting Dell Diagnostic Utility Partition Press any key to continue 5 Press any key to start the Dell Diagnostics from the diagnostics utility partition on your hard drive Starting the Dell Diagnostics From the Drivers and Utilities CD 1 Insert the Drivers and Utilities CD 2 Shut down and restart the computer When the DELL logo appears press F12 imme...

Страница 65: ... Express Test first to increase the possibility of tracing the problem quickly Extended Test Performs a thorough check of devices The test typically takes 1 hour or more and requires you to answer questions periodically Custom Test Tests a specific device You can customize the tests you want to run Symptom Tree Lists the most common symptoms encountered and allows you to select a test based on the...

Страница 66: ...s not appear in your taskbar 1 Click Start All Programs Dell Support Dell Support Settings 2 Ensure that the Show icon on the taskbar option is checked NOTE If the Dell Support Utility is not available from the Start menu go to support dell com and download the software The Dell Support Utility is customized for your computing environment The icon in the taskbar functions differently when you clic...

Страница 67: ...S SNAPPED ONTO THE SPINDLE CHECK THE CABLE CONNECTIONS CHECK FOR HARDWARE INCOMPATIBILITIES See Resolving Software and Hardware Incompatibilities on page 91 RUN THE DELL DIAGNOSTICS See Dell Diagnostics on page 63 CD and DVD drive problems NOTE High speed CD or DVD drive vibration is normal and may cause noise which does not indicate a defect in the drive or the CD or DVD NOTE Because of different...

Страница 68: ...cted to a digital telephone network CHECK THE MICROSOFT OUTLOOK EXPRESS SECURITY SETTINGS If you cannot open your e mail attachments 1 In Outlook Express click Tools Options Security 2 Click Do not allow attachments to remove the checkmark CHECK THE TELEPHONE LINE CONNECTION CHECK THE TELEPHONE CONNECTOR CONNECT THE MODEM DIRECTLY TO THE TELEPHONE WALL CONNECTOR USE A DIFFERENT TELEPHONE LINE Veri...

Страница 69: ...gnostics Checklist on page 128 as you complete these checks CAUTION Before you begin any of the procedures in this section follow the safety instructions in the Product Information Guide If the message is not listed see the documentation for the operating system or the program that was running when the message appeared AUXILIARY DEVICE FAILURE The touch pad track stick or external mouse may be fau...

Страница 70: ...k Drive tests in the Dell Diagnostics see Dell Diagnostics on page 63 HARD DISK DRIVE FAILURE The hard drive does not respond to commands from the computer Shut down the computer remove the hard drive see Hard Drive on page 96 and boot the computer from a CD Then shut down the computer reinstall the hard drive and restart the computer If the problem persists try another drive Run the Hard Disk Dri...

Страница 71: ...hem NO BOOT DEVICE AVAILABLE The computer cannot find the hard drive If the hard drive is your boot device ensure that the drive is installed properly seated and partitioned as a boot device NO BOOT SECTOR ON HARD DRIVE The operating system may be corrupted Contact Dell see Contacting Dell on page 128 No timer tick interrupt A chip on the system board may be malfunctioning Run the System Set tests...

Страница 72: ... Dell Diagnostics see Dell Diagnostics on page 63 UNEXPECTED INTERRUPT IN PROTECTED MODE The keyboard controller may be malfunctioning or a memory module may be loose Run the System Memory tests and the Keyboard Controller test in the Dell Diagnostics see Dell Diagnostics on page 63 X IS NOT ACCESSIBLE THE DEVICE IS NOT READY Insert a disk into the drive and try again WARNING BATTERY IS CRITICALLY...

Страница 73: ...the external keyboard and verify that they appear on the display If you cannot verify these steps you may have a defective external keyboard TO VERIFY THAT THE PROBLEM IS WITH THE EXTERNAL KEYBOARD CHECK THE INTEGRATED KEYBOARD 1 Shut down the computer 2 Disconnect the external keyboard 3 Turn on the computer 4 From the Windows desktop click Start All Programs Accessories Notepad 5 Type some chara...

Страница 74: ...lick End Task CHECK THE SOFTWARE DOCUMENTATION If necessary uninstall and then reinstall the program A program is designed for an earlier Microsoft Windows operating system RUN THE PROGRAM COMPATIBILITY WIZARD The Program Compatibility Wizard configures a program so it runs in an environment similar to non Windows XP operating system environments 1 Click Start All Programs Accessories Program Comp...

Страница 75: ...ftware problem Memory Problems Fill out the Diagnostics Checklist see Diagnostics Checklist on page 128 as you complete these checks CAUTION Before you begin any of the procedures in this section follow the safety instructions in the Product Information Guide IF YOU RECEIVE AN INSUFFICIENT MEMORY MESSAGE Save and close any open files and exit any open programs you are not using to see if that reso...

Страница 76: ...ils on your plan CHECK YOUR MOBILE BROADBAND NETWORK SERVICE Contact your Mobile Broadband service carrier to verify coverage plan and supported services CHECK THE STATUS IN THE DELL MOBILE BROADBAND CARD UTILITY Click the icon in the taskbar to launch the utility Check the status in the main window No card detected Restart the computer and launch the utility again Wireless Disabled Ensure that th...

Страница 77: ...mode If the light is off press the power button to turn on the computer CHARGE THE BATTERY The battery charge may be depleted 1 Reinstall the battery 2 Use the AC adapter to connect the computer to an electrical outlet 3 Turn on the computer NOTE Battery operating time the time the battery can hold a charge decreases over time Depending on how often the battery is used and the conditions under whi...

Страница 78: ...ll D Dock normal computer operation is not possible on battery power alone Ensure that the AC adapter is connected to your computer when the computer is docked to the Dell D Dock Docking While the Computer Is Running If a computer is connected to the Dell D Dock or Dell D Port while the computer is running presence of the docking device is ignored until the AC adapter is connected to the computer ...

Страница 79: ...for setup and troubleshooting information UNLOCK THE SCANNER Ensure that your scanner is unlocked if it has a locking tab or button RESTART THE COMPUTER AND TRY THE SCANNER AGAIN CHECK THE CABLE CONNECTIONS See the scanner documentation for cable connection information Ensure that the scanner cables are securely connected to the scanner and the computer VERIFY THAT THE SCANNER IS RECOGNIZED BY MIC...

Страница 80: ...RFERENCE Turn off nearby fans fluorescent lights or halogen lamps to check for interference REINSTALL THE AUDIO DRIVER See Reinstalling Drivers and Utilities on page 89 RUN THE DELL DIAGNOSTICS See Dell Diagnostics on page 63 NOTE The volume control in some MP3 players overrides the Windows volume setting If you have been listening to MP3 songs ensure that you did not turn the player volume down o...

Страница 81: ...es a higher resolution than your computer supports it is recommended that you attach an external monitor to your computer CHECK THE BATTERY If you are using a battery to power your computer the battery charge may be depleted Connect the computer to an electrical outlet using the AC adapter and turn on the computer TEST THE ELECTRICAL OUTLET Ensure that the electrical outlet is working by testing i...

Страница 82: ...and you still have a display problem but the display is not completely blank run the Video device group in the Dell Diagnostics see Dell Diagnostics on page 63 Then contact Dell see Contacting Dell on page 128 SEE ERROR MESSAGES If an error message appears see Error Messages on page 69 If only part of the display is readable CONNECT AN EXTERNAL MONITOR 1 Shut down your computer and connect an exte...

Страница 83: ...up the computer run the system setup program to familiarize yourself with your system configuration information and optional settings You may want to write down the information for future reference The system setup screens display the current setup information and settings for your computer such as System configuration Boot order Boot start up configuration and docking device configuration setting...

Страница 84: ...t on page 84 The Boot Sequence page displays a general list of the bootable devices that may be installed in your computer including but not limited to the following Diskette Drive Modular bay HDD Internal HDD CD DVD CD RW drive During the boot routine the computer starts at the top of the list and scans each enabled device for the operating system start up files When the computer finds the files ...

Страница 85: ...Enter The computer boots to the selected device The next time you reboot the computer the previous boot order is restored Changing COM Ports Serial Port which is located in the Onboard Devices category allows you to map the serial port COM address or disable the serial port and its address which frees computer resources for another device to use Enabling the Infrared Sensor 1 Locate Fast IR under ...

Страница 86: ...86 System Setup Program FILE LOCATION C Documents and Settings reggie_davis Desktop Projects 07 BEN Source setup fm DELL CONFIDENTIAL PRELIMINARY 1 25 07 FOR PROOF ONLY ...

Страница 87: ...sible replace any devices installed in the module bay with the Dell TravelLite module Fully charge the main battery and any spare batteries that you plan to carry with you Shut down the computer Disconnect the AC adapter NOTICE When the display is closed extraneous items on the keyboard or palm rest could damage the display Remove any extraneous items such as paper clips pens and paper from the ke...

Страница 88: ...ional carnet also known as a merchandise passport from your government Find out what type of electrical outlets are used in the countries you will visit and have appropriate power adapters Check with your credit card company for information about the kinds of emergency travel assistance it offers to users of portable computers Traveling by Air NOTICE Do not walk the computer through a metal detect...

Страница 89: ...erating system You may need to install drivers if you Upgrade your operating system Reinstall your operating system Connect or install a new device Identifying Drivers If you experience a problem with any device identify whether the driver is the source of your problem and if necessary update the driver 1 Click Start Control Panel System 2 Click Hardware Device Manager 3 Scroll down the list to se...

Страница 90: ...le The first time that you run the CD it might prompt you to install setup files Click OK and follow the instructions on the screen to continue 3 From the Language drop down menu in the toolbar select your preferred language for the driver or utility if available A welcome screen appears 4 Click Next The CD automatically scans your hardware to detect drivers and utilities used by your computer 5 A...

Страница 91: ...etected but incorrectly configured you can use the Hardware Troubleshooter to resolve the incompatibility 1 Click Start Help and Support 2 Type hardware troubleshooter in the Search field and click the arrow to start the search 3 Click Hardware Troubleshooter I need to resolve a hardware conflict on my computer Next Restoring Your Operating System You can restore your operating system in the follo...

Страница 92: ...complete 1 Click Start All Programs Accessories System Tools System Restore 2 Ensure that Restore my computer to an earlier time is selected and click Next 3 Click a calendar date to which you want to restore your computer The Select a Restore Point screen provides a calendar that allows you to see and select restore points All calendar dates with available restore points appear in boldface type 4...

Страница 93: ... The Drivers and Utilities CD contains drivers that were installed during assembly of the computer Use the Drivers and Utilities CD to load any required including the drivers required if your computer has a RAID controller drivers Depending on the region from where you ordered your computer or whether you requested the CDs the Drivers and Utilities CD and Operating System CD may not ship with your...

Страница 94: ...94 Reinstalling Software FILE LOCATION C Documents and Settings reggie_davis Desktop Projects 07 BEN Source software fm DELL CONFIDENTIAL PRELIMINARY 1 25 07 FOR PROOF ONLY ...

Страница 95: ...lowing tools Small flat blade screwdriver Phillips screwdriver Small plastic scribe Flash BIOS update see the Dell Support website at support dell com Turning Off Your Computer NOTICE To avoid losing data save and close any open files and exit any open programs before you turn off your computer 1 Shut down the operating system a Save and close any open files exit any open programs click Start Shut...

Страница 96: ...hed 2 Turn off your computer see Turning Off Your Computer on page 95 NOTICE To disconnect a network cable first unplug the cable from your computer and then unplug it from the network wall connector 3 Disconnect any telephone or network cables from the computer 4 Disconnect your computer and all attached devices from their electrical outlets NOTICE To avoid damaging the system board you must remo...

Страница 97: ...he Product Information Guide 3 Slide the hard drive carrier out of the computer 4 Remove the new drive from its packaging Save the original packaging for storing or shipping the hard drive NOTICE Use firm and even pressure to slide the drive into place If you use excessive force you may damage the connector 5 Slide the new hard drive into the bay and into the connector until it is fully seated 6 R...

Страница 98: ... install devices while the computer is running and connected to a docking device docked Removing the Device Security Screw If present you must remove the device security screw before you remove the device 1 Save and close any open files exit any open programs and shut down the computer 2 If the computer is connected to a docking device docked undock it See the documentation that came with your doc...

Страница 99: ...ked NOTICE To prevent damage to devices store them in a safe dry place when they are not installed in the computer Avoid pressing down on them or placing heavy objects on top of them 1 If present remove the device security screw from the bottom of the computer see Removing the Device Security Screw on page 98 2 If the computer is running double click the Safely Remove Hardware icon on the taskbar ...

Страница 100: ...urself by using a wrist grounding strap or by periodically touching an unpainted metal surface such as a connector on the back of the computer NOTICE The hinge cover is fragile and can be damaged if extreme force is used Be careful when removing the hinge cover 1 Follow the procedures in Before You Begin on page 95 2 Turn the computer top side up and then open the display all the way 180 degrees s...

Страница 101: ...tructions in the Product Information Guide NOTICE To avoid electrostatic discharge ground yourself by using a wrist grounding strap or by periodically touching an unpainted metal surface such as a connector on the back of the computer 1 Follow the procedures in Before You Begin on page 95 2 Remove the hinge cover see Hinge Cover on page 100 3 Remove the three screws at the top of the keyboard NOTI...

Страница 102: ... scratching the palm rest when replacing the keyboard hook the tabs along the front edge of the keyboard into the palm rest and then secure the keyboard in place 6 To replace the keyboard connect the keyboard connector to the system board 7 Place the tabs along the front edge of the keyboard into the palm rest and lay the keyboard down on the palmrest 8 Replace the three screws at the top of the k...

Страница 103: ... is located on the bottom of the computer under the memory module cover DIMM A holds the basic memory module as configured from the factory If you did not order additional memory DIMM B is empty Generally if you add memory you use DIMM B If you are upgrading memory you may need to install memory in DIMM A and DIMM B depending on the extent of the upgrade To install a memory module in DIMM A 1 Foll...

Страница 104: ...lot at a 45 degree angle and rotate the module down until it clicks into place If you do not feel the click remove the module and reinstall it 7 Replace the keyboard see Keyboard on page 101 8 Replace the hinge cover see Hinge Cover on page 100 9 Insert the battery into the battery bay or connect the AC adapter to your computer and an electrical outlet 10 Turn on the computer As the computer boots...

Страница 105: ...rew on the memory module cover and then remove the cover NOTICE To prevent damage to the memory module connector do not use tools to spread the memory module securing clips 3 If you are replacing a memory module remove the existing module a Use your fingertips to carefully spread apart the securing clips on each end of the memory module connector until the module pops up b Remove the module from t...

Страница 106: ...lf and install the new memory module a Align the notch in the module edge connector with the tab in the connector slot b Slide the module firmly into the slot at a 45 degree angle and rotate the module down until it clicks into place If you do not feel the click remove the module and reinstall it 5 Replace the memory module cover and tighten the screw NOTICE If the cover is difficult to close remo...

Страница 107: ...instructions in the Product Information Guide 1 Follow the procedures in Before You Begin on page 95 2 Remove the battery see Replacing the Battery on page 31 3 Slide the SIM card into the compartment with the cut off corner of the card facing away from the compartment Wireless Cards If you ordered a wireless LAN or WAN card with your computer the card is already installed CAUTION Before you begin...

Страница 108: ...see Hinge Cover on page 100 3 Remove the keyboard see Keyboard on page 101 4 Ground yourself by touching one of the metal connectors on the back of the computer NOTE If you leave the area ground yourself again when you return to the computer 5 If a card is not already installed go to step 6 If you are replacing a card remove the existing card a Disconnect the antenna cable from the card b Release ...

Страница 109: ...top of or under the card a Move any antenna cables out of the way to make space for the WLAN card b Align the card with the connector at a 45 degree angle and press the card into the connector until it clicks NOTE Your WLAN card may have two or three connectors depending on the type of card you ordered Most connectors have color coded markings that correspond to the type of cable required NOTE For...

Страница 110: ... 4 Ground yourself by touching one of the metal connectors on the back of the computer NOTE If you leave the area ground yourself again when you return to the computer 5 If a card is not already installed go to step 6 If you are replacing a card remove the existing card a Disconnect the antenna cables from the card b Release the card by spreading the metal securing tabs until the card pops up slig...

Страница 111: ...ector until it clicks NOTE Most connectors have color coded markings that correspond to the type of cable required For more specific information about which cable to connect to which connector see the documentation that came with your Mobile Broadband card b Connect the antenna cable or cables to the Mobile Broadband card ensuring that you route the cables correctly Internal Card With Bluetooth Wi...

Страница 112: ...ireless technology with your computer it is already installed 1 Follow the procedures in Before You Begin on page 95 2 Remove the hinge cover see Hinge Cover on page 100 NOTICE Be careful when removing the card to avoid damaging the card card cable or surrounding components 3 Remove the card from its compartment in the computer a Slide the card to the right b Rotate the card toward the front of th...

Страница 113: ...tion Guide NOTICE To avoid electrostatic discharge ground yourself by using a wrist grounding strap or by periodically touching a connector on the back panel of the computer NOTICE To avoid damaging the system board you must remove the main battery before you begin working inside the computer 1 Follow the procedures in Before You Begin on page 95 2 Remove the hinge cover see Hinge Cover on page 10...

Страница 114: ...MINARY 1 25 07 FOR PROOF ONLY 4 Remove the battery cable connector from the connector on the system board 5 Being careful not to break the plastic slightly raise the corner of the mylar above the battery 6 While holding the mylar grasp the battery and pull out of the battery compartment 1 mylar 2 coin cell battery 3 battery cable connector 3 1 2 ...

Страница 115: ...es you with easy access to configure or view the following types of settings Network connectivity Power management Display System information Depending on what you want to do in Dell QuickSet you can start it by either clicking double clicking or right clicking the QuickSet icon in the Microsoft Windows taskbar The taskbar is located in the lower right corner of your screen For more information ab...

Страница 116: ...116 Dell QuickSet FILE LOCATION C Documents and Settings reggie_davis Desktop Projects 07 BEN Source quickset fm DELL CONFIDENTIAL PRELIMINARY 1 25 07 FOR PROOF ONLY ...

Страница 117: ... bus frequency 667 MHz System Information System chipset Intel 945PM Data bus width 64 bits DRAM bus width 64 bits Processor address bus width 36 bits PC Card CardBus controller O2Micro Oz711 CardBus controller PC Card connector one supports one Type I or Type II card Cards supported 3 3 V and 5 V PC Card connector size 80 pins Data width maximum PCMCIA 16 bits CardBus 32 bits Smart Card Read writ...

Страница 118: ...memory available will be less than 4 GB depending on the actual computer configuration Ports and Connectors Serial 9 pin connector 16550C compatible 16 byte buffer connector Video 15 hole connector Audio microphone miniconnector stereo headphones speakers miniconnector USB four 4 pin USB 2 0 compliant connectors Infrared sensor sensor compatible with IrDA Standard 1 1 Fast IR and IrDA Standard 1 0...

Страница 119: ...o support video depending on system memory size and other factors LCD interface LVDS TV support NTSC or PAL in S video and composite modes through docking device only Audio Audio type High Definition Audio Soft Audio Audio controller SigmaTel STAC9200 Stereo conversion 24 bit stereo digital to analog 24 bit stereo analog to digital Interfaces Internal PCI bus HDA External microphone miniconnector ...

Страница 120: ...tical 50 50 Pixel pitch WXGA 0 2588 15 4 inch WSXGA 0 1971 15 4 inch WUXGA 0 1725 15 4 inch Power consumption panel with backlight typical WXGA 5 0 W max WSXGA 5 5 W max WUXGA 6 0 W max Controls brightness can be controlled through keyboard shortcuts Keyboard Number of keys 87 U S and Canada 88 Europe 91 Japan Key travel 2 7 mm 0 3 mm 0 11 inch 0 016 inch Key spacing 19 05 mm 0 3 mm 0 75 inch 0 01...

Страница 121: ...r Dimensions Depth 77 2 mm 3 08 inches Height 20 0 mm 0 80 inch Width 187 03 mm 7 48 inches Weight 9 cell lithium ion battery 0 485 kg 1 07 lb typical 6 cell lithium ion battery 0 355 kg 0 783 lb typical Voltage 14 8 VDC Charge time approximate Computer on 2 5 hours Computer off 1 hour Operating time varies depending on operating conditions and can be significantly reduced under certain power inte...

Страница 122: ... 3 inches Depth 133 85 mm 5 25 inches Weight with cables 0 4 kg 0 9 lb Temperature range Operating 0 to 35 C 32 to 95 F Storage 40 to 65 C 40 to 149 F Physical Height 35 3 mm 1 4 inches Width 361 mm 14 2 inches Depth 262 6 mm 10 3 inches Weight approximately 6 1 lb depending on configuration Environmental Temperature range Operating 0 to 35 C 32 to 95 F Storage 40 to 65 C 40 to 149 F Relative humi...

Страница 123: ...DELL CONFIDENTIAL PRELIMINARY 1 25 07 FOR PROOF ONLY Storage 1 30 GRMS Maximum shock measured with hard drive in head parked position and a 2 ms half sine pulse Operating 122 G Storage 163 G Altitude maximum Operating 15 2 to 3048 m 50 to 10 000 ft Storage 15 2 to 10 668 m 50 to 35 000 ft Environmental continued ...

Страница 124: ...124 Specifications FILE LOCATION C Documents and Settings reggie_davis Desktop Projects 07 BEN Source specs fm DELL CONFIDENTIAL PRELIMINARY 1 25 07 FOR PROOF ONLY ...

Страница 125: ... necessary procedures NOTE Dell s Express Service Code system may not be available in all countries When prompted by Dell s automated telephone system enter your Express Service Code to route the call directly to the proper support personnel If you do not have an Express Service Code open the Dell Accessories folder double click the Express Service Code icon and follow the directions For instructi...

Страница 126: ... use your touch tone telephone to select the subjects that correspond to your questions The AutoTech service is available 24 hours a day 7 days a week You can also access this service through the support service For the telephone number to call see the contact numbers for your region Automated Order Status Service To check on the status of any Dell products that you have ordered you can go to supp...

Страница 127: ...agnostics Checklist indicating the tests you have run and any error messages reported by the Dell Diagnostics 4 Include any accessories that belong with the item s being returned power cables software floppy disks guides and so on if the return is for credit 5 Pack the equipment to be returned in the original or equivalent packing materials You are responsible for paying shipping expenses You are ...

Страница 128: ...s Service Code Return Material Authorization Number if provided by Dell support technician Operating system and version Devices Expansion cards Are you connected to a network Yes No Network version and network adapter Programs and versions See your operating system documentation to determine the contents of the system s start up files If the computer is connected to a printer print each file Other...

Страница 129: ...number listed and your call will be routed appropriately When you need to contact Dell use the electronic addresses telephone numbers and codes provided in the following table If you need assistance in determining which codes to use contact a local or an international operator Country City International Access Code Country Code City Code Department Name or Service Area Website and E Mail Address A...

Страница 130: ...1 800 808 385 Transaction Sales toll free 1 800 808 312 Fax toll free 1 800 818 341 Austria Vienna International Access Code 900 Country Code 43 City Code 1 Website support euro dell com E mail tech_support_central_europe dell com Home Small Business Sales 0820 240 530 00 Home Small Business Fax 0820 240 530 49 Home Small Business Customer Care 0820 240 530 14 Preferred Accounts Corporate Customer...

Страница 131: ...British Virgin Islands General Support toll free 1 866 278 6820 Brunei Country Code 673 Customer Support Penang Malaysia 604 633 4966 Customer Care Penang Malaysia 604 633 4888 Transaction Sales Penang Malaysia 604 633 4955 Canada North York Ontario International Access Code 011 Online Order Status www dell ca ostatus AutoTech automated support toll free 1 800 247 9362 Customer Care Home Sales Sma...

Страница 132: ...311 Customer Care toll free 800 858 2060 Customer Care Fax 592 818 1308 Home and Small Business toll free 800 858 2222 Preferred Accounts Division toll free 800 858 2557 Large Corporate Accounts GCP toll free 800 858 2055 Large Corporate Accounts Key Accounts toll free 800 858 2628 Large Corporate Accounts North toll free 800 858 2999 Large Corporate Accounts North Government and Education toll fr...

Страница 133: ...uters 7023 0182 Customer Care Relational 7023 0184 Home Small Business Customer Care 3287 5505 Switchboard Relational 3287 1200 Switchboard Fax Relational 3287 1201 Switchboard Home Small Business 3287 5000 Switchboard Fax Home Small Business 3287 5001 Dominica General Support toll free 1 866 278 6821 Dominican Republic General Support 1 800 148 0530 Ecuador General Support toll free 999 119 El Sa...

Страница 134: ...nce 04 99 75 40 01 Corporate Support 0825 004 719 Customer Care 0825 338 339 Switchboard 01 55 94 71 00 Sales 01 55 94 71 00 Fax 01 55 94 71 01 Germany Langen International Access Code 00 Country Code 49 City Code 6103 Website support euro dell com E mail tech_support_central_europe dell com Support for XPS portable computers only 06103 766 7222 Support for all other Dell computers 06103 766 7200 ...

Страница 135: ...Code 001 Country Code 852 Website support ap dell com Support E mail apsupport dell com Support Dimension and Inspiron 2969 3188 Support OptiPlex Latitude and Dell Precision 2969 3191 Support PowerApp PowerEdge PowerConnect and PowerVault 2969 3196 Customer Care 3416 0910 Large Corporate Accounts 3416 0907 Global Customer Programs 3416 0908 Medium Business Division 3416 0912 Home and Small Busines...

Страница 136: ...er Care 1850 200 982 Corporate Customer Care dial within U K only 0870 907 4499 Ireland Sales 01 204 4444 U K Sales dial within U K only 0870 907 4000 Fax Sales Fax 01 204 0103 Switchboard 01 204 4444 Italy Milan International Access Code 00 Country Code 39 City Code 02 Website support euro dell com E mail support euro dell com it it emaildell Home and Small Business Support 02 577 826 90 Customer...

Страница 137: ... routers 81 44 556 3468 Faxbox Service 044 556 3490 24 Hour Automated Order Service 044 556 3801 Customer Care 044 556 4240 Business Sales Division up to 400 employees 044 556 1465 Preferred Accounts Division Sales over 400 employees 044 556 3433 Large Corporate Accounts Sales over 3500 employees 044 556 3430 Public Sales government agencies educational institutions and medical institutions 044 55...

Страница 138: ... 81 Customer Care 32 0 2 481 91 19 Fax 26 25 77 82 Macao Country Code 853 Support toll free 0800 105 Customer Service Xiamen China 34 160 910 Transaction Sales Xiamen China 29 693 115 Malaysia Penang International Access Code 00 Country Code 60 City Code 4 Website support ap dell com Support Dell Precision OptiPlex and Latitude toll free 1 800 880 193 Support Dimension Inspiron and Electronics and...

Страница 139: ...Netherlands Amsterdam International Access Code 00 Country Code 31 City Code 20 Website support euro dell com Support for XPS portable computers only 020 674 45 94 Support for all other Dell computers 020 674 45 00 Support Fax 020 674 47 66 Home Small Business Customer Care 020 674 42 00 Relational Customer Care 020 674 4325 Home Small Business Sales 020 674 55 00 Relational Sales 020 674 50 00 Ho...

Страница 140: ...nternational Access Code 00 Country Code 47 Website support euro dell com E mail support euro dell com no no emaildell Support for XPS portable computers only 815 35 043 Support for all other Dell products 671 16882 Relational Customer Care 671 17575 Home Small Business Customer Care 23162298 Switchboard 671 16800 Fax Switchboard 671 16865 Panama General Support 001 800 507 0962 Peru General Suppo...

Страница 141: ...ore International Access Code 005 Country Code 65 Website support ap dell com Support Dimension Inspiron and Electronics and Accessories toll free 1800 394 7430 Support OptiPlex Latitude and Dell Precision toll free 1800 394 7488 Support PowerApp PowerEdge PowerConnect and PowerVault toll free 1800 394 7478 Customer Care toll free 1 800 394 7430 option 6 Transaction Sales toll free 1 800 394 7412 ...

Страница 142: ...utheast Asian and Pacific Countries Customer Support Customer Service and Sales Penang Malaysia 604 633 4810 Spain Madrid International Access Code 00 Country Code 34 City Code 91 Website support euro dell com E mail support euro dell com es es emaildell Home and Small Business Support 902 100 130 Customer Care 902 118 540 Sales 902 118 541 Switchboard 902 118 541 Fax 902 118 539 Corporate Support...

Страница 143: ...for French speaking HSB and Corporate Customers support euro dell com ch fr emaildell Support for XPS portable computers only 0848 33 88 57 Support Home and Small Business for all other Dell products 0844 811 411 Support Corporate 0844 822 844 Customer Care Home and Small Business 0848 802 202 Customer Care Corporate 0848 821 721 Fax 022 799 01 90 Switchboard 022 799 01 01 Taiwan International Acc...

Страница 144: ...support euro dell com uk en ECare Form Home asp E mail dell_direct_support dell com Support Corporate Preferred Accounts PAD 1000 employees 0870 908 0500 Support for XPS portable computers only 0870 366 4180 Support direct and general for all other products 0870 908 0800 Global Accounts Customer Care 01344 373 186 Home and Small Business Customer Care 0870 906 0010 Corporate Customer Care 01344 37...

Страница 145: ...nts DPA toll free 1 800 283 2210 Business Customer Service and Support toll free 1 800 456 3355 Employee Purchase Program EPP Customers toll free 1 800 695 8133 Printers and Projectors Support toll free 1 877 459 7298 Public government education and healthcare Customer Service and Support toll free 1 800 456 3355 Employee Purchase Program EPP Customers toll free 1 800 695 8133 Dell Sales toll free...

Страница 146: ...146 FILE LOCATION C Documents and Settings reggie_davis Desktop Projects 07 BEN Source help fm DELL CONFIDENTIAL PRELIMINARY 1 25 07 FOR PROOF ONLY ...

Страница 147: ...the display until it is clean Moisten a soft lint free cloth with water and wipe the computer and keyboard Do not allow water from the cloth to seep between the touch pad and the surrounding palm rest Touch Pad 1 Shut down your computer 2 Disconnect any attached devices from the computer and from their electrical outlets 3 Remove any installed batteries See Replacing the Battery on page 31 4 Moist...

Страница 148: ...nly FCC Class B This equipment generates uses and can radiate radio frequency energy and if not installed and used in accordance with the manufacturer s instruction manual may cause interference with radio and television reception This equipment has been tested and found to comply with the limits for a Class B digital device pursuant to Part 15 of the FCC Rules This device complies with Part 15 of...

Страница 149: ...nch circuits If necessary consult a representative of Dell Inc or an experienced radio television technician for additional suggestions The following information is provided on the device or devices covered in this document in compliance with the FCC regulations Product name Dell Precision Mobile Workstation M65 Model number PP04X Company name Dell Inc Worldwide Regulatory Compliance Environmental...

Страница 150: ...150 Appendix FILE LOCATION C Documents and Settings reggie_davis Desktop Projects 07 BEN Source appendix fm DELL CONFIDENTIAL PRELIMINARY 1 25 07 FOR PROOF ONLY ...

Страница 151: ...ogram or data file on a floppy CD DVD or hard drive As a precaution back up the data files from your hard drive regularly battery A rechargeable internal power source used to operate portable computers when not connected to an AC adapter and an electrical outlet battery life span The length of time years during which a portable computer battery is able to be depleted and recharged battery operatin...

Страница 152: ...n erased and written over rewritten CD RW drive A drive that can read CDs and write to CD RW rewritable CDs and CD R recordable CDs discs You can write to CD RW discs multiple times but you can write to CD R discs only once CD RW DVD drive A drive sometimes referred to as a combo drive that can read CDs and DVDs and write to CD RW rewritable CDs and CD R recordable CDs discs You can write to CD RW...

Страница 153: ...at uses optical technology to read data from DVDs and CDs DVD player The software used to watch DVD movies The DVD player displays a window with buttons that you use to watch a movie DVD R DVD recordable A recordable version of a DVD Data can be recorded only once onto a DVD R Once recorded the data cannot be erased or written over DVD RW DVD rewritable A rewritable version of a DVD Data can be wr...

Страница 154: ...it is lost FSB front side bus The data path and physical interface between the processor and RAM FTP file transfer protocol A standard Internet protocol used to exchange files between computers connected to the Internet G G gravity A measurement of weight and force GB gigabyte A measurement of data storage that equals 1024 MB 1 073 741 824 bytes When used to refer to hard drive storage the term is...

Страница 155: ...ation that creates international standards for infrared communications IRQ interrupt request An electronic pathway assigned to a specific device so that the device can communicate with the processor Each device connection must be assigned an IRQ Although two devices can share the same IRQ assignment you cannot operate both devices simultaneously ISP Internet service provider A company that allows ...

Страница 156: ...with other computers over analog telephone lines Three types of modems include external PC Card and internal You typically use your modem to connect to the Internet and exchange e mail module bay A bay that supports devices such as optical drives a second battery or a Dell TravelLite module monitor The high resolution TV like device that displays computer output mouse A pointing device that contro...

Страница 157: ...tics programs loaded automatically by the BIOS that perform basic tests on the major computer components such as memory hard drives and video If no problems are detected during POST the computer continues the start up processor A computer chip that interprets and executes program instructions Sometimes the processor is referred to as the CPU central processing unit program Any software that proces...

Страница 158: ... program differs from system setup shortcut An icon that provides quick access to frequently used programs files folders and drives When you place a shortcut on your Windows desktop and double click the icon you can open its corresponding folder or file without having to find it first Shortcut icons do not change the location of files If you delete a shortcut the original file is not affected Also...

Страница 159: ...amically allocated to video UPS uninterruptible power supply A backup power source used when the electrical power fails or drops to an unacceptable voltage level A UPS keeps a computer running for a limited amount of time when there is no electrical power UPS systems typically provide surge suppression and may also provide voltage regulation Small UPS systems provide battery power for a few minute...

Страница 160: ...or example a 66 WHr battery can supply 66 W of power for 1 hour or 33 W for 2 hours wallpaper The background pattern or picture on the Windows desktop Change your wallpaper through the Windows Control Panel You can also scan in your favorite picture and make it wallpaper WLAN wireless local area network A series of interconnected computers that communicate with each other over the air waves using ...

Отзывы: