Installing System Components
87
NOTE:
When installing, hot-swapping, or hot-adding a new power supply, allow
several seconds for the system to recognize the power supply and determine its
status. The power-supply status indicator turns green to signify that the power
supply is functioning properly (see Figure 1-5).
Removing the Power Supply Blank
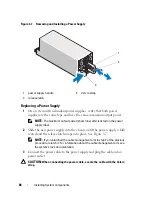
If you are installing a second power supply, remove the power supply blank in
the bay by pulling outward on the blank.
CAUTION:
To ensure proper system cooling, the power supply blank must be
installed in the second power supply bay in a non-redundant configuration.
Remove the power supply blank only if you are installing a second power supply.
Installing the Power Supply Blank
NOTE:
Install the power supply blank only in the second power supply bay.
To install the power supply blank, align the blank with the power supply bay
and insert it into the chassis until it clicks into place.
Internal SD Module
Installing the Internal SD Module
WARNING:
Only trained service technicians are authorized to remove the system
cover and access any of the components inside the system. Before you begin this
procedure, review the safety instructions that came with the system.
1
Turn off the system, including any attached peripherals, and disconnect
the system from the electrical outlet.
2
Open the system. See "Opening the System."
3
Position the module so the tabs on the underside of the tray fit into the
hooks on the chassis, then lower the opposite edge of the card into place.
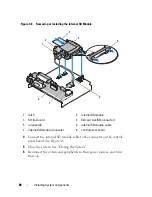
See Figure 3-8.
Содержание PowerVault NX3000
Страница 1: ...Dell PowerVault NX3000 Systems Hardware Owner s Manual ...
Страница 180: ...180 Jumpers and Connectors ...
Страница 182: ...182 Getting Help ...
Страница 192: ...192 Glossary ...
Страница 200: ...200 Index ...


