100
Installing System Components
Replacing the Fan Bracket
1
Align the fan bracket down onto the bracket base so that the mounting
pins fit correctly into the bracket base. See Figure 3-14.
2
Insert the bracket and engage the release levers to lock it in place.
3
If removed, replace the fans in the fan bracket. See "Replacing a Cooling
Fan."
4
Close the system. See "Closing the System."
Optical Drive
An optional slimline
DVD-ROM or DVD+RW
optical drive slides into the front
panel and connects to the SATA controller on the system board. The optical
drive is on the right or left side of the system, depending on your chassis.
NOTE:
DVD devices are data only.
Removing the Optical Drive
WARNING:
Only trained service technicians are authorized to remove the system
cover and access any of the components inside the system. Before you begin this
procedure, review the safety instructions that came with the system.
1
Turn off the system, including any attached peripherals, and disconnect
the system from its electrical outlet.
2
Open the system. See "Opening the System."
3
Disconnect the optical drive cable from the back of the optical drive.
4
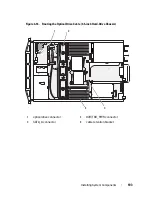
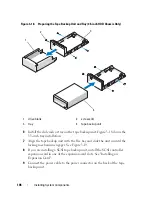
To remove the optical drive, press down on the blue release tab at the back
of the optical drive and push the drive out of the system. See Figure 3-15.
Installing the Optical Drive
WARNING:
Only trained service technicians are authorized to remove the system
cover and access any of the components inside the system. Before you begin this
procedure, review the safety instructions that came with the system.
1
Turn off the system, including any attached peripherals, and disconnect
the system from its electrical outlet.
2
Open the system. See "Opening the System."
Содержание PowerVault NX3000
Страница 1: ...Dell PowerVault NX3000 Systems Hardware Owner s Manual ...
Страница 180: ...180 Jumpers and Connectors ...
Страница 182: ...182 Getting Help ...
Страница 192: ...192 Glossary ...
Страница 200: ...200 Index ...

