1.
Follow the safety guidelines listed in the Safety instructions section.
2.
Follow the procedure listed in the Before working inside your system section.
3.
Keep the #2 Phillips screwdriver ready.
CAUTION: To prevent damage to the hard drive or SSD and the hard-drive or SSD backplane,
you must remove the hard drive or SSD from the blade before removing the hard-drive or
SSD backplane.
CAUTION: You must note the number of each hard drive or SSD and temporarily label them
before removal so that you can replace them in the same locations.
4.
Remove the hard drives or SSDs.
Steps
1.
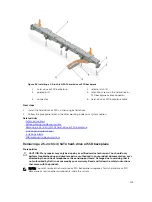
Press the release latches, lift the backplane until the guide pins on the hard-drive or SSD cage
disengage from the guides on the hard-drive or SSD backplane.
2.
Remove the hard-drive or SSD cage. See the Removing the hard-drive or SSD cage section.
3.
Loosen the two retention screws securing the hard-drive or SSD backplane cable connector to the
system board connector.
4.
Lift the backplane away from the system.
Figure 56. Removing a 2.5-inch (x4) SATA hard-drive or SSD backplane
1.
hard-drive or SSD backplane
2. release latch (2)
3. guide pin (5)
4. hard-drive or SSD backplane cable
5. retention screw on the hard-drive or SSD
backplane cable connector (2)
6. connector
126


