7-10
Dell OptiPlex G1 Mini Tower Managed PC Reference and Installation Guide
(,'('ULYH$GGUHVVLQJ
All EIDE devices should be configured for the Cable Select jumper position, which
assigns master and slave status to devices by their position on the interface cable.
When two EIDE devices are connected to a single EIDE interface cable and are con-
figured for the Cable Select jumper position, the device attached to the last connector
on the interface cable is the master or boot device (drive 0) and the device attached to
the middle connector on the interface cable is the slave device (drive 1). Refer to the
drive documentation in your upgrade kit for information on setting devices to the
Cable Select jumper position.
NOTE: If you want to install a second EIDE drive that is a different type from the first
drive but you do not have the specifications for the first drive, do one of the following:
If you purchased the drive from Dell, you can contact Dell for the necessary
reconfiguration information. (See the chapter titled “Getting Help” in the Diag-
nostics and Troubleshooting Guide
for instructions on obtaining technical
assistance.)
If you did not purchase the drive from Dell, call the drive manufacturer.
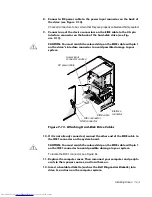
With the two EIDE interface connectors on the system board, your system can sup-
port up to four EIDE devices. EIDE hard-disk drives should be connected to the EIDE
interface connector labeled “IDE1.” (EIDE tape drives and CD-ROM drives should be
connected to the EIDE interface connector labeled “IDE2.”)
,QVWDOOLQJDQ(,'(+DUG'LVN'ULDUG'LVN'ULYH%UDFNHW
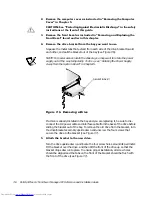
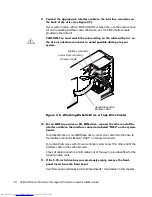
To install an EIDE hard-disk drive in the hard-disk drive bracket, follow these steps:
,I\RXDUHUHSODFLQJDKDUGGLVNGULYHWKDWFRQWDLQVGDWD\RXZDQWWR
NHHSEHVXUHWRPDNHDEDFNXSRI\RXUILOHVEHIRUH\RXEHJLQWKLV
SURFHGXUH
3UHSDUHWKHGULYHIRULQVWDOODWLRQ
&$87,216*URXQG\RXUVHOIE\WRXFKLQJDQXQSDLQWHGPHWDOVXUIDFH
RQWKHEDFNRIWKHFRPSXWHU
:KHQ\RXXQSDFNWKHGULYHGRQRWVHWLWRQDKDUGVXUIDFHZKLFKPD\
GDPDJHWKHGULYH,QVWHDGVHWWKHGULYHRQDVXUIDFHVXFKDVDIRDP
SDGWKDWZLOOVXIILFLHQWO\FXVKLRQLW
Check the documentation that accompanied the drive to verify that it is config-
ured for your computer system.
5HPRYHWKHFRPSXWHUFRYHUDVLQVWUXFWHGLQ´5HPRYLQJWKH&RPSXWHU
&RYHUµLQ&KDSWHU
&$87,216HH´3URWHFWLQJ$JDLQVW(OHFWURVWDWLF'LVFKDUJHµLQWKHVDIHW\
LQVWUXFWLRQVDWWKHIURQWRIWKLVJXLGH
Содержание OptiPlex G1
Страница 1: ... ZZZ GHOO FRP HOO 2SWL3OH 0LQL 7RZHU 0DQDJHG 3 6 VWHPV 5 5 1 1 167 7 21 8 ...
Страница 8: ...x ...
Страница 20: ...xxii ...
Страница 34: ...1 14 Dell OptiPlex G1 Mini Tower Managed PC Reference and Installation Guide ...
Страница 56: ...2 22 Dell OptiPlex G1 Mini Tower Managed PC Reference and Installation Guide ...
Страница 89: ...Working Inside Your Computer 5 9 LJXUH 6 VWHP RDUG XPSHUV jumpered unjumpered ...
Страница 128: ...7 16 Dell OptiPlex G1 Mini Tower Managed PC Reference and Installation Guide ...
Страница 134: ...A 6 Dell OptiPlex G1 Mini Tower Managed PC Reference and Installation Guide ...
Страница 156: ...D 4 Dell OptiPlex G1 Mini Tower Managed PC Reference and Installation Guide ...

