


ME General Settings
To navigate to the
Intel
®
Management Engine (ME) Platform Configuration
page, follow these steps:
1. Under the Management Engine BIOS Extension (MEBx) main menu, select
Intel ME General Settings
. Press <Enter>.
2. The following message appears:
Acquiring General Settings configuration
The
ME General Configuration
page appears. This page allows the IT administrator to configure the specific functionality of
the Intel ME, such as password, power options, and so on. Below are quick links to the various sections.
Intel ME State Control
Change Intel ME Password
Password Policy
Network Setup
Network Name Settings
Host Name
Domain Name
FQDN
Dynamic DNS
Periodic Update Interval
TTL
Previous Menu
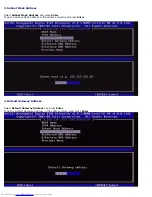
TCP/IP Settings
Wired LAN IPv4 Configuration
DHCP Mode
IPv4 Address
Default Gateway Address
Preferred DNS Address
Alternate DNS Address
Previous Menu
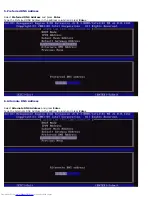
Wired LAN IPv6 Configuration
IPv6 Feature Selection
IPv6 Interface ID Type
IPv6 Address
IPv6 Default Router
Preferred DNS IPv6 Address
Alternate DNS IPv6 Address
Previous Menu
Wireless LAN IPv6 Configuration
IPv6 Feature Selection
IPv6 Interface ID Type
Previous Menu
Unconfigure Network Access
Remote Setup And Configuration
Current Provisioning Mode
Provisioning Record
Start Configuration
Previous Menu
Provisioning Server IPv4/IPv6
Provisioning Server FQDN
TLS PSK
Set PID and PPS
Deleting PID and PPS
Previous Menu
TLS PKI
Remote Configuration
PKI DNS Suffix
Manage Hashes
Adding Customized Hash
Deleting a Hash
Changing the Active State
Viewing a Certificate Hash
Previous Menu
Previous Menu
FW Update Settings
Local FW Update
Secure FW Update
Содержание OptiPlex 980 - Desktop
Страница 9: ......
Страница 31: ...2 Select Y to unconfigure 3 Select Full Unprovisioning and press Enter ...
Страница 67: ...4 Click the to expand the Intel AMT Getting Started section ...
Страница 68: ...5 Click the to expand the Section 1 Provisioning section ...
Страница 69: ...6 Click the to expand the Basic Provisioning without TLS section ...
Страница 72: ...The IP address for the ProvisionServer and Intel SCS are now visible ...
Страница 73: ...9 Select Step 2 Discovery Capabilities ...
Страница 74: ...10 Verify that the setting is Enabled If Disabled click the checkbox next to Disabled and click Apply ...
Страница 75: ...11 Select Step 3 View Intel AMT Capable Computers ...
Страница 76: ...Any Intel AMT capable computers on the network are visible in this list ...
Страница 77: ...12 Select Step 4 Create Profile ...
Страница 78: ...13 Click the symbol to add a new profile ...
Страница 82: ...15 Select the icon with the arrow pointing out to Export Security Keys to USB Key ...
Страница 83: ...16 Select the Generate keys before export radio button ...
Страница 90: ...27 Select Step 7 Monitor Provisioning Process ...
Страница 92: ...28 Select Step 8 Monitor Profile Assignments ...
Страница 95: ...Back to Contents Page ...


