


NOTE:
This option is only available when Dynamic DNS Update is enabled.
This setting allows configuring the TTL time in seconds. This number should be greater than zero. If set to zero, the firmware
uses its internal default value, which is 15 min or 1/3 of lease time for DHCP.
7. Previous Menu
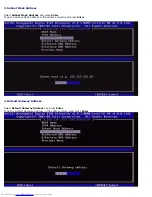
1. Under the Intel ME Network Name Settings, select
Previous Menu
and press
Enter
.
2. The Intel ME Network Name Settings menu changes to the Intel Network Setup page.
TCP/IP Settings
1. Under the Network Setup menu, select
TCP/IP Settings
and press
Enter
.
2. The Intel ME Network Name Settings menu changes to the Intel Network Setup page.
The Intel Network Setup menu changes to the TCP/IP Settings page.
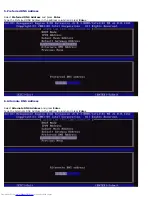
NOTE:
The Intel MEBx has menus for Wireless IPv6, but no menu for wireless IPv4. When the Intel MEBx starts, it will
check for the wireless interface to make the decision to display the wireless IPv6 menu or not.
Wired LAN IPv4 Configuration
Under the TCP/IP Settings, select
Wired LAN IPv4 Configuration
and press
Enter
.
The TCP/IP Settings menu changes to the Wired LAN IPv4 Configuration page.
Содержание OptiPlex 980 - Desktop
Страница 9: ......
Страница 31: ...2 Select Y to unconfigure 3 Select Full Unprovisioning and press Enter ...
Страница 67: ...4 Click the to expand the Intel AMT Getting Started section ...
Страница 68: ...5 Click the to expand the Section 1 Provisioning section ...
Страница 69: ...6 Click the to expand the Basic Provisioning without TLS section ...
Страница 72: ...The IP address for the ProvisionServer and Intel SCS are now visible ...
Страница 73: ...9 Select Step 2 Discovery Capabilities ...
Страница 74: ...10 Verify that the setting is Enabled If Disabled click the checkbox next to Disabled and click Apply ...
Страница 75: ...11 Select Step 3 View Intel AMT Capable Computers ...
Страница 76: ...Any Intel AMT capable computers on the network are visible in this list ...
Страница 77: ...12 Select Step 4 Create Profile ...
Страница 78: ...13 Click the symbol to add a new profile ...
Страница 82: ...15 Select the icon with the arrow pointing out to Export Security Keys to USB Key ...
Страница 83: ...16 Select the Generate keys before export radio button ...
Страница 90: ...27 Select Step 7 Monitor Provisioning Process ...
Страница 92: ...28 Select Step 8 Monitor Profile Assignments ...
Страница 95: ...Back to Contents Page ...


