background image

Software Overview


After setting up your printer and connecting it to your computer, you must install the drivers and utilities from the 

Drivers and Utilities

 CD included with your 

printer. If you purchased a Dell™ computer and your printer at the same time, the drivers and utilities are automatically installed. You don't need to install 

them. The 

Drivers and Utilities

 CD contains the following: 


l

Dell Printer Driver

 allows your computer to communicate with your printer. To use your printer as a printer in Windows, you must install the printer 

driver. For information about installing the printer driver in Windows, see 

"Installing Software"


l

Dell Toner Management System


 displays the status of the printer and the name of the job when you send a job to print. The Dell Toner Management 

System


window also displays the level of toner remaining and allows you to order replacement toner cartridges.  


l

User's Guide

 HTML documentation provides detailed information about using your printer. 


Installing Software  

Before you begin, ensure that your system meets the minimum requirements. 


System Requirements 


Installing Dell Software 


A printer driver is software that lets your computer communicate with your printer. The procedure to install drivers depends on the operating system you are 
using. 

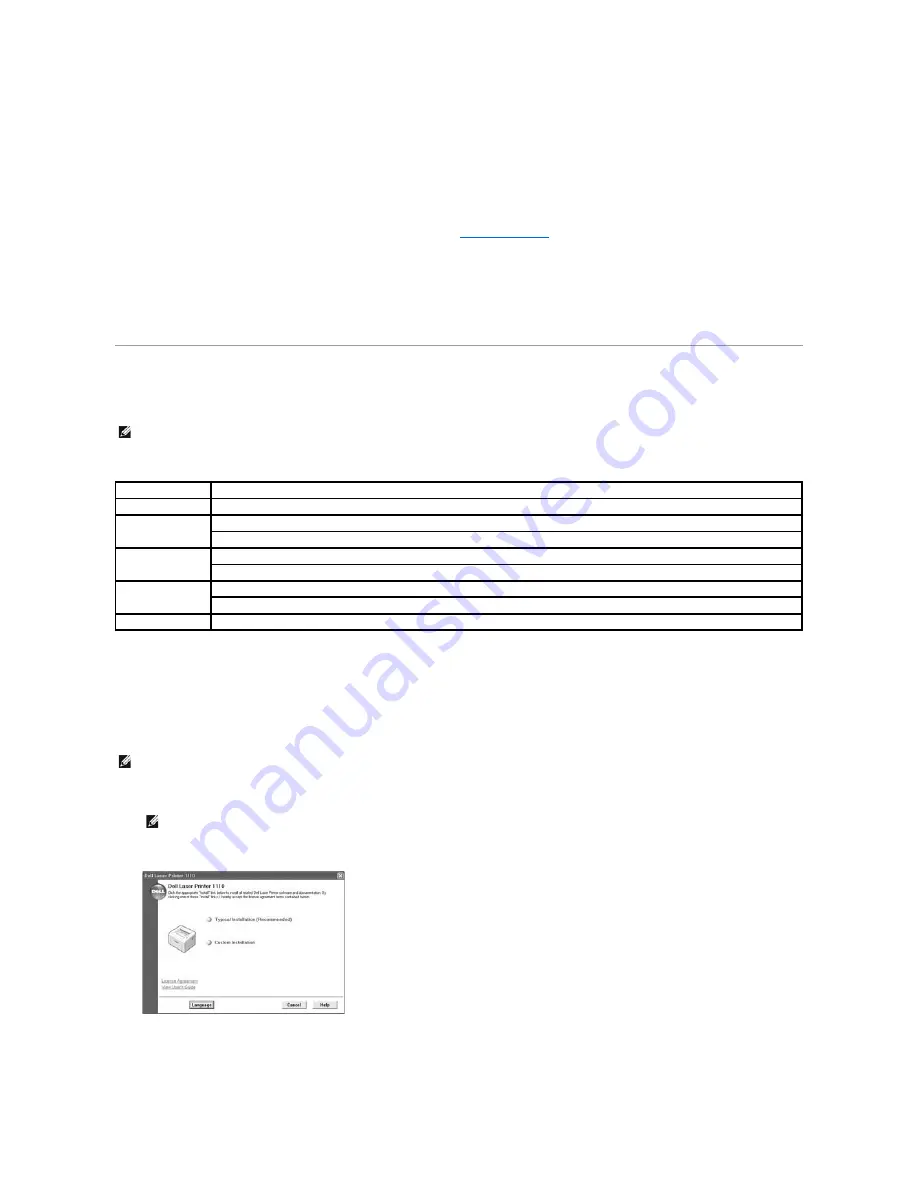
1.

Make sure that the printer is connected to your computer and powered on. Close all unnecessary programs.  


2.

Insert the 

Drivers and Utilities

 CD. 


3.

If necessary,

 select a language by pressing the 

Language

 button on the main screen. 


4.

Select 

Typical Installation

 to install the 

User's Guide

, the printer driver, and Dell Toner Management System


as the default settings. 


NOTE: 

For Windows 2000/XP, the system administrator should install Dell software. 

Item

Requirements 

Operating System 

Windows 98/Me/2000/XP 

CPU 

Windows 98/Me/2000

Pentium II 400 Mhz or higher

Windows XP

Pentium III 933 Mhz or higher

RAM 

Windows 98/Me/2000

64 MB or higher

Windows XP

128 MB or higher

Free Disk Space 

Windows 98/Me/2000

300 MB or higher

Windows XP

1 GB or higher

Internet Explorer 

5.0 or higher 

NOTE: 

If you attach a USB printer cable while your printer and computer are powered on, the Windows hardware wizard launches immediately. Cancel 

the screen and use the 

Drivers and Utilities

 CD to install the Dell software.

NOTE: 

If the printer is not connected to your computer when you install the CD-ROM, the No Printer Found screen appears. Follow the 

instructions to install the software.

Содержание Inspiron 1110

Страница 1: ...the box If there is a missing item contact Dell a The appearance of the power cord may differ according to your country s specifications b The Drivers and Utilities CD contains the Dell printer driver Dell Toner Management System and an HTML User s Guide 3 Save the carton and packing material in case the printer needs to be repacked 4 Remove the packing tape from the printer About Your Printer The...

Страница 2: ... operator panel LEDs signify different things depending on their sequence LEDs that are off on and or blinking indicate printer conditions such as printer status intervention for example out of paper and jammed paper or service For more information on what the LEDs sequence means and what you can do see Understanding the Operator Panel LEDs Item Description ...

Страница 3: ... To cancel a print job Press during printing blinks red while the print job is cleared from both the printer and the computer and the printer then returns to Ready mode This may take some time depending on the size of the print job In Manual Feed mode you can t cancel the print job by pressing Manual Duplex feeding Press each time you load the paper back in the tray after the first side of your jo...

Страница 4: ...o extend the tray 2 Flex the sheets back and forth to loosen them and then fan them out Do not fold or crease the print media Align the edges on a level surface 3 Load the paper stack in the paper tray with the side to be printed on facing up NOTE When printing text at 5 coverage you can expect a toner cartridge life of approximately 1 000 pages for the starter toner cartridge that is shipped with...

Страница 5: ...Serial Bus USB cable USB cables are sold separately Contact Dell to purchase a USB cable To connect the printer to a computer 1 Make sure the printer computer and any other attached devices are powered off and unplugged 2 Connect a USB cable to the USB cable connector on your printer 3 Insert the other end of the cable into an available USB port on the computer Do not use the USB keyboard port Pow...

Страница 6: ...operating correctly 1 Wait approximately 30 seconds for the printer to warm up then press and hold on the operator panel for 2 seconds to print a demo page 2 The Demo page shows the printer s current configuration CAUTION The fusing area at the rear part of the inside of your printer becomes hot once the printer is powered on Be careful not to be burned when you access this area CAUTION Do not dis...

Страница 7: ...ss Service Code Express Service Code Identify your printer when you use support dell com or contact technical support Enter the Express Service Code to direct your call when contacting technical support The Express Service Code is not available in all countries Latest drivers for my printer Answers to technical service and support questions Documentation for my printer Dell Support Website The Del...

Страница 8: ...l the toner cartridge out being careful not to scratch against the printer and lift it up and away from the printer Set it on a clean flat surface 4 With a dry and lint free cloth wipe away any dust and spilled toner from the toner cartridge area and the toner cartridge cavity Cleaning Your Printer Maintaining the Toner Cartridge Ordering Supplies NOTE Do not touch the transfer roller located unde...

Страница 9: ...ironment with salty air Saving Toner To save toner enable the Toner Save mode in the printer properties window For details see Graphics Tab Selecting this option will extend the life of the toner cartridge and reduce your cost per page but will reduce print quality Viewing Toner Levels You can check the level of toner remaining in the toner cartridge in the Printing Status window each time you sen...

Страница 10: ...ing the Toner Cartridge When the toner eventually runs out only blank pages print At this stage the toner cartridge needs to be replaced Order an extra toner cartridge so you will have it on hand when the current cartridge no longer prints satisfactorily See Ordering Supplies for information on ordering toner cartridges To replace the toner cartridge 1 Open the front cover NOTE If toner comes into...

Страница 11: ...nside the printer one on each side CAUTION Avoid reaching too far into the printer The fusing area may be hot NOTE If toner comes into contact with your clothing wipe the toner off with a dry cloth and wash your clothing in cold water Hot water sets toner into fabric CAUTION Do not touch the green underside of the toner cartridge Use the handle on the cartridge to avoid touching this area CAUTION ...

Страница 12: ...ndow each time you send a job to print the printer s operator panel LED sequences tell you about the status of your supplies When lights orange your toner cartridge is low and you should order a new toner cartridge 1 Double click the Dell Toner Reorder Program icon on your desktop OR From the Start menu click Programs Dell Printers Dell Laser Printer 1110 Dell Toner Reorder Program OR In the Print...

Страница 13: ...will occur You must load only one sheet at a time in the tray Guidelines for Paper and Special Materials When selecting or loading paper envelopes or other special material keep these guidelines in mind l Attempting to print on damp curled wrinkled or torn paper can cause paper jams and poor print quality l Use only high quality copier grade paper for the best print quality l Avoid paper with embo...

Страница 14: ...for 0 1 second l Make sure that there is no exposed adhesive material between labels Exposed areas can cause labels to peel off during printing which can cause paper jams Exposed adhesive can also cause damage to printer components l Do not load a sheet of labels through the printer more than once The adhesive backing is designed for one pass through the printer l Do not use labels that are separa...

Страница 15: ...ing print material can be helpful when you want to check the print quality after each page is printed Use the manual feed mode to print transparencies labels envelopes or postcards To use the manual feed mode 1 Load a sheet of print material in the paper tray with the side to be printed on facing up NOTE If you print many pages the surface of the output tray may become hot Be careful not to touch ...

Страница 16: ...erial you must select Manual Feed for Source from the software application and then select the appropriate paper size and type For details see Paper Tab 5 Press to start See the following directions to load each type of print material l Load an envelope in the tray with the flap side down and the stamp area on the top left side The end of the envelope with the stamp area enters the printer first f...

Страница 17: ...h other do not let the printed label sheets stack up as they are printed out NOTE To prevent transparencies from sticking to each other do not let the printed sheets stack up as they are printed out NOTE Place transparencies on a flat surface after removing them from the printer NOTE Do not use transparencies that are separating from the backing sheet NOTE Do not print on media smaller than 3 0 in...

Страница 18: ......

Страница 19: ...y your printer click Preferences or Properties depending on the program or operating system in the print window and go to step 4 If you see Setup Printer or Options click that button instead Then click Properties on the next screen 4 Click OK to close the printer properties window 5 To start the print job click Print or OK depending on the program or operating system in the Print window Canceling ...

Страница 20: ...m The User s Guide shows the Printing Preferences window for Windows XP If you access printer properties through the Printers folder you can view additional Windows based tabs refer to your Windows User s Guide and the Printer tab see Printer Tab a Click the Windows Start button b For Windows 98 Me 2000 click Settings and point to Printers For Windows XP click Printers and Faxes c Point to the Del...

Страница 21: ...0 degrees select 180 from the Rotate drop down list Portrait prints across the width of the page letter style Landscape prints across the length of the page spreadsheet style Layout Options Layout Options allows you to select advanced printing options For details see Printing Multiple Pages on One Sheet of Paper and Printing Posters Double sided Printing Double sided Printing allows you to print t...

Страница 22: ... Paper Scaling Scaling allows you to automatically or manually scale your print job on a page You can choose from None Fit to Page and Reduce Enlarge For details see Fitting Your Document to a Selected Paper Size and Printing a Reduced or Enlarged Document Property Description Resolution You can select the printing resolution by choosing from 600 dpi Normal or 300 dpi Draft The higher the setting ...

Страница 23: ...bitmap images Documents with complicated fonts such as Korean or Chinese or various other fonts will print faster in this setting Print as Graphics When this option is selected the driver downloads all fonts as graphics When printing documents with high graphic content and relatively few TrueType fonts printing performance speed may be enhanced in this setting Property Description Watermark You ca...

Страница 24: ...n the Favorites input box 3 Click Save To use a saved setting select it from the Favorites drop down list To delete a favorite setting item select it from the list and click Delete Property Description High Altitude Correction If your printer is going to be used at an altitude above 2 500 m 8 200 ft checking this option will optimize the print quality for those circumstances Power Save When this o...

Страница 25: ...paper source size and type 6 Click OK and print the document Printing Posters You can select the number of pages to be printed on a single sheet of paper To print more than one page per sheet the pages will be decreased in size and arranged on the sheet You can print up to 16 pages on one sheet 1 To change the print settings from your software application access printer properties See step 3 in Pr...

Страница 26: ...ting pages Printing on Both Sides of Paper Manual Duplex To manually print a 2 sided document You can print on both sides of a sheet of paper manually Before printing decide how you want your document oriented The options are l Long Edge which is the conventional layout used in book binding l Short Edge which is the type often used with calendars NOTE Do not print on both sides of labels transpare...

Страница 27: ... the already printed side down and the top of the page toward the front of the tray according to the instructions in the above window 7 Press to print the other side of your job Fitting Your Document to a Selected Paper Size You can scale your print job to any selected paper size regardless of the digital document size This can be useful when you want to check fine details on a small document 1 To...

Страница 28: ... in Printing a Document 2 From the Paper tab select Reduce Enlarge from the Type drop down list 3 Enter the scaling rate in the Percentage input box You can also click the or button 4 Select the paper source size and type in Paper Options 5 Click OK and print the document The Watermark option allows you to print text over an existing document For example you may want to have large gray letters rea...

Страница 29: ...erties See step 3 in Printing a Document 2 Click the Extras tab and click Edit in the Watermark section The Edit Watermark window appears 3 Select the watermark you want to edit from the Current Watermarks list and change the watermark message and the options 4 Click Update to save the changes 5 Click OK Deleting a Watermark 1 To change the print settings from your software application access prin...

Страница 30: ... settings from your software application access printer properties See step 3 in Printing a Document 3 Click the Extras tab 4 Select the overlay you want to print from the Overlay drop down list box 5 If the overlay file doesn t appear on the Overlay list click Edit and then Load Overlay and select the overlay file To use a page overlay you must create a new page overlay containing your logo or im...

Страница 31: ...ded with your print job and printed on your document Deleting a Page Overlay You can delete page overlays that are no longer used 1 In the printer properties window click the Extras tab 2 Click Edit in the Overlay section 3 Select the overlay you want to delete from the Overlay List box 4 Click Delete Overlay 5 When a confirmation message window appears click Yes 6 Click OK until you exit the Prin...

Страница 32: ...e Start button and select Printers and Faxes 3 Double click your printer icon 4 Click the Printer menu and select Sharing 5 For Windows 2000 check the Shared As box For Windows XP check the Share this printer box 6 Fill in the Share Name field and click OK Setting Up the Client Computer 1 Right click the Start button and select Explore 2 Open your network folder in the left column 3 Click the shar...

Страница 33: ...e A printer driver is software that lets your computer communicate with your printer The procedure to install drivers depends on the operating system you are using 1 Make sure that the printer is connected to your computer and powered on Close all unnecessary programs 2 Insert the Drivers and Utilities CD 3 If necessary select a language by pressing the Language button on the main screen 4 Select ...

Страница 34: ...lect the software you want to remove and click Next The selected driver and all of its components are removed from your computer 3 Click Finish Using the Dell Toner Management System Printing Status Window The Printing Status window displays the status of the printer Printer Ready Printer Offline and Error Check Printer the name of the job currently being printed and the toner level for your print...

Страница 35: ... Printing Less than 50 dB Sleep mode Background noise Toner Supply Single cartridge Toner Cartridge Life Ships with 1 000 page starter toner cartridge at ISO 19752 5 coverage 2 000 pages for a standard toner cartridge Duty Cycle Monthly Up to 8 000 pages Weight 5 5 Kg including Toner Cartridge Package Weight Paper 1 2 Kg Plastic 0 2 Kg External Dimensions W x D x H 358 x 299 x 217 mm 14 1 x 11 8 x...

Страница 36: ...15 9 x 355 6 mm JIS B5 7 17 x 10 1 in 182 x 257 mm ISO B5 6 93 x 9 84 in 176 x 250 mm A6 4 13 x 5 85 in 105 x 148 5 mm Oficio 8 50 x 13 50 in 216 x 343 mm US Folio 8 5 x 13 in 216 x 330 mm Envelopes No 10 4 12 x 9 5 in 105 x 241mm 75 to 90 g m bond 20 to 24 lb for manual feed mode 1 sheet of paper for manual feed mode DL 4 33 x 8 66 in 110 x 220 mm C5 6 38 x 9 01 in 162 x 229 mm C6 4 5 x 6 4in 114...

Страница 37: ...elative humidity of 4 percent to 55 percent The following guidelines should be considered when evaluating the paper s storage environment l Paper should be stored at or near room temperature l The air should not be too dry or too humid Symptom Problem with Paper Solution Poor print quality or toner adhesion problems with feeding Too moist too rough too smooth or embossed faulty paper lot Try anoth...

Страница 38: ...ened ream of paper is to rewrap it tightly in its moisture proof wrapping If the printer environment is subject to extremes unwrap only the amount of paper to be used during the day s operation to prevent unwanted moisture changes ...

Страница 39: ... tells you how to avoid the problem CAUTION A CAUTION indicates a potential for property damage personal injury or death Information in this document is subject to change without notice 2005 Dell Inc All rights reserved Reproduction in any manner whatsoever without the written permission of Dell Inc is strictly forbidden Trademarks used in this text Dell DELL logo and Dell Toner Management System ...

Страница 40: ...ut gently and slowly Follow the steps below to clear the jam Paper Feed Jam 1 Remove any misfed paper by pulling it out by its visible edge Make sure that all of the paper is properly aligned in the tray 2 Open and close the front or top cover to resume printing the document from failed pages Paper Exit Jam 1 If the paper jams as it exits to the output tray and a long portion of the paper is visib...

Страница 41: ...the top cover 2 Printing resumes automatically NOTE Failed pages will not reprint Reprint the failed pages CAUTION The top and inner cover themselves may also be hot due to the heat roller located underneath the inner cover Allow the printer to cool before opening the covers CAUTION When removing jammed paper be careful not to touch the heat roller located underneath the inner cover It is hot and ...

Страница 42: ...ams By selecting the correct paper types most paper jams can be avoided When a paper jam occurs follow the steps outlined in Clearing Jams in the Paper Tray l Follow the procedures in Loading Print Media in the Paper Tray Ensure that the adjustable guides are correctly positioned l Do not overload the paper tray l Do not remove the paper from the tray while your printer is printing l Do not add pa...

Страница 43: ...ing the Starter Toner Cartridge If the printer is receiving data blinks green slowly If the printer is printing received data blinks green quickly You pressed while the printer was receiving data In Manual Duplex mode the first side of your job has printed Load the paper back into the tray and press to start printing For details see Printing on Both Sides of Paper Manual Duplex You print in 600dpi...

Страница 44: ...er and the printer is not connected properly Disconnect the printer cable and reconnect it The connection cable between the computer and the printer is defective If possible attach the cable to another computer that is working properly and print a job You can also try using a different printer cable The port setting is incorrect Check the Windows printer setting to make sure that the print job is ...

Страница 45: ...if necessary See Redistributing Toner If necessary replace the toner cartridge The file may have blank pages Check the file to ensure that it does not contain blank pages Some parts such as the controller or the board may be defective Contact a service representative When you are using Window 98 the illustrations print incorrectly in Adobe Illustrator The setting in the software application is wro...

Страница 46: ...l have the same problems install a new toner cartridge See Replacing the Toner Cartridge Parts of the printer may have toner on them If the defects occur on the back of the page the problem will likely correct itself after a few more pages The fusing assembly may be damaged Contact a service representative Background scatter Background scatter results from bits of toner distributed on the printed ...

Страница 47: ...the problem persists the printer may require repair Contact a service representative Character Voids Character voids are white areas where they should be solid black If you are using transparencies try another type of transparency Because of the composition of the transparency some character voids are normal You may be printing on the wrong surface of the paper Turn over the stack of paper in the ...

Отзывы: