background image

Removing and Installing Parts: Dell Dimension E520 Service Manual

file:///T|/htdocs/systems/dimE520/en/SM_EN/parts.htm[10/16/2012 1:05:24 PM]

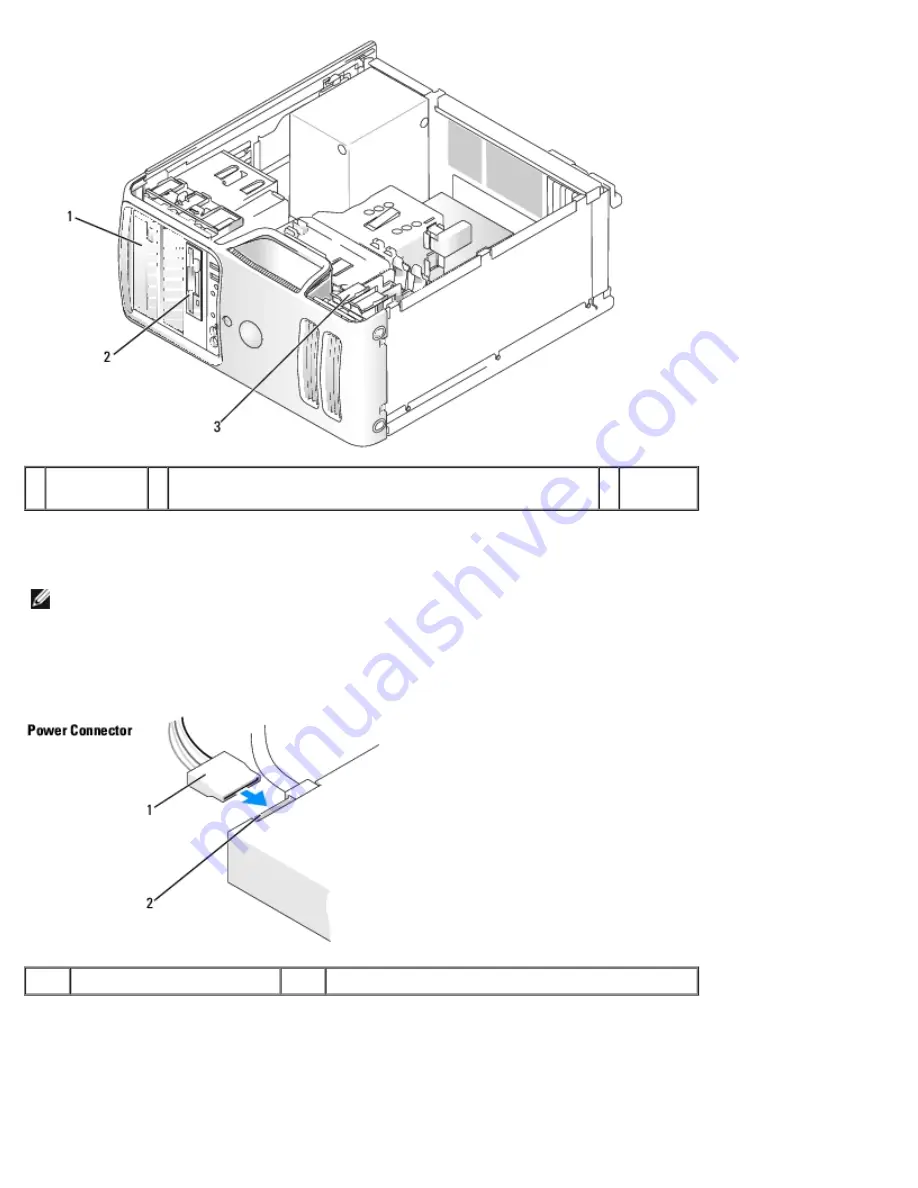
1 CD/DVD

drive

2 FlexBay for optional floppy drive or optional Media Card

Reader

3 hard

drive

Connect serial ATA hard drives to connectors labeled "SATA0" or "SATA1" on the system board.

Connect serial ATA CD or DVD drives to connectors labeled "SATA4" or "SATA5" on the system board.

NOTE: 

Connectors SATA2 and SATA3 are not installed on the system board.

Connecting Drive Cables

When you install a drive, you connect a DC power cable and a data cable to the back of the drive.

1

power cable

2

power input connector

Drive Interface Connectors

Most interface connectors are keyed for correct insertion; that is, a notch or a missing pin on one connector matches a tab or

a filled-in hole on the other connector. Keyed connectors ensure that the pin-1 wire in the cable goes to the pin-1 end of the

connector. The pin-1 end of a connector on a board or a card is usually indicated by a silk-screened "1" printed directly on

Содержание Dimension E520

Страница 1: ...d a Dell n Series computer any references in this document to Microsoft Windows operating systems are not applicable Information in this document is subject to change without notice 2006 Dell Inc All rights reserved Reproduction in any manner whatsoever without the written permission of Dell Inc is strictly forbidden Trademarks used in this text Dell the DELL logo and Dimension are trademarks of D...

Страница 2: ... by performing the removal procedure in reverse order Recommended Tools The procedures in this document may require the following tools Small flat blade screwdriver Phillips screwdriver Flash BIOS update program download Turning Off Your Computer NOTICE To avoid losing data save and close any open files and exit any open programs before you turn off your computer 1 Shut down the operating system a...

Страница 3: ...ocking tabs if you are disconnecting this type of cable press in on the locking tabs before you disconnect the cable As you pull connectors apart keep them evenly aligned to avoid bending any connector pins Also before you connect a cable ensure that both connectors are correctly oriented and aligned NOTICE To avoid damaging the computer perform the following steps before you begin working inside ...

Страница 4: ...he Computer 1 Service Tag Use the Service Tag to identify your computer when you access the Dell Support website or contact support 2 cover release latch Use this latch to remove the cover 3 CD or DVD activity light The CD or DVD drive light is on when the computer reads data from or writes data to the CD or DVD drive 4 CD or DVD eject button Press the CD or DVD eject button to eject a disc from t...

Страница 5: ...mended that you use the back USB connectors for devices that typically remain connected such as printers and keyboards 8 power button Press the power button to turn on the computer NOTICE To avoid losing data do not use the power button to turn off the computer Instead perform an operating system shutdown 9 hard drive activity light The hard drive light is on when the computer reads data from or w...

Страница 6: ...ots 4 Access connectors for installed PCI or PCI Express cards Back Panel Connectors 1 link integrity light Green A good connection exists between a 10 Mbps network and the computer Orange A good connection exists between a 100 Mbps network and the computer Yellow A good connection exists between a 1000 Mbps 1 Gbps network and the computer Off The computer is not detecting a physical connection to...

Страница 7: ...It is recommended that you use the front USB connectors for devices that you connect occasionally such as joysticks cameras or bootable USB devices 6 surround sound connector Use the black surround sound connector to attach multichannel capable speakers On computers with a sound card use the connector on the card 7 line in connector Use the blue line in connector to attach a record playback device...

Страница 8: ...Manual file T htdocs systems dimE520 en SM_EN about htm 10 16 2012 1 04 38 PM 12 VGA connector Use the integrated video connector to attach your video monitor optional On computers with a video card use the connector on the card Back to Contents Page ...

Страница 9: ...to Contents Page Technical Overview Dell Dimension E520 Service Manual Inside View of Your Computer System Board Components Power Supply DC Connector Pin Assignments Inside View of Your Computer 1 power supply 2 system board 3 hard drive 4 floppy drive optional or media card reader optional 5 CD or DVD drive System Board Components ...

Страница 10: ...tery socket BATTERY 6 SATA Connectors SATA0 and SATA1 7 front panel I O connector 8 main power connector 9 SATA connectors SATA4 and SATA5 10 FlexBay USB connector 11 clear CMOS jumper CLRCMOS 12 password jumper CLRPSWD 13 PCI Express x16 card connector 14 PCI Express x1 card connector 15 PCI card connector 16 floppy drive connector FLOPPY 17 Standby LED near blue lever on PCI Express x16 connecto...

Страница 11: ...en SM_EN techov htm 10 16 2012 1 04 43 PM DC Power Connector P1 Pin Number Signal Name Color Wire Gauge 1 3 3 VDC Orange 18 AWG 2 3 3 VDC Orange 18 AWG 3 COM Black 18 AWG 4 5 VDC Red 18 AWG 5 COM Black 18 AWG 6 5 VDC Red 18 AWG 7 COM Black 18 AWG 8 POK Gray 18 AWG 9 5 VFP Purple 18 AWG ...

Страница 12: ...Blue 18 AWG 15 COM Black 18 AWG 16 PS ON Green 18 AWG 17 COM Black 18 AWG 18 COM Black 18 AWG 19 COM Black 18 AWG 20 N C N C 18 AWG 21 5 VDC Red 18 AWG 22 5 VDC Red 18 AWG 23 5 VDC Red 18 AWG 24 COM Black 18 AWG DC Power Connector P2 Pin Number Signal Name 18 AWG Wire 1 COM Black 2 COM Black 3 12 VA DC Yellow 4 12 VA DC Yellow DC Power Connect P3 P5 P8 and P9 Pin Number Signal Name 18 AWG Wire 1 3...

Страница 13: ...wer Connector P7 Pin Number Signal Name 18 AWG Wire 1 5 VDC Red 2 COM Black 3 COM Black 4 12 A VDC Yellow DC Power Connector P10 Pin Number Signal Name 18 AWG Wire 1 12 VA DC Yellow 2 COM Black 3 COM Black 4 5V DC Red NOTE The P10 connector is intended for use with PCI Express graphics cards that have power requirements exceeding 75 watts Back to Contents Page ...

Страница 14: ...Hyper Threading 2 x 2 MB for Pentium D 9XX processors with dual core 2 x 1 MB for Pentium D 8XX processors with dual core 256K for Celeron D 3XX processors 2 MB for Intel Core E6400 processors and earlier 4 MB for Intel Core E6600 processors and later Memory Type 533 MHz 667 MHz and 800 MHz dual DDR2 unbuffered SDRAM Memory connectors four Memory capacities 256 MB 512 MB or 1 GB non ECC Maximum me...

Страница 15: ...CI Express x1 and x16 Bus speed PCI 33 MHz PCI Express x1 slot bidirectional speed 500 MB s x16 slot bidirectional speed 8 GB s PCI connectors two connector size 120 pins connector data width maximum 32 bits PCI Express connector one x1 connector size 36 pins connector data width maximum 1 PCI Express lane PCI Express connector one x16 connector size 164 pins connector data width maximum 16 PCI Ex...

Страница 16: ...press x1 one 36 pin connector PCI Express x16 one 164 pin connector Controls and Lights Power button push button Power light green light Blinking green in sleep state solid green for power on state amber light Blinking amber indicates a problem with the power supply inside the computer If the system cannot boot and there is a solid amber light a problem with the system board may exist see Power Li...

Страница 17: ...6 3 inches Width 18 8 cm 7 4 inches Depth 45 7 cm 18 0 inches Weight 12 7 kg 28 0 lb Environmental Temperature Operating 10 to 35 C 50 to 95 F Storage 40 to 65 C 40 to 149 F Relative humidity 20 to 80 noncondensing Maximum vibration Operating 5 to 350 Hz at 0 0002 G2 Hz Storage 5 to 500 Hz at 0 001 to 0 01 G2 Hz Maximum shock Operating 40 G 5 with pulse duration of 2 msec 10 equivalent to 20 in se...

Страница 18: ...ned off or is not receiving power Reseat the power cable in the power connector on the back of the computer and the electrical outlet If the computer is plugged into a power strip ensure that the power strip is plugged into an electrical outlet and that the power strip is turned on Also bypass power protection devices power strips and power extension cables to verify that the computer turns on pro...

Страница 19: ...e computer If the computer starts normally continue to install additional memory modules one at a time until you have identified a faulty module or reinstalled all modules without error If available install properly working memory of the same type into your computer see Installing Memory If the problem persists contact Dell see Contacting Dell in your Owner s Manual A possible graphics card failur...

Страница 20: ...ard drive check the device to make sure it is functioning properly If the operating system is attempting to boot from a device such as the floppy drive or hard drive check system setup see System Setup to make sure the boot sequence is correct for the devices installed on your computer If the problem persists contact Dell see Contacting Dell in your Owner s Manual Beep Codes Your computer might em...

Страница 21: ...ing system or the program that was running when the message appeared Message Possible Cause Corrective Action 8042 Gate A20 error The keyboard controller failed its test If you receive this message after you make changes in the system setup program enter the system setup program see Entering System Setup and restore the original value s Address Line Short An error in the address decoding circuitry...

Страница 22: ...see Entering System Setup Check the interface cable at both ends INTR1 Error INTR2 Error An interrupt channel on the system board failed to POST The keyboard or system board may need to be replaced Invalid Boot Diskette The operating system cannot be located on drive A or drive C Enter the system setup program see Entering System Setup and confirm that drive A or drive C is properly identified Key...

Страница 23: ...un from the Dell Diagnostics Main Menu Option Function Express Test Performs a quick test of system devices The test typically takes 10 to 20 minutes and requires no interaction on your part Run Express Test first to increase the possibility of tracing the problem quickly Extended Test Performs a thorough check of system devices The test typically takes an hour or more and peridocially requires yo...

Страница 24: ...vice has its own set of specialized commands that only the driver for that device recognizes Required drivers are already installed on your computer no further installation or configuration is needed Many drivers such as the keyboard driver come with your Microsoft Windows operating system You may need to install drivers if you Upgrade your operating system Reinstall your operating system Connect ...

Страница 25: ... the Driver tab 8 Click Roll Back Driver Manually Reinstalling Drivers After copying driver files to your hard drive you may be required to update the driver manually NOTE Drivers can be manually updated for any hardware device installed in your computer 1 Click Start then click Control Panel 2 Under Pick a Category click Performance and Maintenance 3 Click System 4 In the System Properties window...

Страница 26: ...he Hardware Troubleshooter to resolve the incompatibility To resolve incompatibilities using the Hardware Troubleshooter 1 Click Start then click Help and Support 2 Type hardware troubleshooter in the Search field then click the arrow to start the search 3 Click Hardware Troubleshooter in the Search Results list 4 In the Hardware Troubleshooter list click I need to resolve a hardware conflict on m...

Страница 27: ... setup unless you are an expert computer user Certain changes can cause your computer to work incorrectly Entering System Setup 1 Turn on or restart your computer 2 When the DELL logo appears press F2 immediately NOTE Keyboard failure may result when a key on the keyboard is held down for extended periods of time To avoid possible keyboard failure press and release F2 in even intervals until the s...

Страница 28: ...he BIOS version number and date system tags and other system specific information NOTE The system name listed in the BIOS may not appear exactly as the name that appears on the computer or in the computer s documentation CPU Info Lists the processor type processor bus speed processor ID clock speed L2 cache and additional features supported by your processor Memory Info Indicates the type and amou...

Страница 29: ...o controllers are present on the computer Performance Multiple CPU Core If your computer processor supports more than one core this option appears in the Options List Virtualization If your computer processor supports virtual technology this option appears in the Options List SpeedStep If your computer processor supports Intel SpeedStep technology then this option is listed and it allows you to en...

Страница 30: ...s running in a low power mode and S3 a standby state where the power is reduced or turned off for most components but system memory remains active Quick Resume This feature enables disables the Intel Viiv Quick Resume Technology The default setting is Off Maintenance Service Tag Displays the system service tag which is a unique seven digit alphanumeric system identifier SERR Message Controls SERR ...

Страница 31: ...e the device must be bootable To ensure that your device is bootable check the device documentation Changing Boot Sequence for the Current Boot You can use this feature for example to restart your computer to a USB device such as a floppy drive memory key CD RW drive or PXE NIC NOTE If you are booting to a USB floppy drive you must first set the floppy drive to OFF in system setup see System Setup...

Страница 32: ... see Removing the Computer Cover 3 Locate the 2 pin password jumper CLRPSWD on the system board see System Board Components and remove the jumper to clear the password NOTE When you receive your computer the jumper plug is attached to pins 1 and 2 4 Replace the computer cover see Replacing the Computer Cover 5 Connect your computer and monitor to electrical outlets and then turn them on 6 After th...

Страница 33: ...S jumper b Remove the jumper plug from the password jumper CLRPSWD pins 1 and 2 c Place the jumper plug on the CMOS jumper CLRCMOS pins 1 and 2 and wait approximately five seconds d Remove the jumper plug and replace it on the password jumper CLRPSWD pins 1 and 2 4 Replace the computer cover see Replacing the Computer Cover NOTICE To connect a network cable first plug the cable into the network wa...

Страница 34: ...6 2012 1 04 54 PM The file downloads to your desktop 7 Click Close when the Download Complete window appears The file icon appears on your desktop and is titled the same as the download BIOS update file 8 Double click the file icon on the desktop and follow the on screen instructions Back to Contents Page ...

Страница 35: ... can be installed by performing the removal procedure in reverse order You have the tools listed in Recommended Tools Removing the Computer Cover CAUTION Before you begin any of the procedures in this section follow the safety instructions in the Product Information Guide CAUTION To guard against electrical shock always unplug your computer from the electrical outlet before removing the cover CAUT...

Страница 36: ... bottom hinges 4 Locate the three hinge tabs on the bottom edge of the computer 5 Grip the sides of the computer cover and pivot the cover up using the bottom hinges as leverage points 6 Release the cover from the hinge tabs and set it aside Inside View of Your Computer CAUTION Before you begin any of the procedures in this section follow the safety instructions in the Product Information Guide ...

Страница 37: ...ion E520 Service Manual file T htdocs systems dimE520 en SM_EN parts htm 10 16 2012 1 05 24 PM 1 floppy drive 2 CD or DVD drive 3 power supply 4 system board 5 processor shroud and heat sink 6 processor fan 7 hard drive System Board Components ...

Страница 38: ...0 power connector POWER 11 line in line out microphone side surround center and LFE connectors 12 SATA connector SATA4 13 SATA connector SATA5 14 video connector VGA 15 Media Card Reader connector 16 USB connectors 4 USBBACK 17 network connector NIC and USB connectors 2 USB2 18 password jumper CLRPSWD 19 clear CMOS jumper CLRCMOS 20 PCI Express x16 connector SLOT1 21 PCI Express x1 connector SLOT2...

Страница 39: ...reduction in performance See the label on the module to determine the module s capacity NOTE Always install DDR2 memory modules in the order indicated on the system board The recommended memory configurations are A pair of matched memory modules installed in DIMM connectors 1 and 2 or A pair of matched memory modules installed in DIMM connectors 1 and 2 and another matched pair installed in DIMM c...

Страница 40: ...B of memory when you use four 1 GB DIMMs Current 32 bit operating systems such as Microsoft Windows XP can use a maximum of 4 GB of address space however the amount of memory available to the operating system is less than that installed Certain components within the computer require address space in the 4 GB range Any address space reserved for these components cannot be used by computer memory In...

Страница 41: ...lug the cable into the network device and then plug it into the computer 7 Connect your computer and devices to electrical outlets and turn them on 8 Right click the My Computer icon and click Properties 9 Click the General tab 10 To verify that the memory is installed correctly check the amount of memory RAM listed Removing Memory CAUTION Before you begin any of the procedures in this section fol...

Страница 42: ... you touch any of your computer s electronic components You can do so by touching an unpainted metal surface on the computer chassis Your Dell computer provides the following slots for PCI and PCI Express cards Two PCI card slots One PCI Express x16 card slot One PCI Express x1 card slot PCI Cards Your computer supports two PCI cards If you are installing or replacing a card follow the procedures ...

Страница 43: ...lready installed in the computer remove the card Disconnect any cables connected to the card Grasp the card by its top corners and ease it out of its connector 6 Prepare the card for installation See the documentation that came with the card for information on configuring the card making internal connections or otherwise customizing it for your computer CAUTION Some network adapters automatically ...

Страница 44: ...5 bracket within slot 6 bracket caught outside of slot 8 Before you close the card retention door ensure that The tops of all cards and filler brackets are flush with the alignment bar The notch in the top of the card or filler bracket fits around the alignment guide 1 alignment guide 2 alignment bar 3 release tab 4 card retention door 9 Close the card retention door by snapping it into place to s...

Страница 45: ...dd in network adapter then disable the integrated network adapter a Enter system setup see System Setup select Integrated NIC and then change the setting to Off b Connect the network cable to the add in network adapter s connectors Do not connect the network cable to the integrated connector on the back panel NOTE You can use the integrated NIC and add in NIC adapter at the same time if you have a...

Страница 46: ...nstalling or replacing a PCI Express card follow the procedures in the next section If you are removing but not replacing a card see Removing a PCI Express Card If you are installing or replacing a PCI card see Installing a PCI Card CAUTION When replacing the PCI Express Video Card be aware that the heat sink on the card may be very hot during normal operation Be sure that the heat sink has had su...

Страница 47: ...rasp the card by its top corners and then ease it out of its connector 1 PCI Express x16 card 2 securing tab 3 PCI Express x1 card 4 PCI Express x1 card slot 5 PCI Express x16 card slot 7 Prepare the card for installation See the documentation that came with the card for information on configuring the card making internal connections or otherwise customizing it for your computer CAUTION Some netwo...

Страница 48: ... top of the card or filler bracket fits around the alignment guide 11 If previously removed snap the card retention mechanism into place securing the x16 PCI card 1 card retention door 2 card retention mechanism 3 release tabs 2 NOTICE Do not route card cables over or behind the cards Cables routed over the cards can prevent the computer cover from closing properly or cause damage to the equipment...

Страница 49: ...n the card retention door from the inside to pivot the door open The door is hinged and will remain in the open position see Installing a PCI Card for an illustration of the card retention door 4 If your computer includes a card retention mechanism to secure the x16 card in place from the top a Pivot the mechanism upward and gently squeeze in on the sides to release the mechanism from the two tab ...

Страница 50: ...mation Guide CAUTION To guard against electrical shock always unplug your computer from the electrical outlet before removing the cover Removing the Drive Panel 1 Follow the procedures in Before You Begin 2 Remove the computer cover see Removing the Computer Cover 1 sliding plate lever 2 sliding plate 3 drive panel 3 Grasping the lever on the sliding plate pull the sliding plate to the right until...

Страница 51: ...ve panel insert to disengage the insert from the drive panel 2 Without releasing the tab pivot the drive panel insert out and away from the drive panel 3 Set the drive panel insert aside Installing the Drive Panel Insert 1 center drive panel tab 2 drive panel 3 drive panel insert tab 4 drive panel insert 1 Slide the tab on the left side of the drive panel insert under the center drive panel tab 2 ...

Страница 52: ... Before You Begin 1 sliding plate lever 2 sliding plate 3 drive panel 2 Align the drive panel tabs with the side door hinges 3 Rotate the drive panel toward the computer until it snaps into place on the front panel Drives The computer supports a combination of these devices Two serial ATA hard drives Two serial ATA CD or DVD drives An optional floppy drive or an optional Media Card Reader ...

Страница 53: ...nnectors SATA2 and SATA3 are not installed on the system board Connecting Drive Cables When you install a drive you connect a DC power cable and a data cable to the back of the drive 1 power cable 2 power input connector Drive Interface Connectors Most interface connectors are keyed for correct insertion that is a notch or a missing pin on one connector matches a tab or a filled in hole on the oth...

Страница 54: ...over NOTICE To avoid damage to the drive do not set it on a hard surface Instead set the drive on a surface such as a foam pad that will sufficiently cushion it NOTICE If you are replacing a hard drive that contains data you want to keep back up your files before you begin this procedure Check the documentation for the drive to verify that it is configured for your computer Removing a Hard Drive 1...

Страница 55: ...moving this drive changes the drive configuration then be sure to reflect these changes in system setup When you restart your computer enter system setup see System Setup then go to the Drives section of the BIOS and under SATA 0 through 5 set the SATA ports to the correct configuration Installing a Hard Drive 1 Follow the procedures in Before You Begin 2 Remove the computer cover see Removing the...

Страница 56: ...t the power and hard drive cables to the drive 1 serial ATA data cable 2 power cable 6 Check all cables to be certain that they are properly connected and firmly seated 7 Replace the computer cover see Replacing the Computer Cover NOTICE To connect a network cable first plug the cable into the network port or device and then plug it into the computer 8 Connect your computer and devices to electric...

Страница 57: ...ures in Before You Begin 3 Remove the computer cover see Removing the Computer Cover 4 Press in on the blue release tabs on each side of the hard drive bracket and slide it up and out of the computer 5 Snap the bracket to the hard drive 6 Gently slide the new drive second hard drive into place until you feel a click or feel the drive securely installed 1 release tabs 2 2 second hard drive in lower...

Страница 58: ...Removing a Floppy Drive 1 Follow the procedures in Before You Begin 2 Remove the computer cover see Removing the Computer Cover 3 Remove the drive panel see Removing the Drive Panel 1 power cable 2 data cable 4 Disconnect the power and data cable from the back of the floppy drive Disconnect the other end of the cable from the floppy connector on the system board see System Board Components 5 Remov...

Страница 59: ...n of the BIOS and under Diskette Drive set the value to none Installing a Floppy Drive NOTE In the event that the replacement or new floppy drive does not have shoulder screws use the shoulder screws located within the drive panel insert Otherwise reuse the screws attached to the drive that you are replacing 1 Follow the procedures in Before You Begin 2 Remove the computer cover see Removing the C...

Страница 60: ...OPPY on the system board see System Board Components and route the cable through the clip on the processor shroud 1 power cable 2 data cable 3 processor shroud clip 8 Check all cable connections and fold cables out of the way to avoid blocking airflow between the fan and cooling vents Insert the floppy data cable into the clip on top of the processor shroud 9 Replace the drive panel see Installing...

Страница 61: ...e safety instructions in the Product Information Guide NOTICE To prevent static damage to components inside your computer discharge static electricity from your body before you touch any of your computer s electronic components You can do so by touching an unpainted metal surface on the computer chassis 1 Follow the procedures in Before You Begin 2 Remove the computer cover see Removing the Comput...

Страница 62: ...fore you begin any of the procedures in this section follow the safety instructions located in the Product Information Guide NOTICE To prevent static damage to components inside your computer discharge static electricity from your body before you touch any of your computer s electronic components You can do so by touching an unpainted metal surface on the computer chassis 1 Follow the procedures i...

Страница 63: ... Ensure that the Media Card Reader is installed before the FlexBay cable is connected 8 Connect the USB cable to the back of the Media Card Reader and to the USB connector on the system board see System Board Components 1 Media Card Reader 2 USB cable 3 USB connector 9 Route the USB cable through the cable routing clip 10 Replace the computer cover see Replacing the Computer Cover 11 Power up the ...

Страница 64: ...e Panel 4 Disconnect the power cable and the CD DVD drive cable from the back of the drive and the system board 1 power cable 2 data cable 5 Slide the drive release mechanism to the right to release the shoulder screw and then slide the drive out to remove it from the drive bay 6 If you are not replacing the drive replace the drive panel insert see Installing the Drive Panel Insert 7 Replace the d...

Страница 65: ...the Computer Cover 3 If you are installing a new drive unpack the drive and prepare it for installation Check the documentation that accompanied the drive to verify that the drive is configured for your computer 4 If you are installing a new drive remove the drive panel insert see Removing the Drive Panel Insert then remove three shoulder screws from the inside of the drive panel insert and attach...

Страница 66: ...e power cable to the drive 7 Connect the CD DVD data cable to the drive and to the SATA4 connector on the system board see System Board Components NOTE If you are installing a second CD DVD drive connect the data cable to SATA5 1 power cable 2 data cable 8 Check all cable connections and fold cables out of the way to avoid blocking airflow between the fan and cooling vents ...

Страница 67: ...hassis A coin cell battery maintains computer configuration date and time information The battery can last several years If you have to repeatedly reset time and date information after turning on the computer replace the battery CAUTION A new battery can explode if it is incorrectly installed Replace the battery only with the same or equivalent type recommended by the manufacturer Discard used bat...

Страница 68: ...procedures in this section follow the safety instructions in the Product Information Guide Removing the Power Supply 1 Follow the procedures in Before You Begin 2 Remove the computer cover see Removing the Computer Cover 3 Disconnect the DC power cables from the system board and the drives NOTICE Note the routing of the DC power cables underneath the tabs in the computer frame as you remove them f...

Страница 69: ...he DC power cables 4 Run the cables underneath the clips and press the clips to close them over the cables 5 Replace the computer cover see Replacing the Computer Cover NOTICE To connect a network cable first plug the cable into the network port or device and then plug the cable into the computer 6 Connect your computer and devices to electrical outlets and then turn them on Processor CAUTION Befo...

Страница 70: ...w of the Computer 3 If your computer includes a card retention mechanism to secure the x16 card in place from the top a Pivot the mechanism upward and gently squeeze in on the sides to release the mechanism from the two tab slots holding it in place b Set the retention mechanism aside 4 Unhook the floppy drive cable from the clip on the processor shroud and move it out of the way 1 floppy cable cl...

Страница 71: ...iscard the original heat sink If you are not installing a processor upgrade kit from Dell reuse the original heat sink when you install your new processor 7 At the processor place your finger upon the hook end of the release lever then push down and out to release it from the tab that secures it 1 processor cover 2 processor 3 processor socket 4 release lever 8 Release the release lever and lift t...

Страница 72: ... when you turn on the computer 2 If the release lever on the socket is not fully extended move it to that position 3 Orient the front and rear alignment notches on the processor with the front and rear alignment notches on the socket 4 Align the pin 1 corners of the processor and socket 1 processor cover 2 securing tab 3 processor 4 processor socket 5 center cover latch 6 release lever 7 front ali...

Страница 73: ...en the two captive screws 9 Place the floppy ribbon cable back across the top of the processor shroud inserting the cable under the clip Ensure that the cable does not block airflow from the fan and cooling vents 1 heat sink and fan shroud assembly 2 heat sink assembly bracket 3 captive screw housing 2 10 Replace the computer cover see Replacing the Computer Cover NOTICE To connect a network cable...

Страница 74: ... lights 3 headphone connector 4 microphone connector 5 integrated audio connector with jumper block Removing the I O Panel 1 Follow the procedures in Before You Begin 2 Remove the computer cover see Front View of the Computer 3 Remove the mounting screw from the top of the I O panel 4 Remove the I O panel from the computer by sliding it towards the back of the computer Slide it back far enough to ...

Страница 75: ...ure all the I O panel connectors fit into their spaces on the front panel Processor Fan CAUTION Before you begin any of the procedures in this section follow the safety instructions in the Product Information Guide CAUTION To guard against electrical shock always unplug your computer from the electrical outlet before opening the cover CAUTION The heat sink assembly power supply and other component...

Страница 76: ... the clips on the processor shroud and move it out of the way 1 release tab 2 card retention mechanism 3 card retention door 5 Use a long Phillips screwdriver to loosen the two captive screws one on each side of the heat sink assembly 6 Rotate the heat sink assembly towards the rear of the computer and then remove it from the computer 1 heat sink and fan shroud assembly 2 captive screw housing 2 7...

Страница 77: ... the computer Installing the Processor Fan When reinstalling the fan ensure that you do not pinch the wires that run between the system board and the fan NOTICE Ensure that the four fan tabs are fully inserted into the four keyhole slots in the bottom cover so that the fan can slide back fully into position Ensure that the fan release lever tabs are seated into their respective slots Follow the fa...

Страница 78: ...ect all cables from the system board 6 Remove any memory modules that you are transferring to the new system board see Removing Memory 1 system board 2 screws 8 7 Remove 8 screws that secure the system board Six of the screws go through the system board and two of the screws go through the heat sink pivot mounted on the system board 8 Slide the system board assembly toward the front of the compute...

Страница 79: ...e you begin any of the procedures in this section follow the safety instructions in the Product Information Guide 1 Ensure that all cables are connected Fold the cables so they are out of the way 2 Ensure that no tools or extra parts are left inside the computer 3 Align the bottom of the cover with the tabs located along the bottom edge of the computer 4 Using the tabs as leverage rotate the cover...

Отзывы: