background image

6

Record the results of each formal inspection in the inspection and maintenance log in 

the General Instruction (5902392) or use the i-Safe™ inspection web portal to maintain 

your inspection records. 


IMpoRTANT: If the full body harness has been subjected to fall arrest or impact 

forces it must be immediately removed from service and destroyed.

IMpoRTANT: 

Extreme working conditions (harsh environments, prolonged use, etc.) 

may require increasing the frequency of inspections.

INSPECTION STEPS: 

Step 1.  Inspect harness hardware (buckles, D-rings, back pad, loop keepers); 

these items must not be damaged, broken, distorted, and must be free of 

sharp edges, burrs, cracks, worn parts, or corrosion. PVC coated hardware 

must be free of cuts, rips, tears, holes, etc. in the coating to ensure non-

conductivity. Ensure that the release tabs of the buckle work freely and that 

a click is heard when the buckle engages. Inspect parachute buckle spring.

Step 2.

  Inspect webbing; material must be free of frayed, cut, or broken fibers. 

Check for tears, abrasions, mold, burns, or discoloration. Inspect stitching; 

check for pulled or cut stitches. Broken stitches may be an indication that 

the harness has been impact loaded and must be removed from service. 

When performing the annual formal inspection on the XP models of the 

ExoFit harness, remove the back pad and leg strap pads to facilitate 

inspection of the webbing.

Step 3.  Inspect the labels: All labels should be present and fully legible. 
Step 4.  Inspect each system component or subsystem according to manufacturer’s 

instructions.

Step 5.  Record the inspection date and results in the inspection and maintenance 

log in the General Instruction (5902392). 

Step 6.  Inspect the impact indicator on the Delta Harness models with stand-up 

“D” and impact indicator. See Figure L. L-1 shows the harness in a normal 

condition. The D-ring (10) is seated in the pivot (11). If the dorsal D-ring of 

the harness has experienced an impact (12)(L-2), a red-colored area at the 

base of the D-ring will become visible (13) indicating that an impact has 

occurred. The impact indicator cannot be reset and the harness must be 

removed from service and destroyed.

 If inspection reveals a defective condition, remove the unit from service immediately 

and destroy it.  

NoTE: Only DBI-SALA or parties authorized in writing may make repairs to this 

equipment.

MAINTENANCE, SERVICING, SToRAGE

A. WASHING INSTRUCTIONS FULL BODY HARNESS: 

  (See B. for Arc Flash Full Body Harness Washing Instructions)

Step 1.  Spot clean the Delta full body harness with water and a mild soap solution. 

The harness may be laundered by using a bleach-free detergent. Water 

temperature for wash and rinse must not exceed 70° C (160° F). 

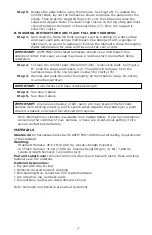
Step 2.  To launder the full body harness, remove the pads. See Figure M. To 

remove the pads, undo the snaps and zippers (14). The pads will fall away 

from the harness straps. Only one leg pad is shown for clarity (15). 

Step 3.  Place the harness in the supplied laundry bag. The bag is designed to 

prevent entanglement of harnesses and to protect the washing machine 

from damage. Use of the laundry bag to wash the pads is optional. 

Note:  Use a bleach-free detergent when washing both the harness and the 

pads. 

Step 4.  Harness and pads may be air dried or tumble dried on low heat (not greater 

than 90° C (200° F). 

Содержание DELTA 2

Страница 1: ...S DE USO Y MANTENIMIENTO ANTES DE UTILIZAR ESTE EQUIPO 5902392 CZ P ED POU IT M V STROJE SI P E T TE OBECN POKYNY K POU IT A DR B 5902392 DK L S DEN GENERELLE ANVISNING FOR BRUG OG VEDLIGEHOLDELSE IND...

Страница 2: ...2 A B F D E 1 2 3 4 3 5 C 2 3 4 6 G H I J 2 J...

Страница 3: ...3 9 7 8 K L 1 L 2 11 10 13 L 12...

Страница 4: ...4 M N 14 17 16 15...

Страница 5: ...peration Step 7 Pass the male portion of the pass through buckle completely through the female portion and then position it on top of the female portion Adjust the straps to a snug comfortable fit Fig...

Страница 6: ...instructions Step 5 Record the inspection date and results in the inspection and maintenance log in the General Instruction 5902392 Step 6 Inspect the impact indicator on the Delta Harness models wit...

Страница 7: ...for clarity 15 Step 3 Harness and pads should be thoroughly air dried before using Do not dry in a mechanical dryer Important A wet harness will have reduced strength Step 4 See step 5 above Step 5 Se...

Страница 8: ...vor dem Bauch zusammen und schlie en Sie den Gurtverschluss Straffen Sie den Riemen sodass er fest und bequem sitzt Abbildung F Handhabung des Gurtverschlusses Schritt 7 F hren Sie das schmale Teil de...

Страница 9: ...er XP Modelle des ExoFit Auffanggurts das R ckenpolster und die Beingurtpolster um die berpr fung des Gurtbands zu erleichtern Schritt 3 berpr fen Sie die Etiketten Alle Etiketten m ssen vorhanden und...

Страница 10: ...n Seife kann R ckst nde hinterlassen welche die Flammbest ndigkeit beintr chtigen k nnen Schritt 2 Entfernen Sie zur Reinigung der Komfortpolster Modell 9501207 die Polster Siehe Abbildung M ffnen Sie...

Страница 11: ...pp p hondelen Justera remmarna till en j mn och bekv m passning Figur G Steg 8 S tt in tungan till snabbanslutningssp nnet i urtaget tills du h r ett klick Ryck till i remmen f r att s kerst lla en s...

Страница 12: ...G L 1 visar selen i normal kondition D ringen 10 r placerad i h llaren 11 Om selens dorsala D ring har utsatts f r en st t 12 L 2 blir ett r df rgat omr de l ngst ner p D ringen synligt 13 som indike...

Страница 13: ...anv ndning Torka inte i en mekanisk torkare Viktigt En v t sele har reducerad styrka Steg 4 Se steg 5 ovan Steg 5 Se steg 6 ovan viktigt Tyngre ansamling av smuts m larf rg etc kan hindra selen att fu...

Страница 14: ...in modo aderente e comodo Figura F Funzionamento della fibbia Fase 7 Passare la parte maschio della fibbia passante completamente attraverso la parte femmina e posizionarla in alto sulla parte femmina...

Страница 15: ...leggibili Fase 4 Controllare ciascun componente di sistema o sottosistema secondo le relative istruzioni del produttore Fase 5 Registrare la date e i risultati dell ispezione nell apposito registro ne...

Страница 16: ...i bottoni e le cerniere 14 I cuscinetti cadranno dalle cinghie dell imbragatura E illustrato solo il cuscinetto per gamba per chiarezza 15 Fase 3 L imbragatura e i cuscinetti devono essere accuratamen...

Страница 17: ...one a em cima da parte f mea Ajuste as correias para um encaixe justo e confort vel Figura G Passo 8 Introduza a l ngua da fivela de liga o r pida no receptor at ouvir um Clique Puxe fortemente a corr...

Страница 18: ...inspec o e manuten o nas Instru es Gerais 5902392 Passo 6 Inspeccione o indicador de impacto nos modelos de Arn s Delta com o D que se levanta e o indicador de impacto Consultar a Figura L L 1 mostra...

Страница 19: ...s e as almofadas devem secar devidamente ao ar antes de serem utilizadas novamente N o secar numa m quina de secar mec nica Importante Um arn s molhado ir ter uma for a menor Passo 4 Consultar o Passo...

Страница 20: ...de la hebilla Paso 7 Pase la parte macho de la hebilla de paso completamente por la parte hembra y despu s col quela sobre la parte hembra Ajuste bien las correas de forma que queden c modas Figura G...

Страница 21: ...s y completamente legibles Paso 4 Inspeccione cada componente del sistema o subsistema seg n las instrucciones del fabricante Paso 5 Anote la fecha de inspecci n y los resultados en el registro de ins...

Страница 22: ...Las almohadillas saldr n de las correas del arn s S lo se muestra la almohadilla de una pierna como ilustraci n 15 Paso 3 El arn s y las almohadillas deben secarse completamente al aire antes de util...

Страница 23: ...c p ezky a usly te z eteln cvaknut Ostr m trhnut m za popruh se ujist te zda je p ezka pevn spojena Obr zek H Krok 9 P it hn te popruh s otvory p ezkou aby sed l pevn a pohodln a pak vsu te kovov jaz...

Страница 24: ...tav vy a te v stroj okam it z provozu a zni te ji POZN MKA Opravy t to v stroje je opr vn na prov d t pouze spole nost DBI SALA nebo autorizovan organizace DR BA SERVIS SKLADOV N A POKYNY K I T N CELO...

Страница 25: ...ov m ry e bude nutn produkt vy adit z provozu V ce informac o i t n je k dispozici u spole nosti Capital Safety Budete li m t dotazy t kaj c se stavu vazku nebo v p pad jak chkoli pochybnost o jeho za...

Страница 26: ...elsen uden ubehag Figur F Betjening af sp ndet Trin 7 F r han enden af sp ndet helt ind igennem hun delen og placer den oven p hun delen Stropperne justeres s de passer i st rrelsen uden ubehag Figur...

Страница 27: ...og resultaterne i inspektions og vedligeholdelsesloggen i den generelle vejledning 5902392 Trin 6 Besigtig st dindikatoren p Delta Harness modellerne med oprejst D og st dindikator Se figur L I L 1 v...

Страница 28: ...fra selet jsstropperne Der er kun vist en benpude for at g re det mere overskueligt 15 Trin 3 Selet j og puder skal t rre helt i luften inden brug De t m ikke t rres i en t rretumbler Vigtigt V dt sel...

Страница 29: ...nat vartalonmy t iseen miellytt v n tiukkuuteen Kuva G Vaihe 8 Ty nn pikalukon kielt vastaanottavaan p h n kunnes kuulet napsahduksen Varmista kiinnitys nyk isem ll hihnasta ter v sti Kuva H Vaihe 9 V...

Страница 30: ...esti Vaihe 5 Kirjaa tarkistusp iv ja tulokset yleisohjeiden tarkistus ja huoltolokiin 5902392 Vaihe 6 Tarkista iskunilmaisin Delta Harness mallista jossa on pystyss oleva D ja iskunilmaisin Katso kuva...

Страница 31: ...ksi vain toisen jalan tyyny 15 Vaihe 3 Valjaiden ja tyynyjen on annettava kuivua perusteellisesti ennen k ytt l kuivaa mekaanisessa kuivurissa T rke M rkien valjaiden lujuus heikkenee Vaihe 4 Katso ko...

Страница 32: ...la positionner dessus la portion femelle Ajuster les sangles pour qu elles soient correctement serr es Figure G tape 8 Ins rer la langue de la boucle raccord rapide dans le r cepteur jusqu entendre un...

Страница 33: ...sultats d inspection dans le journal d inspection et d entretien General Instruction 5902392 tape 6 Inspecter l indicateur d impact sur les mod les de harnais Delta avec le D droit et l indicateur d...

Страница 34: ...ons doivent tre soigneusement s ch s l air avant utilisation Ne pas placer dans un s cheur m canique Important la r sistance d un harnais mouill est r duite tape 4 Voir tape 5 ci dessus tape 5 Voir ta...

Страница 35: ...den s verst p hun delen Juster skulderstroppene slik at de passer akkurat og komfortabelt Fig G Trinn 8 Sett tungen til hurtigkoblingsspennen inn i mottakeren til du h rer et h rbart klikk Dra hardt i...

Страница 36: ...to og resultatene i inspeksjons og vedlikeholdsloggen i Generell instruks 5902392 Trinn 6 Inspiser rykkindikatoren p Delta selemodellene med st ende D og rykkindikator Se fig L L 1 viser selen i norma...

Страница 37: ...roppene Bare en benpute vises for gj re det tydeligere 15 Trinn 3 Selene og putene b r gjennomt rkes i luft f r bruk Ikke t rk i et mekanisk t rkeapparat Viktig En v t sele vil ha redusert styrke Trin...

Страница 38: ...pital Safety 1 D 1 A 2 2 3 D B 3 4 C 4 3 6 15 2 D 5 2 5 E 6 6 F 7 G 8 H 9 I 10 J EN341 EN353 EN534 EN355 EN360 EN363 EN362 i Safe 7 i Safe i Safe 8 9 7 800 328 6146 800 387 7484 www capitalsafety com...

Страница 39: ...39 5902392 i Safe 1 D 2 XP ExoFit 3 4 5 5902392 6 Delta D L L 1 D 10 11 D 12 L 2 D 13 DBI SALA A Arc Flash B 1 Delta 70 C 160 F 2 14 15 3...

Страница 40: ...mfort 16 17 B ARC FLASH 1 Delta ASTM F887 2004 2 omfort 9501207 14 15 3 4 5 5 6 Capital Safety Capital Safety ASTM F887 2004 26 6 6000 Arch Flash 31 6000 Kevlar Nomex 31 6000 Nomex Kevlar D Kevlar Nom...

Страница 41: ...KTA DBISALA OM DU BEH VER ETT NYTT INSTRUKTIONSBLAD KONTROLLERA PRODUKTEN F RE VARJE ANV NDNING ANV ND DEN INTE VID TECKEN P SLITAGE ELLER SKADOR HELKROPPSSELEN R KONSTRUERAD F R ATT S KRA ALLVARLIGA...

Страница 42: ...RBUNDNE KLIK OG D RINGE SKAL V RE KOMPATIBLE I ST RRELSE FORM OG STYRKE DETTE PRODUKT ER IKKE RESISTENT OVER FOR ILD ELLER VARME REPARATIONER M KUN UDF RES AF DBI SALA VED NDRING ELLER MISBRUG AF UDST...

Страница 43: ...TERV V 2 Kapacitet EN PERSON max 140 kg 3 VERSKRID INTE MAXKAPACITETEN F R KOMPONENTEN ELLER ANDRA DELAR I SYSTEMET KAPACITETEN R DEN SAMMANLAGDA VIKT SOM KOMPONENTEN R DIMENSIONERAD F R DEN SAMMANLAG...

Страница 44: ...ASITEETTI ON KOKONAISPAINO JONKA VALJAAT ON SUUNNITELTU KEST M N KOKONAISPAINOON SIS LTYY K YTT J N KEHON PAINO VAATTEET TY KALUT JA MUUT K YTT J N KANTAMAT VARUSTEET OTA YHTEYS DBI SALAAN JOS HALUAT...

Страница 45: ...ukten vid leverenastidpunkten m ste f ljas Underl tenhet att g ra det kan resultera i allvarlig skada eller d dsfall Kontakta Capital Safety om instruktionsblad erfordras Inspektera f re varje anv dnn...

Страница 46: ...nden brug Tages ud af brug efter standsning af fald Udstyret tages ud af brug hvis der ved besigtigelsen viser sig at forekomme slidtage eller skade Forbind kun kompatible komponenter Der m ikke ndres...

Страница 47: ...sicionamento subir a escadas ou interrup o de quedas com uma queda livre com um m ximo de 60 cm 2 p s C An is em D laterais se presentes destinam se para fins de posicionamento 2 Estilo Colete A O ane...

Страница 48: ...redning B D ringen foran hvis tilstede CE Til standsning af fald ANSI OSHA Til positionering til at kravle op ad stiger eller til standsning af fald med maks 60 cm s frit fald C Side D ringene hvis t...

Страница 49: ...to Consulte las instrucciones para obtener m s informaci n CZ 1 U IVATELSK IDENTIFIKACE NA T TEK PI TE PERMANENTN M ZNA KOVA EM 2 A P edn D krou ky slou pouze polohov n nebo plh n po eb ku Pou vejte p...

Страница 50: ...ovat asemointia varten Katso lis tietoja ohjeesta F 1 IDENTIFICATION DE L UTILISATEUR CRIRE SUR L TIQUETTE AVEC UN MARQUEUR IND L BILE 2 A L anneau en D avant est pour le positionnement ou les chelles...

Страница 51: ...protokoll 9 Siehe RFID Tag in Klarsichth lle 10 Etikett nicht entfernen S 1 Tillverkningsdatum satsnummer modellnummer och standarder verensst mmande med 2 Standardprodukt verensst mmer med se 1 3 Eur...

Страница 52: ...for besigtigelsen 7 Den besigtigendes initialer 8 Inspektionslog 9 Se RFID m rkesedlen i den klare pung 10 M rket m ikke fjernes FIN 1 Valmistusp iv m r er numero mallin nume ro ja standardit joita tu...

Страница 53: ...b 9 Data produzione numero del lotto numero modello misura e classe P 1 Data da inspec o 2 Iniciais do inspector 3 Registo de inspec o 4 Consulte a etiqueta RFID na bolsa transparente 5 N o retire est...

Страница 54: ...el bande polyester nylon 8 Capacit 140 kg 310 livres 9 Date de fabrication num ro de lot num ro de mod le taille et classe N 1 Inspisert dato 2 Inspekt rens initialer 3 Inspeksjonslogg 4 Se RFID merke...

Страница 55: ...advertencia inspecci n e ins trucciones dentro de la tapa 2 Este producto pertenece a CZ 1 V stra n kontroln a instruk n informace uvnit kryt 2 Vlastn k produktu DK 1 Advarsels besigtigelses og instru...

Страница 56: ...I 1 Informazioni utente Contrassegnare l etichetta con pennarello indelebile 2 Standard europeo 3 Numero dell organizzazione addetta all ispezione della produzione di questo dispositivo di protezione...

Страница 57: ...rkitse pysyv ll merkint v rill 2 Eurooppalainen standardi 3 T m n henkil kohtaisen suojalaitteen valmistajan tarkastamisesta vastaavan organisaation numero 4 Huomio Lue k ytt ohjeet 5 Tuote vastaa n i...

Страница 58: ...58...

Страница 59: ...59...

Страница 60: ...Sala Way Red Wing MN 55066 5005 Phone 651 388 8282 Fax 651 388 5065 solutions capitalsafety com CSG Canada Ltd 260 Export Boulevard Mississauga Ontario L5S 1Y9 Canada Phone 905 795 9333 Fax 905 795 87...

Отзывы: