background image


14 


2.3.3  Connect on RS-232 Interface  

Another alternative to connect to the SE-500MU is via the RS-232 interface. Follow the procedure 

below to establish connection.  

1.


Connect one end of the RS-232 cable to the SE-500MU and another end to the PC. Make sure the 

SE-500MU is powered ON. 
Note: You will need an RS-232-to-USB adapter on the PC end. 

2.


Run se500MuControl.exe to launch the User Interface. 

3.


At the top right of the interface, click the menu icon 

 to open the Settings window. 

4.


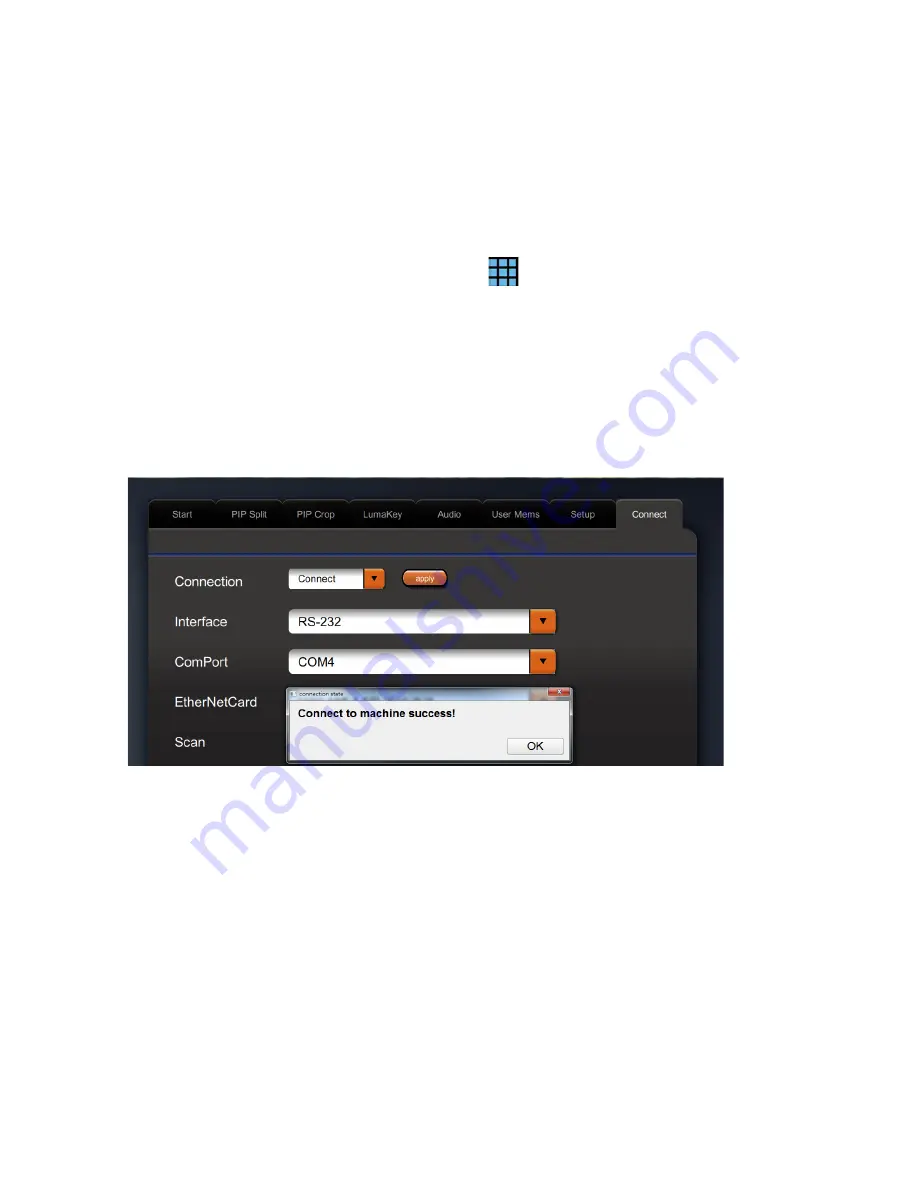
On the Settings window, click the 

Connect

 tab. 

5.


Click the 

Interface

 pull-down menu to select RS-232. 

6.


On the 

ComPort 

pull-down menu, select a COM port to which the SE-500MU is connected.  

7.


Finally, scroll the 

Connect

 tab page back up to the top and select 

Connect

; click the 

Apply

 button 

to establish the connection between the PC and the SE-500MU. A dialog box displaying the 

message of “Connection to machine success” will appear if the connection is successfully 

established. 


8.


Click 

OK

 to close the dialog box and on the main screen, the “

Connected

” status will be displayed 

at the bottom right corner, indicating that the SE-500MU is ready for control. 

Note: the RS-232 settings will be remembered and the PC will automatically connect to the SE-

500MU upon the next start up. 


2.3.4  Functions 

Once you have successfully connected to the switcher, you can then start operating it on the Software 
Control UI. Each individual functions are described and discussed in this section in detail.  


Содержание SE-500MU

Страница 1: ...SE 500MU w w w d a t a v i d e o c o m HD 4 CHANNEL VIDEO SWITCHER Instruction manual...

Страница 2: ...2 3 3 Connect on RS 232 Interface 14 2 3 4 Functions 14 CHAPTER 3 SETTING PARAMETERS 20 3 1 START 20 3 1 1 Transition Type 21 3 1 2 Transition Speed 21 3 1 3 Wipe Effect 21 3 1 4 WIPE Border Size 21 3...

Страница 3: ...TALLY OUTPUTS 35 APPENDIX 2 FIRMWARE UPGRADE 36 APPENDIX 3 DIMENSIONS 38 APPENDIX 4 SPECIFICATIONS 39 SERVICE AND SUPPORT 40 Disclaimer of Product Services The information offered in this instruction...

Страница 4: ...4 caused by using the information contained within this manual Further advice on the content of this manual or on the product can be obtained by contacting your local Datavideo Office or dealer...

Страница 5: ...this unit where the power cord will be walked on rolled over or otherwise stressed 9 If an extension cord must be used with this unit make sure that the total of the ampere ratings on the products pl...

Страница 6: ...17 are qualified for a free two years extension to the standard warranty providing the product is registered with Datavideo within 30 days of purchase Certain parts with limited lifetime expectancy su...

Страница 7: ...ons such as Cut Mix Wipe Transitions Fade to Black PIP Split and Luma Keying 1 1 Features Supports up to Full HD 1080p Remote Control over an Ethernet network Remote Control via RS 232 Interface Video...

Страница 8: ...and Multiview outputs quad view of the four HDMI inputs 2 HDMI Video Input 1 4 The SE 500MU provides four HDMI video input channels for connecting HDMI video sources 3 DVIP Port This port allows the S...

Страница 9: ...CH 1 and only MIC 2 is connected to the right channel CH 2 MIC 2 signal will not be replicated onto the left channel CH 1 which will thus be grounded NC NC When no MIC is connected to the two channels...

Страница 10: ...e Control UI The SE 500 MU s Software Control User Interface is designed for the user to operate configure and control the switcher The Software Control UI can be opened on any Windows system so as to...

Страница 11: ...her 2 3 2 Connect on DVIP Interface To connect to the SE 500MU on the DVIP interface you should configure the network settings of the switcher as well as the PC 1 Connect one end of the Ethernet cable...

Страница 12: ...check if the Model Name displayed is SE 500MU Note 1 If the Address Mode is Fixed IP please make sure the IP address is in the same IP range as the EtherNetCard i e their first three octets are the s...

Страница 13: ...essage of Connection to machine success will appear if the connection is successfully established 12 Click OK to close the dialog box and on the main screen the Connected status will be displayed at t...

Страница 14: ...t to which the SE 500MU is connected 7 Finally scroll the Connect tab page back up to the top and select Connect click the Apply button to establish the connection between the PC and the SE 500MU A di...

Страница 15: ...cts 13 AUTO transition button 5 WIPE transition effect selection Program Preview 6 MIX Enable Disable button 14 Program row 7 WIPE transition effect Enable Disable 15 Preview row PIP Keyer MENU 8 Enab...

Страница 16: ...control panel for the first two which are Left Right and Top Bottom wipes Center WIPE can be selected from the MENU Start Clicking the REV button reverses the direction of the WIPE MIX Enable Disable...

Страница 17: ...w Luma Keyer Enable Disable buttons Luma Key PGM Shows the luma key source on the PGM output and enables the luma key effect however the luma key effect cannot be previewed on the QUAD split view disp...

Страница 18: ...which the Transition Effect will be triggered as you move the T Bar CUT button Clicking the Cut button performs immediate manual switch between PVW and PGM views without any transition effect AUTO bu...

Страница 19: ...e number buttons along the PREVIEW row selects a video source BKG button Clicking the BKG button will switch the background to the Matte background or color bars BLK button Clicking the BLK button pla...

Страница 20: ...ion the user is allowed to set video output resolution reset to factory default and selects the interface language 3 1 Start Option Parameters Parameter Value or Range Default Value Start Transition T...

Страница 21: ...the user to choose The three wipe effects are LEFT RIGHT TOP BOTTOM and CENTER The default is LEFT RIGHT 3 1 4 WIPE Border Size The WIPE Border Size generally allows the user to select an appropriate...

Страница 22: ...eatures are enabled at the same time the lumakey source will be the upper layer and the PIP source will be the lower layer The layer order cannot be changed Option Parameters Parameter Value or Range...

Страница 23: ...de To adjust this parameter simply move the cursor on the slide bar and the parameter value will be displayed in the text box next to the slider 3 2 3 Position X Adjusting Position X parameter moves t...

Страница 24: ...meter to small selects a thin border middle will yield a medium size width large is the maximum PIP border width 3 2 7 Border Color The user is allowed to assign a PIP border color The available color...

Страница 25: ...op edge of the PIP window Bot Adjusts the position of the bottom edge of the PIP window The parameter value will be displayed in the text box next to the slider 3 4 Lumakey Keyer of the SE 500MU provi...

Страница 26: ...black background and white if the image is on a white background 3 4 3 Cleanup Level The Cleanup Level allows the user to fine tune the effect of the luma key The default value is 20 3 4 4 Transparen...

Страница 27: ...ion The user can either select the EBU or SMPTE standard By selecting AUTO allows the device to automatically detect the audio standard When the image is 50 Hz the audio follows EBU standard and when...

Страница 28: ...one of the USER memory shortcut buttons 1 3 on the PC APP Panel as a quick way of loading those previously saved User configurations Use the SHIFT button to switch between USER MEMORY 1 3 and USER MEM...

Страница 29: ...Res 1080p 60 1080p 59 94 1080p 50 1080i 60 1080i 59 94 1080i 50 720p 60 720p 59 94 720p 50 576i 480i MV Out Res 1080p 60 1080p 59 94 1080p 50 1080i 60 1080i 59 94 1080i 50 720p 60 720p 59 94 720p 50...

Страница 30: ...xpected issues from occurring 3 7 2 MV Out Res In MV Out RES the user is allowed to select an appropriate MULTIVIEW output resolution The available resolutions are listed as follows 1080p 60 1080p 59...

Страница 31: ...ter the Factory Default button is clicked 3 7 5 Language The available OSD menu languages are English Traditional Chinese and Simplified Chinese Please restart the PC APP after modifying the language...

Страница 32: ...nterface pull down menu to select DVIP or RS 232 interface and then configure the connection accordingly Please make sure the correct IP or COM Port is selected so that the connection can be successfu...

Страница 33: ...ernet Card Click the pull down menu to select an Ethernet Card from the displayed list 3 8 5 Scan Click the SCAN button to scan the network to which the switcher is connected to 3 8 6 IP Select After...

Страница 34: ...2 for example 2 Click the MENU button on the Software Interface to open the Setting window 3 Click the Lumakey tab and on the menu that opens set the Lumakey Source to Input 2 4 In this example the l...

Страница 35: ...llector output Tally output of input video Program 1 2 No Function 3 Preview 1 Open collector output Tally output of input video Preview 1 4 RCOM GND Ground Ground 5 Program 4 Open collector output Ta...

Страница 36: ...he switcher is working in the Bootloader mode At this point do not operate the switcher but click the Firmware Upgrade button to re run the firmware upgrade process Remark 2 If your RS 232 connection...

Страница 37: ...9 After the machine is rebooted you will immediately see images of the four inputs being displayed on the MV monitor Reconnect to the SE 500MU via the RS 232 interface On the Setup tab page confirm th...

Страница 38: ...38 Appendix 3 Dimensions All measurements in millimeters mm...

Страница 39: ...s D Sub 15 male connector Software Update RS 232 Standards Supported Input Resolution VGA XGA 1024 x 768 SXGA 1280 x 1024 UXGA 1600 x1200 WUXGA 1920 x 1200 1920 x 1080p 60 59 94 50 1920 x 1080i 60 59...

Страница 40: ...2427338 E mail sales datavideo in Tel 91 0120 2427337 A 132 Sec 63 Noida 201307 India India Noida Datavideo India Kochi Tel 91 4844 025336 Fax 91 4844 047696 2nd Floor North Wing Govardhan Building O...

Отзывы: