background image

6-96

Magellan

®

 9500

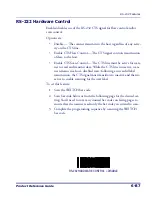
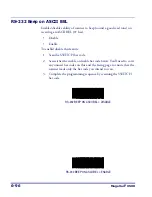
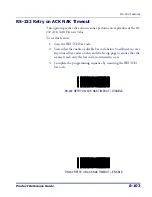
RS-232 Beep on ASCII BEL

Enables/disables ability of scanner to beep (sound a good read tone) on 
receiving an ASCII BEL (07 hex).

Disable

Enable

To enable/disable this feature:

1. Scan the SWITCH bar code.

2. Scan either the enable or disable bar code below. You’ll need to cover 

any unused bar codes on this and the facing page to ensure that the 
scanner reads only the bar code you intend to scan.

3. Complete the programming sequence by scanning the SWITCH 

bar code.

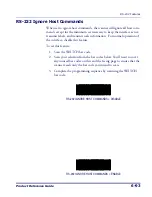
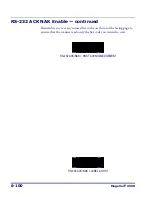
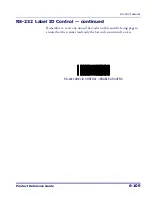
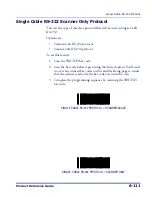
RS-232 BEEP ON ASCII BEL = DISABLE

RS-232 BEEP ON ASCII BEL = ENABLE

Содержание Magellan 9500?

Страница 1: ...Magellan 9500 9500 9504 9504 with SmartSentry Product Reference Guide...

Страница 2: ...9 5115120 5144118 5146463 5179270 5198649 5200597 5202784 5208449 5210397 5212371 5212372 5214270 5229590 5231293 5232185 5233169 5235168 5237161 5237162 5239165 5247161 5256864 5258604 5258699 526055...

Страница 3: ...Site Preparation and Installation 2 1 Pre Installation Considerations 2 2 Checkstand Design 2 3 Scanner Installation 2 4 Scanner Maintenance 2 4 References 2 4 Scanner Usage 2 4 Site Preparation Overv...

Страница 4: ...eset 3 9 Scale Adjustments 3 10 Operational Maintenance 3 12 Vertical Scan Window Replacement 3 13 Horizontal Scan Window Replacement WRG 3 15 Chapter 4 Problem Isolation 4 1 Diagnostic Procedures 4 2...

Страница 5: ...st Mode 6 11 General Scanner and Scale Features 6 12 Double Read Timeout 6 12 Laser Timeout 6 14 Motor Timeout 6 16 Green LED Idle State 6 19 Scanner Button Options 6 20 Power up Beep Control 6 22 Goo...

Страница 6: ...90 RS 232 Host Echo 6 91 RS 232 Host Echo Quiet Interval 6 92 RS 232 Ignore Host Commands 6 93 RS 232 TTL 6 94 RS 232 TTL Invert 6 95 RS 232 Beep on ASCII BEL 6 96 RS 232 Beep After Weigh 6 97 RS 232...

Страница 7: ...ission 6 140 EAN 13 Check Character Transmission 6 141 EAN 13 ISBN Conversion Enable 6 142 EAN 13 Label ID 6 143 EAN 13 2 Digit Supplemental Label ID 6 144 EAN 13 5 Digit Supplemental Label ID 6 145 E...

Страница 8: ...I 6 195 Code 39 AIM ID 6 196 Code 39 Label ID 6 197 Code 39 Length Control 6 198 Code 39 Maximum Label Length 6 199 Code 39 Minimum Label Length 6 200 Code 39 Fixed Length 1 6 201 Code 39 Fixed Length...

Страница 9: ...Length 1 6 245 Codabar Fixed Length 2 6 246 Codabar Stitching 6 247 Code 93 Enable 6 248 Code 93 AIM ID 6 249 Code 93 Label ID 6 250 Code 93 Length Control 6 251 Code 93 Maximum Label Length 6 252 Co...

Страница 10: ...e Information B 1 Introduction B 1 General Specifications B 1 RS 232 Cable Pinout B 2 Scanner B 2 RS 232 Cable Pinout continued B 3 Scale B 3 IBM Cable Pinout B 4 Scanner and Scale B 4 IBM USB Cable P...

Страница 11: ...re 2 2 End User shall not copy modify decompile disassemble reverse engineer or otherwise reproduce or remanufacture the Software whether modified or unmodified nor sell assign sublicense distribute l...

Страница 12: ...DATALOGIC BE LIABLE TO END USER OR ANY THIRD PARTY FOR LOST PROFITS LOST DATA INTERRUPTION OF BUSINESS OR SERVICE OR FOR ANY OTHER SPECIAL CONSEQUENTIAL CONTINGENT INDIRECT INCIDENTAL PUNITIVE EXEMPLA...

Страница 13: ...scanner or scanner scale and its most common accessories and details counter preparation and installation Cable routing connection and testing are also explained in this chapter Chapter 3 Operation an...

Страница 14: ...ertain programming sessions Appendix D Host Commands contains a partial listing of available host commands that can be used with a compatible host interface Appendix E Factory Defaults is a table prov...

Страница 15: ...governmental agencies It is your responsibility to ensure compliance with the regulations that govern installation of weighing devices CAUTION blocks inform you that proper handling adherence to the p...

Страница 16: ...wn in Figure 1 1 Figure 1 1 Scanner Scale Nomenclature Produce Rail All Weighs Platter Scanner LED Green Scale LED Yellow Weighing Surface Lean Oversize Produce Here Vertical Window Horizontal Window...

Страница 17: ...offTerminal POT Brick Input Scale Data dual cable scanner scale Drives Remote Display Label Data Scale Data for single cable interfaces Application Download where appropriate Test Port On Screen Progr...

Страница 18: ...order to scan items Two separate projections one from the horizontal window and one from the vertical window combine to form a zone where bar code labels are read Refer to Chapter 3 Scan ning Items fo...

Страница 19: ...005 kg Maximum Static Weight Overload A maximum static weight of 150 pounds 68 kg can be sustained by the scale without incurring damage or degrading performance Automatic Zero Maintenance The scale s...

Страница 20: ...n Power up Once installed and powered up a warm up time of 15 minutes must be allowed before calibrating or performing weighing operations User Configurable Warm up The user may configure the unit for...

Страница 21: ...o 40 C 50 to 104 F Dust Resistant Optics Cavity IP5X 70 C 158 F 40 C 40 F Temperature 40 to 70 C 40 to 158 F Illumination Artificial Light 0 450 Foot candles 4 842 LUX Sunlight 0 8 000 Foot candles 86...

Страница 22: ...wer cord shipped is not compatible with your electrical system Please contact your distributor immediately to receive the necessary information and components to ensure electrical compatibility Power...

Страница 23: ...observed in this product Exposure to the light emitted from the scan windows has been shown not to be harmful The safety record of bar code scanning is perfect after mil lions of hours of use worldwi...

Страница 24: ...stationary laser beam is ever emitted the failing unit should be disconnected from its power supply until repaired by a qualified technician WARNING This equipment has been tested and found to comply...

Страница 25: ...4 709 369 4 712 853 4 749 879 4 786 798 4 792 666 4 798 943 4 799 164 4 816 660 4 861 972 4 861 973 4 866 257 4 868 836 4 879 456 4 963 719 4 991 692 5 144 118 5 179 270 5 198 649 5 247 162 5 229 588...

Страница 26: ...ates UL 60950 T V NRTL UL Canada CAN CSA C22 2 No 60950 T V NRTL UL World IEC60950 IEC 825 1 2001 T V CB Emmisions United States 47CFR Part 15J FCC Canada ICES 0003 Class B Europe EN 55022 Class B Saf...

Страница 27: ...mentals and Add ons 2 5 digit supplimentals Cou pon code and Code 128 Plural Stage Dual UPC Bar Codes for Japan 2 label read Reduced Space Symbology RSS RSS 14 RSS expanded RSS Stacked EAN 8 13 JAN 8...

Страница 28: ...1 16 Magellan 9500 NOTES...

Страница 29: ...little or no modification into open ings cut for previously installed scanners such as Magellan scanners or NCR scanner models 7820 24 and 7870 Other models are designed for applications with smaller...

Страница 30: ...anner installation and operation procedures can reduce the risk of repetitive motion injuries but not eliminate it Although there are currently no formal guidelines for checkstand ergo nomics the Food...

Страница 31: ...rizon tal surface of the scanner is flush with all surrounding surfaces 6 Choose a design which integrates the scanner and scale to eliminate extended reaches and lifts during weighing tasks 7 Provide...

Страница 32: ...hes are evident References Anonymous 1992 Ergonomic Improvement of Scanning Checkstand Designs Food Marketing Institute 800 Connecticut Ave N W Washington D C 20006 Grant Katharyn A et al 1992 Ergonom...

Страница 33: ...either the vertical or horizontal window slide items across the scanner in their natural orientations on the checkstand as much as possible Site Preparation Overview Consider the following factors bef...

Страница 34: ...board to allow leveling of the scanner or scanner scale within the counter Use a 0 375 thick board to replicate the mount ing flange on the long scanner or scanner scale and adjust screws or bolts unt...

Страница 35: ...mum vertical clearance of 1 5 3 8 cm MUST be provided reference Figure 2 2 Another consideration is that the scan zone must be kept free of obstruc tions such as enclosures keyboard mounts etc Figure...

Страница 36: ...nstalled one with a removable filter that may be washed or replaced is recommended Figure 2 3 Debris Chutes Ventilation Slots NOTE DO NOT place the scanner in a close fitting fully enclosed checkstand...

Страница 37: ...and maintenance such as zeroing and calibration without removing the scanner from the checkstand Additionally all cable connections made at the scanner can be connected and removed while the unit is...

Страница 38: ...mount of electrical noise interference on the power line ask a qualified electrician to measure the input line voltage Figure 2 4 Input Power Wiring AC DC Power Supply Power Mains Neutral Line Ground...

Страница 39: ...Mounting may require installation of support s countertop routing or other such devices Depending upon checkstand design you may wish to install an item diverter to direct items toward the scan win d...

Страница 40: ...zone scanning is accom plished in one fluid motion The operator simply slides the item from the conveyor belt or diverter area through the scanning area and passes the item to the other hand which in...

Страница 41: ...easy to remove in the event that replace ment is required A little planning now will save a lot of frus tration later 4 Connect and verify all system operations The scanner should be installed so tha...

Страница 42: ...Optional Item Diverter Conveyor Deadplate Scanner Bagging Area Take Away Belt Keyboard Remote Display POS Terminal Printer Check Writing Stand Optional Scan Bag Well Optional 6 3 16 0cm Cash Drawer B...

Страница 43: ...el 850x 950x inter changeability and minimum required counter cutout for new 950x instal lations respectively Figure 2 7 Dimensions 28 9 lb 13 1kg Scanner Scale Weight 22 2 lb 10 1kg Scanner Weight w...

Страница 44: ...5 1 9cm Max Radius 0 25 0 64cm 4x 20 125 0 06 51 2 0 15 cm 18 625 060 47 3 0 15 cm 0 37 03 0 94 0 07 cm 0 37 030 0 94 0 07 cm If leveling feet are needed use the placement shown here represented with...

Страница 45: ...562 29 367cm 1 0 2 54cm Max Radius 0 25 0 64cm 4x 20 09 0 06 51 03 0 15cm 17 88 0 06 45 26 0 015cm 0 61 03 1 55 0 07 cm 50 030 1 27 0 07 cm If leveling feet are needed use the placement shown here rep...

Страница 46: ...r preparations to accommodate the scanner or scanner scale Hav ing completed those steps physical installation of the scanner or scanner scale can begin The following instructions apply to all models...

Страница 47: ...it s controls and features Leave the guide at the checkstand when the installation is complete Remove the protective packing and carefully lift the unit from the carton Be sure to save the box and all...

Страница 48: ...e connect the Remote Scale Display to the proper connector on the unit s connector panel refer to Figure 2 14 Note that if the Remote Scale Display is not con nected a scanner power up Selftest will s...

Страница 49: ...procedures 4 The unit should be permitted to reach thermal equilibrium before proceeding to the next steps Reference the topic Warm Up Time in Chapter 1 When the unit is moved from a cooler temperatu...

Страница 50: ...t the function by pressing the bottom push button A ticking sound will be heard which should cease upon deactivating an EAS tag Decoupled Mode In this mode items do not require a bar code to be scanne...

Страница 51: ...ration procedures Remote Scale Display Check to verify that 0 00 lb 0 000 kg for met ric is displayed then place an item on the weighing platter Verify that the display shows a weight and that the yel...

Страница 52: ...the scanner will first sound three tones wait a few seconds then sound six rapid tones after which you should immediately release the button While in Scanner Diagnostic Mode identification numbers fo...

Страница 53: ...ound a series of tones and the Remote Display will show an error code Turn to Chapter 4 Problem Isolation for a description of error codes Press the Scale Zero Push Button once more to reset the unit...

Страница 54: ...DC Power Supply EAS Controller Box AC Power EAS Interface Cable Scanner Interface Cable Scale Interface Cable Scanner Scale Optional Remote Scale Display Cable optional Scanner Scale POS Terminal Pri...

Страница 55: ...alling the optional Remote Scale Display consider both the cus tomer s viewing angle and the amount of daily ambient light conditions anticipated at this installation site Figure 2 13 shows available...

Страница 56: ...isplay is easily readable for the majority of your customers the dis play should be approximately 48 to 60 122 to 152 cm from the floor Figure 2 13 Remote Scale Display NOTE Check with local Weights a...

Страница 57: ...or through the cutout in the back of the base see Figure 2 15 4 Drill the mounting screw holes using a drill bit of the appropriate diameter for your mounting screws or bolts 5 Drill the cable routing...

Страница 58: ...ubber band from the connector and attach the connec tor to the display head 9 Slip the display head onto the stalk base 10 Feed the entire remaining length of the Remote Scale Display inter face cable...

Страница 59: ...e Display Take care not to pinch or pierce the interface cable while securing the Remote Scale Display to the checkstand Figure 2 15 Remote Scale Display Components 48 60 122 152cm 36 91cm 11 5 29cm 2...

Страница 60: ...scanner scale If you need to change from pounds to kilograms or vice versa call technical support You can verify that the scale is set correctly for your country s requirements by observing that the R...

Страница 61: ...The controller must be located near the scanner and be within easy connection of an ade quate power supply The EAS Single Antenna installed under the scanner s top platter must be situated so that it...

Страница 62: ...assembly is determined to be in the position the EAS Single Antenna should be with regard to product flow proceed to the next step Otherwise skip to step 7 3 Remove the screws that fasten the Load Cel...

Страница 63: ...n indicated by Figure 2 17 then route the antenna cable down through the unit s side Securely attach the antenna using the screws provided 8 Connect the antenna cable to the EAS Controller Box 9 Re in...

Страница 64: ...ner and scale interface cable s EAS cable and Remote Scale Display cable optional to the scanner Some POS terminals require two interface cables one for the scanner interface and one for the scale int...

Страница 65: ...es Remote Display Label Data Scale Data for single cable interfaces Application Download where appropriate Test Port On Screen Programming OSP Application Download RS 232 Handheld Scanner Input Auxill...

Страница 66: ...5 Figure 2 20 and Figure 2 21 2 Remove the All Weighs Platter to gain access to the lift handles Grasp the platter as shown in Figure 2 22 and gently lift it from the scanner If the top edge of the pl...

Страница 67: ...ing from either direction Make adjustments as needed to align the platter with the counter by moving support rails up or down or consider installing screws in positions that will allow their use in ad...

Страница 68: ...2 40 Magellan 9500 Figure 2 23 Using the Lift Handles Marked Lift Handle DO NOT use the EAS Antenna to lift the unit...

Страница 69: ...ecting any peripheral device If you have not identified any specific requirements for your POS system follow these steps 1 Power down the POS terminal 2 Ensure that power is disconnected from the scan...

Страница 70: ...on the 7 segment display 7 Power up the POS terminal Verify that scanning deactivation and weighing functions are operational and that data is properly com municated between the scanner and your POS...

Страница 71: ...tems To scan items using the scanner slide or push them through the scan zone as shown in Figure 3 1 The scanner will work equally well with either a left to right or right to left motion through the...

Страница 72: ...er than picking them up By avoiding any gripping twisting and rotation of your hands and wrists you can prevent repetitive motion injuries This technique also relieves you from lifting possibly thousa...

Страница 73: ...r item bar codes are read by the scanner Decoupled Mode Deactivation is independent of the scanning function Hybrid Mode EAS system is armed whenever the scanner is enabled and the deactivation beep i...

Страница 74: ...ed hold the EAS tag directly downstream from the horizontal window and press and release the Manual EAS Deactivation Push Button This manual deactiva tion feature is optional and can be enabled disabl...

Страница 75: ...re items do not rest on the counter or other non weighing surfaces Reference Figure 3 2 Figure 3 2 L Shaped Platter Item Placement 2 Once weighed items are in place enter PLU price Look Up data as des...

Страница 76: ...that must be successfully completed before the scanner sounds the initial good read tone and illuminates the lamps indicating the scanner and or scale are ready for operation These steps include Powe...

Страница 77: ...pair is made Operational Configuration Once Selftest diagnostics have been successfully run a tone is emitted if configured to do so and the unit enters an operational configuration state The scanner...

Страница 78: ...ero on the platter If you have a scanner without scale model the yellow lamp will not be lit when the scanner is ready for scanning Once the scanner enters Normal Operation it begins a countdown seque...

Страница 79: ...er scale is shipped from the factory it is con figured to work with the POS system interface at your store and read the bar code symbologies you designated If you need to change this configu ration in...

Страница 80: ...l automatically adjust itself to true zero The scale also automatically zeros itself on power up if the weight present on the scale is within these defined limits Zeroing the Scale The zeroing operati...

Страница 81: ...by a local regulatory body In many areas of the United States the scale calibration switch must be sealed before being placed into service Consult the agency responsible for regulating weigh ing devic...

Страница 82: ...twice daily with a nonabrasive mild water based glass cleaner and paper towels or lint free cleaning tissues The textured plastic surfaces and stainless steel can also be cleaned using the same clean...

Страница 83: ...the scanner Figure 3 3 Platter Removal 2 If the top edge of the platter is blocked you may find it easier to grasp the platter vertical bezel as shown in Figure 3 3b Vertical Bezel Obstruction a b OR...

Страница 84: ...eat the new vertical scan window into the window channel within its bottom retention tabs Tilt the window in to engage the two tabs at the top of the retainer and carefully snap the window to secure i...

Страница 85: ...3 Once the vertical bezel is freed from the platter the WRG window can be slid from its channel as shown Carefully dispose of any dam aged glass 4 Slide a new WRG window fully into the channel 5 Re in...

Страница 86: ...3 16 Magellan 9500 Figure 3 5 Removing Replacing the WRG Window Slide WRG Window Out Remove Vertical Bezel...

Страница 87: ...e error reporting modes are used Power Up Selftest Operational tests and Diagnostic tests These test sequences are explained on the fol lowing pages Power Up Selftest The Power up Selftest is a pre op...

Страница 88: ...udes troubleshooting flowcharts to help isolate the problem Diagnostic Procedures Your Point Of Sale POS system may contain many components that operate as a system Since almost all scanner or scale p...

Страница 89: ...code will appear on the 7 segment display refer to Figure 4 1 Pressing the Volume Tone Push button will cause the scanner to sound a series of beeps corresponding to that error code The table on the...

Страница 90: ...pter for problem identi fication and corrective actions 8 Remote Display Connect the Remote Display If necessary replace display or cable Alternatively you can disable the Remote Display using the pro...

Страница 91: ...oubleshooting always remember to check all cable connections first before proceeding with other problem isolation steps 7 Segment Display Remote Display Scale Status Lamp Problem Description Action Re...

Страница 92: ...sonnel report error E__5 Flash pause 5 blinks long pause repeat sequence Internal software fault Call technical support personnel report error Other Scale Reporting 0 Off Cannot zero at power up or we...

Страница 93: ...the Selftest flowchart if you re unsure the unit has passed Selftest Flashing Green LED If the Green LED is flashing slowly the scanner is most likely in Sleep Mode Press and release the Volume Tone P...

Страница 94: ...NO YES Does the 7 segment display show 4 or 5 NO NO YES Does the 7 segment display show 7 or A NO YES Does the 7 segment display show 8 Does the 7 segment display show C Does the 7 segment display sh...

Страница 95: ...YES NO Does the scanner read satisfactorily YES NO Does the scanner read satisfactorily Enter Scanner Diagnostic Mode by holding the Volume Tone Push Button for 4 seconds until first 3 and then 6 rapi...

Страница 96: ...gramming bar codes provided in Section 6 Check interface and I F options inactive symbologies and other configurable features Troubleshoot the host or call Tech Support YES NO Does the scanner read sa...

Страница 97: ...e weigh platter moves freely Remove item s from scale Press Scale Zero Button If the scale still fails to zero recalibrate the scale NO YES 0 shown on RemoteDisplay Yellow LED off NO NO NO YES Is prob...

Страница 98: ...play Use the programming bar codes in Section 6 to enable operation using a Remote Display Verify that the Remote Display cable is securely attached to the external Remote Display port and reset the s...

Страница 99: ...ort YES YES NO NO Do the EAS Antenna s deactivate labels Do the EAS Antenna s deactivate labels Check all EAS cable connections If possible retest the system substituting known good EAS cable and or c...

Страница 100: ...4 14 Magellan 9500 NOTES...

Страница 101: ...will meet Weights and Measurement requirements Certification of the scanner scale s weighing apparatus is subject to Fed eral State and Local Weights and Measures statutes and is restricted to author...

Страница 102: ...other than these performed by a certified technician or verification offi cial Access to the calibration switch should be restricted with a paper or a wire and lead seal after the calibration has been...

Страница 103: ...that the scanner scale automatic zero setting mechanism is operating correctly 1 Place 0 007 pounds 4 grams for metric on the center of the weigh ing platform The entire weight must be placed on the w...

Страница 104: ...t set including the case on the weighing surface of the scale The display should show an under score and three hyphens which is the overweight indica tion 5 Remove all weight from the weighing surface...

Страница 105: ...eigh platter 6 Press the Zero Push Button The Yellow LED will go out for approximately 10 seconds or less and the Remote Display will alternately display and until the scale is ready to proceed 7 When...

Страница 106: ...ush Button again to permanently store the calibra tion data and exit Calibration Mode You have completed the cali bration of the scanner scale The unit s calibration must now be verified as required b...

Страница 107: ...Test Shift Test Blanking Test Decreasing Load Test Return to Zero Test Increasing Load Test Phase 1 This test checks Scale operation with five ten and fifteen pound weights 1 Check that the display re...

Страница 108: ...a fifteen pound load on the center of each of the four quadrants A B C and D in Figure 5 2 of the scanner scale s weigh platter Verify that a reading of between 14 99 and 15 01 lb registers under load...

Страница 109: ...0 00 Blanking Test This test ensures that the scanner scale will indicate its weighing capability has been exceeded if a weight greater than 0 05 pounds over its maximum upper weight limit is placed...

Страница 110: ...fully the scanner scale returns to zero Remove all weights from the scale and verify that the scale reads 0 00 lb After completing this test close the calibration access cover and seal per local Weigh...

Страница 111: ...1 This test checks Scale operation for increasing loads from 0 100 kg and 7 50 kg 1 Check that the display reads 0 000 kg when at rest with nothing on the weighing surface The Yellow LED is steadily...

Страница 112: ...ure that items placed anywhere on the weigh ing surface of the scanner scale are weighed properly Refer to Figure 5 3 when performing this test 1 Place and remove in succession a 5 0 kilogram load on...

Страница 113: ...ur face and check that the display reads between 12 490 kg and 12 510 kg 3 Place an additional 2 50 kilograms in the center of the weighing sur face and check that the display reads between 14 990 kg...

Страница 114: ...l the upper limit plus 0 82 kilograms on the weigh platter For example If the upper limit is set at 15 kilograms place weights equaling 15 82 kilograms 2 Verify that the display shows a dash and three...

Страница 115: ...Return to Zero Test This test ensures that after all other tests have been completed success fully the scanner scale returns to zero Without any weight on the weigh platter verify that the scale read...

Страница 116: ...5 16 Magellan 9500 NOTES...

Страница 117: ...specific publi cations to program scanner features This manual has been developed to make it quick and easy for users of all levels to find the information needed to understand and configure fea ture...

Страница 118: ...company or application Once you know the scanner s current settings you can determine what changes will be required to allow communication with your host system and or optional features you choose to...

Страница 119: ...h bar codes etc If you experience difficulties have questions or require additional infor mation contact your local distributor or call your dealer or sales represen tative CAUTION It is possible via...

Страница 120: ...e settings This manual provides the bar code labels and instructions necessary to configure the scanner s features and options Programming via Handheld Device The scanner can also accept programming v...

Страница 121: ...s manual the scanner is typically placed in Programming Mode by scanning the SWITCH label While in the Programming Mode the scanner only recognizes ONLY the special programming bar codes contained in...

Страница 122: ...e before completing all input will result in an error tone and cause the scanner to exit Programming Mode Under these circumstances the current feature you were trying to set is thrown out any previou...

Страница 123: ...disconnected Disconnecting power during Pro gramming Mode before scanning the SWITCH bar code will cause all new settings to be ignored On power up the scanner will return to previous settings 4 Maint...

Страница 124: ...ust be entered before ending the programming session In the example three digits must be scanned from the number pad in Appendix C This type of format requiring several bar codes is nec essary to allo...

Страница 125: ...9 Table 6 1 Programming Sequence 1 1 C A B 2 3 1 2 3 4 5 6 SET SWITCH ENABLE NEW FEATURE ENABLE NEW FEATURE USING THE FOLLOWING SETTINGS SWITCH SWITCH SWITCH 0 8 ITEM TAG ITEM VALUE END RESET 0 ONE BA...

Страница 126: ...code to return the scanner to the default settings configured at the factory for the currently active interface This bar code is typically used to return the scanner to a known operating state when th...

Страница 127: ...he host via the scanner interface This allows the bar code to be scanned continuously without requiring a response from the POS terminal To return the scanner to normal function scan the TEST MODE DIS...

Страница 128: ...d Timeout 1 Scan the SWITCH bar code 2 Scan your selection from the bar codes below You ll need to cover any unused bar codes on this and the facing page to ensure that the scanner reads only the bar...

Страница 129: ...Reference Guide 6 13 Double Read Timeout continued Remember to cover any unused bar codes on this and the facing page to ensure that the scanner reads only the bar code you intend to scan DOUBLE READ...

Страница 130: ...can prolong the life of the VLDs To set the Laser Timeout 1 Scan the SWITCH bar code 2 Scan your selection from the bar codes below You ll need to cover any unused bar codes on this and the facing pag...

Страница 131: ...oduct Reference Guide 6 15 Laser Timeout continued Remember to cover any unused bar codes on this and the facing page to ensure that the scanner reads only the bar code you intend to scan LASER TIMEOU...

Страница 132: ...elow You ll need to cover any unused bar codes on this and the facing page to ensure that the scanner reads only the bar code you intend to scan 3 Complete the programming sequence by scanning the SWI...

Страница 133: ...oduct Reference Guide 6 17 Motor Timeout continued Remember to cover any unused bar codes on this and the facing page to ensure that the scanner reads only the bar code you intend to scan MOTOR TIMEOU...

Страница 134: ...500 Motor Timeout continued Remember to cover any unused bar codes on this and the facing page to ensure that the scanner reads only the bar code you intend to scan MOTOR TIMEOUT 30 MINUTES MOTOR TIME...

Страница 135: ...dy to read a label Options are Off On dim To set the LED Idle State 1 Scan your selection from the bar codes below You ll need to cover any unused bar codes on this and the facing page to ensure that...

Страница 136: ...ll button functions To set the desired Scanner Button Option 1 Scan the SWITCH bar code 2 Scan your selection from the bar codes below You ll need to cover any unused bar codes on this and the facing...

Страница 137: ...1 Scanner Button Options continued Remember to cover any unused bar codes on this and the facing page to ensure that the scanner reads only the bar code you intend to scan SCANNER BUTTON OPTION ENABLE...

Страница 138: ...beep One beep Three beeps To set the Power up Beep 1 Scan the SWITCH bar code 2 Scan your selection from the three bar codes below You ll need to cover any unused bar codes on this and the facing page...

Страница 139: ...t Reference Guide 6 23 Power up Beep Control continued Remember to cover any unused bar codes on this and the facing page to ensure that the scanner reads only the bar code you intend to scan POWER UP...

Страница 140: ...ature 1 Scan the SWITCH bar code 2 Scan your selection from the two bar codes below You ll need to cover any unused bar codes on this and the facing page to ensure that the scanner reads only the bar...

Страница 141: ...tone Low 660 Hz Medium 860 Hz High 1050 Hz To set the Good Read Beep Frequency 1 Scan the SWITCH bar code 2 Scan your selection from the three bar codes below You ll need to cover any unused bar codes...

Страница 142: ...ad Beep Frequency continued Remember to cover any unused bar codes on this and the facing page to ensure that the scanner reads only the bar code you intend to scan GOOD READ BEEP FREQUENCY MEDIUM GOO...

Страница 143: ...ads only the bar code you intend to scan 3 Scan the appropriate digits from the keypad in Appendix C that rep resent the desired good read beep length setting The selectable range is 1 255 which is th...

Страница 144: ...Low Volume 2 Medium Volume 3 Medium High Volume 4 Highest Volume To set the Good Read Beep Volume 1 Scan the SWITCH bar code 2 Scan your selected volume bar code from this or the following pages You l...

Страница 145: ...rence Guide 6 29 Good Read Beep Volume continued Remember to cover any unused bar codes on this and the facing page to ensure that the scanner reads only the bar code you intend to scan GOOD READ BEEP...

Страница 146: ...ad Beep Volume continued Remember to cover any unused bar codes on this and the facing page to ensure that the scanner reads only the bar code you intend to scan GOOD READ BEEP VOLUME MEDIUM HIGH GOOD...

Страница 147: ...o set the Good Read When to Indicate feature 1 Scan the SWITCH bar code 2 Scan the desired mode bar code from this page You ll need to cover any unused bar codes on this and the facing page to ensure...

Страница 148: ...ontinued Remember to cover any unused bar codes on this and the facing page to ensure that the scanner reads only the bar code you intend to scan GOOD READ INDICATE AFTER TRANSMIT GOOD READ INDICATE A...

Страница 149: ...ensure that the scanner reads only the bar code you intend to scan 3 Complete the programming sequence by scanning the SWITCH bar code SCALE DISABLE SCALE ENABLE NOTE Recalibration recertification ma...

Страница 150: ...nted the scanner scale will apply the country spe cific weighing rules specified via this feature SCALE COUNTRY MODE U S A SCALE COUNTRY MODE U K NOTE Scale Country Mode applies only when a scale is e...

Страница 151: ...tures Product Reference Guide 6 35 Scale Country Mode continued Remember to cover any unused bar codes on this and the facing page to ensure that the scanner reads only the bar code you intend to scan...

Страница 152: ...ht doesn t return to zero between weight requests from the POS plus scale will require re zeroing if a non zero weight is left on for more than 4 minutes To set this feature 1 Scan the SWITCH bar code...

Страница 153: ...d Remember to cover any unused bar codes on this and the facing page to ensure that the scanner reads only the bar code you intend to scan SCALE ENFORCED ZERO RETURN SCALE MUST RETURN TO ZERO WEIGHT W...

Страница 154: ...erface Type 1 Scan the SWITCH bar code 2 Scan your selection from the bar codes below You ll need to cover any unused bar codes on this and the facing page to ensure that the scanner reads only the ba...

Страница 155: ...es Product Reference Guide 6 39 Scale Interface Type continued Remember to cover any unused bar codes on this and the facing page to ensure that the scanner reads only the bar code you intend to scan...

Страница 156: ...You ll need to cover any unused bar codes on this and the facing page to ensure that the scanner reads only the bar code you intend to scan The strategy is to select the lowest possible filter level n...

Страница 157: ...Guide 6 41 Scale Motion Level Filter continued Remember to cover any unused bar codes on this and the facing page to ensure that the scanner reads only the bar code you intend to scan SCALE MOTION LEV...

Страница 158: ...Scan the SWITCH bar code 2 Scan your selection from the two bar codes below You ll need to cover any unused bar codes on this and the facing page to ensure that the scanner reads only the bar code you...

Страница 159: ...play REMOTE DISPLAY DISABLE REMOTE DISPLAY ENABLE NOTE Recalibration recertification may be required when adding a Remote Display Consult your local Weights and Measures authority If this feature is e...

Страница 160: ...uctivity Index Reporting allows the scanner to provide information to an external computer indicating how easy the label was to read To set this feature 1 Scan the SWITCH bar code 2 Scan your selectio...

Страница 161: ...ct Reference Guide 6 45 Aux Port Mode continued Remember to cover any unused bar codes on this and the facing page to ensure that the scanner reads only the bar code you intend to scan AUX PORT MODE E...

Страница 162: ...lay will show the error code for the failed laser reference Error Codes in 4 but the scanner will continue to func tion Single Laser Failure Fatal If it is desirable to have maximum per formance or no...

Страница 163: ...o provide feedback to the cashier on how to scan in a more ergonomic fashion To set this feature 1 Scan the SWITCH bar code 2 Scan your selection from the bar codes below You ll need to cover any unus...

Страница 164: ...m is armed whenever the scanner is enabled and the deactivation beep is sounded when an EAS tag is deactivated To set this feature 1 Scan the SWITCH bar code 2 Scan your selection from the bar codes b...

Страница 165: ...ct Reference Guide 6 49 EAS Mode continued Remember to cover any unused bar codes on this and the facing page to ensure that the scanner reads only the bar code you intend to scan EAS MODE DISABLE EAS...

Страница 166: ...lan 9500 EAS Mode continued Remember to cover any unused bar codes on this and the facing page to ensure that the scanner reads only the bar code you intend to scan EAS MODE DECOUPLED MODE EAS MODE HY...

Страница 167: ...s and the facing page to ensure that the scanner reads only the bar code you intend to scan 3 Scan the appropriate digits from the keypad in Appendix C that rep resent the desired EAS Beep Duration Th...

Страница 168: ...r any unused bar codes on this and the facing page to ensure that the scanner reads only the bar code you intend to scan 3 Scan the appropriate digits from the keypad in Appendix C that rep resent the...

Страница 169: ...is always enabled ENABLE ONLY WHEN SCANNER ENABLED The Manual EAS Deactivation Push Button is only available when the scanner is enabled and running 1 See EAS Mode on page 48 for more information abo...

Страница 170: ...can To set this feature 1 Scan the SWITCH bar code 2 Scan your selection from the bar codes below You ll need to cover any unused bar codes on this and the facing page to ensure that the scanner reads...

Страница 171: ...al EAS Deactivation Push Button continued Remember to cover any unused bar codes on this and the facing page to ensure that the scanner reads only the bar code you intend to scan MANUAL EAS DEACTIVATO...

Страница 172: ...n 3 Scan the appropriate digits from the keypad in Appendix C that rep resent the desired duration The selectable range is 1 255 which is the duration in 10 millisecond increments Pad all single and d...

Страница 173: ...nd to scan 3 Scan the appropriate digits from the keypad in Appendix C that rep resent the desired duration The selectable range is 1 255 which is the duration in 10 millisecond increments Pad all sin...

Страница 174: ...riate digits from the keypad in Appendix C that rep resent the desired duration The selectable range is 1 255 which is the duration in 50 millisecond increments Pad all single and double digit numbers...

Страница 175: ...IBM USB 45 IBM Port 17 04 NOT USER SELECTABLE Null Interface Indicated by 7 segment FRU display flashing 0 at start up NOTE A new scanner may have been shipped from the factory with a Null Interface...

Страница 176: ...uld be taken to select the correct interface type since you can cause damage to the scanner and or POS terminal by attempting to change to an incompatible interface ALWAYS make interface selections wi...

Страница 177: ...ensure that the scanner reads only the bar code you intend to scan INTERFACE TYPE RS 232 STANDARD CAUTION Great care should be taken to select the correct interface type since you can cause damage to...

Страница 178: ...he scanner reads only the bar code you intend to scan INTERFACE TYPE RS 232 WINCOR NIXDORF CAUTION Great care should be taken to select the correct interface type since you can cause damage to the sca...

Страница 179: ...INTERFACE TYPE RS 232 SINGLE CABLE CAUTION Great care should be taken to select the correct interface type since you can cause damage to the scanner and or POS terminal by attempting to change to an...

Страница 180: ...M PORT 17 CAUTION Great care should be taken to select the correct interface type since you can cause damage to the scanner and or POS terminal by attempting to change to an incompatible interface ALW...

Страница 181: ...INTERFACE TYPE IBM USB CAUTION Great care should be taken to select the correct interface type since you can cause damage to the scanner and or POS terminal by attempting to change to an incompatible...

Страница 182: ...u intend to scan 3 Scan the appropriate digits from the keypad in Appendix C that rep resent the desired maximum host transmitted message length The selectable range is 0 249 data characters Labels th...

Страница 183: ...r code is transmitted When the feature Good Read Beep Control is enabled the scanner will beep when the data is placed in a transmission buffer When a DISABLE SCANNER command is received from the host...

Страница 184: ...acter Set and their corresponding Hex Values is available in the inside back cover of this manual ASCII parameters must be input by scanning a pair of hexadecimal digits for each character Thus to set...

Страница 185: ...Product Reference Guide 6 69 Global Prefix continued Remember to cover any unused bar codes on this and the facing page to ensure that the scanner reads only the bar code you intend to scan SET GLOBAL...

Страница 186: ...ssion Three standard options are available below Contact your dealer for other alternate settings for this feature No Global Suffix CR Carriage Return CR LF Carriage Return Line Feed To set the Global...

Страница 187: ...Product Reference Guide 6 71 Global Suffix continued Remember to cover any unused bar codes on this and the facing page to ensure that the scanner reads only the bar code you intend to scan GLOBAL SUF...

Страница 188: ...on host commands To set this feature 1 Scan the SWITCH bar code 2 Scan your selection from the bar codes below You ll need to cover any unused bar codes on this and the facing page to ensure that the...

Страница 189: ...resses are available 6A 6B 6E To set the IBM Scale Address 1 Scan the SWITCH bar code 2 Scan the bar code below or from the following page that represents the desired scale address designation 3 Compl...

Страница 190: ...9500 IBM Scale Address continued Remember to cover any unused bar codes on this and the facing page to ensure that the scanner reads only the bar code you intend to scan IBM SCALE ADDRESS 6B IBM SCAL...

Страница 191: ...e 128 Code 93 and Codabar for IBM USB To enable disable the IBM Transmit Labels in Code 39 Format feature 1 Scan the SWITCH bar code 2 Scan either the enable or disable bar code below You ll need to c...

Страница 192: ...f scanner and scale Ignores all scanner and scale configuration host commands To set this feature 1 Scan the SWITCH bar code 2 Scan your selection from the bar codes below You ll need to cover any unu...

Страница 193: ...ued Remember to cover any unused bar codes on this and the facing page to ensure that the scanner reads only the bar code you intend to scan IBM USB INTERFACE OPTION COMPATIBLE W MAGELLAN SL HOST I F...

Страница 194: ...enable all scanners to communicate Options are Table Top Scanner Handheld Scanner To set this feature 1 Scan the SWITCH bar code 2 Scan your selection from the bar codes below You ll need to cover any...

Страница 195: ...m the bar codes below and on the immediately following pages You ll need to cover any unused bar codes on this and the facing page to ensure that the scanner reads only the bar code you intend to scan...

Страница 196: ...9500 RS 232 Baud Rate continued Remember to cover any unused bar codes on this and the facing page to ensure that the scanner reads only the bar code you intend to scan RS 232 BAUD RATE 4800 RS 232 B...

Страница 197: ...erence Guide 6 81 RS 232 Baud Rate continued Remember to cover any unused bar codes on this and the facing page to ensure that the scanner reads only the bar code you intend to scan RS 232 BAUD RATE 1...

Страница 198: ...500 RS 232 Baud Rate continued Remember to cover any unused bar codes on this and the facing page to ensure that the scanner reads only the bar code you intend to scan RS 232 BAUD RATE 57600 RS 232 BA...

Страница 199: ...1 Scan the SWITCH bar code 2 Scan the bar code below representing the desired Data Bit setting You ll need to cover any unused bar codes on this and the facing page to ensure that the scanner reads o...

Страница 200: ...WITCH bar code 2 Scan the bar code below representing the desired Stop Bit setting You ll need to cover any unused bar codes on this and the facing page to ensure that the scanner reads only the bar c...

Страница 201: ...N RS 232 PARITY ODD To set this feature 1 Scan the SWITCH bar code 2 Scan the bar code below or on the following pages representing the desired Parity setting You ll need to cover any unused bar codes...

Страница 202: ...ellan 9500 RS 232 Parity continued Remember to cover any unused bar codes on this and the facing page to ensure that the scanner reads only the bar code you intend to scan RS 232 PARITY EVEN RS 232 PA...

Страница 203: ...er to read and transmit data While the CTS line is inactive scan ner remains in a host disabled state following a successful label transmission the CTS signal must transition to inactive and then to a...

Страница 204: ...continued Remember to cover any unused bar codes on this and the facing page to ensure that the scanner reads only the bar code you intend to scan RS 232 HARDWARE CONTROL ENABLE CTS FLOW CONTROL RS 23...

Страница 205: ...d the facing page to ensure that the scanner reads only the bar code you intend to scan 3 Scan the appropriate digits from the keypad in Appendix C that rep resent the desired delay The selectable ran...

Страница 206: ...disable bar code below You ll need to cover any unused bar codes on this and the facing page to ensure that the scanner reads only the bar code you intend to scan 3 Complete the programming sequence...

Страница 207: ...t via RS 232 Host Echo Quiet Interval The scanner can be set to observe this delay before sending its data in order to avoid RS 232 transmission conflicts To enable disable this feature 1 Scan the SWI...

Страница 208: ...AL You ll need to cover any unused bar codes on this and the fac ing page to ensure that the scanner reads only the bar code you intend to scan 3 Scan the appropriate digits from the keypad in Append...

Страница 209: ...le information For normal operation of the interface disable this feature To set this feature 1 Scan the SWITCH bar code 2 Scan your selection from the bar codes below You ll need to cover any unused...

Страница 210: ...s feature 1 Scan the SWITCH bar code 2 Scan the bar code below which represents the desired setting for this feature You ll need to cover any unused bar codes on this and the facing page to ensure tha...

Страница 211: ...de 2 Scan the bar code below which represents the desired setting for this feature You ll need to cover any unused bar codes on this and the facing page to ensure that the scanner reads only the bar c...

Страница 212: ...isable this feature 1 Scan the SWITCH bar code 2 Scan either the enable or disable bar code below You ll need to cover any unused bar codes on this and the facing page to ensure that the scanner reads...

Страница 213: ...L RS 232 SASI and RS 232 Single Cable To enable disable the Beep After Weigh feature 1 Scan the SWITCH bar code 2 Scan either the enable or disable bar code below You ll need to cover any unused bar c...

Страница 214: ...p on Not on File Select for the host to beep or not when a not on file condition is detected by the host This feature is also applicable to single cable RS 232 RS 232 BEEP ON NOT ON FILE DISABLE RS 23...

Страница 215: ...el is sent Host Acknowledgement Enabled for Host Commands the scan ner will respond with ACK NAK when the host sends a command Label Host Enabled for both Label Transmission Host Commands To select th...

Страница 216: ...2 ACK NAK Enable continued Remember to cover any unused bar codes on this and the facing page to ensure that the scanner reads only the bar code you intend to scan RS 232 ACK NAK HOST ACKNOWLEDGEMENT...

Страница 217: ...he ASCII Character Set and their corresponding Hex Values is available in the inside back cover of this manual ASCII parameters must be input by scanning a pair of hexadecimal digits for the desired c...

Страница 218: ...cter Set and their corresponding Hex Values is available in the inside back cover of this manual ASCII parameters must be input by scanning a pair of hexadecimal digits for the desired character For e...

Страница 219: ...set this feature 1 Scan the SWITCH bar code 2 Scan either the enable or disable bar code below You ll need to cover any unused bar codes on this and the facing page to ensure that the scanner reads on...

Страница 220: ...ure that the scanner reads only the bar code you intend to scan 3 Scan the appropriate digits from the keypad in Appendix C that rep resent the desired timeout A setting of 0 specifies an infinite tim...

Страница 221: ...nused bar codes on this and the facing page to ensure that the scanner reads only the bar code you intend to scan 3 Scan the appropriate digits from the keypad in Appendix C that rep resent the desire...

Страница 222: ...nore Errors recommended setting Assume ACK risk of lost label data Assume NAK risk of duplicate label To select the option for RS 232 ACK NAK Error Handling 1 Scan the SWITCH bar code 2 Scan the desir...

Страница 223: ...ACK NAK Error Handling continued Remember to cover any unused bar codes on this and the facing page to ensure that the scanner reads only the bar code you intend to scan RS 232 ACK NAK ERROR HANDLING...

Страница 224: ...32 Label ID Control This feature specifies whether or not Label IDs are transmitted to the host and if so whether to attach them as a prefix or suffix RS 232 LABEL ID CONTROL DISABLE RS 232 LABEL ID C...

Страница 225: ...ence Guide 6 109 RS 232 Label ID Control continued Remember to cover any unused bar codes on this and the facing page to ensure that the scanner reads only the bar code you intend to scan RS 232 LABEL...

Страница 226: ...them in this chapter as Single Cable options please find them referenced as follows RS 232 Baud Rate on page 79 RS 232 Number of Data Bits on page 83 RS 232 Number of Stop Bits on page 84 RS 232 Pari...

Страница 227: ...canner only RS 232 protocol To set this feature 1 Scan the SWITCH bar code 2 Scan the bar code below representing the desired option You ll need to cover any unused bar codes on this and the facing pa...

Страница 228: ...held in high state and CTS is ignored Option 2 Assert RTS and wait for CTS to be asserted Option 3 Assert RTS and ignore CTS Option 4 RTS held low wait for CTS to be asserted Option 5 RTS held high wa...

Страница 229: ...ide 6 113 Single Cable RS 232 RTS CTS Selection continued Remember to cover any unused bar codes on this and the facing page to ensure that the scanner reads only the bar code you intend to scan RTS C...

Страница 230: ...ble RS 232 RTS CTS Selection continued Remember to cover any unused bar codes on this and the facing page to ensure that the scanner reads only the bar code you intend to scan RTS CTS SELECTION OPTION...

Страница 231: ...e 1 Scan the SWITCH bar code 2 Scan either the enable or disable bar code below You ll need to cover any unused bar codes on this and the facing page to ensure that the scanner reads only the bar code...

Страница 232: ...bar code 2 Scan either the enable or disable bar code below You ll need to cover any unused bar codes on this and the facing page to ensure that the scanner reads only the bar code you intend to scan...

Страница 233: ...e 1 Scan the SWITCH bar code 2 Scan either the enable or disable bar code below You ll need to cover any unused bar codes on this and the facing page to ensure that the scanner reads only the bar code...

Страница 234: ...al designation for the desired character A table containing the ASCII Character Set and their corresponding decimal values is available in the inside back cover of this manual ASCII parameters must be...

Страница 235: ...e 1 Scan the SWITCH bar code 2 Scan either the enable or disable bar code below You ll need to cover any unused bar codes on this and the facing page to ensure that the scanner reads only the bar code...

Страница 236: ...l designation for the desired character A table containing the ASCII Character Set and their corresponding decimal values is available in the inside back cover of this manual ASCII parameters must be...

Страница 237: ...on this and the facing page to ensure that the scanner reads only the bar code you intend to scan 3 Complete the programming sequence by scanning the SWITCH bar code UPC A DISABLE UPC A ENABLE NOTE I...

Страница 238: ...cover any unused bar codes on this and the facing page to ensure that the scanner reads only the bar code you intend to scan 3 Complete the programming sequence by scanning the SWITCH bar code UPC A N...

Страница 239: ...able or disable bar code below You ll need to cover any unused bar codes on this and the facing page to ensure that the scanner reads only the bar code you intend to scan 3 Complete the programming se...

Страница 240: ...bar code 2 Scan either the enable or disable bar code below You ll need to cover any unused bar codes on this and the facing page to ensure that the scanner reads only the bar code you intend to scan...

Страница 241: ...set this feature 1 Scan the SWITCH bar code 2 Scan your selection from the bar codes below You ll need to cover any unused bar codes on this and the facing page to ensure that the scanner reads only...

Страница 242: ...d as two hex pairs A table containing the ASCII Character Set and their corresponding Hex Values is available in the inside back cover of this manual ASCII parameters must be input by scanning a pair...

Страница 243: ...esired Label ID characters entered as two hex pairs A table containing the ASCII Character Set and their corresponding Hex Values is available in the inside back cover of this manual ASCII parameters...

Страница 244: ...ID characters entered as two hex pairs A table containing the ASCII Character Set and their corresponding Hex Values is available in the inside back cover of this manual ASCII parameters must be inpu...

Страница 245: ...ed Label ID characters entered as two hex pairs A table containing the ASCII Character Set and their corresponding Hex Values is available in the inside back cover of this manual ASCII parameters must...

Страница 246: ...ure 1 Scan the SWITCH bar code 2 Scan either the enable or disable bar code below You ll need to cover any unused bar codes on this and the facing page to ensure that the scanner reads only the bar co...

Страница 247: ...able or disable bar code below You ll need to cover any unused bar codes on this and the facing page to ensure that the scanner reads only the bar code you intend to scan 3 Complete the programming se...

Страница 248: ...ble bar code below You ll need to cover any unused bar codes on this and the facing page to ensure that the scanner reads only the bar code you intend to scan 3 Complete the programming sequence by sc...

Страница 249: ...an the SWITCH bar code 2 Scan either the enable or disable bar code below You ll need to cover any unused bar codes on this and the facing page to ensure that the scanner reads only the bar code you i...

Страница 250: ...bar code 2 Scan either the enable or disable bar code below You ll need to cover any unused bar codes on this and the facing page to ensure that the scanner reads only the bar code you intend to scan...

Страница 251: ...cters entered as two hex pairs A table containing the ASCII Character Set and their corresponding Hex Values is available in the inside back cover of this manual ASCII parameters must be input by scan...

Страница 252: ...ID characters entered as two hex pairs A table containing the ASCII Character Set and their corresponding Hex Values is available in the inside back cover of this manual ASCII parameters must be inpu...

Страница 253: ...esired Label ID characters entered as two hex pairs A table containing the ASCII Character Set and their corresponding Hex Values is available in the inside back cover of this manual ASCII parameters...

Страница 254: ...characters entered as two hex pairs A table containing the ASCII Character Set and their corresponding Hex Values is available in the inside back cover of this manual ASCII parameters must be input b...

Страница 255: ...set this feature 1 Scan the SWITCH bar code 2 Scan either the enable or disable bar code below You ll need to cover any unused bar codes on this and the facing page to ensure that the scanner reads o...

Страница 256: ...able bar code below You ll need to cover any unused bar codes on this and the facing page to ensure that the scanner reads only the bar code you intend to scan 3 Complete the programming sequence by s...

Страница 257: ...enable or disable bar code below You ll need to cover any unused bar codes on this and the facing page to ensure that the scanner reads only the bar code you intend to scan 3 Complete the programming...

Страница 258: ...elow You ll need to cover any unused bar codes on this and the facing page to ensure that the scanner reads only the bar code you intend to scan 3 Complete the programming sequence by scanning the SWI...

Страница 259: ...bel ID characters entered as two hex pairs A table containing the ASCII Character Set and their corresponding Hex Values is available in the inside back cover of this manual ASCII parameters must be i...

Страница 260: ...el ID characters entered as two hex pairs A table containing the ASCII Character Set and their corresponding Hex Values is available in the inside back cover of this manual ASCII parameters must be in...

Страница 261: ...desired Label ID characters entered as two hex pairs A table containing the ASCII Character Set and their corresponding Hex Values is available in the inside back cover of this manual ASCII parameter...

Страница 262: ...D characters entered as two hex pairs A table containing the ASCII Character Set and their corresponding Hex Values is available in the inside back cover of this manual ASCII parameters must be input...

Страница 263: ...set this feature 1 Scan the SWITCH bar code 2 Scan your selection from the bar codes below You ll need to cover any unused bar codes on this and the facing page to ensure that the scanner reads only...

Страница 264: ...ered as two hex pairs A table containing the ASCII Character Set and their corresponding Hex Values is available in the inside back cover of this manual ASCII parameters must be input by scanning a pa...

Страница 265: ...set this feature 1 Scan the SWITCH bar code 2 Scan either the enable or disable bar code below You ll need to cover any unused bar codes on this and the facing page to ensure that the scanner reads on...

Страница 266: ...isable bar code below You ll need to cover any unused bar codes on this and the facing page to ensure that the scanner reads only the bar code you intend to scan 3 Complete the programming sequence by...

Страница 267: ...he SWITCH bar code 2 Scan either the enable or disable bar code below You ll need to cover any unused bar codes on this and the facing page to ensure that the scanner reads only the bar code you inten...

Страница 268: ...ters entered as two hex pairs A table containing the ASCII Character Set and their corresponding Hex Values is available in the inside back cover of this manual ASCII parameters must be input by scann...

Страница 269: ...esired Label ID characters entered as two hex pairs A table containing the ASCII Character Set and their corresponding Hex Values is available in the inside back cover of this manual ASCII parameters...

Страница 270: ...l ID characters entered as two hex pairs A table containing the ASCII Character Set and their corresponding Hex Values is available in the inside back cover of this manual ASCII parameters must be inp...

Страница 271: ...red Label ID characters entered as two hex pairs A table containing the ASCII Character Set and their corresponding Hex Values is available in the inside back cover of this manual ASCII parameters mus...

Страница 272: ...ssive To set this feature 1 Scan the SWITCH bar code 2 Scan the bar code representing the desired option on the following pages You ll need to cover any unused bar codes on facing pages to ensure that...

Страница 273: ...Decoding Levels continued Remember to cover any unused bar codes on this and the facing page to ensure that the scanner reads only the bar code you intend to scan EAN 8 DECODING LEVELS VERY CONSERVATI...

Страница 274: ...Levels continued Remember to cover any unused bar codes on this and the facing page to ensure that the scanner reads only the bar code you intend to scan EAN 8 DECODING LEVELS MODERATELY AGGRESSIVE EA...

Страница 275: ...t Reference Guide 6 159 Other UPC EAN Options The following pages contain other selectable features for UPC EAN sym bologies UPC EAN Reconstruction Price Weight Check Enable EAN Two Label Addons UPC A...

Страница 276: ...n store printed labels To set this feature 1 Scan the SWITCH bar code 2 Scan either the enable or disable bar code below You ll need to cover any unused bar codes on this and the facing page to ensure...

Страница 277: ...an the SWITCH bar code 2 Scan the bar code representing the desired option below or on the following pages You ll need to cover any unused bar codes on facing pages to ensure that the scanner reads on...

Страница 278: ...Check continued Remember to cover any unused bar codes on this and the facing page to ensure that the scanner reads only the bar code you intend to scan PRICE WEIGHT CHECK 4 DIGIT PRICE WEIGHT PRICE W...

Страница 279: ...Weight Check continued Remember to cover any unused bar codes on this and the facing page to ensure that the scanner reads only the bar code you intend to scan PRICE WEIGHT CHECK 4 DIGIT EUROPEAN PRIC...

Страница 280: ...e enable or disable bar code below You ll need to cover any unused bar codes on this and the facing page to ensure that the scanner reads only the bar code you intend to scan 3 Complete the programmin...

Страница 281: ...es can be read which include 2 Digit or 5 Digit Supplementals however it is not required that addons be included in bar codes To set this feature 1 Scan the SWITCH bar code 2 Scan the bar code represe...

Страница 282: ...lan 9500 Addons continued Remember to cover any unused bar codes on this and the facing page to ensure that the scanner reads only the bar code you intend to scan ADDONS OPTIONAL 2 DIGIT AND 5 DIGIT S...

Страница 283: ...scan speed most aggressive To set this feature 1 Scan the SWITCH bar code 2 Scan the bar code representing the desired option on the following pages You ll need to cover any unused bar codes on facing...

Страница 284: ...ls continued Remember to cover any unused bar codes on this and the facing page to ensure that the scanner reads only the bar code you intend to scan UPC A EAN 13 DECODING LEVELS VERY CONSERVATIVE UPC...

Страница 285: ...N 13 Decoding Levels continued Remember to cover any unused bar codes on this and the facing page to ensure that the scanner reads only the bar code you intend to scan UPC A EAN 13 DECODING LEVELS MOD...

Страница 286: ...able bar code below You ll need to cover any unused bar codes on this and the facing page to ensure that the scanner reads only the bar code you intend to scan 3 Complete the programming sequence by s...

Страница 287: ...ters entered as two hex pairs A table containing the ASCII Character Set and their corresponding Hex Values is available in the inside back cover of this manual ASCII parameters must be input by scann...

Страница 288: ...nt the desired Label ID characters entered as two hex pairs A table containing the ASCII Character Set and their corresponding Hex Values is available in the inside back cover of this manual ASCII par...

Страница 289: ...at rep resent the desired Label ID characters entered as two hex pairs A table containing the ASCII Character Set and their corresponding Hex Values is available in the inside back cover of this manua...

Страница 290: ...ent the desired Label ID characters entered as two hex pairs A table containing the ASCII Character Set and their corresponding Hex Values is available in the inside back cover of this manual ASCII pa...

Страница 291: ...r code below You ll need to cover any unused bar codes on this and the facing page to ensure that the scanner reads only the bar code you intend to scan 3 Complete the programming sequence by scanning...

Страница 292: ...bar code 2 Scan either the enable or disable bar code below You ll need to cover any unused bar codes on this and the facing page to ensure that the scanner reads only the bar code you intend to scan...

Страница 293: ...re 1 Scan the SWITCH bar code 2 Scan either the enable or disable bar code below You ll need to cover any unused bar codes on this and the facing page to ensure that the scanner reads only the bar cod...

Страница 294: ...ot be reported to the terminal To set this feature 1 Scan the SWITCH bar code 2 Scan your selection from the bar codes below You ll need to cover any unused bar codes on this and the facing page to en...

Страница 295: ...set this feature 1 Scan the SWITCH bar code 2 Scan your selection from the bar codes below You ll need to cover any unused bar codes on this and the facing page to ensure that the scanner reads only...

Страница 296: ...cters entered as two hex pairs A table containing the ASCII Character Set and their corresponding Hex Values is available in the inside back cover of this manual ASCII parameters must be input by scan...

Страница 297: ...bar code below You ll need to cover any unused bar codes on this and the facing page to ensure that the scanner reads only the bar code you intend to scan 3 Complete the programming sequence by scann...

Страница 298: ...r code 2 Scan either the enable or disable bar code below You ll need to cover any unused bar codes on this and the facing page to ensure that the scanner reads only the bar code you intend to scan 3...

Страница 299: ...ed bar code will not be reported to the terminal To set this feature 1 Scan the SWITCH bar code 2 Scan your selection from the bar codes below You ll need to cover any unused bar codes on this and the...

Страница 300: ...ature 1 Scan the SWITCH bar code 2 Scan your selection from the bar codes below You ll need to cover any unused bar codes on this and the facing page to ensure that the scanner reads only the bar code...

Страница 301: ...el ID characters entered as two hex pairs A table containing the ASCII Character Set and their corresponding Hex Values is available in the inside back cover of this manual ASCII parameters must be in...

Страница 302: ...ng page to ensure that the scanner reads only the bar code you intend to scan 3 Complete the programming sequence by scanning the SWITCH bar code RSS EXPANDED LENGTH CONTROL VARIABLE LENGTH RSS EXPAND...

Страница 303: ...code you intend to scan 3 Scan the appropriate digits from the keypad in Appendix C that rep resent the desired maximum label length The selectable range for this option is 00 to 74 Pad all single dig...

Страница 304: ...nd to scan 3 Scan the appropriate digits from the keypad in Appendix C that rep resent the desired minimum label length The selectable range for this option is 00 to 74 Pad all single digit numbers wi...

Страница 305: ...ing page to ensure that the scanner reads only the bar code you intend to scan 3 Scan the appropriate digits from the keypad in Appendix C that rep resent the desired fixed label length The selectable...

Страница 306: ...he bar code you intend to scan 3 Scan the appropriate digits from the keypad in Appendix C that rep resent the desired fixed label length The selectable range for this option is 00 to 74 Pad all singl...

Страница 307: ...et this feature 1 Scan the SWITCH bar code 2 Scan either the enable or disable bar code below You ll need to cover any unused bar codes on this and the facing page to ensure that the scanner reads onl...

Страница 308: ...sable bar code below You ll need to cover any unused bar codes on this and the facing page to ensure that the scanner reads only the bar code you intend to scan 3 Complete the programming sequence by...

Страница 309: ...bar code below You ll need to cover any unused bar codes on this and the facing page to ensure that the scanner reads only the bar code you intend to scan 3 Complete the programming sequence by scanni...

Страница 310: ...disable bar code below You ll need to cover any unused bar codes on this and the facing page to ensure that the scanner reads only the bar code you intend to scan 3 Complete the programming sequence b...

Страница 311: ...et this feature 1 Scan the SWITCH bar code 2 Scan either the enable or disable bar code below You ll need to cover any unused bar codes on this and the facing page to ensure that the scanner reads onl...

Страница 312: ...ature 1 Scan the SWITCH bar code 2 Scan your selection from the bar codes below You ll need to cover any unused bar codes on this and the facing page to ensure that the scanner reads only the bar code...

Страница 313: ...aracters entered as two hex pairs A table containing the ASCII Character Set and their corresponding Hex Values is available in the inside back cover of this manual ASCII parameters must be input by s...

Страница 314: ...ly the bar code you intend to scan 3 Complete the programming sequence by scanning the SWITCH bar code CODE 39 LENGTH CONTROL VARIABLE LENGTH CODE 39 LENGTH CONTROL FIXED LENGTH NOTE If variable lengt...

Страница 315: ...appropriate digits from the keypad in Appendix C that rep resent the desired maximum label length The selectable range for this option is 00 to 50 Pad all single digit numbers with a leading zero to y...

Страница 316: ...digits from the keypad in Appendix C that rep resent the desired minimum label length The selectable range for this option is 00 to 50 Pad all single digit numbers with a leading zero to yield a two...

Страница 317: ...the bar code you intend to scan 3 Scan the appropriate digits from the keypad in Appendix C that rep resent the desired fixed label length The selectable range for this option is 00 to 50 Pad all sin...

Страница 318: ...intend to scan 3 Scan the appropriate digits from the keypad in Appendix C that rep resent the desired fixed label length The selectable range for this option is 00 no second fixed length or 01 to 50...

Страница 319: ...anner s software and the data will be decoded if all bar code proofing requirements are met To set this feature 1 Scan the SWITCH bar code 2 Scan your selection from the bar codes below You ll need to...

Страница 320: ...feature 1 Scan the SWITCH bar code 2 Scan either the enable or disable bar code below You ll need to cover any unused bar codes on this and the facing page to ensure that the scanner reads only the ba...

Страница 321: ...the enable or disable bar code below You ll need to cover any unused bar codes on this and the facing page to ensure that the scanner reads only the bar code you intend to scan 3 Complete the program...

Страница 322: ...le bar code below You ll need to cover any unused bar codes on this and the facing page to ensure that the scanner reads only the bar code you intend to scan 3 Complete the programming sequence by sca...

Страница 323: ...bel ID characters entered as two hex pairs A table containing the ASCII Character Set and their corresponding Hex Values is available in the inside back cover of this manual ASCII parameters must be i...

Страница 324: ...e below You ll need to cover any unused bar codes on this and the facing page to ensure that the scanner reads only the bar code you intend to scan 3 Complete the programming sequence by scanning the...

Страница 325: ...Scan either the enable or disable bar code below You ll need to cover any unused bar codes on this and the facing page to ensure that the scanner reads only the bar code you intend to scan 3 Complete...

Страница 326: ...CH bar code 2 Scan either the enable or disable bar code below You ll need to cover any unused bar codes on this and the facing page to ensure that the scanner reads only the bar code you intend to sc...

Страница 327: ...o set this feature 1 Scan the SWITCH bar code 2 Scan your selection from the bar codes below You ll need to cover any unused bar codes on this and the facing page to ensure that the scanner reads only...

Страница 328: ...ered as two hex pairs A table containing the ASCII Character Set and their corresponding Hex Values is available in the inside back cover of this manual ASCII parameters must be input by scanning a pa...

Страница 329: ...r codes on this and the facing page to ensure that the scanner reads only the bar code you intend to scan 3 Complete the programming sequence by scanning the SWITCH bar code CODE 128 LENGTH CONTROL VA...

Страница 330: ...the keypad in Appendix C that rep resent the desired maximum label length The selectable range for this option is 01 to 80 Pad all single digit numbers with a leading zero to yield a two digit entry 0...

Страница 331: ...te digits from the keypad in Appendix C that rep resent the desired minimum label length The selectable range for this option is 01 to 80 Pad all single digit numbers with a leading zero to yield a tw...

Страница 332: ...e that the scanner reads only the bar code you intend to scan 3 Scan the appropriate digits from the keypad in Appendix C that rep resent the desired fixed label length The selectable range for this o...

Страница 333: ...eads only the bar code you intend to scan 3 Scan the appropriate digits from the keypad in Appendix C that rep resent the desired fixed label length The selectable range for this option is 01 to 80 Pa...

Страница 334: ...ware and the data will be decoded if all bar code proofing requirements are met To set this feature 1 Scan the SWITCH bar code 2 Scan your selection from the bar codes below You ll need to cover any u...

Страница 335: ...et this feature 1 Scan the SWITCH bar code 2 Scan either the enable or disable bar code below You ll need to cover any unused bar codes on this and the facing page to ensure that the scanner reads onl...

Страница 336: ...ature 1 Scan the SWITCH bar code 2 Scan your selection from the bar codes below You ll need to cover any unused bar codes on this and the facing page to ensure that the scanner reads only the bar code...

Страница 337: ...aracters entered as two hex pairs A table containing the ASCII Character Set and their corresponding Hex Values is available in the inside back cover of this manual ASCII parameters must be input by s...

Страница 338: ...set this feature 1 Scan the SWITCH bar code 2 Scan either the enable or disable bar code below You ll need to cover any unused bar codes on this and the facing page to ensure that the scanner reads o...

Страница 339: ...code below You ll need to cover any unused bar codes on this and the facing page to ensure that the scanner reads only the bar code you intend to scan 3 Complete the programming sequence by scanning...

Страница 340: ...d to cover any unused bar codes on this and the facing page to ensure that the scanner reads only the bar code you intend to scan 3 Complete the programming sequence by scanning the SWITCH bar code I...

Страница 341: ...ntifier To set this feature 1 Scan the SWITCH bar code 2 Scan your selection from the bar codes below You ll need to cover any unused bar codes on this and the facing page to ensure that the scanner r...

Страница 342: ...tered as two hex pairs A table containing the ASCII Character Set and their corresponding Hex Values is available in the inside back cover of this manual ASCII parameters must be input by scanning a p...

Страница 343: ...unused bar codes on this and the facing page to ensure that the scanner reads only the bar code you intend to scan 3 Complete the programming sequence by scanning the SWITCH bar code I 2 OF 5 LENGTH C...

Страница 344: ...from the keypad in Appendix C that rep resent the desired maximum label length The selectable range for this option is 02 to 50 even numbers only Pad all single digit num bers with a leading zero to...

Страница 345: ...n the appropriate digits from the keypad in Appendix C that rep resent the desired minimum label length The selectable range for this option is 02 to 50 even numbers only Pad all single digit num bers...

Страница 346: ...e scanner reads only the bar code you intend to scan 3 Scan the appropriate digits from the keypad in Appendix C that rep resent the desired fixed label length The selectable range for this option is...

Страница 347: ...s only the bar code you intend to scan 3 Scan the appropriate digits from the keypad in Appendix C that rep resent the desired fixed label length The selectable range for this option is 00 or 02 to 50...

Страница 348: ...set this feature 1 Scan the SWITCH bar code 2 Scan your selection from the bar codes below You ll need to cover any unused bar codes on this and the facing page to ensure that the scanner reads only...

Страница 349: ...et this feature 1 Scan the SWITCH bar code 2 Scan either the enable or disable bar code below You ll need to cover any unused bar codes on this and the facing page to ensure that the scanner reads onl...

Страница 350: ...sable bar code below You ll need to cover any unused bar codes on this and the facing page to ensure that the scanner reads only the bar code you intend to scan 3 Complete the programming sequence by...

Страница 351: ...To set this feature 1 Scan the SWITCH bar code 2 Scan the bar code below or from the following page representing the desired option You ll need to cover any unused bar codes and facing pages to ensur...

Страница 352: ...Character Set continued Remember to cover any unused bar codes on this and the facing page to ensure that the scanner reads only the bar code you intend to scan CODABAR START STOP CHARACTER abcd tn e...

Страница 353: ...1 Scan the SWITCH bar code 2 Scan either the enable or disable bar code below You ll need to cover any unused bar codes on this and the facing page to ensure that the scanner reads only the bar code y...

Страница 354: ...cover any unused bar codes on this and the facing page to ensure that the scanner reads only the bar code you intend to scan 3 Complete the programming sequence by scanning the SWITCH bar code CODABAR...

Страница 355: ...low You ll need to cover any unused bar codes on this and the facing page to ensure that the scanner reads only the bar code you intend to scan 3 Complete the programming sequence by scanning the SWIT...

Страница 356: ...ature 1 Scan the SWITCH bar code 2 Scan your selection from the bar codes below You ll need to cover any unused bar codes on this and the facing page to ensure that the scanner reads only the bar code...

Страница 357: ...racters entered as two hex pairs A table containing the ASCII Character Set and their corresponding Hex Values is available in the inside back cover of this manual ASCII parameters must be input by sc...

Страница 358: ...his and the facing page to ensure that the scanner reads only the bar code you intend to scan 3 Complete the programming sequence by scanning the SWITCH bar code CODABAR LENGTH CONTROL VARIABLE LENGTH...

Страница 359: ...riate digits from the keypad in Appendix C that rep resent the desired maximum label length The selectable range for this option is 03 to 50 Pad all single digit numbers with a leading zero to yield a...

Страница 360: ...s from the keypad in Appendix C that rep resent the desired minimum label length The selectable range for this option is 03 to 50 Pad all single digit numbers with a leading zero to yield a two digit...

Страница 361: ...igits from the keypad in Appendix C that rep resent the desired fixed label length The selectable range for this option is 03 to 50 Pad all single digit numbers with a leading zero to yield a two digi...

Страница 362: ...nt the desired fixed label length The selectable range for this option is 00 or 03 to 50 Pad all single digit numbers with a leading zero to yield a two digit entry 03 50 4 Complete the programming se...

Страница 363: ...nts are met To set this feature 1 Scan the SWITCH bar code 2 Scan your selection from the bar codes below You ll need to cover any unused bar codes on this and the facing page to ensure that the scann...

Страница 364: ...ure 1 Scan the SWITCH bar code 2 Scan either the enable or disable bar code below You ll need to cover any unused bar codes on this and the facing page to ensure that the scanner reads only the bar co...

Страница 365: ...set this feature 1 Scan the SWITCH bar code 2 Scan your selection from the bar codes below You ll need to cover any unused bar codes on this and the facing page to ensure that the scanner reads only...

Страница 366: ...red as two hex pairs A table containing the ASCII Character Set and their corresponding Hex Values is available in the inside back cover of this manual ASCII parameters must be input by scanning a pai...

Страница 367: ...ar codes on this and the facing page to ensure that the scanner reads only the bar code you intend to scan 3 Complete the programming sequence by scanning the SWITCH bar code CODE 93 LENGTH CONTROL VA...

Страница 368: ...ts from the keypad in Appendix C that rep resent the desired maximum label length The selectable range for this option is 01 to 50 Pad all single digit numbers with a leading zero to yield a two digit...

Страница 369: ...propriate digits from the keypad in Appendix C that rep resent the desired minimum label length The selectable range for this option is 01 to 50 Pad all single digit numbers with a leading zero to yie...

Страница 370: ...that the scanner reads only the bar code you intend to scan 3 Scan the appropriate digits from the keypad in Appendix C that rep resent the desired fixed label length The selectable range for this op...

Страница 371: ...only the bar code you intend to scan 3 Scan the appropriate digits from the keypad in Appendix C that rep resent the desired fixed label length The selectable range for this option is 00 or 01 to 50...

Страница 372: ...ware and the data will be decoded if all bar code proofing requirements are met To set this feature 1 Scan the SWITCH bar code 2 Scan your selection from the bar codes below You ll need to cover any u...

Страница 373: ...set this feature 1 Scan the SWITCH bar code 2 Scan either the enable or disable bar code below You ll need to cover any unused bar codes on this and the facing page to ensure that the scanner reads o...

Страница 374: ...over any unused bar codes on this and the facing page to ensure that the scanner reads only the bar code you intend to scan 3 Complete the programming sequence by scanning the SWITCH bar code MSI PLES...

Страница 375: ...below representing the desired number of MSI Plessey check characters to be calculated and verified You ll need to cover any unused bar codes on this and the facing page to ensure that the scanner rea...

Страница 376: ...er any unused bar codes on this and the facing page to ensure that the scanner reads only the bar code you intend to scan 3 Complete the programming sequence by scanning the SWITCH bar code MSI PLESSE...

Страница 377: ...To set this feature 1 Scan the SWITCH bar code 2 Scan your selection from the bar codes below You ll need to cover any unused bar codes on this and the facing page to ensure that the scanner reads on...

Страница 378: ...entered as two hex pairs A table containing the ASCII Character Set and their corresponding Hex Values is available in the inside back cover of this manual ASCII parameters must be input by scanning...

Страница 379: ...odes on this and the facing page to ensure that the scanner reads only the bar code you intend to scan 3 Complete the programming sequence by scanning the SWITCH bar code MSI PLESSEY LENGTH CONTROL VA...

Страница 380: ...its from the keypad in Appendix C that rep resent the desired maximum label length The selectable range for this option is 4 to 16 Pad all single digit numbers with a leading zero to yield a two digit...

Страница 381: ...the appropriate digits from the keypad in Appendix C that rep resent the desired minimum label length The selectable range for this option is 4 to 16 Pad all single digit numbers with a leading zero...

Страница 382: ...re that the scanner reads only the bar code you intend to scan 3 Scan the appropriate digits from the keypad in Appendix C that rep resent the desired fixed label length The selectable range for this...

Страница 383: ...only the bar code you intend to scan 3 Scan the appropriate digits from the keypad in Appendix C that rep resent the desired fixed label length The selectable range for this option is 0 zero or 4 to...

Страница 384: ...t this feature 1 Scan the SWITCH bar code 2 Scan your selection from the bar codes below You ll need to cover any unused bar codes on this and the facing page to ensure that the scanner reads only the...

Страница 385: ...To set this feature 1 Scan the SWITCH bar code 2 Scan either the enable or disable bar code below You ll need to cover any unused bar codes on this and the facing page to ensure that the scanner reads...

Страница 386: ...cover any unused bar codes on this and the facing page to ensure that the scanner reads only the bar code you intend to scan 3 Complete the programming sequence by scanning the SWITCH bar code STANDA...

Страница 387: ...u ll need to cover any unused bar codes on this and the facing page to ensure that the scanner reads only the bar code you intend to scan 3 Complete the programming sequence by scanning the SWITCH bar...

Страница 388: ...ature 1 Scan the SWITCH bar code 2 Scan your selection from the bar codes below You ll need to cover any unused bar codes on this and the facing page to ensure that the scanner reads only the bar code...

Страница 389: ...Label ID characters entered as two hex pairs A table containing the ASCII Character Set and their corresponding Hex Values is available in the inside back cover of this manual ASCII parameters must b...

Страница 390: ...ng page to ensure that the scanner reads only the bar code you intend to scan 3 Complete the programming sequence by scanning the SWITCH bar code STANDARD 2 OF 5 LENGTH CONTROL VARIABLE LENGTH STANDAR...

Страница 391: ...e appropriate digits from the keypad in Appendix C that represent the desired maximum label length The selectable range for this option is 01 to 50 even numbers only Pad all single digit numbers with...

Страница 392: ...digits from the keypad in Appendix C that represent the desired minimum label length The selectable range for this option is 01 to 50 even numbers only Pad all single digit numbers with a leading zero...

Страница 393: ...fac ing page to ensure that the scanner reads only the bar code you intend to scan 3 Scan the appropriate digits from the keypad in Appendix C that represent the desired fixed label length The selecta...

Страница 394: ...y the bar code you intend to scan 3 Scan the appropriate digits from the keypad in Appendix C that represent the desired fixed label length The selectable range for this option is 1 to 50 Pad all sing...

Страница 395: ...be decoded if all bar code proofing requirements are met To set this feature 1 Scan the SWITCH bar code 2 Scan your selection from the bar codes below You ll need to cover any unused bar codes on thi...

Страница 396: ...6 280 Magellan 9500 NOTES...

Страница 397: ...the operator s controls and indicators The descriptions following identify the use or function of each component Figure A 1 Scanner and Scale Controls Manual EAS Deactivation Push Button Volume Tone...

Страница 398: ...ramming chapter of this manual Table A 1 Scanner and Scale LED Indications LED INDICATION DURATION COMMENT Scale at Zeroa Scale Yellow LED on steady The scale is at rest and reads zero weight The scal...

Страница 399: ...ash ing is not observed the scanner can still function in a limited capacity Call systems support for ser vice in either case FRU Indication Scanner Green LED flashes a coded sequence in concert with...

Страница 400: ...D is OFF OFF Deactivation mode must be selected via programming Refer ence EAS Mode ALL MODES COUPLED DECOUPLED or HYBRID Deactivation Ready Deactivation Tri color LED is lit steadily Green OFF Deacti...

Страница 401: ...b Manual Deactivation Successful Deactivation Tri color LED flashes Red then Orange then returns to Green High frequency beep An EAS tag was suc cessfully deacti vated via manual push button Deactivat...

Страница 402: ...EAS timer runs out or 3 Following a successful EAS tag deactivation Table A 2 EAS Indications NOTE Volume changes made using the Volume Tone Push Button are lost when the scanner is powered down and...

Страница 403: ...7 segment display to view Interface Type Bootloader Version Number Appli cation Version Number and Configuration File Number This mode is used to determine if a scanner can read bar codes Press the b...

Страница 404: ...tem failure non fatal error EAS Failure Mode is indicatedc by EAS LED blinks ON OFF red scanning disabled FRU Status LED Indicator blinks 9 Error tone is sounded for one second Upon pressing the butt...

Страница 405: ...lit when no weight is on the scale indicating scale at zero If it is not press the switch to zero the scale The unit will sound a click upon pressing the button 4 Seconds Scale Diagnostics Modea This...

Страница 406: ...al is broken or missing you may be prohibited from operating the scale without recertifi cation Check local and state requirements for specific restrictions Calibration Switch Cover This cover restric...

Страница 407: ...abling you to create standard interface cables for use in interconnecting the scanner scale external handheld scanner and POS terminal General Specifications Wire Requirements Cable length should not...

Страница 408: ...Table B 1RS 232 Cable Pinouts PIN FUNCTION DESCRIPTION 1 N C No Connection 2 CTS in Clear To Send input 3 N C No Connection 4 RTS out Request To Send output 5 RxD in Receive Data Input 6 TxD out Tran...

Страница 409: ...osition Cable Pinout Table B 2RS 232 Scale Cable Pinouts PIN FUNCTION DESCRIPTION 1 5V pullup 5V pullup 2 CTS IN Clear To Send input 3 N C No Connection 4 RTS OUT Request To Send output 5 RxD IN Recei...

Страница 410: ...e RJ45 10 Position Cable Pinout Table B 3IBM Cable Pinouts PIN FUNCTION DESCRIPTION 1 N C No Connection 2 N C No Connection 3 N C No Connection 4 LINEB Line B 5 N C No Connection 6 LINEA Line A 7 N C...

Страница 411: ...onnector Hardware RJ45 10 Position Cable Pinout Table B 4IBM USB Cable Pinouts PIN FUNCTION DESCRIPTION 1 N C No Connection 2 N C No Connection 3 N C No Connection 4 USB D USB D 5 N C No Connection 6...

Страница 412: ...5Auxilliary Port Cable Pinouts PIN FUNCTION DESCRIPTION 1 5V pullup 5V pullup 2 CTS in Clear To Send input 3 N C No Connection Reserved 4 RTS out Request To Send output 5 RxD in Receive Data Input 6 T...

Страница 413: ...B 7 Power Cable Connector Hardware 6 pin Molex Cable Pinout Table B 6Power Cable Pinouts PIN FUNCTION DESCRIPTION 1 EARTH GND Earth Ground 2 SIGNAL GND Signal Ground 3 5V IN 5V in 4 N C No Connection...

Страница 414: ...500 Remote Display Connector Hardware 4 pin SDL Cable Pinout Table B 7Remote Display Cable Pinouts PIN FUNCTION DESCRIPTION 1 12V OUT 12V out 2 LINE_A_DSPLY LINE A Display 3 LINE_B_DSPLY LINE B Displa...

Страница 415: ...J10 Cable Pinout Table B 8EAS Comm Port Cable Pinouts PIN FUNCTION DESCRIPTION 1 VCC5 VCC5 2 EAS DEACT EN EAS Deactivation 3 VCC5 VCC5 4 EAS DETECT EN EAS Detection 5 EAS LBL DETECT EN EAS tag Detect...

Страница 416: ...B 10 Magellan 9500 NOTES...

Страница 417: ...dix to enter numbers and characters as you would select digits characters from a keypad Scan your selection from the bar codes below You ll need to cover any unused bar codes on this and the facing pa...

Страница 418: ...umbers and characters as you would select digits characters from a keypad Scan your selection from the bar codes below You ll need to cover any unused bar codes on this and the facing page to ensure t...

Страница 419: ...ter numbers and characters as you would select digits characters from a keypad Scan your selection from the bar codes below You ll need to cover any unused bar codes on this and the facing page to ens...

Страница 420: ...umbers and characters as you would select digits characters from a keypad Scan your selection from the bar codes below You ll need to cover any unused bar codes on this and the facing page to ensure t...

Страница 421: ...ter numbers and characters as you would select digits characters from a keypad Scan your selection from the bar codes below You ll need to cover any unused bar codes on this and the facing page to ens...

Страница 422: ...umbers and characters as you would select digits characters from a keypad Scan your selection from the bar codes below You ll need to cover any unused bar codes on this and the facing page to ensure t...

Страница 423: ...ter numbers and characters as you would select digits characters from a keypad Scan your selection from the bar codes below You ll need to cover any unused bar codes on this and the facing page to ens...

Страница 424: ...umbers and characters as you would select digits characters from a keypad Scan your selection from the bar codes below You ll need to cover any unused bar codes on this and the facing page to ensure t...

Страница 425: ...ontact Tech Support for more details COMMAND ASCII HEX COMMENT Enable Scanner E 0x45 Disable Scanner D 0x44 Reset Scanner R 0x52 Not On File Indication F 0x46 Long series of beeps Beep Good Read Tone...

Страница 426: ...D 2 Magellan 9500 NOTES...

Страница 427: ...min 40 10 min 40 10 min 40 10 min 40 10 min Green LED Idle State 2 on dim 2 on dim 2 on dim 2 on dim 2 on dim 2 on dim Scanner Button Options 1 vol tone reset 1 vol tone reset 1 vol tone reset 1 vol t...

Страница 428: ...nable 1 enable 1 enable 1 enable 1 enable Aux Port Mode 0 disable 0 disable 0 disable 0 disable 0 disable 0 disable Laser Failure Mode 0 single OK 0 single OK 0 single OK 0 single OK 0 single OK 0 sin...

Страница 429: ...0 no limit Number of Host Transmission Buffers 1 2 buffers 1 2 buffers 1 2 buffers 1 2 buffers 0 1 buffer 0 1 buffer Global Prefix 00 00 00 00 Global Suffix 0D00 CR 0D00 CR 0D00 CR 0D00 CR IBM Interfa...

Страница 430: ...ho Quiet Interval 1 10ms 1 10ms RS 232 Ignore Host Commands 0 disable 0 disable 0 disable 0 disable 0 disable 0 disable RS 232 TTL 0 normal RS 232 0 normal RS 232 RS 232 TTL Invert 0 disable 0 disable...

Страница 431: ...ble as prefix 1 enable as prefix 1 enable as prefix Single Cable RS 232 Scanner Only Proto col 0 scan ner scale Single Cable RS 232 RTS CTS Selection Option 5 Single Cable RS 232 Use BCC 0 disable Sin...

Страница 432: ...C A 128 Supple mental Label ID 4100 A 4100 A 4100 A 4100 A UPC E Enable 1 enable 1 enable 1 enable 1 enable 1 enable 1 enable UPC E Number Sys tem Character Trans mission 1 enable 1 enable 1 enable 1...

Страница 433: ...4600 F 4100 A 4600 F EAN 13 5 Digit Sup plemental Label ID 4600 F 4600 F 4100 A 4600 F EAN 13 128 Supple mental Label ID 4600 F 4600 F 4100 A 4600 F Bookland AIM ID 0 disable 0 disable 0 disable Book...

Страница 434: ...ghtly More Aggresive 2 Slightly More Aggresive 2 Slightly More Aggresive 2 Slightly More Aggresive 2 Slightly More Aggresive 2 Slightly More Aggresive GTIN Label ID 4700 G 4700 G 4700 G 4700 G GTIN 2...

Страница 435: ...0 variable 0 variable 0 variable 0 variable 0 variable 0 variable RSS Expanded Maxi mum Label Length 74 74 74 74 74 74 RSS Expanded Mini mum Label Length 1 1 1 1 1 1 RSS Expanded Fixed Length 1 8 8 8...

Страница 436: ...1 enable 1 enable 1 enable 1 enable Pharmacode 39 Enable 1 enable 0 disable 0 disable 0 disable 0 disable 0 disable Pharmacode 39 Start Stop Character Transmission 0 disable 0 disable 0 disable 0 dis...

Страница 437: ...disable 0 disable 0 disable 0 disable 0 disable 0 disable EAN 128 AIM ID 1 enable 1 enable 0 disable EAN 128 Label ID 0000 0000 5000 P 0000 Interleaved 2 of 5 I 2 of 5 Enable 0 disable 0 disable 0 di...

Страница 438: ...et 3 abcd abcd 3 abcd abcd 3 abcd abcd 3 abcd abcd 3 abcd abcd 3 abcd abcd Codabar Start Stop Character Match 0 disable 0 disable 0 disable 0 disable 0 disable 0 disable Codabar Check Character Calcul...

Страница 439: ...aximum Label Length 50 50 50 50 50 50 Code 93 Minimum Label Length 2 2 2 2 2 2 Code 93 Fixed Length 1 8 8 8 8 8 8 Code 93 Fixed Length 2 14 14 14 14 14 14 Code 93 Stitching 1 enable 1 enable 1 enable...

Страница 440: ...disable 0 disable 0 disable 0 disable Standard 2 of 5 Check Character Cal culation 0 disable 0 disable 0 disable 0 disable 0 disable 0 disable Standard 2 of 5 Check Character Transmission 1 enable 1 e...

Страница 441: ...abel Length 6 6 6 6 6 6 Standard 2 of 5 Fixed Length 1 10 10 10 10 10 10 Standard 2 of 5 Fixed Length 2 0 0 0 0 0 0 Standard 2 of 5 Stitching 0 disable 0 disable 0 disable 0 disable 0 disable 0 disabl...

Страница 442: ...E 16 Magellan 9500 NOTES...

Страница 443: ...and de asserted after label transmission is complete No other flow control mecha nisms are required or supported Symbologies requiring fixed lengths UPC EAN will enforce length requirements for valida...

Страница 444: ...ample R40101044123456789 RSS Expanded Prefix must be ASCII characters R4 Check character must be included in label UPC A Number system must be included in label data Check digit must be included in la...

Страница 445: ...l data and is assumed to be cor rect Supplemental data is appended to base label Prefix must be an ASCII character A total length including prefix must be greater or equal to 19 Code 128 Supplemental...

Страница 446: ...data and is assumed to be cor rect Prefix must be an ASCII character E total length including prefix must be 14 Example E0998875012345 UPC E with Code 128 Supplemental Number system must be included...

Страница 447: ...12 EAN 8 with 5 Digit Supplemental Check digit must be included in label data and is assumed to be cor rect Prefix must be an ASCII characters FF total length including pre fix must be 15 Example FF00...

Страница 448: ...3 with 5 Digit Supplemental Check digit must be included in label data and is assumed to be cor rect Prefix must be an ASCII character F total length including prefix must be 19 Example F1101234567891...

Страница 449: ...included in label data Label length including start stop and check characters and exclud ing prefix character must meet requirements imposed by the main scanner s fixed or variable label length contr...

Страница 450: ...d must be included in the label Example s 99 95s the lower case s at each end of the example is a placeholder for the start stop character set Code 128 Prefix must be an ASCII character Label length e...

Страница 451: ...144769254 Code 93 Prefix must be an ASCII character Label length excluding prefix character must meet requirements imposed by the main scanner s fixed or variable label length control for this symbolo...

Страница 452: ...aracteristics can be supported UPC A AIM does not specify UPC A as a separate symbology using this transmission format labels will be transmitted as EAN 13 Example E00060992011187 UPC E AIM does not s...

Страница 453: ...to any EAN base label Prefix must be ASCII characters E2 Length of supplemental data including prefix must be 8 Total required length is 24 for EAN 13 and 19 for EAN 8 Examples addon portion is highli...

Страница 454: ...ng prefix is 13 Examples X01234567890 Code 39 Check character must be included in label data Label length including start stop and check characters and exclud ing prefix characters must meet requireme...

Страница 455: ...e form ABCD ABCD and must be included in the label Example F0s 99 95s the lower case s at each end of the example is a placeholder for the start stop character set MSI Plessey Check character must be...

Страница 456: ...haracter Maximum length is the maximum label size supported by the scan ner Example e001900123456789083103001750 I 2 of 5 Check character must be included in label data Label length including check ch...

Страница 457: ...it is identified as a Code 128 A prefix of C0 designates that no function code is present in the 1st or 2nd character position A prefix of C2 designates that a function code 1 is present in the 2nd c...

Страница 458: ...F 16 Magellan 9500 NOTES...

Страница 459: ...R SO SI DLE DC1 DC2 DC3 DC4 NAK SYN ETB CAN EM SUB ESC FS GS RS US 00 01 02 03 04 05 06 07 08 09 0A 0B 0C 0D 0E 0F 10 11 12 13 14 15 16 17 18 19 1A 1B 1C 1D 1E 1F SP 0 1 2 3 4 5 6 7 8 9 20 21 22 23 24...

Страница 460: ...atalogic Scanning KK Telephone 81 0 3 3491 6761 japan scanning datalogic com Latin America Datalogic Scanning Inc Telephone 305 591 3222 latinamerica scanning datalogic com Singapore Datalogic Scannin...

Отзывы: