background image

AFQM. AFQM 6

EnglIsH

dEutscH

POlskI

srPskI

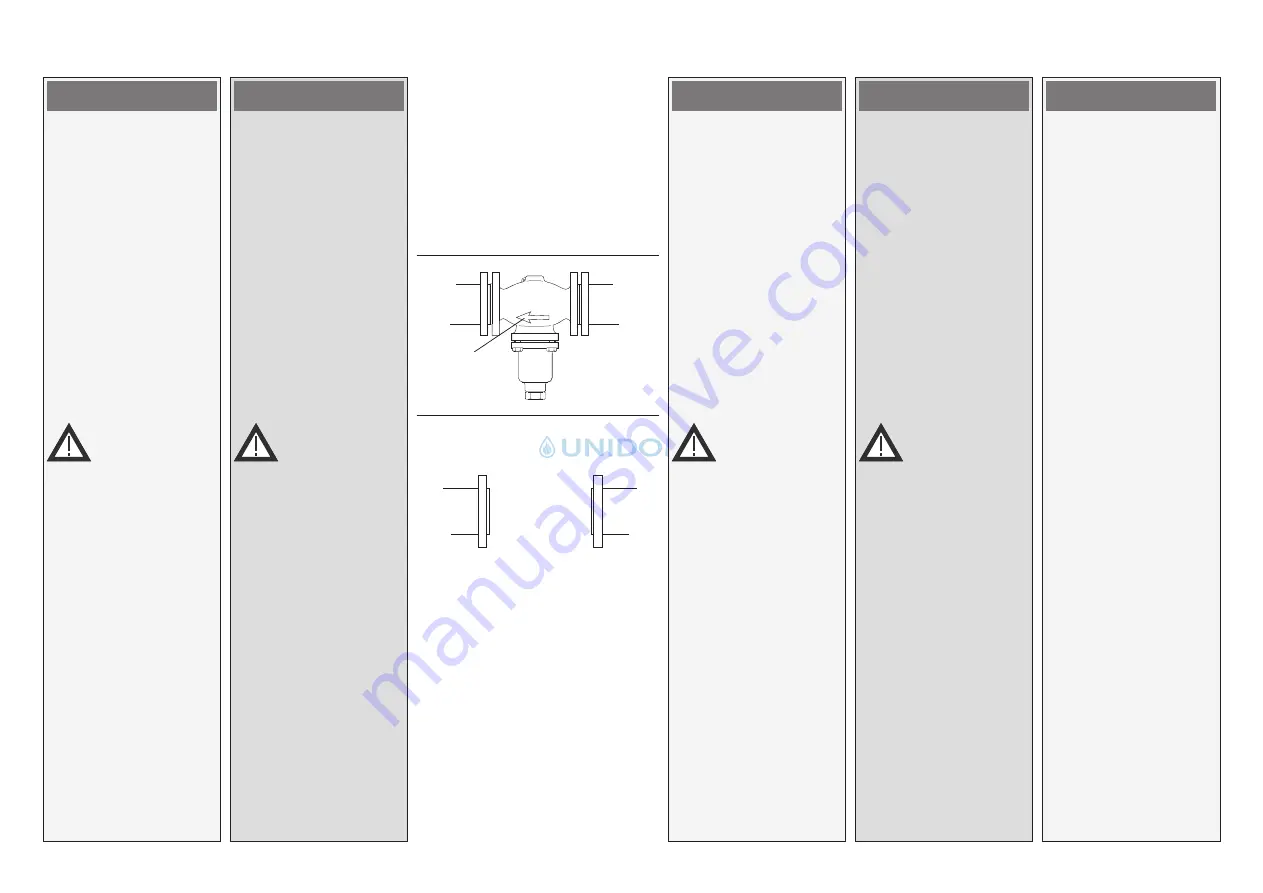
Valve Installation 

1.  Install strainer in front of 

valve. 

2.  Rinse system before 

installing valve. 

3.  Observe flow direction 


on the valve body.

Flanges 

 in the pipeline 

system must be in parallel 
direction, the sealing 
surfaces must be clean and 
undamaged. 

4.  Install valve. 

5.  Tighten screws crosswise 

in 3 steps up to the 
maximum torque.

Actuator AMV(E) 41.  and 
Valve Mounting 

see Instructions AMV(E) 41..

Einbau Ventil 

1.  Schmutzfänger vor dem 

Ventil einbauen

2.  Anlage vor dem Einbau 

des Ventils spülen

3.  Durchflussrichtung 

 auf 

dem Ventilgehäuse 
beachten

Flansche 

 in der Rohr-

leitung müssen parallel, 
Dichtflächen sauber und 
ohne Beschädigung sein.

4.  Ventil einbauen

5.  Schrauben über Kreuz 

in 3  Stufen bis zum max. 
Drehmoment anziehen

Montage stellantrieb 
AMV(E) 41. and valve

siehe Montageanleitung 
AMV(E) 41 .

Montaż zaworu

1. Zamontować filtr przed 

regulatorem.

2. Przed zamontowaniem 

zaworu przepłukać 
instalację.

3. Zwrócić uwagę na wskaźnik 

kierunku przepływu na 
korpusie zaworu 

.

Kołnierze 

 na rurociągu 

muszą być wzajemnie 
równoległe, a powierzchnie 
pod uszczelki czyste i bez 
uszkodzeń.

4. Zamontować zawór

5. Dokręcać przeciwległe 

nakrętki w 3 krokach 
do osiągnięcia 
maksymalnego momentu.

Montaż siłownika AMV(E) 
41. oraz zaworu. 

see Instructions AMV(E) 41..

ugradnja ventila

1.  Ugraditi hvatač nečistoće 

ispred ventila

2.  Isprati sistem pre ugradnje 

ventila

3.  Obratiti pažnju na smer 

strujanja fluida koji 
pokazuje strelica na telu 
ventila 

.

Prirubnice 

 na cevovodu 

moraju da budu u paralelnom 
položaju, zaptivna površina 
mora da bude čista i 
neoštećena.

4.  Ugraditi ventil

5.  Pritegnite vijke na 

prirubnicama u tri 
koraka do maksimalnog 
momenta. 

Montaža pogona AMV(E) 
41.  i  ventila

Pogledati Uputstva  
AMV(E) 41....

Содержание AFQM

Страница 1: ...foss de Strona 2 www danfoss pl Strana 2 www danfoss com Flow Controller with Integrated Motorized Valve for Electrical Actuator AFQM Volumenstromregler mit integriertem Motorventil f r elektrischen S...

Страница 2: ...Telefon 04621 30 60 89 0 Mail info unidomo com ffnungszeiten Mo Fr 8 00 17 00 Uhr a member of DAIKIN group Individuelle Beratung Komplettpakete Kostenloser Versand ber 15 Jahre Erfahrung Hochwertige...

Страница 3: ...nstrom begrenzung 9 Einstellung mittels Einstelldiagramm 9 Einstelldiagramme 10 Einstellung mittels W rmez hler 11 Spis tre ci Warunki bezpiecze stwa 3 Zakres zastosowa 3 Monta 4 Dopuszczalne pozycje...

Страница 4: ...izungs und K hlungsanlagen Die technischen Daten auf den Typenschildern sind f r den Einsatz ma gebend Warunki bezpiecze stwa W celu unikni cia ryzyka zranienia os b i uszkodzenia urz dze nale y bezwz...

Страница 5: ...Ventile DN 100 125 und bei DN 15 80 Mediumstemperaturen gr er 120 C Einbauort Einbauschema Vorlauf oder R cklauf Monta Dopuszczalne pozycje monta u Dla zawor w DN 15 80 temperatura czujnika do 120 C D...

Страница 6: ...anziehen Montage Stellantrieb AMV E 41 and valve siehe Montageanleitung AMV E 41 Monta zaworu 1 Zamontowa filtr przed regulatorem 2 Przed zamontowaniem zaworu przep uka instalacj 3 Zwr ci uwag na wsk...

Страница 7: ...ziehen Anzugsmoment 100 Nm falls das Andr cken zu schwer ist wie folgt vorgehen Schubstange des Stellantriebs AMV E 6 durch elektrische Handverstellung einfahren AMV E 6 ansschlie end auf STOP drehen...

Страница 8: ...hten Ventil ffnen mit dem Stellantriebs AMV E 4 1 Taster dr cken Ventil ffnet 2 Hubanzeige beachten Izolacja NIE izolowa si ownika Dla temperatur czynnika do 100 C nap d ci nieniowy mo e zosta zaizolo...

Страница 9: ...ahme Vorher sicherstellen dass das Ventil auf ist siehe Seite 7 Kiedy rurki impulsowe s pod czone maksymalne ci nienie robocze 25 bar nie mo e by przekroczone Nieprzestrzeganie powy szego mo e spowodo...

Страница 10: ...ritt 1 Einstellung Ventilhub 1 Ventil schlie en durch Drehen der Einstellschraube bis zum Anschlag Ci nienie na wyj ciu zaworu mo e tylko nieznacznie by wy sze od ci nienia na wej ciu zaworu Nieprzest...

Страница 11: ...ese Anzahl No nach rechts drehen Einstellung des Ventil hubes ist abgeschlossen 4 Einstellschraube kann plombiert werden Bohrung Einstelldiagramme 2 Wybra wykres poni ej No Wymagany przep yw Liczba ob...

Страница 12: ...einfahren Hubanzeige beachten Stellantrieb AMV 4 Taster dr cken dadurch die Schubstange einfahren Hubanzeige beachten Krok 2 Regulacja pozycji kra cowych si ownika patrz Instrukcja Obs ugi Si ownik e...

Страница 13: ...nlage oder ein Bypass vollst ndig ge ffnet ist 3 Anzeige des W rme z hlers beachten 4 Erh hung des Volumenstroms 5 Reduzierung des Volumenstroms 2 Upewni si e uk ad jak r wnie bypass s otwarte 3 ledzi...

Страница 14: ...Telefon 04621 30 60 89 0 Mail info unidomo com ffnungszeiten Mo Fr 8 00 17 00 Uhr a member of DAIKIN group Individuelle Beratung Komplettpakete Kostenloser Versand ber 15 Jahre Erfahrung Hochwertige...

Страница 15: ...ktrischen Stell antrieb 7 Volumenstrom berpr fen Einstellung des Ventil hubes ist abgeschlossen 8 Einstellschraube kann plombiert werden Bohrung 6 Jak tylko licznik ciep a wska e wymagan warto delikat...

Отзывы: