EDUS04-906_b
Installation Manual
Room Air Conditioners H-Series
29
9
6.
Connectin
g
to the HA system.
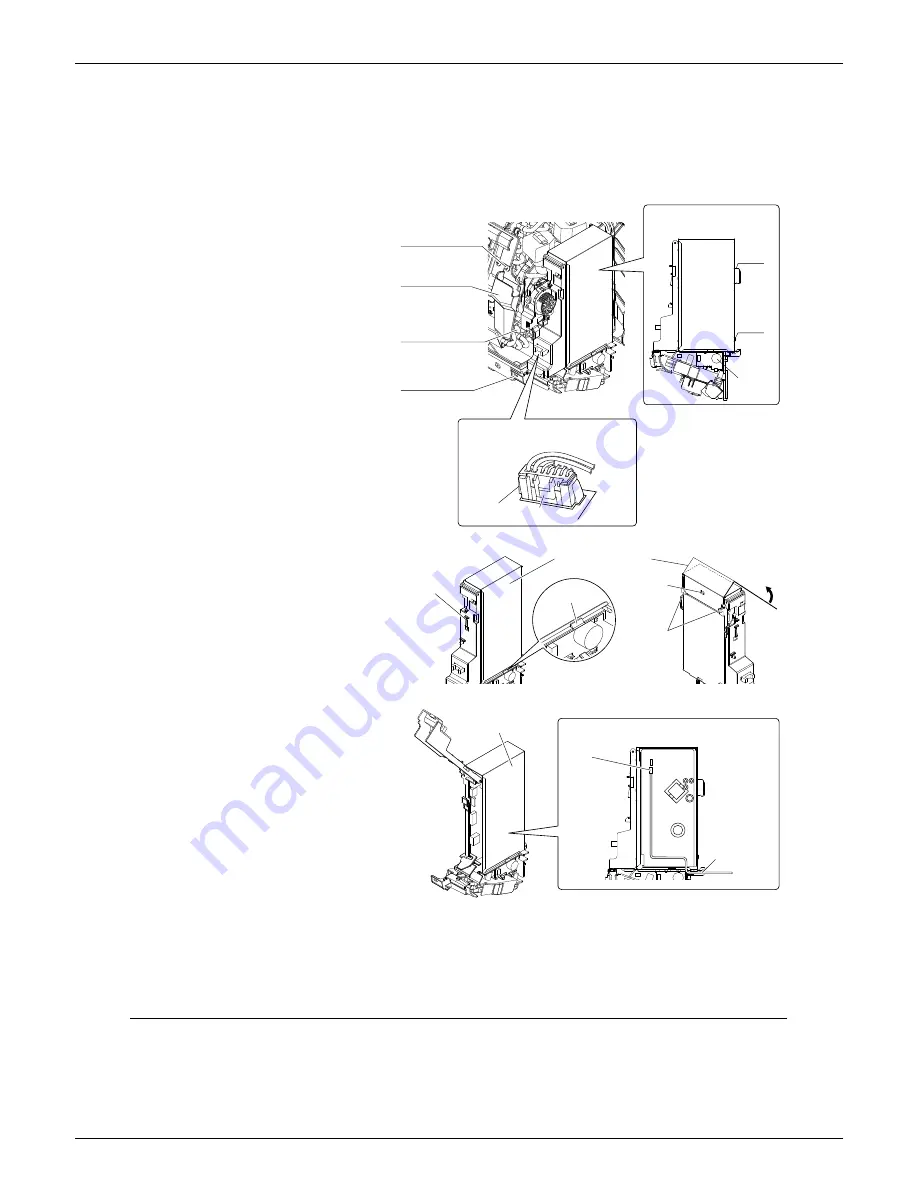
1) Remo
v
e the front grille. (3 scre
w
s)
2) Remo
v
e the decelerator assem
b
ly parts.
(1 scre
w
)
2-1) Remo
v
e the decelerator assem
b
ly
part scre
w
s. (See Fig. 1)
2-2) Remo
v
e the decelerator assem
b
ly
part connector. Remo
v
e
b
y pressing
on the ta
b
s on the
b
ottom of the
connector.
(See the ta
b
position diagram 1)
3) Remo
v
e the electric parts
b
ox.
(1 scre
w
, 2 ta
b
s)
3-1) Remo
v
e the electric parts
b
ox fixing
scre
w
.
3-2) P
u
ll the electric parts
b
ox to
w
ard
yo
u
and discharge the ta
b
2.
4) Remo
v
e the electric parts
b
ox co
v
er.
(3 ta
b
s) (Refer to Fig. 2)
4-1) Discharge the ta
b
3.
4-2) P
u
ll
u
p the electric parts
b
ox co
v
er
slo
w
ly, discharge the ta
b
4, slide
u
p,
and discharge the ta
b
5.
5) Insert the connection cord into the HA
connector “S21”.
6) Lay the connection cord as sho
w
n in
“Fig. 3”.
7) Replace the electric parts
b
ox co
v
er and
electric parts
b
ox as they
w
ere.
8
) Attach the decelerator assem
b
ly part
along
w
ith the g
u
ide rail. (Refer to Fig. 2)
9) Install the front grille.
Fi
g
. 1
Decelerator assem
b
ly
part fixing scre
w
Anti-drip co
v
er
Electric parts
b
ox
fixing scre
w
Anti-drip co
v
er
fixing scre
w
Position of tabs on the decelerator
assembly part connector
Location of the tabs
on the electric parts box
Ta
b
Ta
b
2
Ta
b
1
B
u
zzer
Ta
b
3
Electric parts
b
ox co
v
er
G
u
ide rail
Ta
b
4
Ta
b
5
Fi
g
. 2
Inside the electric parts box
Fi
g
. 3
Electric parts
b
ox co
v
er
HA connector
“S21”
To connection cord
Содержание Quaternity H-Series
Страница 1: ...EDUS04 906_b H Series Heat Pump...
Страница 45: ...Operation Manual EDUS04 906_b 44 Room Air Conditioners H Series Ground terminal...
Страница 46: ...EDUS04 906_b Operation Manual Room Air Conditioners H Series 45 DRY button...
Страница 47: ...Operation Manual EDUS04 906_b 46 Room Air Conditioners H Series...
Страница 48: ...EDUS04 906_b Operation Manual Room Air Conditioners H Series 47...
Страница 49: ...Operation Manual EDUS04 906_b 48 Room Air Conditioners H Series...
Страница 51: ...Operation Manual EDUS04 906_b 50 Room Air Conditioners H Series...
Страница 52: ...EDUS04 906_b Operation Manual Room Air Conditioners H Series 51...
Страница 53: ...Operation Manual EDUS04 906_b 52 Room Air Conditioners H Series...
Страница 56: ...EDUS04 906_b Operation Manual Room Air Conditioners H Series 55...
Страница 57: ...Operation Manual EDUS04 906_b 56 Room Air Conditioners H Series 1 8 F 1 C 3 6 F 2 C...
Страница 58: ...EDUS04 906_b Operation Manual Room Air Conditioners H Series 57...
Страница 59: ...Operation Manual EDUS04 906_b 58 Room Air Conditioners H Series COOLING or DRY COOLING mode or...
Страница 60: ...EDUS04 906_b Operation Manual Room Air Conditioners H Series 59...
Страница 61: ...Operation Manual EDUS04 906_b 60 Room Air Conditioners H Series...
Страница 62: ...EDUS04 906_b Operation Manual Room Air Conditioners H Series 61...
Страница 63: ...Operation Manual EDUS04 906_b 62 Room Air Conditioners H Series...
Страница 64: ...EDUS04 906_b Operation Manual Room Air Conditioners H Series 63...
Страница 65: ...Operation Manual EDUS04 906_b 64 Room Air Conditioners H Series...
Страница 66: ...EDUS04 906_b Operation Manual Room Air Conditioners H Series 65...
Страница 67: ...Operation Manual EDUS04 906_b 66 Room Air Conditioners H Series...
Страница 68: ...EDUS04 906_b Operation Manual Room Air Conditioners H Series 67...
Страница 69: ...Operation Manual EDUS04 906_b 68 Room Air Conditioners H Series...
Страница 70: ...EDUS04 906_b Operation Manual Room Air Conditioners H Series 69...
Страница 71: ...Operation Manual EDUS04 906_b 70 Room Air Conditioners H Series 3P226009 1...


