EDUS04-906_b
Installation Manual
Room Air Conditioners H-Series
25
5
4.
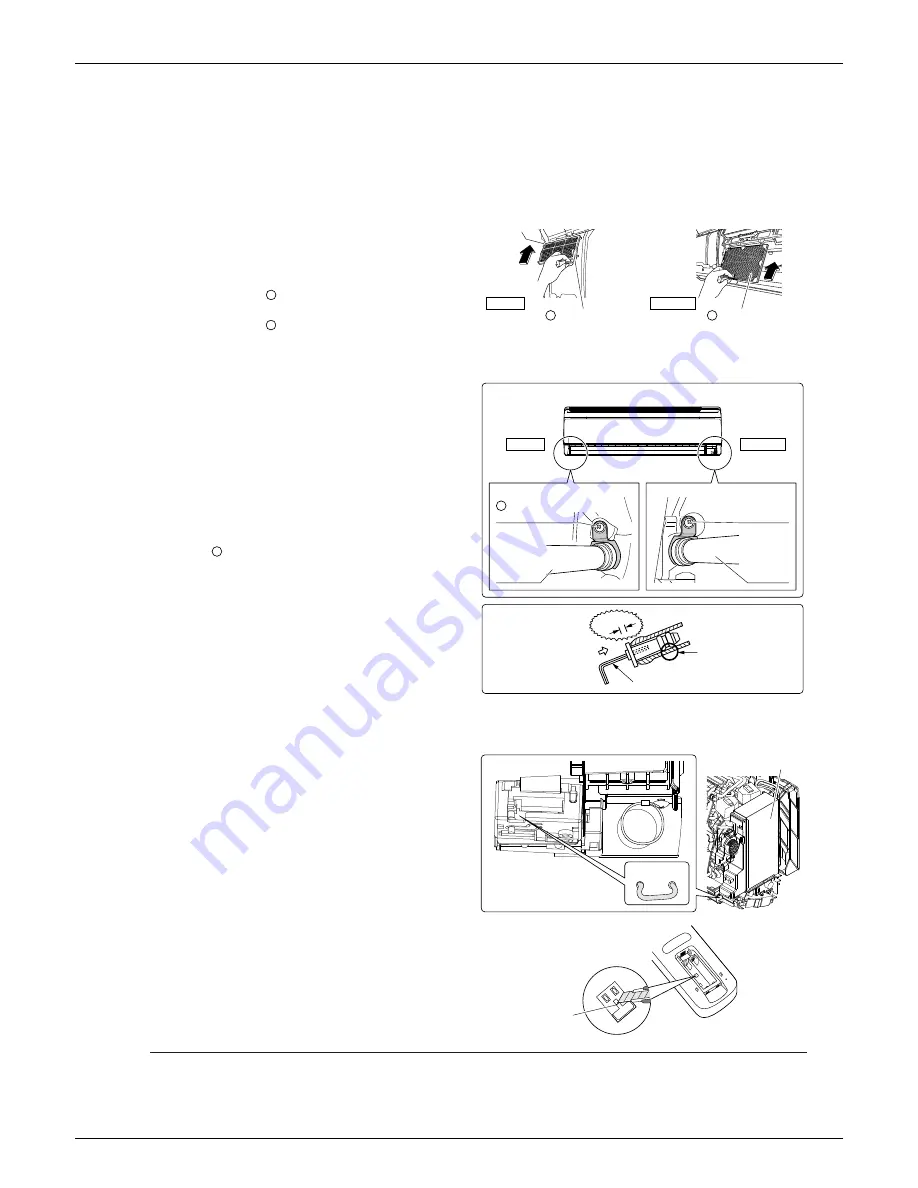
Installing the titanium apatite
photocatalytic air-purifying filter
and deodorizing filter for streamer.
1) Open the front panel to pull out the air filter.
2) Attach the
titanium apatite photocatalytic air-
purifying filter.
3) Attach the
deodorizing filter for streamer.
4) Replace the air filter to its original position and close
the front panel.
5.
How to replace the drain plug and
drain hose.
• Replacing onto the left side
1) Remove the insulation fixing screws on the right to
remove the drain hose.
2) Reattach the insulation fixing screw on the right as it was.
*(Forgetting to attach this may cause water leakages.)
3) Remove the drain plug on the left side and attach it to
the right side.
4) Insert the drain hose and tighten with included
indoor unit fixing screw.
6.
How to set the different addresses.
• When 2 indoor units are installed in 1 room, the
2 wireless remote controllers can be set for different
addresses.
1) Remove the front grille. (3 screws)
2) Cut the address jumper “JA”. (See Fig. 1)
3) Remove the remote controller lid and cut the
address jumper “J4”. (See Fig. 2)
Right side
Deodorizing filter
for streamer
B
Left side
C
Titanium apatite
photocatalytic
air-purifying filter
C
B
Attachment on the right side (factory default)
Drain hose
Attachment on the left side
* The drain hose is on the back of the unit.
Front side of unit
Drain hose
Drain hose attachment position
Right side
Left side
Indoor unit
fixing screw
D
Insulation
fixing screw
How to set drain plug.
No gap
.
Insert a hexagon wrench (3/16 inch (4mm)).
Do not apply lubricating
oil (refrigerant oil) when
inserting.
Application of causes
deterioration and drain
leakage of the plug.
D
Electric parts box cover
Cut JA.
Fig. 1
J4
Fig. 2
Cut section
Содержание Quaternity H-Series
Страница 1: ...EDUS04 906_b H Series Heat Pump...
Страница 45: ...Operation Manual EDUS04 906_b 44 Room Air Conditioners H Series Ground terminal...
Страница 46: ...EDUS04 906_b Operation Manual Room Air Conditioners H Series 45 DRY button...
Страница 47: ...Operation Manual EDUS04 906_b 46 Room Air Conditioners H Series...
Страница 48: ...EDUS04 906_b Operation Manual Room Air Conditioners H Series 47...
Страница 49: ...Operation Manual EDUS04 906_b 48 Room Air Conditioners H Series...
Страница 51: ...Operation Manual EDUS04 906_b 50 Room Air Conditioners H Series...
Страница 52: ...EDUS04 906_b Operation Manual Room Air Conditioners H Series 51...
Страница 53: ...Operation Manual EDUS04 906_b 52 Room Air Conditioners H Series...
Страница 56: ...EDUS04 906_b Operation Manual Room Air Conditioners H Series 55...
Страница 57: ...Operation Manual EDUS04 906_b 56 Room Air Conditioners H Series 1 8 F 1 C 3 6 F 2 C...
Страница 58: ...EDUS04 906_b Operation Manual Room Air Conditioners H Series 57...
Страница 59: ...Operation Manual EDUS04 906_b 58 Room Air Conditioners H Series COOLING or DRY COOLING mode or...
Страница 60: ...EDUS04 906_b Operation Manual Room Air Conditioners H Series 59...
Страница 61: ...Operation Manual EDUS04 906_b 60 Room Air Conditioners H Series...
Страница 62: ...EDUS04 906_b Operation Manual Room Air Conditioners H Series 61...
Страница 63: ...Operation Manual EDUS04 906_b 62 Room Air Conditioners H Series...
Страница 64: ...EDUS04 906_b Operation Manual Room Air Conditioners H Series 63...
Страница 65: ...Operation Manual EDUS04 906_b 64 Room Air Conditioners H Series...
Страница 66: ...EDUS04 906_b Operation Manual Room Air Conditioners H Series 65...
Страница 67: ...Operation Manual EDUS04 906_b 66 Room Air Conditioners H Series...
Страница 68: ...EDUS04 906_b Operation Manual Room Air Conditioners H Series 67...
Страница 69: ...Operation Manual EDUS04 906_b 68 Room Air Conditioners H Series...
Страница 70: ...EDUS04 906_b Operation Manual Room Air Conditioners H Series 69...
Страница 71: ...Operation Manual EDUS04 906_b 70 Room Air Conditioners H Series 3P226009 1...


