background image

3

To assure that your unit operates safely and efficiently, it must 

be installed, operated, and maintained in accordance with 

these installation and operating instructions, all local building 

codes and ordinances.

ePa r

egulatiOns

I

mportant

: t

he

 U

nIted

 S

tateS

 e

nvIronmental

 p

rotectIon

 a

gen

-

cy

 (epa) 

haS


ISSUed


varIoUS


regUlatIonS


regardIng


the


Intro

-

dUctIon


and


dISpoSal


of


refrIgerantS


In


thIS


UnIt

.  f

aIlUre


to


follow


theSe


regUlatIonS


may


harm


the


envIronment


and


can


lead


to


the


ImpoSItIon


of


SUbStantIal


fIneS

. b

ecaUSe


regUlatIonS


may


vary


dUe


to


paSSage


of


new


lawS

we


SUggeSt


a


certIfIed


technIcIan


perform


any


work


done


on


thIS


UnIt

. S

hoUld


yoU


have


any


qUeStIonS


pleaSe


contact


the


local


offIce


of


the

 epa.

n

atiOnal

 C

Odes

This product is designed and manufactured to permit  installa-

tion in accordance with National Codes. It is the installer’s re-

sponsibility to install the product in accordance with National 

Codes and/or prevailing local codes and regulations.
The heating and cooling capacities of the unit should be 

greater than or equal to the design heating and cooling loads 

of the area to be conditioned. The loads should be calculat-

ed by an approved method or in accordance with ASHRAE 

Guide or Manual J - Load Calculations published by the Air 

Conditioning Contractors of America.

Obtain from:

American National Standards Institute 

125 West 43rd Street, 4th Floor

New York, NY 10036

System design and installation should also, where applicable, 

follow information presented in accepted industry guides such 

as the ASHRAE Handbooks. The manufacturer assumes no 

responsibility for equipment installed in violation of any code 

or regulation. The mechanical installation of the packaged roof 

top units consists of making final connections between the unit 

and building services; supply and return duct connections; and 

drain connections (if required).  The internal systems of the unit 

are completely factory-installed and tested prior to shipment.
Units are generally installed on a steel roof mounting curb as-

sembly which has been shipped to the job site for installation 

on the roof structure prior to the arrival of the unit.  The model 

number shown on the unit’s identification plate identifies the 

various components of the unit such as refrigeration tonnage, 

heating input and voltage.
Carefully inspect the unit for damage including damage to the 

cabinetry.  Any bolts or screws which may have loosened in 

transit must be re-tightened.  In the event of damage, the re-

ceiver should:

1.  Make notation on delivery receipt of any visible damage 

to shipment or container.

2.  Notify carrier promptly and request an inspection.

3.  In case of concealed damage, carrier should be notified 

as soon as possible-preferably within 5 days.

4.  File the claim with the following supporting documents:

a.  Original  Bill  of  Lading,  certified  copy,  or  indemnity 

bond.

b.  Original paid freight bill or indemnity in lieu thereof. 

c.  Original invoice or certified copy thereof, showing trade 

and other discounts or reductions.

d.  Copy of the inspection report issued by carrier repre-

sentative at the time damage is reported to the car-

rier. The carrier is responsible for making prompt in-

spection of damage and for a thorough investigation 

of each claim. The distributor or manufacturer will not 

accept claims from dealers for transportation damage.

NOTE: 

When inspecting the unit for transportation damage, 

remove all packaging materials. Recycle or dispose  of the 

packaging material according to local codes.

P

re

-i

nstallatiOn

 C

heCks

Carefully read all instructions for the installation prior to in-

stalling unit. Ensure each step or procedure is understood 

and any special considerations are taken into account be-

fore starting installation.  Assemble all tools, hardware and 

supplies needed to complete the installation. Some items 

may need to be purchased locally.

UNIT LOCATION

IMPORTANT NOTE: 

Remove wood shipping rails prior to 

installation of the unit.

a

ll

 i

nstallatiOns

:

i

mPOrtant

 n

Ote

:


Unit should be energized 24 hours prior to 

compressor start up to ensure crankcase heater has suf-

ficiently  warmed  the  compressors.    Compressor  damage 

may occur is this step is not followed.

NOTE: 

 Appliance is shipped from factory for vertical duct 

application. 

Proper installation of the unit ensures trouble-free opera-

tion. Improper installation can result in problems ranging 

from noisy operation to property or equipment damages, 

dangerous conditions that could result in injury or personal 

property damage and that are not covered by the warranty. 

Give this booklet to the user and explain it’s provisions. The 

user should retain these instructions for future reference.

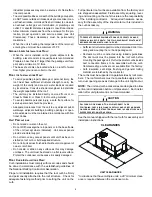
• For proper operation and condensate drainage, the unit 

must be mounted level.

•  Do not locate the unit in an area where the outdoor air 

will be frequently contaminated by compounds containing 

chlorine or fluorine. Common sources of such compounds 

include swimming pool chemicals and chlorine bleaches, 

paint stripper, adhesives, paints, varnishes, sealers, wax-

es (which are not yet dried) and solvents used during con-

struction and remodeling. Various commercial and

T

O


PREVENT


POSSIBLE


EQUIPMENT


DAMAGE

PROPERTY


DAMAGE

PERSONAL


INJURY


OR


DEATH

THE


FOLLOWING


BULLET


POINTS


MUST


BE


OBSERVED


WHEN


INSTALLING


THE


UNIT

.

WARNING

Содержание DCC Series

Страница 1: ... 3 Clearances 4 Roof Curb Post Installation Checks 5 Roof Top Duct Connections 5 Rigging Details 5 Electrical Wiring 6 Circulating Air and Filters 8 Condensate Drain Connection 8 Startup Adjustments and Checks 9 Air Flow Adjustments 10 INSTALLATION INSTRUCTIONS WARNING PROP 65 WARNING FOR CALIFORNIA CONSUMERS Cancer and Reproductive Harm www P65Warnings ca gov 0140M00517 A ONLY PERSONNEL THAT HAVE...

Страница 2: ...d performance is achieved after 72 hours of operation Rated performance is delivered at the specified airflow See product specification sheet for light commercial models Specification sheets can be found at www daikinac com for Daikin brand products Within the website please select the commercial products menu and then select the submenu for the type of product to be installed such as air conditio...

Страница 3: ...pt of any visible damage to shipment or container 2 Notify carrier promptly and request an inspection 3 In case of concealed damage carrier should be notified as soon as possible preferably within 5 days 4 File the claim with the following supporting documents a Original Bill of Lading certified copy or indemnity bond b Original paid freight bill or indemnity in lieu thereof c Original invoice or ...

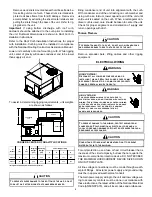
Страница 4: ...de on any surface as this may damage unit base The unit must be stored on a flat level surface Protect the condenser coil because it is easily damaged Roof Curb Installations Only Curb installations must comply with local codes and should be done in accordance with the established guidelines of the National Roofing Contractors Association Proper unit installation requires that the roof curb be fir...

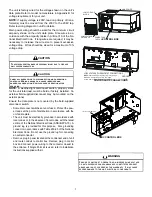
Страница 5: ...ET UNIT ON CURB CAUTION Horizontal Discharge To convert to horizontal discharge remove the covers over the horizontal duct connections save washered screws Refer to IOD 7006 included in the literature pack for install ing horizontal duct covers to the downflow duct connections Flexible duct connectors between the unit and ducts are rec ommended Insulate and weatherproof all external ductwork and j...

Страница 6: ...an tilever curb is used care should be taken to center the unit Check for proper alignment and orientation of supply and return openings with duct Rigging Removal Remove spreader bars lifting cables and other rigging equipment ELECTRICAL WIRING For unit protection use a fuse or hacr circuit breaker that is in excess of the circuit ampacity but less than or equal to the maximum overcurrent protecti...

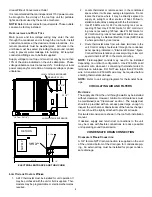
Страница 7: ...e absence of local codes with the latest edition of the National Electrical Code ANSI NFPA 70 A ground lug is provided for this purpose Size grounding conductor in accordance with Table 250 95 of the National Electrical Code Do not use the ground lug for connecting a neutral conductor Remove plug in panel located at the condenser end of unit and route conduit to control box Remove plug in control ...

Страница 8: ...the thermostat 3 Use 18 AWG wire for 24V control wiring runs not ex ceeding 75 feet Use 16 AWG wire for 24V control wir ing runs not exceeding 125 feet Use 14 AWG wire for 24V control wiring runs not exceeding 200 feet Low volt age wiring may be National Electrical Code NEC Class 2 where permitted by local codes 4 Route thermostat wires from sub base terminals to the unit Control wiring should ent...

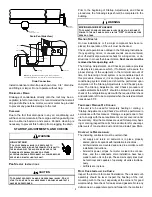
Страница 9: ...a step by step sequence which if followed will assure the proper startup of the equipment in the minimum amount of time Air balancing of duct system is not considered part of this procedure However it is an important phase of any air conditioning system startup and should be performed upon completion of the Startup Adjustments and Checks proce dure The Startup Adjustments and Checks procedure at o...

Страница 10: ... 4 3 Percent Voltage Unbalance 100 x 1 8 Percent voltage unbalance MUST NOT exceed 2 4 216 400 216 100 X AIR FLOW ADJUSTMENTS NOTE For 2 speed models airflow adjustments must be made on high speed i e 2nd stage cooling or in heat mode Refer to Motor Sheave Adjustments section When the final adjustments are complete the current draw of the motor should be checked and compared to the full load curre...

Страница 11: ...RCE lbs SHEAVE DIAMETER in TYPE New V belts will drop rapidly during the first few hours of use Check tension frequently during the first 24 hours of operation Tension should fall between the minimum and maximum force To determine the deflection distance from a normal position measure the distance from sheave to sheave using a straightedge or a cord This is your refer ence line On multiple belt dr...

Страница 12: ...G After the cooling mode is checked out turn the thermo stat system switch to OFF 10 Turn the thermostat system switch to HEAT and fan switch to AUTO 11 Slowly raise the heating temperature setting When the heating first stage makes contact stop raising the tem perature setting The compressor blower and fan should now be running with the reversing valve in the de ener gized heating position After ...

Страница 13: ...ature of the refrigerant in the outdoor coil must be below the tempera ture of the outdoor air in order to extract heat from the air Thus the greater the difference in the outdoor temperature and the outdoor coil temperature the greater the heating capacity of the heat pump This phenomenon is a char acteristic of a heat pump It is a good practice to provide supplementary heat for all heat pump ins...

Страница 14: ...ENCY OR EQUIPMENT DAMAGE DUE TO DUST AND LINT BUILD UP ON INTERNAL PARTS NEVER OPERATE UNIT WITHOUT AN AIR FILTER INSTALLED IN THE RETURN AIR SYSTEM Cabinet Finish Maintenance Use a fine grade automotive wax on the cabinet finish to maintain the finish s original high luster This is especial ly important in installations with extended periods of direct sunlight Clean Outside Coil Qualified Service...

Страница 15: ... shift a Undercharged check for leaks b Valve Body Damaged Replace valve c Unit Properly Charged If it is on the heating cycle raise the discharge pressure by restricting airflow through the indoor coil If the valve does not shift tap it lightly on both ends with a screwdriver handle DO NOT TAP THE VALVE BODY If the unit is on the cooling cycle raise the discharge pressure by restricting airflow t...

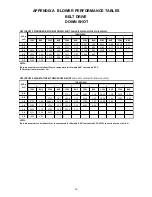
Страница 16: ...representsdry coil without filter to compensate for filter add 0 08 to measured E S P SCFM correction for wet coil 4 CFM BHP CFM BHP CFM BHP CFM BHP CFM BHP CFM BHP 0 6 2793 1 64 2603 1 39 2450 1 18 2270 0 97 0 8 2903 1 87 2696 1 57 2369 1 23 2236 1 05 1987 0 82 1 0 2776 1 86 2682 5 1 69 2445 1 38 2196 1 12 1968 0 90 1 2 2599 1 71 2539 1 57 2310 1 29 1932 0 96 1 4 2424 1 57 2305 1 40 2032 1 11 1 6...

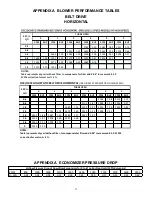
Страница 17: ...ORIZONTAL INCLUDES 2 SPEED MOTOR ON HIGH SPEED CFM BHP CFM BHP CFM BHP CFM BHP CFM BHP CFM BHP 0 6 2746 1 38 2515 1 12 0 8 2721 1 47 2494 1 21 2261 0 97 1 0 2689 1 56 2500 1 32 2255 1 06 1994 0 83 1 2 2752 1 74 2473 1 40 2252 1 15 1996 0 91 1 4 2802 1 88 2487 1 53 2286 1 27 2037 1 02 1 6 2553 1 67 2308 1 40 1997 1 08 1 8 2355 1 51 2014 1 19 2 2055 1 29 NOTES Table representsdry coil without filter...

Страница 18: ... 30 4 35 EHK4 20 24 0 3 3 37 9 40 EHK4 25 30 1 3 3 45 5 50 14 3 20 EHK4 10 12 0 18 6 20 EHK4 15 18 0 26 1 30 EHK4 20 24 0 33 6 35 EHK4 25 30 1 41 3 45 3 3 17 6 25 EHK4 10 12 0 3 3 22 8 25 EHK4 15 18 0 3 3 30 3 35 EHK4 20 24 0 3 3 37 8 40 EHK4 25 30 1 3 3 45 4 50 12 3 15 EHK7 10 10 0 15 4 20 EHK7 15 15 1 21 8 25 EHK7 20 20 0 27 9 30 EHK7 25 25 1 34 3 35 2 6 14 9 20 EHK7 10 10 0 2 6 18 6 20 EHK7 15 ...

Страница 19: ... 41 8 45 EHK4 20 24 0 3 3 49 3 50 EHK4 25 30 1 3 3 57 0 60 14 3 20 EHK4 10 12 0 29 3 30 EHK4 15 18 0 36 8 40 EHK4 20 24 0 44 3 45 EHK4 25 30 1 52 0 60 3 3 17 6 25 EHK4 10 12 0 3 3 32 6 35 EHK4 15 18 0 3 3 40 1 45 EHK4 20 24 0 3 3 47 6 50 EHK4 25 30 1 3 3 55 3 60 12 3 15 EHK7 10 10 0 24 8 25 EHK7 15 15 1 31 1 35 EHK7 20 20 0 37 3 40 EHK7 25 25 1 43 6 45 2 6 14 9 20 EHK3 10 10 0 2 6 27 4 30 EHK3 15 ...

Страница 20: ...DEL NUMBER MINIMUM CFM EHK 10 2100 EHK 15 2100 EHK 20 2100 EHK 25 2100 MINIMUM AIR FLOW FOR ELECTRIC HEAT 6 TON ATTENTION INSTALLING PERSONNEL Use only the heater kit specified for each model as dictated by the table above ...

Страница 21: ...URN SUPPLY 12 17 7 3 8 11 25 6 1 4 4 7 8 DRAIN THRU CURB LOCATION EMBOSS FOR THRU THE BASE UTILITIES BOTTOM VIEW OF UNIT 8 3 16 5 7 8 19 7 16 27 3 8 47 1 2 4 1 2 7 1 2 SUPPLY RETURN NOTE Refer to IOD 7006 included in the literature pack for installing horizontal duct covers ...

Страница 22: ...n the unit for the most up to date wiring HIGH VOLTAGE DISCONNECT ALL POWER BEFORE SERVICING OR INSTALLING THIS UNIT MULTIPLE POWER SOURCES MAY BE PRESENT FAILURE TO DO SO MAY CAUSE PROPERTY DAMAGE PERSONAL INJURY OR DEATH APPENDIX D WIRING DIAGRAMS DCC072 208 230 460 575 3 60 1 SPEED ...

Страница 23: ...the unit for the most up to date wiring HIGH VOLTAGE DISCONNECT ALL POWER BEFORE SERVICING OR INSTALLING THIS UNIT MULTIPLE POWER SOURCES MAY BE PRESENT FAILURE TO DO SO MAY CAUSE PROPERTY DAMAGE PERSONAL INJURY OR DEATH 23 WIRING DIAGRAMS DCH072 208 230 3 60 1 SPEED ...

Страница 24: ...ring diagram on the unit for the most up to date wiring HIGH VOLTAGE DISCONNECT ALL POWER BEFORE SERVICING OR INSTALLING THIS UNIT MULTIPLE POWER SOURCES MAY BE PRESENT FAILURE TO DO SO MAY CAUSE PROPERTY DAMAGE PERSONAL INJURY OR DEATH 24 DCH072 460 575 3 60 1 SPEED ...

Страница 25: ...NAL USE COPPER CONDUCTORS ONLY 2 IF OPTIONAL ECONOMIZER IS INSTALLED REMOVE ECON SHRT PLM AND CONNECT ECON PLM TO ECON PLF 3 TB3 LOW VOLTAGE TERMINAL BLOCK 4 TERMINALS FOR 24VAC PWR RD BR WIRE AND 6 TERMINALS FOR 24VAC COM BL WIRE 4 CONNECTIONS SHOWN ARE FOR 1 STAGE HEAT OPERATION WHEN 2 STAGE OPERATION IS REQIRED REMOVE JUMPER WIRE CONNECTING W2 TO W1 ON TB1 5 IF OPTIONAL SMOKE DETECTOR S ARE INS...

Страница 26: ...T1 T2 T3 CC OR RD BK OR RD YL BK T1 T3 COMP T2 EM BR OR RD BK WH OR BL GY BL YL GY BL YL GR RD BK 2 3 4 24V CNTL VOLTAGE LINE VOLTAGE TR1 LOW VOLTAGE FIELD WIRING HIGH VOLTAGE Y2 2ND STAGE COOL CALL OUTPUT Y1 1ST STAGE COOL CALL OUTPUT W2 2ND STAGE HEAT CALL OUTPUT W1 1ST STAGE HEAT CALL OUTPUT G C R TB1 CONNECTION 24VAC PWR INPUT THERMOSTAT IN OUT 24VAC COM INPUT FAN CALL OUTPUT THERMOSTAT CO NNE...

Страница 27: ...P T2 EM OR RD BK WH OR BL GY BL YL GY BL YL GR RD BK 2 3 4 24V CNTL VOLTAGE LINE VOLTAGE TR1 LOW VOLTAGE FIELD WIRING HIGH VOLTAGE Y2 2ND STAGE COOL CALL OUTPUT Y1 1ST STAGE COOL CALL OUTPUT W2 2ND STAGE HEAT CALL OUTPUT W1 1ST STAGE HEAT CALL OUTPUT G C R TB1 CONNECTION 24VAC PWR INPUT THERMOSTAT IN OUT 24VAC COM INPUT FAN CALL OUTPUT THERMOSTAT CONNECTIONS YELLOW PINK STRIPE YELLOW YL PK BL PK B...

Страница 28: ... TO ECON PLF 3 TB3 LOW VOLTAGE TERMINAL BLOCK 4 TERMINALS FOR 24VAC PWR RD BR WIRE AND 6 TERMINALS FOR 24VAC COM BL WIRE 4 CONNECTIONS SHOWN ARE FOR 1 STAGE HEAT OPERATION WHEN 2 STAGE OPERATION IS REQIRED REMOVE JUMPER WIRE CONNECTING W2 TO W1 ON TB1 5 IF OPTIONAL SMOKE DETECTOR S ARE INSTALLED REMOVE JUMPER WIRE CONNECTING S1 TO S2 ON TB1 WIRE CONNECTIONS FROM ACCESSORY KIT CONNECT RD WIRE TO TB...

Страница 29: ...2 L3 T1 T2 T3 CC OR RD BK OR RD YL BK T1 T3 COMP T2 EM OR RD BK WH OR BL GY BL YL GY BL YL GR RD BK 2 3 4 24V CNTL VOLTAGE LINE VOLTAGE TR1 LOW VOLTAGE FIELD WIRING HIGH VOLTAGE Y2 2ND STAGE COOL CALL OUTPUT Y1 1ST STAGE COOL CALL OUTPUT W2 2ND STAGE HEAT CALL OUTPUT W1 1ST STAGE HEAT CALL OUTPUT G C R TB1 CONNECTION 24VAC PWR INPUT THERMOSTAT IN OUT 24VAC COM INPUT FAN CALL OUTPUT THERMOSTAT CONN...

Страница 30: ...30 WIRING DIAGRAMS FOR MODELS WITH DDC CONTROLS FOR COMPLETE INFORMATION AND INSTALLATION INSTRUCTIONS FOR MODELS WITH DDC CONTROLS SEE MANUAL DK DDC TGD XXX ...

Страница 31: ...3 60 SEE NOTE 2 BI7 CFS PK BL PK RD YL GR 1 4 HEATER PLF BK BK PU PU RD OR RD BK RD BK BC CC DAT AI1 GND AGND 24VAC AI4 AI5 AI6 AI7 AI8 AI2 AI3 BK BR GR BL BL BL RD 24V RD RD BL BL SEE NOTE 4 YL RD PK RD OR BK RD YL BK RD GR WH RD BL BL BL GR YL BR WH WH WH BR 2 3 5 6 7 8 9 BK BK RD BL AG C PU T5 T4 T3 T2 T1 TB2 TB1 RD SEE NOTE 5 CS PS ES XS RD BK PU BL OAT HGRH EXF ALRM AGND T3 GR AO3 AO2 AO1 COM...

Страница 32: ... PROVING SWITCH CONTACTOR COMPRESSOR CONTACTOR COMPRESSOR CONTACTOR RELAY CONDENSOR FAN CONDENSOR FAN CONTACTOR CLOGGED FILTER SWITCH CRANKCASE HEATER CRANKCASE HEATER SWITCH CONDENSER MOTOR COMMON C ON TB2 COMPRESSOR COM1 AND SMOKE DETECTOR DEFROST THERMOSTAT ECONOMIZER EVAPORATOR MOTOR ECON COM3 8 BI1 AND SMOKE DETECTOR EXHAUST FAN EQUIPMENT GROUND HOT GAS REHEAT HIGH PRESSURE SWITCH LOAD SHEDDI...

Страница 33: ...TER PLF C L2 BR BK BK DFT RD RD BK BK GR F C PU BK PU RD BK RD OR RD BK RD BK RCCF BK BC CFC CC DAT AI1 GND AGND 24VAC AI4 AI5 AI6 AI7 AI8 AI2 AI3 BK BR GR BL CHS RVC BL BL RD 24V RD RD BL BL RD SEE NOTE 4 YL RD PK RD OR BK RD YL BK RD RD BK RD RD BK RD GR WH RD BL BL BL GR BK YL BR WH WH WH OR BR OR BK RD BK BK RD 2 3 5 6 7 8 9 T2 T1 L1 BK BK RD BL BL BL AG C PU T5 T4 T3 T2 T1 TB2 TB1 RD SEE NOTE...

Страница 34: ...RY INPUTS BLOWER LOW SPEED BLOWER PROVING SWITCH COMPRESSOR CONTACTOR COMPRESSOR CONTACTOR RELAY CLOGGED FILTER SWITCH CRANKCASE HEATER CRANKCASE HEATER SWITCH CONDENSER MOTOR COMMON C ON TB2 COMPRESSOR COM1 AND SMOKE DETECTOR DEFROST THERMOSTAT ECONOMIZER EVAPORATOR MOTOR ECON COM3 8 AND SMOKE DETECTOR EXHAUST FAN EQUIPMENT GROUND HOT GAS REHEAT HIGH PRESSURE SWITCH LOAD SHEDDING LOW PRESSURE SWI...

Страница 35: ...BL PK 6 4 9 8 7 3 2 1 BI4 BI5 BI6 BI7 GND GND COM3 8 RL8 AO4 COM2 AO3 AO2 AO1 COM3 8 RL7 RL6 RL5 RL4 RL3 RL2 RL1 COM1 BL HGRH EXF ALRM RD YL PU BK T3 T2 T1 L2 L1 OR RD BK BL BL BL OR RD RD BK BL BL RD BK BK RD RD WH PK BK BK L3 T3 T2 T1 L2 L1 BK RD C BK PU RD RD YL BK BK RD SEE NOTE 4 575 C 460 BL 24V RD BL 24V SEE NO TE 5 RD RD TB1 RD BK PU PU PK YL PK BK PK AI1 BK BR GR BL DAT OAT BI8 AI2 AI3 AI...

Страница 36: ...Y EQUIPPED WHEN REQUIRED OR ORANGE AGND AO AI ALRM BC BCC BHS BI BLS BPSW CC CCR CFS CH CHR CHS CM COM COMP CS DFT ECON EM ES EXF GND HGRH HPS LDS LPS OAT OARH PLF PS RCCF RL RSS RVC SAT DAT SMK EMG SPCTEMP SPCRH T1 T5 TB1 2 TR1 2 XS DC GROUND FOR ANALOG SENSORS AG ON TB2 4 ANALOG OUTPUTS 8 ANALOG INPUTS ALARM BLOWER CONTACTOR BLOWER CONTACTOR COIL BLOWER HIGH SPEED 8 BINARY INPUTS BLOWER LOW SPEE...

Страница 37: ... 24VAC AI4 AI5 AI6 AI7 AI8 AI2 AI3 BK BR GR BL BL RD 24V RD RD BL BL SEE NOTE 4 YL RD PK BK GR WH RD BL BL GR GR YL BR BR WH WH 2 3 5 6 7 8 9 BK AG C PU T5 T4 T3 T2 T1 TB2 TB1 RD SEE NOTE 5 CS PS ES XS RD BK PU BL OAT HGRH EXF ALRM AGND GR AO3 AO2 AO1 COM3 8 RL7 RL6 RL5 RL4 RL3 RL2 RL1 COM1 BK 240 575 208 460 BL BL BPSW GR BK YL PK BL PK BL PK HPS LPS YL YL PK YL RD WH WH WH BK GR CO2 VOUT DC GND ...

Страница 38: ...VING SWITCH COMPRESSOR CONTACTOR COMPRESSOR 2ND STAGE SOLENOID CONDENSOR FAN CONDENSOR FAN CONTACTOR COIL CLOGGED FILTER SWITCH CRANKCASE HEATER CRANKCASE HEATER SWITCH CONDENSER MOTOR COMMON C ON TB2 COMPRESSOR DEFROST THERMOSTAT ECONOMIZER EVAPORATOR MOTOR ECON COM3 8 BI1 AND SMOKE DETECTOR EXHAUST FAN EQUIPMENT GROUND HOT GAS REHEAT HIGH PRESSURE SWITCH LOAD SHEDDING LOW PRESSURE SWITCH OUTDOOR...

Страница 39: ...AI2 AI3 BK BR GR CHS RVC BL BL RD 24V RD RD BL BL RD SEE NOTE 4 YL RD PK RD RD RD WH RD BL BL GR BK YL BR WH WH WH OR BR OR BK RD BK BK RD 2 3 5 6 7 8 9 T2 T1 L1 BL AG C PU T5 T4 T3 T2 T1 TB2 TB1 SEE NOTE 5 CS PS ES XS RD BK BL OAT HGRH EXF ALRM AGND GR AO3 AO2 AO1 COM3 8 RL7 RL6 RL5 RL4 RL3 RL2 RL1 COM1 BK BL BL 208 240 3 60 0140L06609 A GND VOUT DC OARH SPCRH STPT OFFSET GND TEMP SPCTEMP VOUT DC...

Страница 40: ... 2 COM1 RL1 RL2 COM2 COM3 8 AI3 RL3 RL4 RL5 CC RL6 CFC RL7 RL8 RVC 24VAC GND ECON PLF SMK EMG AO1 AO2 AO3 AO4 DDC BI4 2 2 208 240 3 60 208 240 3 60 SWITCH PRESS OVERCURRENT PROT DEVICE TERMINAL PLUG CONNECTION FIELD GROUND IGNITER JUNCTION INTERNAL TO INTEGRATED CONTROL SCHEMATIC SYMBOL SEE NOTE 5 HGRH EXF ALRM 0140L06610 A OARH CO2 SPC TEMP COM SENSOR OFFSET SPCRH SEE NOTE 4 CS BC1 AGND AO AI ALR...

Страница 41: ...6 RL5 RL4 RL3 RL2 RL1 COM1 BL HGRH EXF ALRM RD YL PU BK T3 T2 T1 L2 L1 BC2 RD BK BL BL OR RD BK BL BL RD BK RD WH PK BK BK L3 T3 T2 T1 L2 L1 BK RD C BK PU RD RD YL BK BK RD SEE NOTE 7 575 C 460 BL 24V RD BL 24V SEE NOTE 8 RD RD TB1 RD BK PU PU PK YL PK BK PK AI1 BK BR GR BL DAT OAT BI8 AI2 AI3 AI4 AI5 AI6 AI7 AI8 GND AGND 24VAC AGND AG C GR RD BK BL BL BL BR WH OR BR WH OR BK RD BK BL BPSW YL PK B...

Страница 42: ... BI BPSW CC CFS CH CHR CHS CM COM COMP DFT ECON EM ES EXF GND HGRH HPS LDS LPS OAT OARH PLF PS RCCF RL RSS RVC SAT DAT SMK EMG SPCTEMP SPCRH T1 T5 TB1 2 TR1 2 XS SD CS CFC TB1 T3 PM DC GROUND FOR ANALOG SENSORS AG ON TB2 4 ANALOG OUTPUTS 8 ANALOG INPUTS ALARM HIGH SPEED CONTACTOR LOW SPEED CONTACTOR 8 BINARY INPUTS BLOWER PROVING SWITCH COMPRESSOR CONTACTOR CLOGGED FILTER SWITCH CRANKCASE HEATER C...

Страница 43: ...ty service maintenance and proper unit operation Verify proper weatherproofing of all ductwork roof curbs and electrical connections Check that the flue screen is in place Check gas piping for leaks Verify gas pressure to the unit is within the range specified on the serial plate Check to ensure that all fans pulleys and wheels are secure Check for proper belt tension and alignment per installatio...

Страница 44: ...Condenser Fan Amps ELECTRICAL Total External Static Pressure Blower Wheel RPM TEMPERATURES Outdoor Air Temperature Return Air Temperature Cooling Supply Air Temperature Discharge Circuit 1 Heating Supply Air Temperature PRESSURES Gas Inlet Pressure Gas Manifold Pressure Suction Circuit 1 Suction Circuit 2 Discharge Circuit 2 Superheat Orifice System Superheat Orifice System Subcooling TXV System S...

Страница 45: ...45 THIS PAGE INTENTIONALLY LEFT BLANK ...

Страница 46: ...46 THIS PAGE INTENTIONALLY LEFT BLANK ...

Страница 47: ...47 THIS PAGE INTENTIONALLY LEFT BLANK ...

Страница 48: ...K Daikin is very interested in all product comments Please fill out the feedback form on the following link https daikincomfort com contact us You can also scan the QR code on the right to be directed to the feedback page ...

Отзывы: