


211
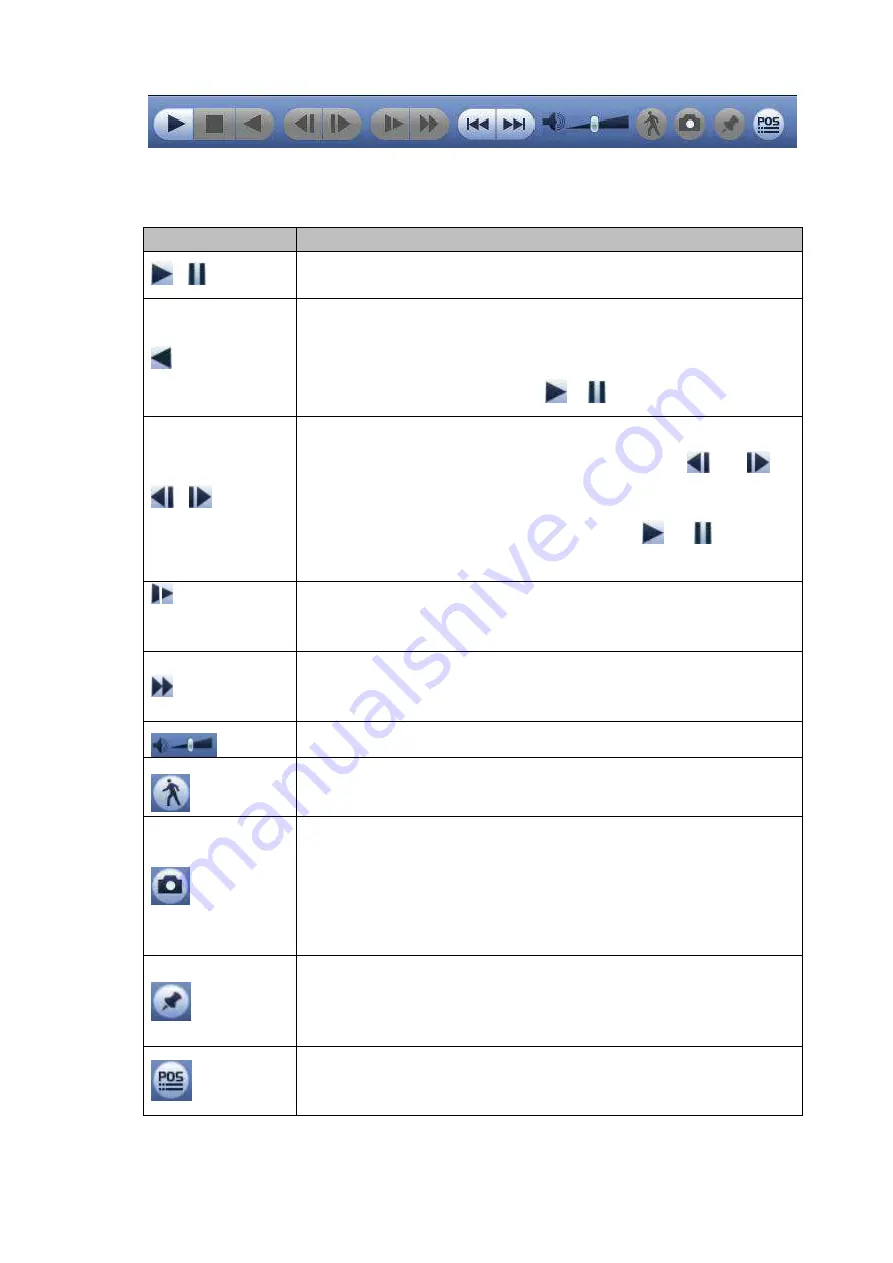
Figure 4-95
Please refer to the following sheet for more information.
Icon
Function
、
Play/Pause
In slow play mode, click it to switch between play/pause.
Backward play
In normal play mode, left click the button, the file begins backward
play. Click it again to pause current play.
In backward play mode, click
or
to restore normal play.
、
Display previous frame/next frame.
When pause the normal playback file, click
or
to
playback frame by frame.
In frame by frame playback mode, click
or
to resume
normal playback mode.
Slow play
In playback mode, click it to realize various slow play modes such as
slow play 1, slow play 2, and etc.
Fast forward
In playback mode, click to realize various fast play modes such as
fast play 1,fast play 2 and etc.
Adjust the volume of the playback
Smart search .
You can refer to chapter 4.6.3 for detailed information.
Click the snapshot button in the full-screen mode, the system can
snapshot 1 picture.
System supports custom snap picture saved path. Please connect the
peripheral device first, click snap button on the full-screen mode, you
can select or create path. Click Start button, the snapshot picture can
be saved to the specified path.
Mark button.
Please note this function is for some series product only. Please make
sure there is a mark button in the playback control pane.
You can refer to chapter 4.6.4 for detailed information.
Display/hide POS information.
In 1-channel playback mode, you can click it to display/hide POS
information on the video.
Содержание DHI-NVR5224-24P-4KS2
Страница 1: ...Network Video Recorder User s Manual V4 3 2...
Страница 136: ...124 Figure 3 5 3 6 6 NVR42N Series Please refer to Figure 3 6 for connection sample Figure 3 6...
Страница 140: ...128 Figure 3 11 3 6 12 NVR42V 8P Series Please refer to Figure 3 12 for connection sample...
Страница 141: ...129 Figure 3 12...
Страница 155: ...143 Figure 4 15 Step 2 Click device display edit interface See Figure 4 16...
Страница 218: ...206 Figure 4 93 Figure 4 94...
Страница 238: ...226 Figure 4 110 Figure 4 111 Figure 4 112...
Страница 249: ...237 Figure 4 123 Figure 4 124...
Страница 251: ...239 Figure 4 126 Click draw button to draw the zone See Figure 4 127...
Страница 255: ...243 Figure 4 130 Click Draw button to draw a zone See Figure 4 131 Figure 4 131...
Страница 260: ...248 Figure 4 136 Click draw button to draw the zone See Figure 4 137...
Страница 273: ...261 Figure 4 148 Figure 4 149...
Страница 274: ...262 Figure 4 150 Figure 4 151...
Страница 384: ...372 Figure 5 60 Figure 5 61...
Страница 385: ...373 Figure 5 62 Figure 5 63...
Страница 409: ...397 Figure 5 96 Figure 5 97...
Страница 415: ...403 Figure 5 106 5 10 4 4 Record Control The interface is shown as in Figure 5 107 Figure 5 107...