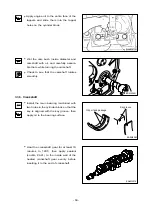
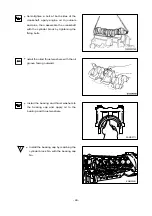
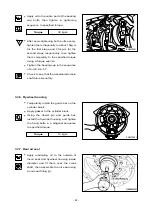
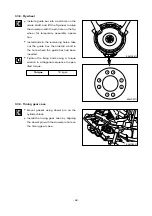
background image

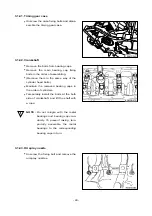
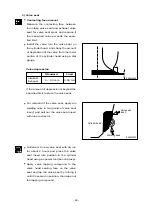
2) Wear

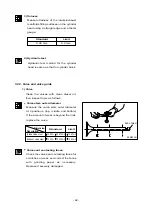
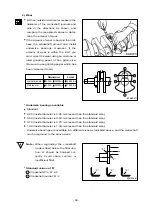
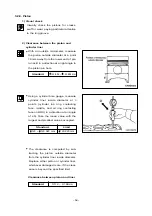
With an outside micrometer measure the

diameter of the crankshaft journals and

pins in the directions as shown, and

compare the measured values to deter-

mine the amount of wear.

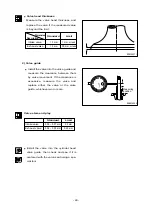
If the amount of wear is beyond the limit,

have the crankshaft ground and install

undersize bearings. However, if the

amount of wear is within the limit, you

can correct the wear using an oil stone or

oiled grinding paper of fine grain size.

(Be sure to use grinding paper which has

been immersed in oil.)

* Undersize bearings available

Standard 

0.25 (Inside diameter is 0.25 mm lesser than the standard size.)

0.50 (Inside diameter is 0.50 mm lesser than the standard size.)

0.75 (Inside diameter is 0.75 mm lesser than the standard size.)

1.00 (Inside diameter is 1.00 mm lesser than the standard size.)

Undersize bearings are available in 4 different sizes as indicated above, and the crankshaft

can be reground to the above sizes.

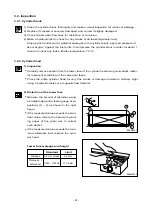
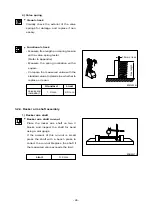
Note : When regrinding the crankshaft

as described below, the fillet sec-

tion ‘R’ should be finished cor-

rectly. Avoid sharp corners or

insufficient fillet.

* Standard values of ‘R’

Crankshaft Pin ‘R’: 4.5

Crankshaft journal ‘R’: 4

2

1

- 50 -

B

B

B

A

A

B

EFM2047I

" R "

" R "

" R "

" R "

" R "

EFM2048I

Standard

Limit

Journal diameter

95.966 ~  95.988 mm

94.966 mm

Pin diameter

82.966 ~  82.988 mm

81.966 mm

Содержание POLUS P126TI

Страница 1: ...65 99892 8051 Operation Manual GENERATOR DIESEL ENGINE DE12T POLUS P126TI...

Страница 2: ...l from cover to cover and to acquaint yourself fully with all the information contained in this manual Please contact your authorized DAEWOO dealer for the answers to any questions you may have about...

Страница 3: ...belt tension check and adjust 3 5 Lubrication system 3 11 Turbocharger 3 6 Air cleaner 3 12 Electrical equipment 4 Commissioning and operation 26 4 1 Preparation 4 4 Operation in winter 4 2 Breaking i...

Страница 4: ...ti hole type 5 hole Fuel injection pressure kg cm2 220 1st 160 2nd 220 Compression pressure kg cm2 28 at 200 rpm Condition 50Hz 60Hz 50Hz 60Hz 60Hz 1 500rpm 1 800rpm 1 500rpm 1 800rpm 1 800rpm Continu...

Страница 5: ...4 15 16 17 18 3 4 5 6 7 8 9 1 Cooling fan 2 Exhaust valve 3 Valve spring 4 Oil filter 5 Tappet 6 Push rod 7 Piston pin 8 Piston 9 Combustion chamber 10 Crankshaft pulley 11 Vibration damper 12 Oil pum...

Страница 6: ...M1003 1 2 10 11 12 3 4 5 6 7 8 9 1 Intake manifold 2 Fuel filter 3 Oil cooler 4 Injection pump 5 Cylinder block 6 Oil filter 7 Injection nozzle assembly 8 Rocker arm 9 Cylinder head cover 10 Exhaust m...

Страница 7: ...alve 7 Alternator 8 Oil pan 9 Starter 10 Flywheel housing 11 Flywheel 12 Exhaust manifold 13 Injection nozzle assembly 14 Oil filter 15 Fuel filter 16 Oil cooler 17 Intake manifold 18 Injection pipe 1...

Страница 8: ...urbocharger 5 Turbocharger 6 Oil drain valve 7 Air pipe Intercooler Intake manifold 8 Oil pan 9 Starter 10 Flywheel housing 11 Flywheel 12 Exhaust manifold 13 Injection nozzle assembly 14 Oil filter 1...

Страница 9: ...operation for the first time read the operating instructions carefully and familiarize yourself with the critical points If you are unsure ask your DAEWOO representative For reasons of safety we reco...

Страница 10: ...t be filled only when the engine is switched off Keep service products anti freeze only in containers which can not be confused with drinks containers Comply with the manufacturer s instructions when...

Страница 11: ...testing and monitoring equipment for battery charge oil pressure and coolant temperature function satisfactorily Comply with instructions for operation of the alternator See Commissioning and operatio...

Страница 12: ...ol Diesel fuel gas oil thinners or solvents as washing agents After washing apply a fatty skin cream to the skin Change oil soaked clothing and shoes Do not put oily rags into your pockets Ensure that...

Страница 13: ...gine serial No example 2 P126TI EDIGA900001 Serial No Production Year 1999 Engine Model Suffix 10 Engine Number EA8O3001 EA9O2002 DAEWOO HEAVY INDUSTRIES LTD MODEL SPEED 1500 1800 rpm STAND BY PRIME B...

Страница 14: ...gine has replaceable dry cylinder liners and individual cylinder heads with struck in valve seat rings and replaceable valve guides 3 2 2 Piston con rod crankshaft The forged crankshaft is a ingrate t...

Страница 15: ...the front end 3 4 Valves The overhead valves are actuated via chilled cast iron tappets push rods and rocker arms from the camshaft 12 EA8O3002 Injection pump gear Z 72 Water pump gear Z 29 Camshaft g...

Страница 16: ...ntly check the oil level Somewhat higher oil consumption is normal until piston rings are seated The oil level should be maintained in the safe range between the Min and Max marks on the dipstick The...

Страница 17: ...aks and repair or replace the oil filter if necessary Change the oil filter cartridge simultaneously at every replacement of engine oil 14 SAE 20 20W SAE 10W SAE 30 SAE 40 50 SAE 10W 30 SAE 5W 20 SAE...

Страница 18: ...capacity The intercooler life and performance depends on the intake air condition greatly Fouled air pollutes and clogs the air fins of intercooler As a result of this the engine output is decreased a...

Страница 19: ...delivered fuel and leak fuel from the nozzle flow through the return pipe back to the tank A strainer is arranged ahead of the fuel feed pump 1 Fuel filter 7 Delivery pipe 1a Full water drain plug 8...

Страница 20: ...tic speed sensor signal will control a wide variety of engines in an isochronous or droop mode It is designed for high reliability and built ruggedly to withstand the engine environment Simplicity of...

Страница 21: ...G OR SERVICING REFER TO PRODUCT PUBLICATION ON ON E2 E3 E1 OFF LEAD CIRCUIT SOFT COUPLING C2 STARTING FUEL ACTUATOR ACTUATOR MAGNETIC PICK UP PICK UP IDLE BATTERY AUX CW SPED TRIM CONTROL 5K CLOSE FOR...

Страница 22: ...e to two gallons of Number 2 D fuel can be used Once kerosene has been added the engine should be run for several minutes to mix the fuel 3 8 4 How to select fuel oil Fuel quality is an important fact...

Страница 23: ...Min F C Viscosity Kinematic D 445 1 3 2 4 1 9 4 1 1 8 10 CST 100 F 40 C Cloud Point F D 2500 See Note 1 See Note 1 See Note 1 Sulfur Content D 129 0 5 0 5 0 15 wt Max Carbon Residue D 524 0 15 0 35 0...

Страница 24: ...n the event of loss of coolant shut the engine down Check the coolant level of the expansion tank by removing the expansion tank filler cap and add coolant if necessary When injecting antifreeze solut...

Страница 25: ...in winter the amount of anti freeze shown in the following table should be used in accordance with the ambient temperature As the individual freezing points corresponding to the proportions of antifre...

Страница 26: ...sed through the turbine rotor of the turbocharger Air compressor impeller mounted on the same shaft draws in fresh air and delivers it at a higher pressure to the cylinders The turbocharger is natural...

Страница 27: ...avoid damage to the rectifier and regulator The alternator is maintenance free nevertheless it must be protected against dust and above all against moisture and water Operate the alternator according...

Страница 28: ...ipped in fuel and then a coat of grease should be applied again Always protect starter motor against moisture Warning Always disconnect the battery earth cable before starting work on the electrical s...

Страница 29: ...the Max and Min marks of the determined quantity on the oil level gauge Cleanliness Ensure outmost cleanliness when handling fuels lubricants and coolants 4 2 Breaking in 4 2 1 Operation of a new engi...

Страница 30: ...l as RPM decreases In addition cold oil will generally show higher oil pressure for any specific RPM than hot oil Both of these conditions reflect normal engine operation c Watch the engine water temp...

Страница 31: ...ions Abnormally high cooling water temperature could cause the overheating of engine and the sticking of cylinder components And excessively low cooling water temperature increases the fuel consumptio...

Страница 32: ...aved and more lasting results will be obtained by following a definite and thorough procedure of analysis and correction of all items affecting power and performance Economical trouble free operation...

Страница 33: ...posits and engine wear Refill and drain oil pan every 50 hours of operation or 6 months whichever occurs first At the end of the break in period 50 hours change the oil sump oil and replace the oil fi...

Страница 34: ...t the oil filler neck on the head cover and the lubricating oil in accordance with the oil capacity of the engine through oil filler Be careful about the mixing of dust or contaminator during the supp...

Страница 35: ...y Lightly oil the O ring and turn the oil filter until sealing face is fitted against the O ring Turn 1 1 4 turns further with the filter wrench Note It is strongly advisable to use DAEWOO genuine oil...

Страница 36: ...covers for filler neck and working valves If twice in a short time the water pump of an engine develops leases or the coolant is heavily contaminated dull brown mechanically contaminated grey or blac...

Страница 37: ...creased and engine malfunction is occurred So you always check whether the intake air systems like air filter element are worn or polluted Cleaning In order to maintain the heat transfer efficiency of...

Страница 38: ...filter is installed horizontally watch for top mark on cleaner bowl 5 4 2 Changing filter element Caution Do not allow dirt to get into the clean air end On removing the hexagon nut take out the dirt...

Страница 39: ...be dry before it is reinstalled Never use steam sprayers petrol gasoline alkalis or hot liquids etc to clean the filter elements Knocking out dirt by hand In emergencies when no compressed air or clea...

Страница 40: ...rning it counter clockwise with filter wrench Discard the used filter Remove the fuel filter thread adapter seal ring Use a clean lint free cloth to clean the gasket surface of the fuel filter head In...

Страница 41: ...ontaminants are water and microbial growth black slime Generally this type of contamination is the result of poor fuel handling practices Black slime requires water in the fuel to form and grow so the...

Страница 42: ...or cracks or breaks and replace if damaged Check and see if the lead seal for idling control and speed control levers have not been removed No alterations must be made to the injection pump If the lea...

Страница 43: ...replaced 5 7 Turbocharger 5 7 1 Maintenance by authorized specialist personnel The turbochargers do not call for any specific maintenance The only points to be observed are the oil pipes which should...

Страница 44: ...peration This precaution will enable any wear of the Measuring of axial clearance bearings to be detected in good time before serious damage is caused to the rotor and bearings Measuring rotor axial c...

Страница 45: ...r s piston come at the compression top dead center by turning the crankshaft adjust the valve clearances 2 Loosen the lock nuts of rocker arm adjusting screws and push the feeler gauge of specified va...

Страница 46: ...ng bolts using a screw driver until the gauge can be pulled out with some restriction 4 After the adjustment fix the adjusting bolt not to rotate and tighten the lock nut at the same time 5 Measure th...

Страница 47: ...howing the notch mark of the right figure corresponding to the injection timing is aligned with the pointer on the flywheel housing Turn the timer until the notch mark of the indicator plate attached...

Страница 48: ...tions First tighten the bolts slightly then slightly more again and finally tighten with a torque wrench Cylinder Head Bolts The tightening by excessive torque may cause the damages of the cylinder he...

Страница 49: ...le holder hole and connect the compression pressure gauge to the adapter 3 Cut off fuel circulation rotate the starter then measure compression pressure of each cylinder Testing conditions at water te...

Страница 50: ...ng a V belt tension tester 4 Measuring tension Lower indicator arm 1 into the scale Apply tester to belt at a point midway between two pulleys so that edge of contact surface 2 is flush with the V bel...

Страница 51: ...ange the V belts loosen mounting bolts 1 and lock nut 2 and push tension pulley inwards by turning adjusting nut 3 48 Tensioning forces on the tester Type Drive belt width new installation When servic...

Страница 52: ...kage for intercooler hoses clamp Intake Clean and change Exhaust the air cleaner element System Clean the inter cooler air fins Clean the turbo charger Check the leakage fuel line Clean the fuel strai...

Страница 53: ...r Replace Inspect of other parts Check valve clearance Normal Adjust Check cylinder head gasket Replace Normal Engine disassembly valve assembly piston cylinder liner etc Fuel Inspect amount of fuel N...

Страница 54: ...air Replace Repair Replace Repair Replace Repair Replace Replenish Replace Replace Damage Check cooling water pump Engine disassembly Fuel unit Inspect fuel quality Poor Clean and replace with specili...

Страница 55: ...Check injection timing Adjustment Disassemble engine or injection pump Inspect injection pipe Check Turbocharger Repair Replace Disassemble injection pump or engine Others Inspect air cleaner Clean R...

Страница 56: ...Normal Normal Normal Check cooling temperature Inspect oil quality Check oil relief valve Retighten Replace Disassemble engine Too high Refer to engine overhea Water fuel mixed in oil Disassemble engi...

Страница 57: ...re Disassemble injection pump Inspect head gasket Disassemble engine valve assembly piston cylinder liner etc Adjust Replace Adjust Adjust Check valve clearance Replace Causes according to Use Conditi...

Страница 58: ...al Retighten Replace Check compressed pressure Engine disassembly piston cylinder liner Disassemble cylinderhead valve stem seal Inspect air cleaner Clean Replace 7 Engine Knocking Inspect combustion...

Страница 59: ...Repair Replace Generator Check fan belt tension damage Normal Normal Electrolytic liquid s standard Replenish Battery room damage Replace Battery self discharge Charging Battery over charging Inspect...

Страница 60: ...nction lowered Repair or replace Fuel pipe system clogged Repair Air suction amount insufficient Clean or replace air cleaner Supercharger poor Repair or replace 2 Output insufficient Compression pres...

Страница 61: ...d crankshaft Oil supply insufficiency as clogging Clean oil passage at oil passage progresses 3 Piston piston pin Piston clearance increase as the wear Replace piston piston ring of piston and piston...

Страница 62: ...on Correct position improper Piston skirt part damaged or Replace piston abnormal wear Oil ring s oil return hole clogged Replace piston ring Oil ring s contact poor Replace piston ring 2 Oil level lo...

Страница 63: ......

Страница 64: ...0 Fax 1 973 618 2501 Daewoo Heavy Industries America Cleveland Office 4530 Renaissance Parkway Warrensville Heights OH 44128 U S A Tel 1 216 595 1212 Fax 1 216 595 1214 Daewoo Rep C O Boeing Co P O Bo...

Страница 65: ...65 99897 8050 Maintenance Manual GENERATOR DIESEL ENGINE DE12T POLUS P126TI...

Страница 66: ...INTENANCE are essential In this manual the following symbols are used to indicate the type of service operations to be per formed Removal Adjustment Installation Cleaning Disassembly Pay close attenti...

Страница 67: ...o not hesitate to contact our head office dealers or authorized service shops near by your location for any ser vices For the last the content of this maintenance instruction may be changed without no...

Страница 68: ...1 Preventive maintenance 2 3 Engine inspection 2 2 Diagnosis and remedy 3 DISASSEMBLY AND REASSEMBLY OF MAJOR COMPONENTS 28 3 1 Disassembly 3 3 Reassembly 3 2 Inspection 3 4 Breaking in 4 MAINTENANCE...

Страница 69: ...be dis carded and new ones should be prepared for installation as normal function of the parts can not be maintained if these parts are reused 7 To facilitate proper and smooth reassemble operation ke...

Страница 70: ...eries generator diesel engines discharge very low level of haz ardous exhaust gases such as smoke nitrogen oxide hydrocarbon or carbon monoxide and thus ensure high perfor mance and low fuel consumpti...

Страница 71: ...4 15 16 17 18 3 4 5 6 7 8 9 1 Cooling fan 2 Exhaust valve 3 Valve spring 4 Oil filter 5 Tappet 6 Push rod 7 Piston pin 8 Piston 9 Combustion chamber 10 Crankshaft pulley 11 Vibration damper 12 Oil pum...

Страница 72: ...M1003 1 2 10 11 12 3 4 5 6 7 8 9 1 Intake manifold 2 Fuel filter 3 Oil cooler 4 Injection pump 5 Cylinder block 6 Oil filter 7 Injection nozzle assembly 8 Rocker arm 9 Cylinder head cover 10 Exhaust m...

Страница 73: ...d cover 5 Turbocharger 6 Oil drain valve 7 Alternator 8 Oil pan 9 Starter 10 Flywheel housing 11 Flywheel 12 Exhaust manifold 13 Injection nozzle assembly 14 Oil filter 15 Fuel filter 16 Oil cooler 17...

Страница 74: ...Oil pan 9 Starter 10 Flywheel housing 11 Flywheel 12 Exhaust manifold 13 Injection nozzle assembly 14 Oil filter 15 Breather hose 16 Oil cooler 17 Intake manifold 2 P126TI 6 EA8M1005 1 2 7 6 8 9 10 14...

Страница 75: ...nozzle type Multi hole type 5 hole Multi hole type 5 hole Fuel injection pressure kg cm2 220 1st 160 2nd 220 Compression pressure kg cm2 28 at 200 rpm Condition 50Hz 60Hz 50Hz 60Hz 60Hz 1 500rpm 1 80...

Страница 76: ...er liners detail care is needed Since DE12T and POLUS P126TI generator diesel engine of DE12 series cylinder liner is dry type particularly the cooling water control should be applied thoroughly The d...

Страница 77: ...ensity after refilling with clean fresh water Amount of Anti freeze in winter 2 1 2 Fan belt Use a fan belt of specified dimensions and replace if damaged frayed or deteriorated Check the fan belt for...

Страница 78: ...ter Drain water in cartridge with loosening the cock under filter manually 6 from time to time The fuel filter should be replaced at every 1 200 hours 2 1 6 Air cleaner In case that elements are defor...

Страница 79: ...d Cleaning of intercooler fins Every 600 hours 2 1 8 Valve clearance adjust procedure After letting the 1 cylinder s piston come at the compression top dead center by turning the crankshaft adjust the...

Страница 80: ...sponding to of lower lists Adjust the valve clearance corresponding to of lower lists After reinsuring the valve clearances retighten if necessary No 1 Cylinder is located at the side where flywheel w...

Страница 81: ...n 200rpm 10 rotation 2 1 10 Injection nozzle IInstall a nozzle on the nozzle tester If the inspected injection pressure is less than the specified value adjust using the adjust ing shims Check the ato...

Страница 82: ...ctrolytic solution if less than specified value 1 12 1 28 replenish 2 1 13 Air removal of fuel system The suction room of fuel injection pump has the function of air removal continuously during the op...

Страница 83: ...d oil mixed air frequent cleaning must be done on the impellers Tear down the impeller casing attention be careful not to bend and must clean with non acid solvent solution If necessary use plastic sc...

Страница 84: ...ir Replace Inspect of other parts Check valve clearance Normal Adjust Check cylinder head gasket Replace Normal Engine disassembly valve assembly piston cylinder liner etc Fuel Inspect amount of fuel...

Страница 85: ...Replace Repair Replace Repair Replace Repair Replace Replenish Replace Replace Damage Check cooling water pump Engine disassembly Fuel unit Inspect fuel quality Poor Clean and replace with specilied...

Страница 86: ...Check injection timing Adjustment Disassemble engine or injection pump Inspect injection pipe Check Turbocharger Repair Replace Disassemble injection pump or engine Others Inspect air cleaner Clean R...

Страница 87: ...Normal Normal Normal Check cooling temperature Inspect oil quality Check oil relief valve Retighten Replace Disassemble engine Too high Refer to engine overhea Water fuel mixed in oil Disassemble engi...

Страница 88: ...re Disassemble injection pump Inspect head gasket Disassemble engine valve assembly piston cylinder liner etc Adjust Replace Adjust Adjust Check valve clearance Replace Causes according to Use Conditi...

Страница 89: ...al Retighten Replace Check compressed pressure Engine disassembly piston cylinder liner Disassemble cylinderhead valve stem seal Inspect air cleaner Clean Replace 7 Engine Knocking Inspect combustion...

Страница 90: ...Repair Replace Generator Check fan belt tension damage Normal Normal Electrolytic liquid s standard Replenish Battery room damage Replace Battery self discharge Charging Battery over charging Inspect...

Страница 91: ...s function lowered Repair or replace Fuel pipe system clogged Repair Air suction amount insufficient Clean or replace air cleaner Supercharger poor Repair or replace 2 Output insufficient Compression...

Страница 92: ...d crankshaft Oil supply insufficiency as clogging Clean oil passage at oil passage progresses 3 Piston piston pin Piston clearance increase as the wear Replace piston piston ring of piston and piston...

Страница 93: ...on Correct position improper Piston skirt part damaged or Replace piston abnormal wear Oil ring s oil return hole clogged Replace piston ring Oil ring s contact poor Replace piston ring 2 Oil level lo...

Страница 94: ...line Clean the fuel strainer of fuel feed pump Remove sediment from fuel tank Fuel Drain the water in separator System Replace the fuel filter element Check fuel Injection timing Check the injection n...

Страница 95: ...only when the original parts that the manufacture recommends to use is used the engine trouble would be preventively maintained and capable to keep up the maximum performances For the analogous parts...

Страница 96: ...revent any damage to them 3 1 2 Cooling water Remove the radiator cap Open the drain plug at the radiator lower part to drain the coolant as the right figure CAUTION When removing radiator filler cap...

Страница 97: ...Loosen the tension adjusting nut installed on the alternator bracket and take off the alternator belt 3 1 5 Cooling fan Remove the flange fixing bolts then take off the flange and cooling fan 3 1 6 Al...

Страница 98: ...ses connected to the fuel injection pump take off the bracket fixing bolts then disassemble the fuel filter 3 1 9 Breather Loosen the clamp screw to remove the rubber hose 3 1 10 Intercooler Tear down...

Страница 99: ...n the intake manifold fixing bolts then disassemble the intake manifold 3 1 13 Turbo charger Release the clamp screw of the rubber hose connected to the intake manifold and take off the intake pipes b...

Страница 100: ...f you unscrew two nuts simultaneously 3 1 15 Thermostat Remove the by pass pipe connected to the water pump unscrew the thermostat fixing bolts then disassemble the ther mostat housing Disassemble the...

Страница 101: ...attaching bolts then disassemble the injection pump NOTE As far as possible place the No 1 cylinder in OT position to disassemble the injection pump Release the pump fixing bracket bolts to disassembl...

Страница 102: ...fixing bolts and disassemble the damper from the pulley 3 1 22 Timing gear case cover Disassemble the oil seal using an oil seal removing jig Remove the cover fixing bolts and disas semble the cover...

Страница 103: ...may not be lost and keep the cover packing as assembled with the cover 3 1 26 Rocker arm assembly Unscrew the rocker arm bracket bolts and remove the rocker arm assembly Take off the snap rings to rem...

Страница 104: ...rs Take off the valves Remove and discard the valve stem seal using a general tool as it should not be re used 3 1 30 Oil cooler Remove the water pipe connected to the water pump Remove the oil pipe c...

Страница 105: ...ble the oil suction pipe assem bly Disassemble the oil pipe feeding oil from the oil pump to the cylinder block Unscrew the oil pump fixing borts and disassemble the oil pump 3 1 33 Relief valve Disas...

Страница 106: ...and keep them in the sequence of cylinder No 3 1 35 Cylinder liner Disassemble the cylinder liner using a liner puller 3 1 36 Flywheel Position the engine so that the head installing surface of the cy...

Страница 107: ...fixing bolts disas semble the flywheel housing 3 1 39 Cam shaft and tappet Remove the cam shaft gear Take off the cam shaft gear thrust washer Take out the cam shaft using care not to damage the cam...

Страница 108: ...e cylinder head bolts Maintain the removed bearing caps in the order of cylinders Temporarily install the bolts at the both side of crankshaft and lift the shaft with a rope NOTE Do not mingle with th...

Страница 109: ...ully remove carbon from the lower lace of the cylinder head using nonmetallic mater ial to prevent scratching of the valve seat faces Check the entire cylinder head for very fine cracks or damage invi...

Страница 110: ...em as follows Valve stem outer diameter Measure the valve stem outer diameter at 3 positions top middle and bottom If the amount of wear is beyond the limit replace the valve Valve seat contacting fac...

Страница 111: ...ure the valve and replace either the valve or the valve guide whichever worn more Valve stem end play Install the valve into the cylinder head valve guide then check and see if it is centered with the...

Страница 112: ...cified limit replace the valve seat For removal of the valve seat apply arc welding work to two points of valve seat insert and pull out the valve seat insert with inner extractor Undercool a new valv...

Страница 113: ...standard value to determine whether to replace or repair 3 2 4 Rocker arm shaft assembly 1 Rocker arm shaft Rocker arm shaft run out Place the rocker arm shaft on two V blocks and inspect the shaft f...

Страница 114: ...considerable amount of step wear should be replaced Diameter of the rocker arm bushing Measure the inside diameter of the rock er arm bushing with an inside microme ter or vernier calipers and compare...

Страница 115: ...ter With an outside micrometer measure the tappet outside diameter If the mea sured value is beyond the limit replace tappets Push rod run out Use a feeler gauge to measure the push rod run out Roll t...

Страница 116: ...mshaft journal and camshaft bush With an outside micrometer measure the camshaft journal diameter Measure the inside diameter of the camshaft bushing on the cylinder block using a cylinder bore indica...

Страница 117: ...With a feeler gauge measure the clear ance between the thrust plate and camshaft journal If the end play is excessive replace the thrust plate 3 2 6 Crank shaft 1 Defect check Visually check the cran...

Страница 118: ...ide diameter is 0 25 mm lesser than the standard size 0 50 Inside diameter is 0 50 mm lesser than the standard size 0 75 Inside diameter is 0 75 mm lesser than the standard size 1 00 Inside diameter i...

Страница 119: ...wear or damage 2 Oil clearance between crankshaft and bearing Main bearing clearance Install the main bearing in the cylinder block tighten the bearing cap to speci fied torque then measure the insid...

Страница 120: ...diameter with the outside diameters of crankshaft pins to determine the oil clearance If the clearance deviates from the specified range have the crankshaft journals and pins ground and install under...

Страница 121: ...g crush Install the bearing and cap in the con necting rod big end retighten the bolts to specified torque unscrew out one bolt completely then measure the clearance between the bearing cap and connec...

Страница 122: ...measure cylinder liner inside diameter at 3 points cylinder top ring contacting face middle and oil ring contacting face on BDC in a direction at an angle of 45 Take the mean value with the largest a...

Страница 123: ...r gauge Replace piston rings with new ones if the gap is beyond the limit 3 Piston ring side clearance Fit the compression ring and oil ring in the piston ring groove With a feeler gauge measure side...

Страница 124: ...between the pis ton pin and connecting rod bushing and replace either of them whichever dam aged more if the measured value is beyond the limit 3 Condition check Check the engaged condition of the pis...

Страница 125: ...easure the alignment of the connecting rod piston pin bushing holes with con necting rod big end holes At this time also use both connecting rod tester and feeler gauge 3 Wear Assemble the connecting...

Страница 126: ...after being reassembled Check the bolts for looseness after preliminary reassembly After completing the engine reassembly operation check if there is missing parts or shortage of parts Keep your hand...

Страница 127: ...shaft rotates smoothly 3 3 5 Crankshaft Install the main bearing machined with two holes in the cylinder block so that the key is aligned with the key groove then apply oil to the bearing surface Heat...

Страница 128: ...inder block by tightening the fixing bolts nstall the oiled thrust washers with the oil groove facing outward Install the bearing and thrust washers to the bearing cap and apply oil to the bearing and...

Страница 129: ...4 3 5 2 6 1 7 Check to see that the assembled crank shaft turns smoothly 3 3 6 Flywheel housing Temporarily install the guide bar on the cylinder block Apply gasket to the cylinder block Using the do...

Страница 130: ...take out the guide bar then install a bolt in the hole where the guide bar had been inserted Tighten the fixing bolts using a torque wrench in a diagonal sequence to spec ified torque 3 3 9 Timing gea...

Страница 131: ...cam gear by aligning it with camshaft key groove With the oil port on the idle gear pin fac ing the cylinder block install the idle gear pin Install the idle gear by coinciding the marks impressed on...

Страница 132: ...icating oil to the outside of the oil seal and timing gear case inside diameter and fit them over the crank shaft then assemble the oil seal using an oil seal fitting jig 3 3 14 Cylinder liner Stand t...

Страница 133: ...longer side machined with key groove on the bearing of the connecting rod big end and the mark of impressed on the inside of the piston face each other in opposite directions On the piston head surfa...

Страница 134: ...r liner and piston and slightly lift and insert the piston into the cylinder so that the ring may not be damaged by the fillet of the liner Install the bearing in the connecting rod cap and apply oil...

Страница 135: ...ief valve Assemble the relief valve 3 3 17 Oil pump and oil pipe Install a dowel pin in the No 7 bearing cap then assemble the oil pump with specified torque Assemble the oil suction pipe with the del...

Страница 136: ...marks of IN and EX impressed on the valve head before assembling the valve with the valve head With a valve stem seal fitting jig assem ble the valve stem seal with the valve guide After installing va...

Страница 137: ...pander and install it onto the special tool guider Tighten the bolts until the expander is forced out of the cylinder head bottom After mounting the nozzle tube make a hydraulic test to check for wate...

Страница 138: ...careful not to dam age the head gasket If the dowel pin is not in alignment lift the cylinder head again and then remount it Coat the head bolts with engine oil then tighten them in proper sequence to...

Страница 139: ...th adjusting screw respectively and then tighten with the lock nut As for the valve clearance adjust it when in cold as follow By cranking the engine let 6 cylinder s valves overlap In time adjust the...

Страница 140: ...cket rocker arm spring washer and snap ring in the described sequence Install the rocker arm and bracket in the same direction 3 3 23 Injection nozzle Install the dust seal with its round portion faci...

Страница 141: ...ler and cylinder block Install a connection pipe between the oil cooler and oil filter Install the oil cooler connecting pipe Install packing and assemble the car tridge using a filter wrench 3 3 26 I...

Страница 142: ...re cor responding to the injection timing is aligned with the pointer on the fly wheel housing Turn the timer until the notch mark of the indicator plate attached to the fuel injec tion pump is aligne...

Страница 143: ...lley Install the crankshaft pulley assembly on the crankshaft then tighten the bolts and thrust washers 3 3 28 Fan drive pulley Install the fan drive pulley onto the tim ing gear case cover 3 3 29 Wat...

Страница 144: ...nifold and install the heat resisting plate First install the nuts and then place an additional nut on each of them to prevent looseness 3 3 32 Turbocharger Fit a new gasket over the stud bolts of the...

Страница 145: ...efore assembling the intake manifold 3 3 35 Injection pipe Semi assemble a nut at both ends of the fuel high pressure pipe and tighten them up one by one to specified torque Tighten hollow screws to a...

Страница 146: ...f FUEL FEED PUMP FUEL FILTER FUEL INJECTION PUMP 3 3 37 Cylinder head cover Assemble the cover packing with the cover install the cover on the head then tighten the fixing bolts in sequence to specifi...

Страница 147: ...the V belt on the crank pulley alternator pulley and fan drive pulley Adjust the V belt tension using the ten sion adjusting bolt 3 3 41 Oil level gauge Assemble the oil level gauge and guide tube on...

Страница 148: ...n the safe range between the min and max marks on dipstick NOTE If you have a problem getting a good oil level reading on dipstick rotate dipstick 180 and re insert for check b Watch the oil pressure...

Страница 149: ...chamber heat goes on to the thermostat through the water pipe and circulates to the water pump if water temperature is lower than the valve opening temperature on the thermostat while circulating to...

Страница 150: ...bly sequence for reassembly operation Replace the oil seal 7 with a new one at reassembly To reassemble the impeller maintain a constant gap 0 3 0 6 mm between the impeller and pump housing using a fe...

Страница 151: ...g wide at temperature of 95 C the thermostat is normal Replacing thermostat and precautions for handling 1 Precautions for handling The wax pallet type thermostat does not react as quickly as bellows...

Страница 152: ...g into water Replace cylinder head jacket due to broken cyli gasket nder head gasket 2 Engine overcooling Thermostat inoperative Replace thermostat Ambient temperature Install radiator curtain too low...

Страница 153: ...system 85 Item Specifications Item Specifications Lubricating system Forced pressure Oil filter type Full flow circulation Oil pump type Gear type Bypass for filter element Relief valve opening press...

Страница 154: ...pump cover is fixed with the two dowel pins 3 Disassemble the drive gear and dri ven gear Inspection and correction 1 With steel rule and feeler gauge mea sure the axial end play of the oil pump gear...

Страница 155: ...the clearance between the bushing and shaft and compare the measured value with the standard value to determine whether to replace or not Reassembly 1 For reassembly reverse the disassembly sequence...

Страница 156: ...Valve guide oil seals or valve Replace guides or valve stem worn 2 Oil pressure too low Poor oil Use suggested oil Relief valve sticking Replace Restrictions in oil pump Clean strainer strainer Oil p...

Страница 157: ...pipes and hoses necessary to connect those components 2 3 8 9 4 7 12 10 11 5 1 EA8O3004 1 Fuel filter 1a Fuel water drain plug 2 Air bleeding screw for fuel filter 3 Injection nozzle 4 Overflow tube...

Страница 158: ...out timer Plunger 12 right hand helix 30 lead Delivery valve 120 mm3 st 8 x 2 4mm Fuel feed pump NP FP K P 105207 1400 Pre stroke 4 7 mm 2 Nozzle holder assembly 65 10101 7300 105160 4351 3 Nozzle 65...

Страница 159: ...8 Governor adjustment 91 over 14 Rack limit EA8M4001 11 0 10 8 6 5 6 4 250 400 20 0 _ 45 0 Idle spring Set 6 5 0 mm 10 0 5 900 5 _ B D C A PUMP SPEED rpm RACK POSITION mm...

Страница 160: ...ion order 1 5 3 6 2 4 6 Injection timing BTDC 12 92 A Test condition Nozzle Holder Ass y 105780 8130 Opening pressure 175 kg cm2 for injection pump Injection pipe ID OD L 3 0 x 8 0 600 mm Test oil ISO...

Страница 161: ...4 3 3 Governor system P126TI Governor system for fuel injection pump consists of Integral Actuator and Speed Control Unit 1 Integral Actuator Side View Top View 93...

Страница 162: ...21 N m 16 flat washer 2 17 lock washer 2 18 nut 2 7 9 N m 19 threaded bolt part of bearing kit 2 20 actuator spring 1 21 gasket lower cover 1 22 lower cover 1 23 washer 8 24 allen screw 6 2 0 3 0 N m...

Страница 163: ...st in the design Non interacting perfor mance controls allow near optimum response to be easily obtained The primary features of the ESD5550 Series speed control unit are the engine STARTING FUEL and...

Страница 164: ...ation Droop Adj Max K L Jumpered 400 Hz 75 Hz per 1 0 A change Droop Adj Min K L Jumpered 15 Hz 6 Hz per 1 0 A change Speed Trim Range 200 HZ Remote Variable Speed Range 500 7 5 Hz or any part thereof...

Страница 165: ...ALLING OR SERVICING REFER TO PRODUCT PUBLICATION ON ON E2 E3 E1 OFF LEAD CIRCUIT SOFT COUPLING C2 STARTING FUEL ACTUATOR ACTUATOR MAGNETIC PICK UP PICK UP IDLE BATTERY AUX CW SPED TRIM CONTROL 5K CLOS...

Страница 166: ...electrical connections are illustrated above Actuator and battery connections to Terminals A B E and F should be 16 AWG 1 3 mm2 or larger Long cables require an increased wire size to minimize voltage...

Страница 167: ...Battery supply voltage 12 or 24 VDC 2 C D 1 0 VAC RMS min while cranking 3 P G 10 VDC Internal Supply 4 F A 1 0 2 0 VDC while cranking Probable Cause Of Abnorma Reading 1 DC battery power not connect...

Страница 168: ...d control unit defective If actuator at minimum fuel position erroneous speed signal Check speed sensor data 1 If the voltage reading is 1 0 to 2 0 VDC a SPEED adjustment set above desired speed b Def...

Страница 169: ...tappet via the camshaft of injection pump and performs reciprocating operation to control the suction and delivery of fuel When the cam reaches the Bottom Dead Center as shown in the figure the fuel i...

Страница 170: ...ion air must be bled from the fuel lines When using the priming pump fix it securely to prevent the possible entry of moisture or other for eign substances in the inside of feed pump In addition a str...

Страница 171: ...g then take off the tappet 10 and push rod 1 3 Inspection If the check valve is damaged or scored on its seat face replace it with a new one Inspect the piston and tappet for damage Replace the push r...

Страница 172: ...ed for 40 seconds or so 2 Delivery test Make a test with the feed pump mounted on a pump tester as illustrated Operate the pump at the rate of 1 000 rpm and check to see if the pump delivery is more t...

Страница 173: ...chamber past the injection nozzle at proper spray pressure and spray angle then burnt completely to achieve effective engine performance 2 1 spring type 1 Disassembly 1 Cap nut 2 Adjusting screw 3 Spr...

Страница 174: ...ened operate the nozzle 2 3 times to bleed it Operate the nozzle tester lever at the specified rate Adjust the injection pressure to the stan dard pressure using the adjusting screw After adjusting th...

Страница 175: ...4 16 31 30 7 6 4 3 17 1 EQM4029I 1 Nozzle holder body 2 Push rod 3 Primary spring 4 Adjusting screw 6 Gasket 7 Cap nut 10 Adjusting shim 11 Scondary spring 12 Spring Seat 13 Lift pin 14 Pin 15 Spacer...

Страница 176: ...onto a vise b With the nut install the two pins on the plate c Install the nozzle holder body 1 onto the plate with the cap nut side facing downward d Assemble adjusting shim 10 secondary spring 11 a...

Страница 177: ...e cap nut keep checking to see if the lock pin comes all the way into the nozzle Note Tighten the retaining nut until it resists hand tightening then fur ther tighten it using a torque wrench h Be sur...

Страница 178: ...ng screw l Assemble the nozzle and nozzle holder assembly to the nozzle tester 105785 1010 m Adjust the primary opening pressure to the specified pressure using the adjusting screw 4 n With a monkey w...

Страница 179: ...the nozzle holder on the plate with the cap nut facing upward c Install the holder into the cap nut d Install a nut 157892 1000 SW 17mm on the holder e Assemble the pin 157892 4200 or 157892 4300 to t...

Страница 180: ...g Assemble the nozzle and nozzle holder assembly to the nozzle tester and zero the dial gauge h Operate the nozzle tester bleed the retain ing nut and check for fuel leakage I Operate the nozzle test...

Страница 181: ...edle valve puts an end to descent the position of needle valve lift value as shown in the above and right figures and check that the value is with in the specified limit Measuring point for pre lift T...

Страница 182: ...alve b Release the nozzle tester handle to decrease the tester pressure then take a note of the movements of the dial gauge c Take the indicated value on the pressure gauge at the point of time when t...

Страница 183: ...is higher than the standard value In a reverse manner readjust the primary opening pressure down to the bottom limit of the standard value b If the secondary opening pressure still deviates from the...

Страница 184: ...pray patterns oil tightness of seat portion and oil leakage from each part b When replacing the nozzle replace it with a new nozzle service kit integrated with a nozzle lift piece and spacer as a comp...

Страница 185: ...nozzle and needle valve 3 Injection pressure incorrect Adjust 2 Engine starts but 1 Pipe from feed pump to injection pump Clean stalls immediately clogged or filter clogged 2 Air in fuel Bleed 3 Feed...

Страница 186: ...s defective Disassemble correct 7 Injection starting pressure of each barrel Adjust incorrect Disassemble correct 8 Automatic timer defective Disassemble correct 7 Engine does not reach 1 Nozzles not...

Страница 187: ...t Approx 1 257 kg cm2 Approx 1 9 kg cm2 At maximum output Air suction volume Approx 19 0m3 min Approx 26 0m3 min Speed of turbine revolution Approx 95 00 rpm Approx 91 000rpm Maximum allowable speed 1...

Страница 188: ...ollar 27 Compressor wheel 7 V band 18 Screw 28 Nut 8 Wheel 19 Thrust bearing 29 Bolt 9 Piston ring 20 Thrust space 30 Clamp 10 Wheel shroud 21 Piston ring 31 Compressor housing 11 Center housing 22 Se...

Страница 189: ...e turbine shaft can get rotating force This is the operating principle of turbine which is mounted with seal rings and heat protector to prevent exhaust gas from affecting the bearings adversely 2 Com...

Страница 190: ...8kg cm2 2 If unusual sound or vibration is heard or felt reduce engine revo lutions slowly and locate the cause 1 Run the engine at idle for 5 min utes before stopping 2 Abrupt starting of the engine...

Страница 191: ...s from discharge pipes turbocharger fixing portions etc lowers charging effect As such components as turbine chamber that becomes red hot during operation use heat resisting steel nuts do not intercha...

Страница 192: ...owly If a high pitch sound is heard con tinuously it means that the rotor assembly is not normal In this case as the metal bearing and rotor are likely to be in abnormal conditions the turbocharger sh...

Страница 193: ...entering the inside of the turbocharger 1 Lubricating system Before reassembling the turbocharger onto the engine inject new oil in the oil inlet port and lubricate the journal and thrust bearings by...

Страница 194: ...eplace 5 Turbine blades and compressor blades Disassemble repair or replace coming in contact with each other or damaged 6 Exhaust piping deformed or clogged Check and correct 2 Excessive white 1 Oil...

Страница 195: ...tration 1 Nozzle tube Insert ass y DPN 5337 2 Valve stern oil seal installer EF 123 082 3 Injection pump setting ass y EF 123 015 4 Oil seal insert ass y FR EF 123 127 5 Oil seal insert ass y RR EF 12...

Страница 196: ...Oil seal puller ass y RR EF 123 048 8 Cylinder pressure tester EU 2 0531 adapter 9 Cylinder liner puller ass y EU 123 087 10 Valve stem seal punch EF 123 066 11 Valve clearance adjust ass y EU 2 0131...

Страница 197: ...129 No Description Part No Illustration 13 Crankshaft gear punch EU 2 0647 14 Feeler gauge 60 99901 0027 15 Snap ring plier T7610001E 16 Piston ring plier T7621010E...

Страница 198: ...bolt M14 x 1 5 12 9T 28 0 kg m Crankshaft main bearing cap bolt M16 x 1 5 12 9T 30 0 kg m Balance weight fixing bolt M14 x 1 5 10 9T 9 0 kg m Flywheel fixing bolt M14 x 1 5 10 9T 18 0 kg m Crankshaft...

Страница 199: ...0 8 30 7 50 11 10 12 50 13 00 18 50 22 00 M16 5 60 6 00 9 00 8 00 11 50 10 50 17 90 18 50 18 00 26 00 31 00 M6x1 5 6 20 6 50 9 70 8 60 12 50 11 30 17 00 19 50 20 00 28 00 33 00 M18 7 80 8 30 12 50 11...

Страница 200: ...m from the lower side 122 854 122 886 Clearance between piston and liner 0 114 0 169 Piston Tor ring 3 5 Width of piston ring 2nd ring 3 060 3 080 Replace piston if groove width grooves Oil ring 4 040...

Страница 201: ...bearing cap bolt kg m 30 Apply oil to bolt moving Journal bearing crush 0 15 0 25 parts Oil seal for wear Replace oil seal if oil leaking Replace with new one use shim Clearance between conn bearing c...

Страница 202: ...04 0 07 0 2 stem valve head Exhaust 0 06 0 09 0 25 Replace Clearance between valve guide cyl head installing hole 0 01 0 39 Apply oil to valve guide and press in Clearance between valve Intake 22 Valv...

Страница 203: ...le oil temperature in short time C 120 not allowable Axial play of oil pump gear 0 055 0 105 Replace gear or cover Clearance between gear shaft oil pump over hole 0 032 0 068 Clearance between drive g...

Страница 204: ...ing temp Thermostat under atmospheric pressure C 83 Replace if defective Full opening temp C 95 or lower Stroke minimum 8mm Piping Fuel pipe injection pipe Nozzle holder for Correct or replace and the...

Страница 205: ...973 618 2501 Daewoo Heavy Industries America Cleveland Office 4530 Renaissance Parkway Warrensville Heights OH 44128 U S A Tel 1 216 595 1212 Fax 1 216 595 1214 Daewoo Rep C O Boeing Co P O Box 3707...

Отзывы: