www.daewoopower.bg
8
EN
www.daewoopower.bg
8
EN
24
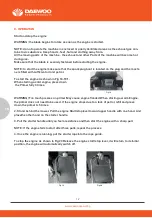
7. ASSEMBLY
Assembling the handle
1. Fasten the lower handle toThe device by using
two bolts andtwo small knobs on each side as
shown in Fig 2.
46cm cutting witch has one knob on each side)
2.Unfold the upper handle and fix it to lower
handleby using the big knobs and the
blots on each sideas shown in Fig3
NOTE: Make sure the rope guide is on the right
handle, when you stand behind the mower.
Fasten the connection cord with clip
As shown in Fig 4Fix the connection cord
to the lower handle With the cord clip .(supplied)
Assembling the grass bag onto the mower
As shown in Fig 6
1.Lift the rear discharge cover with one hand
andhook in the grass bag.2.Release the rear
discharge cover to secure thegrass bag in position.
Assembling the mulching plug (Fig 8)
1. Remove the grass bag
2. Push the plastic mulchingplug
(Fig 8) into the dischargechute (Fig 9) until it is locked inplace.
(Please pay attention to thelock when assembling.
3. Then release the flap(Fig 10),
it will close Back to cover themulching plug.
Assembling the side discharge chute As shown in Fig 11
Fig 2
Fig 3
Fig 4
Fig 6
Fig 8
Fig 9
Fig 10
7. ASSEMBLY
Assembling the handle
1. Fasten the lower handle toThe device by using
two bolts andtwo small knobs on each side as
shown in Fig 2.
46cm cutting witch has one knob on each side)
2.Unfold the upper handle and fix it to lower
handleby using the big knobs and the
blots on each sideas shown in Fig3
NOTE: Make sure the rope guide is on the right
handle, when you stand behind the mower.
Fasten the connection cord with clip
As shown in Fig 4Fix the connection cord
to the lower handle With the cord clip .(supplied)
Assembling the grass bag onto the mower
As shown in Fig 6
1.Lift the rear discharge cover with one hand
andhook in the grass bag.2.Release the rear
discharge cover to secure thegrass bag in position.
Assembling the mulching plug (Fig 8)
1. Remove the grass bag
2. Push the plastic mulchingplug
(Fig 8) into the dischargechute (Fig 9) until it is locked inplace.
(Please pay attention to thelock when assembling.
3. Then release the flap(Fig 10),
it will close Back to cover themulching plug.
Assembling the side discharge chute As shown in Fig 11
clean the blade and the deck.
9. Do not remove grass debris in the mower casing or on the blade by hand orwith your feet. Instead
use suitable tools such as a brush or broom.
Emptying the grass bag
As soon as grass clippings start to trail the lawn mower, it is time to empty the
grass bag.
NOTE: Before taking off the grass bag, switch off the engine and wait untilthe blade has come to a
stop.
1. To take off the grass bag, use one hand to lift up ejector flap and the other to grab onto the carry
handle. The ejector flap automatically falls down after removing the grass bag and closes off the
rear chute opening.
2. Empty the grass debris in the grass bag, and refit grass Bag.
NOTE: If any grass residue is caught in the discharge chute, clean it using a brush. Do not remove
grass debris in the mower casing or on the blade by hand or with your feet. Instead use suitable
tools such as a brush or broom. To ensure that the cut grass can be collected into grass Bag, the
discharge opening and inside the mower casing must be cleared of any blockage.
10. STORING AND MAINTENANCE
WARNING : Before performing any maintenance or cleaning work, switch Off the engine and wait
until the blade has come to a stop.
Cleaning
General cleaning
The lawn mower should be cleaned thoroughly every time after it has been used. Always clean your
lawnmower immediately after use. Do not allow grass cuttings and other debris to become dry and
hard on any of the mower surfaces. Dried grass remnants and dirt may impair the mowing opera-
tion. Check that the grass chute is free of any residual grass. Remove any such residue. Check the
underside of the lawn mower and the blade mount. for this purpose ,tilt the Lawn mower onto its left
side (opposite the oil filler neck)
NOTE: Before placing the lawn mower on its side , fully drain the fuel tank using a petrol extraction
pump. Do not tilt the lawn mower by more than 90 degrees.
Maintenance of the spark plug.
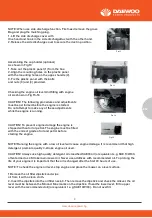
As shown in Fig 22
1. Once the engine has cooled, pull off the spark plugwith a twist.
2. Remove the spark plug using a spark plug wrench3.Clean the spark plug with a wire brush (not
supplied ).4.Using a feeler gauge set the gap to 0.75mm
5. Install the spark plug carefully by hand to avoid cross-threading.
6. After the spark plug is seated tighten with thespanner to compress the washer.
How to Service the Air Filter As shown in Fig 23Soiled air filters reduce the engine output by supply
too little air to the carburetor. if the air contains a lot of dust , the air filter should be checked more
frequently.
Содержание DLM4600SPL
Страница 19: ...www daewoopower bg 19 BG 1 20 2 21 3 22 4 22 5 22 6 23 7 25 8 27 9 28 10 30 11 33 12 34 13 41...
Страница 40: ...www daewoopower bg 40 BG 10 6 M5x30 10 6 M5x30...
Страница 43: ...www daewoopower bg 43 BG 24 6 6 12 6...
Страница 44: ...www daewoopower bg 44 BG 1 1 2022 6 6...
Страница 45: ...www daewoopower bg 45 BG...
Страница 46: ...www daewoopower bg 1784 1 51 359 2 81 77 600 359 2 81 77 601...

