www.daewoopower.bg
2
EN
INDEX
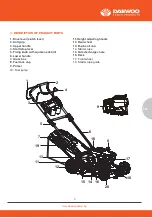
1. DESCRIPTION OF PRODUCT PARTS
.................................................................................................. 19
2. TECHNICAL SPECIFICATIONS
............................................................................................................ 20
3. INTENDED USE
..................................................................................................................................... 20
4. SAFETY INFORMATION
....................................................................................................................... 20
5. WARNING SYMBOLS ON THE MACHINE
........................................................................................... 21
6. SAFETY INSTRUCTIONS
..................................................................................................................... 22
7. ASSEMBLY
............................................................................................................................................. 24
8. ADJUSTMENT
...................................................................................................................................... 27
9. OPERATION
.......................................................................................................................................... 28
10. STORING AND MAINTENANCE
........................................................................................................ 30
11. TROUBLESHOOTING
......................................................................................................................... 33
WARRANTY
............................................................................................................................................... 35
1
3
4
4
4
5
6
8
11
12
14
17
3
Warning! The lawnmower exhaust gas contains toxic substances, Do not start or run
6.For wheeled rotary machines, mow across the face of slopes, never up anddown;
7.Exercise extreme caution when changing direction on slopes;
8.Do not mow excessively steep slopes;
9.Use extreme caution when reversing or pulling the lawnmower towards you;10.Stop the blade(s) if
the lawnmower has to be tilted for transportation when
crossing surfaces other than grass, and when transporting the lawnmower toand from the area to
be mowed;
11. Never operate the lawnmower with defective guards, or without safetydevices, for example
deflectors and/or grass catchers, in place;
12. Do not change the engine governor settings or over speed the engine;13.Disengage all blade
and drive clutches before starting the engine;14.Start the engine or switch on the motor carefully
according to instructions
and with feet well away from the blade(s);
15. Do not tilt the lawnmower when starting the engine or switching on the motor,except if the lawn-
mower has to be tilted for starting. In this case, do not tilt itmore than absolutely necessary and lift
only the part which is away from theoperator;
16. Do not start the engine when standing in front of the discharge chute;17.Do not put hands or feet
near or under rotating parts. Keep clear of the
discharge opening at all times;
18.Never pick up or carry a lawnmower while the engine is running;19.Stop the engine and discon-
nect the spark plug wire , make sure that all
moving parts have come to a complete stop and, where a key is fitted removethe key:
-Before clearing blockages or unclogging chute;
-Before checking, cleaning or working on the lawnmower;
-After striking a foreign object. Inspect the lawnmower for damage and makerepairs before restar-
ting and operating the lawnmower;
-If lawnmower starts to vibrate abnormally (check immediately);
20. Stop the engine and disconnect the spark plug wire, make sure that allmoving parts have come
to a complete stop and, where a key is fitted removethe key:
-Whenever you leave the lawnmower;
-Before refueling;
21. Reduce the throttle setting during engine shut down and, if the engine isprovided with a shut-off
valve, turn the fuel off at the conclusion of mowing;
22. Go slow when using a trailing seat.
Maintenance and storage
1. Keep all nuts, bolts and screws tight to be sure the equipment is in safeworking condition;
2. Never store the equipment with petrol in the tank inside a building wherefumes can reach an open
flame or spark;
3. Allow the engine to cool before storing in any enclosure;
4. To reduce the fire hazard, keep the engine, silencer, battery compartment andpetrol storage area
free of grass, leaves, or excessive grease;
5. Check the grass catcher frequently for wear or deterioration;6.Replace worn or damaged parts
for safety;
7. If the fuel tank has to be drained, this should be done outdoors.
IMPORTANT
Please read these instructions fully before assembling and operating. Description Of Symbols
Symbols are used in this manual to attract your attention to possible risks. The safety symbols and
the explications which accompany them must be perfectly understood. The warning themselves do
not prevent the risks and cannot be a substitute for proper methods of avoiding accidents.
7. ASSEMBLY
Assembling the handle
1. Fasten the lower handle toThe device by using
two bolts andtwo small knobs on each side as
shown in Fig 2.
46cm cutting witch has one knob on each side)
2.Unfold the upper handle and fix it to lower
handleby using the big knobs and the
blots on each sideas shown in Fig3
NOTE: Make sure the rope guide is on the right
handle, when you stand behind the mower.
Fasten the connection cord with clip
As shown in Fig 4Fix the connection cord
to the lower handle With the cord clip .(supplied)
Assembling the grass bag onto the mower
As shown in Fig 6
1.Lift the rear discharge cover with one hand
andhook in the grass bag.2.Release the rear
discharge cover to secure thegrass bag in position.
Assembling the mulching plug (Fig 8)
1. Remove the grass bag
2. Push the plastic mulchingplug
misuse. The user/operator and not the Manufacturer will be liable for any damage or injuries of any
kind caused as a result of this
Please note that our equipment has not been designed for use in commercial , trade or industrial
applications . our warranty will be voided if the machine is used in commercial , trade or industrial
businesses or for equivalent purposes.
4. SAFETY INFORMATION
IMPORTANT
Please read these instructions fully before assembling and operating. Description Of Symbols
Symbols are used in this manual to attract your attention to possible risks. The safety symbols and
the explications which accompany them must be perfectly understood. The warning themselves do
not prevent the risks and cannot be a substitute for proper methods of avoiding accidents.
7. ASSEMBLY
Assembling the handle
1. Fasten the lower handle toThe device by using
two bolts andtwo small knobs on each side as
shown in Fig 2.
46cm cutting witch has one knob on each side)
2.Unfold the upper handle and fix it to lower
handleby using the big knobs and the
blots on each sideas shown in Fig3
NOTE: Make sure the rope guide is on the right
handle, when you stand behind the mower.
Fasten the connection cord with clip
As shown in Fig 4Fix the connection cord
to the lower handle With the cord clip .(supplied)
Assembling the grass bag onto the mower
As shown in Fig 6
1.Lift the rear discharge cover with one hand
andhook in the grass bag.2.Release the rear
discharge cover to secure thegrass bag in position.
Assembling the mulching plug (Fig 8)
1. Remove the grass bag
2. Push the plastic mulchingplug
(Fig 8) into the dischargechute (Fig 9) until it is locked inplace.
(Please pay attention to thelock when assembling.
3. Then release the flap(Fig 10),
it will close Back to cover themulching plug.
4. SAFETY INFORMATION
IMPORTANT
Please read these instructions fully before assembling and operating. Description Of Symbols
Symbols are used in this manual to attract your attention to possible risks. The safety symbols and
the explications which accompany them must be perfectly understood. The warning themselves do
not prevent the risks and cannot be a substitute for proper methods of avoiding accidents.
7. ASSEMBLY
Assembling the handle
1. Fasten the lower handle toThe device by using
two bolts andtwo small knobs on each side as
shown in Fig 2.
46cm cutting witch has one knob on each side)
2.Unfold the upper handle and fix it to lower
handleby using the big knobs and the
blots on each sideas shown in Fig3
NOTE: Make sure the rope guide is on the right
handle, when you stand behind the mower.
Fasten the connection cord with clip
As shown in Fig 4Fix the connection cord
to the lower handle With the cord clip .(supplied)
Assembling the grass bag onto the mower
As shown in Fig 6
1.Lift the rear discharge cover with one hand
andhook in the grass bag.2.Release the rear
discharge cover to secure thegrass bag in position.
Assembling the mulching plug (Fig 8)
1. Remove the grass bag
Checking the engine oil level And filling with engine
oil As shown in Fig 15-16
CAUTION! The following procedures and adjustments
must be performed before the engine is started.
Do not attempt to make any of these adjustments
while the engine is running.
CAUTION! To prevent engine damage the engine is
shipped without oil or petrol. The engine must be filled
with the correct grade of oil and petrol before
starting the engine.
NOTE! Running the engine with a low oil level will cause engine damage. It is recommend that high
detergent, premium quality 4-stroke engine oil used.
CAUTION! Always use high quality detergent oil classified SAE30 oil (or equivalent e. g SAE 10W/30,
often termed as 4 Stroke lawn mower oil. Never use additives with recommended oil. To prolong the
life of your engine it is important that the oil is changed after the first 20 hours of use.
NOTE: To check the engine oil level, stop engine and place the mower on a level surface.
1.Remove the oil filler dipstick and wipe
oil from it with a clean cloth.
2. Insert the dipstick into the oil filler neck,3. Then remove the dipstick and check the oillevel. the oil
level must be between theMin and Max marks on the dipstick. If nearthe lower level, fill to upper
lever with the recommended oil((or equivalent t e. g SAE 10W/30). Do not overfill.
To clean a flooded engine
IMPORTANT
Please read these instructions fully before assembling and operating. Description Of Symbols
Symbols are used in this manual to attract your attention to possible risks. The safety symbols and
the explications which accompany them must be perfectly understood. The warning themselves do
not prevent the risks and cannot be a substitute for proper methods of avoiding accidents.
7. ASSEMBLY
Assembling the handle
1. Fasten the lower handle toThe device by using
two bolts andtwo small knobs on each side as
shown in Fig 2.
46cm cutting witch has one knob on each side)
2.Unfold the upper handle and fix it to lower
handleby using the big knobs and the
blots on each sideas shown in Fig3
NOTE: Make sure the rope guide is on the right
handle, when you stand behind the mower.
Fasten the connection cord with clip
As shown in Fig 4Fix the connection cord
to the lower handle With the cord clip .(supplied)
Assembling the grass bag onto the mower
As shown in Fig 6
1.Lift the rear discharge cover with one hand
andhook in the grass bag.2.Release the rear
discharge cover to secure thegrass bag in position.
Assembling the mulching plug (Fig 8)
1. Remove the grass bag
2. Push the plastic mulchingplug
(Fig 8) into the dischargechute (Fig 9) until it is locked inplace.
(Please pay attention to thelock when assembling.
3. Then release the flap(Fig 10),
it will close Back to cover themulching plug.
Assembling the side discharge chute As shown in Fig 11
Содержание DLM4600SPL
Страница 19: ...www daewoopower bg 19 BG 1 20 2 21 3 22 4 22 5 22 6 23 7 25 8 27 9 28 10 30 11 33 12 34 13 41...
Страница 40: ...www daewoopower bg 40 BG 10 6 M5x30 10 6 M5x30...
Страница 43: ...www daewoopower bg 43 BG 24 6 6 12 6...
Страница 44: ...www daewoopower bg 44 BG 1 1 2022 6 6...
Страница 45: ...www daewoopower bg 45 BG...
Страница 46: ...www daewoopower bg 1784 1 51 359 2 81 77 600 359 2 81 77 601...

