Warning! The lawnmower exhaust gas contains toxic substances, Do not start or run
engine indoors or in an enclosed area, even if windows and doors are open.
Conforms to relevant safety standards
Waste electrical products should not be disposed of with household waste.
Please recycle where facilities exist. Check your local authority or retailer for
recycling advice.
6. SAFETY INSTRUCTIONS
Training
1. Read the instructions carefully. Be familiar with the controls and the properuse of the equipment;
2. Never allow children or people unfamiliar with these instructions to use thelawnmower. Local
regulations can restrict the age of the operator;
3. Never mow while people, especially children, or pets are nearby;4.Keep in mind that the operator
or user is responsible for accidents or
hazards occurring to other people or their property.
Preparation
1. While mowing, always wear substantial footwear and long trousers. Do notoperate the equipment
when barefoot or wearing open sandals;
2. Thoroughly inspect the area where the equipment is to be used and removeall objects which can
be thrown by the machine;
3. Warning - petrol is highly flammable.
-Store fuel in containers specifically designed for this purpose;
-Refuel outdoors only and do not smoke while refueling;
-Add fuel before starting the engine. Never remove the cap of the fuel tank oradd petrol while the
engine is running or when the engine is hot;
-If petrol is spilled, do not attempt to start the engine but move the machineaway from the area of
spillage and avoid creating any source of ignition untilpetrol vapour have dissipated;
-Replace all fuel tank and container caps securely;4.Replace faulty silencers;
5. Before using, always visually inspect to see that the blades, blade bolts andcutter assembly are
not worn or damaged. Replace worn or damaged bladesand bolts in sets to preserve balance;
6. On multi-bladed machines, take care as rotating one blade can cause otherblades to rotate.
Operation
1.Do not operate the engine in a confined space where dangerous carbonmonoxide fumes can
collect;
2.Mow only in daylight or in good artificial light;
3.Avoid operating the equipment in wet grass, where feasible;
4.Always be sure of your footing on slopes;
5.Walk, never run;
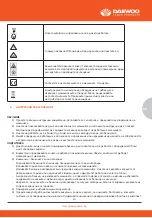
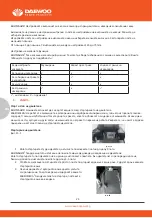
WARING- To reduce the risk of injury , user must read instruction manual.
This symbol, before a safety comment, indicates a precaution, a warning or a danger.
Ignoring this warning can lead to an accident for yourself or for others.
To limit the risk of injury, fire or electrocution always apply the recommendations
Beware of sharp blades –remove spark plug lead before maintenance.
Risk of injury . do not open or remove safety shields while engine is running.
Wearing ear protection , eye protection when operating.
engine indoors or in an enclosed area, even if windows and doors are open.
Conforms to relevant safety standards
Waste electrical products should not be disposed of with household waste.
Please recycle where facilities exist. Check your local authority or retailer for
recycling advice.
6. SAFETY INSTRUCTIONS
Training
1. Read the instructions carefully. Be familiar with the controls and the properuse of the equipment;
2. Never allow children or people unfamiliar with these instructions to use thelawnmower. Local
regulations can restrict the age of the operator;
3. Never mow while people, especially children, or pets are nearby;4.Keep in mind that the operator
or user is responsible for accidents or
hazards occurring to other people or their property.
Preparation
1. While mowing, always wear substantial footwear and long trousers. Do notoperate the equipment
when barefoot or wearing open sandals;
2. Thoroughly inspect the area where the equipment is to be used and removeall objects which can
be thrown by the machine;
3. Warning - petrol is highly flammable.
-Store fuel in containers specifically designed for this purpose;
-Refuel outdoors only and do not smoke while refueling;
-Add fuel before starting the engine. Never remove the cap of the fuel tank oradd petrol while the
engine is running or when the engine is hot;
-If petrol is spilled, do not attempt to start the engine but move the machineaway from the area of
spillage and avoid creating any source of ignition untilpetrol vapour have dissipated;
-Replace all fuel tank and container caps securely;4.Replace faulty silencers;
5. Before using, always visually inspect to see that the blades, blade bolts andcutter assembly are
not worn or damaged. Replace worn or damaged bladesand bolts in sets to preserve balance;
6. On multi-bladed machines, take care as rotating one blade can cause otherblades to rotate.
Operation
1.Do not operate the engine in a confined space where dangerous carbonmonoxide fumes can
collect;
2.Mow only in daylight or in good artificial light;
3.Avoid operating the equipment in wet grass, where feasible;
4.Always be sure of your footing on slopes;
5.Walk, never run;
NOTE: When use side discharge function. First need remove the grass
Wipe away any spilt oil.)
Warning! The lawnmower exhaust gas contains toxic substances, Do not start or run
engine indoors or in an enclosed area, even if windows and doors are open.
Conforms to relevant safety standards
Waste electrical products should not be disposed of with household waste.
Please recycle where facilities exist. Check your local authority or retailer for
recycling advice.
6. SAFETY INSTRUCTIONS
Training
1. Read the instructions carefully. Be familiar with the controls and the properuse of the equipment;
2. Never allow children or people unfamiliar with these instructions to use thelawnmower. Local
regulations can restrict the age of the operator;
3. Never mow while people, especially children, or pets are nearby;4.Keep in mind that the operator
or user is responsible for accidents or
hazards occurring to other people or their property.
Preparation
1. While mowing, always wear substantial footwear and long trousers. Do notoperate the equipment
when barefoot or wearing open sandals;
2. Thoroughly inspect the area where the equipment is to be used and removeall objects which can
be thrown by the machine;
3. Warning - petrol is highly flammable.
-Store fuel in containers specifically designed for this purpose;
-Refuel outdoors only and do not smoke while refueling;
-Add fuel before starting the engine. Never remove the cap of the fuel tank oradd petrol while the
engine is running or when the engine is hot;
-If petrol is spilled, do not attempt to start the engine but move the machineaway from the area of
spillage and avoid creating any source of ignition untilpetrol vapour have dissipated;
-Replace all fuel tank and container caps securely;4.Replace faulty silencers;
5. Before using, always visually inspect to see that the blades, blade bolts andcutter assembly are
not worn or damaged. Replace worn or damaged bladesand bolts in sets to preserve balance;
6. On multi-bladed machines, take care as rotating one blade can cause otherblades to rotate.
Operation
1.Do not operate the engine in a confined space where dangerous carbonmonoxide fumes can
collect;
2.Mow only in daylight or in good artificial light;
3.Avoid operating the equipment in wet grass, where feasible;
4.Always be sure of your footing on slopes;
5.Walk, never run;
WARING- To reduce the risk of injury , user must read instruction manual.
This symbol, before a safety comment, indicates a precaution, a warning or a danger.
Ignoring this warning can lead to an accident for yourself or for others.
To limit the risk of injury, fire or electrocution always apply the recommendations
Beware of sharp blades –remove spark plug lead before maintenance.
Never refuel while the engine is running.
Risk of injury . do not open or remove safety shields while engine is running.
Wearing ear protection , eye protection when operating.
Warning! The lawnmower exhaust gas contains toxic substances, Do not start or run
engine indoors or in an enclosed area, even if windows and doors are open.
Conforms to relevant safety standards
Waste electrical products should not be disposed of with household waste.
Please recycle where facilities exist. Check your local authority or retailer for
recycling advice.
6. SAFETY INSTRUCTIONS
Training
1. Read the instructions carefully. Be familiar with the controls and the properuse of the equipment;
2. Never allow children or people unfamiliar with these instructions to use thelawnmower. Local
regulations can restrict the age of the operator;
3. Never mow while people, especially children, or pets are nearby;4.Keep in mind that the operator
or user is responsible for accidents or
hazards occurring to other people or their property.
Preparation
1. While mowing, always wear substantial footwear and long trousers. Do notoperate the equipment
when barefoot or wearing open sandals;
2. Thoroughly inspect the area where the equipment is to be used and removeall objects which can
be thrown by the machine;
3. Warning - petrol is highly flammable.
-Store fuel in containers specifically designed for this purpose;
-Refuel outdoors only and do not smoke while refueling;
-Add fuel before starting the engine. Never remove the cap of the fuel tank oradd petrol while the
engine is running or when the engine is hot;
-If petrol is spilled, do not attempt to start the engine but move the machineaway from the area of
spillage and avoid creating any source of ignition untilpetrol vapour have dissipated;
-Replace all fuel tank and container caps securely;4.Replace faulty silencers;
5. Before using, always visually inspect to see that the blades, blade bolts andcutter assembly are
not worn or damaged. Replace worn or damaged bladesand bolts in sets to preserve balance;
6. On multi-bladed machines, take care as rotating one blade can cause otherblades to rotate.
Operation
1.Do not operate the engine in a confined space where dangerous carbonmonoxide fumes can
collect;
2.Mow only in daylight or in good artificial light;
3.Avoid operating the equipment in wet grass, where feasible;
4.Always be sure of your footing on slopes;
5.Walk, never run;
8. ADJUSTMENT
Setting the cutting height As shown in Fig 17
CAUTION! Adjust the cutting height only when the engine is switch off the spark plug Boot has been
pulled.
The cutting height is centrally adjusted with Cutting height adjusting handle. Different cutting
Heights can be selected.
Pull the adjusting handle out and select the desired cutting height. The handle snaps onto the
desired position.
From position 1 to position 7. The cutting height range from 25mm to 75 mm.
Setting required function
NOTE: This lawn mower has four functions. These functions can be converted by changing acces-
sory setting. Please see the following chart for detail setting.
www.daewoopower.bg
28
BG
ВНИМАНИЕ
!
Настройвайте
височината
на
косене
само
при
спрян
двигател
и
извадена
запалителна
свещ
.
Височината
на
рязане
е
настроена
централно
с
лоста
за
настройване
на
височината
на
косене
.
Можете
да
избирате
различни
височини
.
Издърпайте
лоста
се
настройва
на
височаната
навън
и
изберете
желаната
височина
.
Застопорете
лоста
на
желаната
позиция
.
От
позиция
1
до
позиция
7.
Височината
може
да
се
настройва
от
25
до
75mm.
Настройка
на
желаната
функция
ВНИМАНИЕ
!
Тази
косачка
има
четири
функции
.
Те
могат
да
бъдат
избирани
със
смяна
на
аксесоарите
.
Вижте
таблицата
по-долу
за
подробности
:
За
да
настроите
косачката
Мулчиране
Колектор
за
трева
Улей
за
странично
изхвърляне
За
предно
изхвърляне
x
x
x
За
събиране
на
тревата
в
колектора
x
x
За
мулчиране
х
х
За
странично
изхвърляне
х
-
инсталиран
Х
–
премахнат
9.
РАБОТА
Старт и стоп на двигателя
ВНИМАНИЕ
!
Ножовете
започват
да
се
въртят
веднага
след
стартирането
на
двигателя.
ЗАБЕЛЕЖКА
!
Не
работ
ете
с
машината
в
затворени
или
недобре
вентилирани
зони,
тъй
като
изгорелите
газове
съдържат
токсични
субстанции.
Пазете
ръцете,
краката,
косата
и
облеклото
си
далече
от
машината.
Всички
дви
-
жещи
се
части,
ауспуха
и
други
части
на
машината
се
нагряват
по
време
на
работа.
Уверете
се,
че
ножът
е
здраво
прикрепен
и
затегнат
преди
да
стартирате
двигателя.
Стартиране на двигателя
фиг
. 15-1
1.
Когато
стартирате
студен
двигател,
натиснете
помпичката
плътно
до
долу
3
пъти
.
ВНИМАНИЕ
!
Твърде
многото
натискане
на
помпата
може
да
доведе
до
задавяне
на
двигателя
.
Когато
стартирате
топъл
двигател
не
е
нужно
да
използвате
помпата
.
Ако
двигателят
спре
поради
липса
на
бензин,
долейте
и
натиснете
помпата
до
долу
3-5
пъти
.
2.
Стойте
зад
косачката
.
Натиснете
старт/стоп
лоста
под
горната
дръжка
с
една
ръка
.
С
другата
ръка
хванете
стартерното
въже
3.
Леко
издърпайте
стартерното
въже
докато
усетите
съпротивление
.
След
това
рязко
издърпайте
въжето
.
ЗАБЕЛЕЖКА
!
Ако
двигателят
не
стартира,
поставете
стартерното
въже
във
водача
.
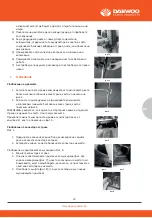
(Please pay attention to thelock when assembling.
3. Then release the flap(Fig 10),
it will close Back to cover themulching plug.
Assembling the side discharge chute As shown in Fig 11
9. OPERATION
Start and stop the engine
WARNING: the blade begins to rotate as soon as the engine is started.
NOTE: do not operate the machine in enclosed or poorly Ventilated areas as the exhaust gas con-
tains toxic substance. Keep hands , feet ,hair and clothing away from.
All the moving parts of the machine . the exhaust and other Parts of the machine will become hot
during use.
Make sure that the blade is securely fastened before starting the engine.
NOTE: to start the engine make sure that the spark plug boot is located on the plug and the machi-
ne is filled with sufficient oil and petrol.
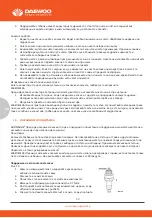
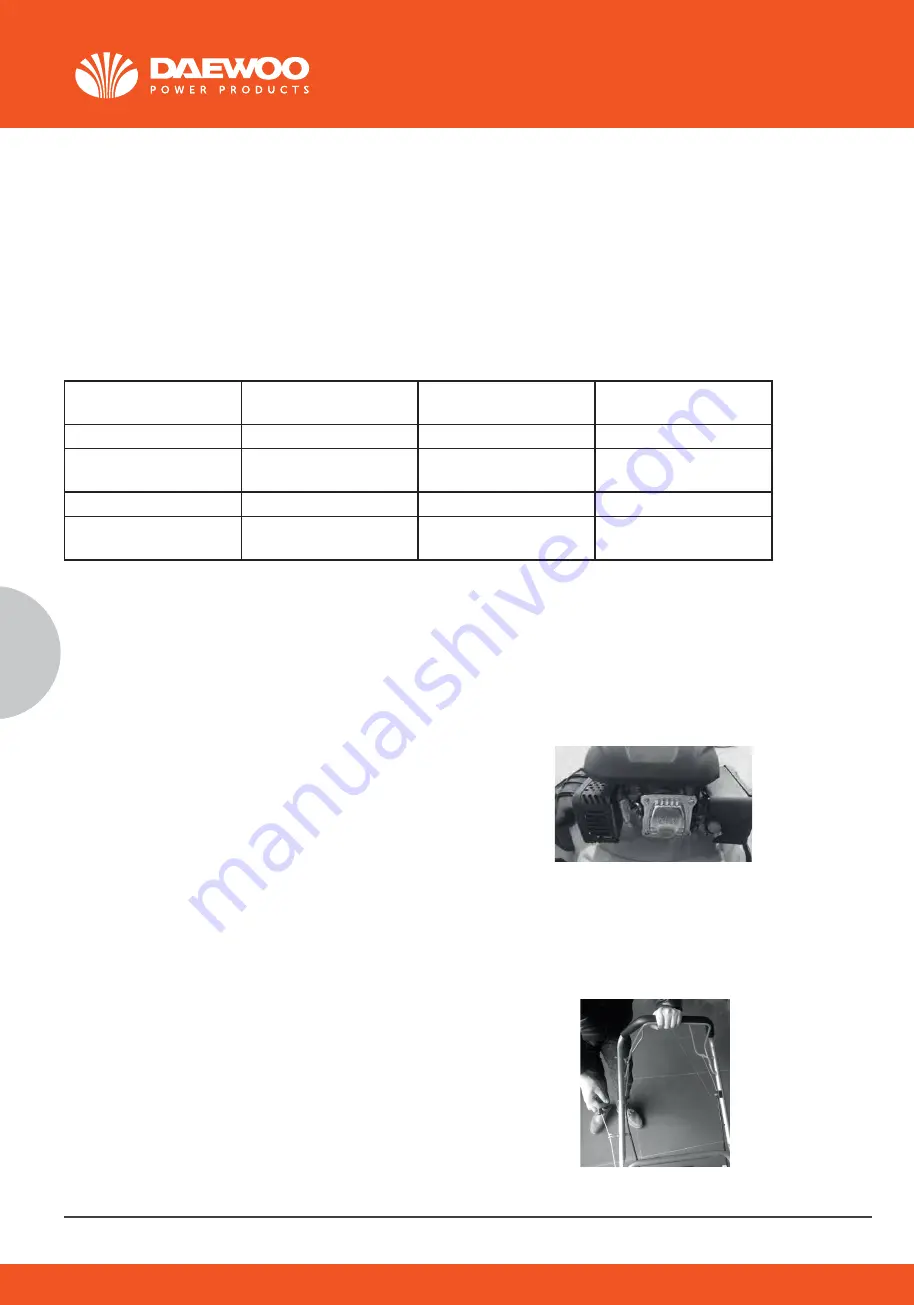
To start the engine As shown in Fig 18-19 1.
When starting a cold engine, press down
the Primer fully 3 times.
WARNING! Too much presses on primer May cause engine flooded When starting a warm Engine,
the primer does not need to be used. If the engine stops due to a lack of petrol, refill and press
down the primer 3~5 times.
2. Stand behind the mower. Pull the engine Start/stoplever toward upper handle with one hand. And
placethe other hand on the starter handle.
3. Pull the starter handle until you feel a resistance andthen start the engine with a sharp pull.
NOTE: If the engine fails to start after three pulls, repeat the process.
4. Once the engine is running, put the starter ropeInto the rope guide.
To stop the engine As shown in Fig 20 Release the engine start/stop lever, it will return to its Initial
position, the engine will automatically switch off.
Fig 18
фиг
.15
Assembling the side discharge chute As shown in Fig 11
28
9. OPERATION
Start and stop the engine
WARNING: the blade begins to rotate as soon as the engine is started.
NOTE: do not operate the machine in enclosed or poorly Ventilated areas as the exhaust gas con-
tains toxic substance. Keep hands , feet ,hair and clothing away from.
All the moving parts of the machine . the exhaust and other Parts of the machine will become hot
during use.
Make sure that the blade is securely fastened before starting the engine.
NOTE: to start the engine make sure that the spark plug boot is located on the plug and the machi-
ne is filled with sufficient oil and petrol.
To start the engine As shown in Fig 18-19 1.
When starting a cold engine, press down
the Primer fully 3 times.
WARNING! Too much presses on primer May cause engine flooded When starting a warm Engine,
the primer does not need to be used. If the engine stops due to a lack of petrol, refill and press
down the primer 3~5 times.
2. Stand behind the mower. Pull the engine Start/stoplever toward upper handle with one hand. And
placethe other hand on the starter handle.
3. Pull the starter handle until you feel a resistance andthen start the engine with a sharp pull.
NOTE: If the engine fails to start after three pulls, repeat the process.
4. Once the engine is running, put the starter ropeInto the rope guide.
To stop the engine As shown in Fig 20 Release the engine start/stop lever, it will return to its Initial
position, the engine will automatically switch off.
Fig 18
Fig 19
Fig 20
фиг
.16
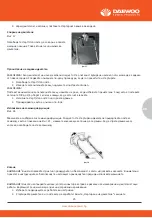
2. Push the plastic mulchingplug
(Fig 8) into the dischargechute (Fig 9) until it is locked inplace.
(Please pay attention to thelock when assembling.
3. Then release the flap(Fig 10),
it will close Back to cover themulching plug.
Assembling the side discharge chute As shown in Fig 11
often termed as 4 Stroke lawn mower oil. Never use additives with recommended oil. To prolong the
life of your engine it is important that the oil is changed after the first 20 hours of use.
NOTE: To check the engine oil level, stop engine and place the mower on a level surface.
1.Remove the oil filler dipstick and wipe
oil from it with a clean cloth.
2. Insert the dipstick into the oil filler neck,3. Then remove the dipstick and check the oillevel. the oil
level must be between theMin and Max marks on the dipstick. If nearthe lower level, fill to upper
lever with the recommended oil((or equivalent t e. g SAE 10W/30). Do not overfill.
9. OPERATION
Start and stop the engine
WARNING: the blade begins to rotate as soon as the engine is started.
NOTE: do not operate the machine in enclosed or poorly Ventilated areas as the exhaust gas con-
tains toxic substance. Keep hands , feet ,hair and clothing away from.
All the moving parts of the machine . the exhaust and other Parts of the machine will become hot
during use.
Make sure that the blade is securely fastened before starting the engine.
NOTE: to start the engine make sure that the spark plug boot is located on the plug and the machi-
ne is filled with sufficient oil and petrol.
To start the engine As shown in Fig 18-19 1.
When starting a cold engine, press down
the Primer fully 3 times.
WARNING! Too much presses on primer May cause engine flooded When starting a warm Engine,
the primer does not need to be used. If the engine stops due to a lack of petrol, refill and press
down the primer 3~5 times.
2. Stand behind the mower. Pull the engine Start/stoplever toward upper handle with one hand. And
placethe other hand on the starter handle.
3. Pull the starter handle until you feel a resistance andthen start the engine with a sharp pull.
NOTE: If the engine fails to start after three pulls, repeat the process.
4. Once the engine is running, put the starter ropeInto the rope guide.
To stop the engine As shown in Fig 20 Release the engine start/stop lever, it will return to its Initial
position, the engine will automatically switch off.
To clean a flooded engine
NOTE: if the engine won't start after you have Operated the starter several times, the engine may be
flood with excess fuel. Use following procedure to clear and start a flooded engine.
1.Release the engine start/stop lever to stopengine.
2.Remove the spark plug, dry it, and thenreinstall it.
NOTE: Install the spark plug carefully by hand, to avoid cross-threading.After the plug is seated
tighten 1/8 to 1/4 turn with socket spanner of sparkplug to compress the washer.
1.Pull the engine start/stop lever toward upper handle.
2.Operate the starter as described above
Using the Self-propelled function As shown in Fig 21
This unit equipped with self-propelled system.
If you press the drive lever(clutch lever), the clutch
for the drive will be closed and the lawnmower will
start to move with the engine running .
To stop the moving lawnmower, just simply release
the drive lever in good time.
Mowing
WARNING: Always observe the strictest safety procedures when using the lawnmower. Carefully
read the safety instructions of this manual before using the lawnmower.
WARNING: Never open the ejector flap when the grass bag has been detached (to be emptied) and
the engine is still running. The rotating blade can cause serious injuries!
1. Select your required setting.
2. Start the engine and allow it run, and set it to required speed. See “to start theengine”.
3. Keep a firm grip on the upper handle with engine stop/start lever and drivelever (clutch lever)
closed and walk along with it self-propelling to startmowing.
Working advices
1. Walk, never run with the mower, be very careful when mowing uneven orrough ground.
2. Mow across slopes, never up and down.
3. Be careful when changing the direction of the mower on a slope.4.Do not mow excessively steep
NOTE: do not operate the machine in enclosed or poorly Ventilated areas as the exhaust gas con-
All the moving parts of the machine . the exhaust and other Parts of the machine will become hot
NOTE: to start the engine make sure that the spark plug boot is located on the plug and the machi-
WARNING! Too much presses on primer May cause engine flooded When starting a warm Engine,
the primer does not need to be used. If the engine stops due to a lack of petrol, refill and press
2. Stand behind the mower. Pull the engine Start/stoplever toward upper handle with one hand. And
3. Pull the starter handle until you feel a resistance andthen start the engine with a sharp pull.
To stop the engine As shown in Fig 20 Release the engine start/stop lever, it will return to its Initial
NOTE: if the engine won't start after you have Operated the starter several times, the engine may be
flood with excess fuel. Use following procedure to clear and start a flooded engine.
1.Release the engine start/stop lever to stopengine.
2.Remove the spark plug, dry it, and thenreinstall it.
NOTE: Install the spark plug carefully by hand, to avoid cross-threading.After the plug is seated
tighten 1/8 to 1/4 turn with socket spanner of sparkplug to compress the washer.
1.Pull the engine start/stop lever toward upper handle.
2.Operate the starter as described above
Using the Self-propelled function As shown in Fig 21
This unit equipped with self-propelled system.
If you press the drive lever(clutch lever), the clutch
for the drive will be closed and the lawnmower will
start to move with the engine running .
To stop the moving lawnmower, just simply release
the drive lever in good time.
Mowing
WARNING: Always observe the strictest safety procedures when using the lawnmower. Carefully
read the safety instructions of this manual before using the lawnmower.
WARNING: Never open the ejector flap when the grass bag has been detached (to be emptied) and
the engine is still running. The rotating blade can cause serious injuries!
1. Select your required setting.
2. Start the engine and allow it run, and set it to required speed. See “to start theengine”.
3. Keep a firm grip on the upper handle with engine stop/start lever and drivelever (clutch lever)
closed and walk along with it self-propelling to startmowing.
Working advices
1. Walk, never run with the mower, be very careful when mowing uneven orrough ground.
2. Mow across slopes, never up and down.
3. Be careful when changing the direction of the mower on a slope.4.Do not mow excessively steep
slopes.
5. The best result will be achieved if the grass is dry. Wet grass will tend to clogthe blade and the
grass collection system.
6. Grass grows at different rates at different time of the year. Never use thelowest cutting height for
the first cut of the season or in drought conditions.
7. Only about one thirds of the grass height should be cut.
8. When mowing with mulching, to ensure that the cut grass can be scatteredefficiently, do not cut
high or wet grass. When you have been cutting forseveral minutes, please stop the mower, and
9. OPERATION
Start and stop the engine
WARNING: the blade begins to rotate as soon as the engine is started.
NOTE: do not operate the machine in enclosed or poorly Ventilated areas as the exhaust gas con-
tains toxic substance. Keep hands , feet ,hair and clothing away from.
All the moving parts of the machine . the exhaust and other Parts of the machine will become hot
during use.
Make sure that the blade is securely fastened before starting the engine.
NOTE: to start the engine make sure that the spark plug boot is located on the plug and the machi-
ne is filled with sufficient oil and petrol.
To start the engine As shown in Fig 18-19 1.
When starting a cold engine, press down
the Primer fully 3 times.
WARNING! Too much presses on primer May cause engine flooded When starting a warm Engine,
the primer does not need to be used. If the engine stops due to a lack of petrol, refill and press
down the primer 3~5 times.
2. Stand behind the mower. Pull the engine Start/stoplever toward upper handle with one hand. And
placethe other hand on the starter handle.
3. Pull the starter handle until you feel a resistance andthen start the engine with a sharp pull.
NOTE: If the engine fails to start after three pulls, repeat the process.
4. Once the engine is running, put the starter ropeInto the rope guide.
To stop the engine As shown in Fig 20 Release the engine start/stop lever, it will return to its Initial
position, the engine will automatically switch off.
WARNING! If the blade is cracked or damaged replace it with a new one
Содержание DLM4600SPL
Страница 19: ...www daewoopower bg 19 BG 1 20 2 21 3 22 4 22 5 22 6 23 7 25 8 27 9 28 10 30 11 33 12 34 13 41...
Страница 40: ...www daewoopower bg 40 BG 10 6 M5x30 10 6 M5x30...
Страница 43: ...www daewoopower bg 43 BG 24 6 6 12 6...
Страница 44: ...www daewoopower bg 44 BG 1 1 2022 6 6...
Страница 45: ...www daewoopower bg 45 BG...
Страница 46: ...www daewoopower bg 1784 1 51 359 2 81 77 600 359 2 81 77 601...

