www.daewoopower.bg
3
EN
19
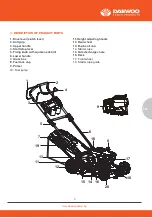
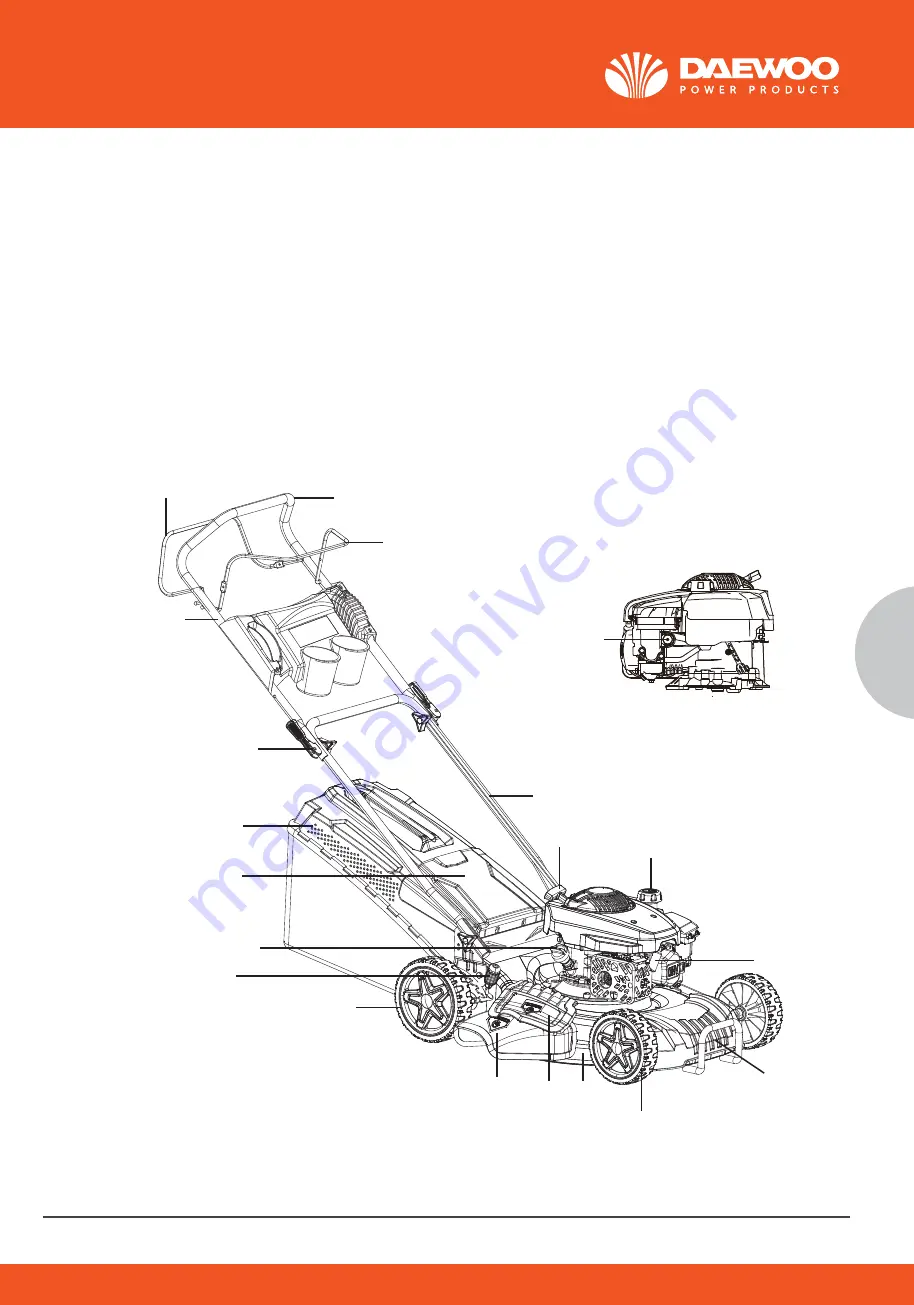
1. DESCRIPTION OF PRODUCT PARTS
1. Drive lever (clutch lever)
2. Soft grip
3. Upper handle
4. Start/stop lever
5. Fixing knob with square neck blot
6. Lower handle
7. Grass box
8. Fuel tank cap
9. Primer
10. Front decorative cover
11. Height adjusting handle
12. Rear wheel
13. Engine oil cap
14. Side discharge cover
15. Side discharge chute
16. Deck
17. Spark plug boot
18. Starter handle
19. Rear discharge cover
20. Front wheel
Warning! The lawnmower exhaust gas contains toxic substances, Do not start or run
6.For wheeled rotary machines, mow across the face of slopes, never up anddown;
10. Fuel pump
14. Starter rope
17. Front wheel
18. Starter rope guide
www.daewoopower.bg
3
EN
19
1. DESCRIPTION OF PRODUCT PARTS
12. Rear wheel
13. Engine oil cap
14. Side discharge cover
15. Side discharge chute
16. Deck
17. Spark plug boot
18. Starter handle
19. Rear discharge cover
20. Front wheel
19
1. DESCRIPTION OF PRODUCT PARTS
1. Drive lever (clutch lever)
2. Soft grip
3. Upper handle
4. Start/stop lever
5. Fixing knob with square neck blot
6. Lower handle
7. Grass box
8. Fuel tank cap
9. Primer
1. Drive lever (clutch lev er)
2. Soft grip
3. Upper handle
4. Start/stop lever
5. Fixing knob with square neck blot
6. Lower handle
7. Grass box
8. Fuel tank cap
9. Primer
10. Front decorative cover
11. Height adjusting handle
12. Rear wheel
13. Engine oil cap
14. Side discharge cover
15. Side di sc harge chute
16. Deck
17. Spark plug boot
18. Starter handle
19. Rear dis charge cover
20. Front wheel
1
2
4
3
9
5
6
7
18
8
19
13
17
11
12
10
15 14 16
20
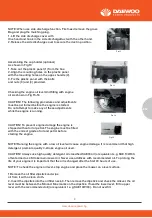
NOTE: When use side discharge function. First need remove the grass
Bag and plug the mulching plug.
1. Lift the side discharge cover with
One hand and hook in the side dischargeDuct with the other hand.
2. Release the side discharge cover tosecure the duct in position.
Assembling the cup holder (optional)
As shown in Fig 13
1. Take out the plastic panel (1) from the box.
2. Align the mounting holes on the plastic panel
with the mounting holes on the upper-handle (2).
3. Fix the plastic panel with the bolts
and nuts (3) and (4) provided.
Checking the engine oil level And filling with engine
oil As shown in Fig 15-16
CAUTION! The following procedures and adjustments
must be performed before the engine is started.
Do not attempt to make any of these adjustments
while the engine is running.
CAUTION! To prevent engine damage the engine is
shipped without oil or petrol. The engine must be filled
with the correct grade of oil and petrol before
starting the engine.
NOTE! Running the engine with a low oil level will cause engine damage. It is recommend that high
detergent, premium quality 4-stroke engine oil used.
CAUTION! Always use high quality detergent oil classified SAE30 oil (or equivalent e. g SAE 10W/30,
often termed as 4 Stroke lawn mower oil. Never use additives with recommended oil. To prolong the
misuse. The user/operator and not the Manufacturer will be liable for any damage or injuries of any
Please note that our equipment has not been designed for use in commercial , trade or industrial
applications . our warranty will be voided if the machine is used in commercial , trade or industrial
Please read these instructions fully before assembling and operating. Description Of Symbols
Symbols are used in this manual to attract your attention to possible risks. The safety symbols and
the explications which accompany them must be perfectly understood. The warning themselves do
not prevent the risks and cannot be a substitute for proper methods of avoiding accidents.
Wearing ear protection , eye protection when operating.
Hot surfaces will burn finger or palms.
NOTE: When use side discharge function. First need remove the grass
Bag and plug the mulching plug.
1. Lift the side discharge cover with
One hand and hook in the side dischargeDuct with the other hand.
2. Release the side discharge cover tosecure the duct in position.
Assembling the cup holder (optional)
As shown in Fig 13
1. Take out the plastic panel (1) from the box.
2. Align the mounting holes on the plastic panel
with the mounting holes on the upper-handle (2).
3. Fix the plastic panel with the bolts
and nuts (3) and (4) provided.
Checking the engine oil level And filling with engine
oil As shown in Fig 15-16
CAUTION! The following procedures and adjustments
must be performed before the engine is started.
Do not attempt to make any of these adjustments
while the engine is running.
CAUTION! To prevent engine damage the engine is
shipped without oil or petrol. The engine must be filled
with the correct grade of oil and petrol before
starting the engine.
NOTE! Running the engine with a low oil level will cause engine damage. It is recommend that high
detergent, premium quality 4-stroke engine oil used.
CAUTION! Always use high quality detergent oil classified SAE30 oil (or equivalent e. g SAE 10W/30,
often termed as 4 Stroke lawn mower oil. Never use additives with recommended oil. To prolong the
life of your engine it is important that the oil is changed after the first 20 hours of use.
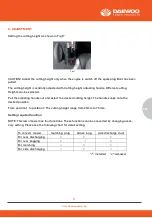
NOTE: To check the engine oil level, stop engine and place the mower on a level surface.
Assembling the grass bag onto the mower
As shown in Fig 6
1.Lift the rear discharge cover with one hand
andhook in the grass bag.2.Release the rear
discharge cover to secure thegrass bag in position.
Assembling the mulching plug (Fig 8)
1. Remove the grass bag
2. Push the plastic mulchingplug
(Fig 8) into the dischargechute (Fig 9) until it is locked inplace.
(Please pay attention to thelock when assembling.
3. Then release the flap(Fig 10),
it will close Back to cover themulching plug.
Assembling the side discharge chute As shown in Fig 11
9. OPERATION
Start and stop the engine
WARNING: the blade begins to rotate as soon as the engine is started.
NOTE: do not operate the machine in enclosed or poorly Ventilated areas as the exhaust gas con-
tains toxic substance. Keep hands , feet ,hair and clothing away from.
All the moving parts of the machine . the exhaust and other Parts of the machine will become hot
during use.
Make sure that the blade is securely fastened before starting the engine.
NOTE: to start the engine make sure that the spark plug boot is located on the plug and the machi-
ne is filled with sufficient oil and petrol.
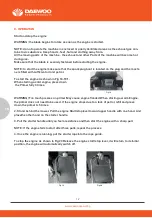
To start the engine As shown in Fig 18-19 1.
When starting a cold engine, press down
the Primer fully 3 times.
WARNING! Too much presses on primer May cause engine flooded When starting a warm Engine,
the primer does not need to be used. If the engine stops due to a lack of petrol, refill and press
down the primer 3~5 times.
2. Stand behind the mower. Pull the engine Start/stoplever toward upper handle with one hand. And
placethe other hand on the starter handle.
Fig 18
Hot surfaces will burn finger or palms.
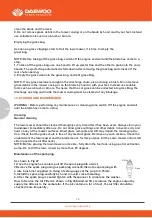
6. On multi-bladed machines, take care as rotating one blade can cause otherblades to rotate.
Operation
1.Do not operate the engine in a confined space where dangerous carbonmonoxide fumes can
collect;
2.Mow only in daylight or in good artificial light;
3.Avoid operating the equipment in wet grass, where feasible;
4.Always be sure of your footing on slopes;
5.Walk, never run;
NOTE: When use side discharge function. First need remove the grass
Bag and plug the mulching plug.
1. Lift the side discharge cover with
One hand and hook in the side dischargeDuct with the other hand.
2. Release the side discharge cover tosecure the duct in position.
Assembling the cup holder (optional)
As shown in Fig 13
1. Take out the plastic panel (1) from the box.
2. Align the mounting holes on the plastic panel
with the mounting holes on the upper-handle (2).
3. Fix the plastic panel with the bolts
and nuts (3) and (4) provided.
Checking the engine oil level And filling with engine
oil As shown in Fig 15-16
CAUTION! The following procedures and adjustments
must be performed before the engine is started.
Do not attempt to make any of these adjustments
while the engine is running.
CAUTION! To prevent engine damage the engine is
shipped without oil or petrol. The engine must be filled
with the correct grade of oil and petrol before
starting the engine.
NOTE! Running the engine with a low oil level will cause engine damage. It is recommend that high
detergent, premium quality 4-stroke engine oil used.
CAUTION! Always use high quality detergent oil classified SAE30 oil (or equivalent e. g SAE 10W/30,
Wipe away any spilt oil.)
4. Align the ribs of the cap with the groove of the filler neck. then rotate
1/4 turn to secure it.
Filling with engine fuel As shown in Fig 15
CAUTION! Always use clean, fresh unleaded petrol. Purchase fuel in quantities that can be used
within 30 days. Never mix oil with petrol.
CAUTION! Do not fill into the base of neck to allow for fuel expansion. Do not overfill the fuel tank.
CAUTION! WARNING! Petrol is highly flammable and extreme precaution must be taken when
handling or working with it. Keep out of reach of children.
CAUTION! To prevent engine damage the engine is shipped without oil or petrol. The engine must be
filled with the correct grade of oil and petrol before starting the engine.
WARNING! Refuel in a well-ventilated area with the engine stopped. Do not smoke or allow flame or
sparks in the area where the engine is refueled or where petrol is stored. Avoid repeated or prolon-
ged contact with skin or inhalation of vapour.
1. Clean the area around the petrol filler capbefore removing the cap. Remove thewarning tag, check
the fuel level.
2. Refill the tank if the fuel level is low.3.Refuel carefully to avoid overfilling or
spilling fuel. There should be no fuel in thefiller neck.
4. Clean up any overflow or splashes of petrolbefore starting the engine.
5. Tighten the filler cap after filling, fingertight on.
CAUTION! The following procedures and adjustments
shipped without oil or petrol. The engine must be filled
NOTE! Running the engine with a low oil level will cause engine damage. It is recommend that high
detergent, premium quality 4-stroke engine oil used.
CAUTION! Always use high quality detergent oil classified SAE30 oil (or equivalent e. g SAE 10W/30,
often termed as 4 Stroke lawn mower oil. Never use additives with recommended oil. To prolong the
life of your engine it is important that the oil is changed after the first 20 hours of use.
NOTE: To check the engine oil level, stop engine and place the mower on a level surface.
2. Insert the dipstick into the oil filler neck,3. Then remove the dipstick and check the oillevel. the oil
level must be between theMin and Max marks on the dipstick. If nearthe lower level, fill to upper
lever with the recommended oil((or equivalent t e. g SAE 10W/30). Do not overfill.
WARNING! Refuel in a well-ventilated area with the engine stopped. Do not smoke or allow flame or
sparks in the area where the engine is refueled or where petrol is stored. Avoid repeated or prolon-
ged contact with skin or inhalation of vapour.
1. Clean the area around the petrol filler capbefore removing the cap. Remove thewarning tag, check
the fuel level.
2. Refill the tank if the fuel level is low.3.Refuel carefully to avoid overfilling or
spilling fuel. There should be no fuel in thefiller neck.
4. Clean up any overflow or splashes of petrolbefore starting the engine.
5. Tighten the filler cap after filling, fingertight on.
clean the blade and the deck.
9. Do not remove grass debris in the mower casing or on the blade by hand orwith your feet. Instead
Please read these instructions fully before assembling and operating. Description Of Symbols
Symbols are used in this manual to attract your attention to possible risks. The safety symbols and
the explications which accompany them must be perfectly understood. The warning themselves do
not prevent the risks and cannot be a substitute for proper methods of avoiding accidents.
1. Fasten the lower handle toThe device by using
two bolts andtwo small knobs on each side as
46cm cutting witch has one knob on each side)
2.Unfold the upper handle and fix it to lower
NOTE: Make sure the rope guide is on the right
to the lower handle With the cord clip .(supplied)
1.Lift the rear discharge cover with one hand
andhook in the grass bag.2.Release the rear
discharge cover to secure thegrass bag in position.
(Fig 8) into the dischargechute (Fig 9) until it is locked inplace.
(Please pay attention to thelock when assembling.
Assembling the side discharge chute As shown in Fig 11
NOTE: When use side discharge function. First need remove the grass
Bag and plug the mulching plug.
1. Lift the side discharge cover with
One hand and hook in the side dischargeDuct with the other hand.
2. Release the side discharge cover tosecure the duct in position.
Assembling the cup holder (optional)
As shown in Fig 13
1. Take out the plastic panel (1) from the box.
2. Align the mounting holes on the plastic panel
with the mounting holes on the upper-handle (2).
3. Fix the plastic panel with the bolts
and nuts (3) and (4) provided.
Checking the engine oil level And filling with engine
oil As shown in Fig 15-16
CAUTION! The following procedures and adjustments
must be performed before the engine is started.
Do not attempt to make any of these adjustments
while the engine is running.
CAUTION! To prevent engine damage the engine is
shipped without oil or petrol. The engine must be filled
with the correct grade of oil and petrol before
starting the engine.
NOTE! Running the engine with a low oil level will cause engine damage. It is recommend that high
detergent, premium quality 4-stroke engine oil used.
CAUTION! Always use high quality detergent oil classified SAE30 oil (or equivalent e. g SAE 10W/30,
often termed as 4 Stroke lawn mower oil. Never use additives with recommended oil. To prolong the
life of your engine it is important that the oil is changed after the first 20 hours of use.
NOTE: To check the engine oil level, stop engine and place the mower on a level surface.
1.Remove the oil filler dipstick and wipe
oil from it with a clean cloth.
2. Insert the dipstick into the oil filler neck,3. Then remove the dipstick and check the oillevel. the oil
level must be between theMin and Max marks on the dipstick. If nearthe lower level, fill to upper
lever with the recommended oil((or equivalent t e. g SAE 10W/30). Do not overfill.
Содержание DLM4600SPL
Страница 19: ...www daewoopower bg 19 BG 1 20 2 21 3 22 4 22 5 22 6 23 7 25 8 27 9 28 10 30 11 33 12 34 13 41...
Страница 40: ...www daewoopower bg 40 BG 10 6 M5x30 10 6 M5x30...
Страница 43: ...www daewoopower bg 43 BG 24 6 6 12 6...
Страница 44: ...www daewoopower bg 44 BG 1 1 2022 6 6...
Страница 45: ...www daewoopower bg 45 BG...
Страница 46: ...www daewoopower bg 1784 1 51 359 2 81 77 600 359 2 81 77 601...

