background image

28


„

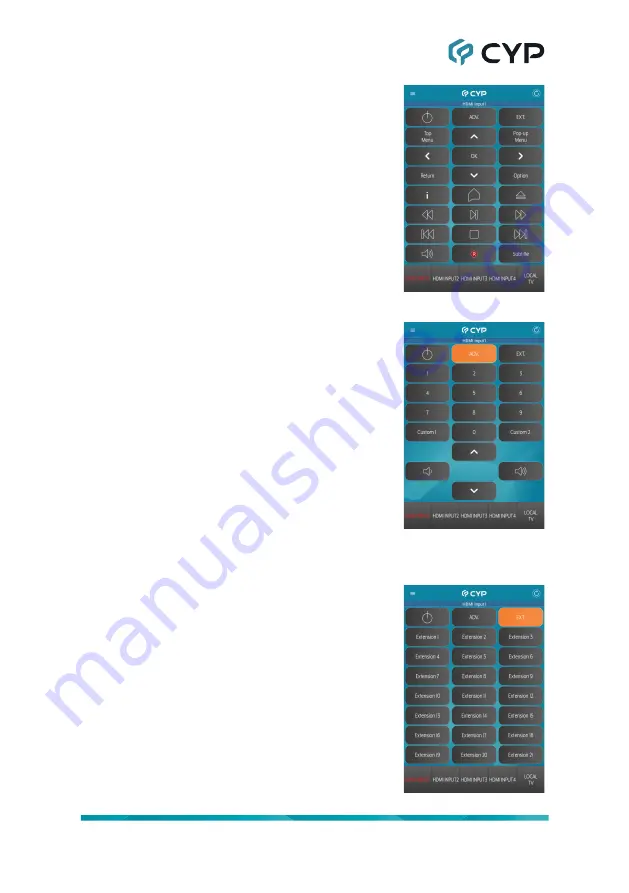
Normal IR Remote Buttons:


These buttons share their functions with the 

buttons at the bottom of the unit’s physical 

remote, as defined within the unit’s WebGUI. 

Pressing any of these buttons will send 

the defined IR command to the IR Blaster 

associated with the current input or local 

display.


„

Advance IR Remote Buttons:


These buttons share their functions with 

the “Advance Mode” buttons on the unit’s 

physical remote, as defined within the unit’s 

WebGUI. To access these buttons in the 

app, press the “ADV.” button. To return to 

the Normal button set, press the button a 

second time. Pressing any of these buttons 

will send the defined IR command to the IR 

Blaster associated with the current input or 

local display.


  Note: If the Advance button set has been  
  disabled in the unit’s WebGUI for the current  
  device, this page will not be available.


„

Extension IR Remote Buttons:


These buttons are only available within the 

app and are defined within the unit’s WebGUI 

under the “Extension” set. To access these 

buttons in the app, press the “EXT.” button. 

To return to the Normal button set, press the 

button a second time. Pressing any of these 

buttons will send the defined IR command 

to the IR Blaster associated with the current 

input or local display.


  Note: If the Extension button set has been  
  disabled in the unit’s WebGUI for the device,  
  this page will not be available.

Содержание CPLUS-401V

Страница 1: ...Operation Manual Operation Manual UHD 4 1 HDMI Switcher with Stereo Amplifier CPLUS 401V ...

Страница 2: ... registered trademarks of HDMI licensing Administrator Inc ...

Страница 3: ...Technology reserves the right to make improvements to this document and or product at any time and without notice COPYRIGHT NOTICE No part of this document may be reproduced transmitted transcribed stored in a retrieval system or any of its part translated into any language or computer file in any form or by any means electronic mechanical magnetic optical chemical manual or otherwise without expr...

Страница 4: ...d into this product through any openings or empty slots in the unit as you may damage parts inside the unit Do not attach the power supply cabling to building surfaces Use only the supplied power supply unit PSU Do not use the PSU if it is damaged Do not allow anything to rest on the power cabling or allow any weight to be placed upon it or any person walk on it To protect the unit from overheatin...

Страница 5: ...itch Tab 12 6 6 2 Analog Audio Tab 13 6 6 3 EDID Settings Tab 15 6 6 4 IR Settings Tab 18 6 6 5 IR Control Tab 19 6 6 6 User Config Tab 23 6 6 7 System Settings Tab 24 6 7 Mobile Device App 26 6 7 1 App Main Page 27 6 7 2 App Unit Control Slider 29 6 7 3 App Selection Menu Page 30 6 8 Telnet Control 31 6 9 Serial and Telnet Commands 31 7 Connection Diagram 48 8 Specifications 49 8 1 Technical Spec...

Страница 6: ... selected source or from the ARC audio coming back from the display connected to the HDMI output offering a flexible sound experience LPCM 2 0 sources only This unit also contains a specialized IR learning and smart routing functionality IR codes from each connected source s remote can be learned and then recalled using this unit s dedicated remote control or the mobile device app Intelligent IR r...

Страница 7: ...e equipment such as media players video game consoles or set top boxes HDMI receiving equipment such as an HDTV monitor or audio amplifier An active network connection from a switch or router is required for control of the unit via the mobile device app HDMI cable distance can be impacted by the materials and design of the cable used The use of Premium High Speed HDMI cables is highly recommended ...

Страница 8: ...of LPCM up to 8 channels Bitstream and advanced HD Bitstream audio formats Supports the ARC Audio Return Channel function to transmit digital audio from an ARC enabled TV connected to the HDMI output LPCM 2 0 only Stereo analog audio breakout mirrored to both amplified 20W per channel and un amplified 3 5mm headphone connections LPCM 2 0 only Support for learning IR remote codes for on demand retr...

Страница 9: ...io source for both analog outputs The LED will illuminate to indicate which source is currently selected Note If the display connected to the HDMI output does not support ARC no audio will be heard when the ARC source is selected 4 MUTE Button and LED Press to toggle between muting and unmuting the analog audio output The LED will illuminate when mute is active Note By default the mute button only...

Страница 10: ...r mobile device app 4 IR OUT 1 5 Ports Connect to the provided IR Blasters to transmit IR signals to devices within direct line of sight of the IR Blasters 5 RS 232 Port Connect directly to a PC laptop or other serial control device to send RS 232 commands to control the unit 6 LINE OUT Port Connect to powered speakers headphones or an amplifier for stereo analog audio output 7 RIGHT LEFT 2 pin Te...

Страница 11: ...utton will send a user defined IR command to the current source device 2 ADV Button Pressing this button toggles the unit between using the Standard and Advanced IR remote button definitions 3 IN 1 4 Buttons Press any of these buttons to switch immediately to the corresponding input 4 AUDIO Buttons SOURCE Button Press this button to sequentially switch through the available audio sources for both ...

Страница 12: ...being viewed For example if the user is watching input 3 then pressing any of these buttons will send the associated user defined commands to the device connected to input 3 via the IR Blaster connected to IR output 3 Source 3 Source 3 1 2 3 4 5 6 7 8 9 0 Ad v 1 2 3 4 1 2 3 4 ZONE B A ARC IR SERVICE ZONE A ZONE B AUDIO SELECT MUTE Vol Vol POWER 4 x 2 Martix Source 1 Source 2 Source 3 Source 4 HDMI...

Страница 13: ... user within the WebGUI Similar to the other user defined buttons they are used to tell the unit to transmit IR commands to the source device currently being viewed Buttons that have Advanced mode functionality are easily identified by their alternative coloring Note For detailed information about assigning user defined IR commands within the WebGUI please refer to Section 6 6 5 1 2 3 4 5 6 7 8 9 ...

Страница 14: ...r Not Used IR Extender Cable 1 2 3 Infrared Power Ground 6 5 RS 232 Pinout and Defaults Serial Port Default Settings Baud Rate 19200 Data Bits 8 Parity Bits None Stop Bits 1 Flow Control None 1 2 3 4 5 8 7 6 9 DCD RxD TxD DTR GND RI CTS RTS DSR DE 9 Female Port ...

Страница 15: ... address is 192 168 1 50 By clicking on one of the listed devices you will be presented with the network details of that particular device 1 IP Mode If you choose you can alter the static IP network settings for the device or switch the unit into DHCP mode to automatically obtain proper network settings from a local DHCP server To switch to DHCP mode please select DHCP from the IP mode drop down t...

Страница 16: ...Note The default user name and password is admin On the left side of the browser you will see the following menu tabs where all primary functions of the unit are controllable via the built in WebGUI The individual functions will be introduced in the following sections Clicking the Logout tab will automatically log the currently connected user out of the WebGUI and return to login page ...

Страница 17: ...ange accordingly 1 Output A The button for selecting the output to route A V inputs to Details about the output name and currently selected input are also displayed here Clicking on the gear icon opens up the Output Edit window 2 Input 1 2 3 4 Buttons for selecting the HDMI input 1 through 4 to route to the output Details about the input names and current sync status are also displayed here Clicki...

Страница 18: ...nput allows for individual control over its name To edit the name of an input please click the Edit icon then type the new name in the space provided in the Edit window The name can be up to 32 characters long Click the Save button to confirm the change 6 6 2 Analog Audio Tab This tab allows for control over the amplified analog output of this unit This unit s DSP allows control over features such...

Страница 19: ... performance of connected analog speakers Mute Mute or unmute the amplified analog output independent of the current line out mute setting Equalizer Setting Clicking on this button opens up the Equalizer window which has adjustment sliders at a variety of commonly adjusted frequencies from 64Hz to 8kHz Each slider has an adjustment range of 10 to 10 decibels Volume Adjusts the volume of the amplif...

Страница 20: ...ate and upload the preferred EDID file bin format from a local PC Once the correct file has been selected please click the Upload button in the window and the file will be transferred to the unit Download To save an existing User EDID to your local PC select the User EDID slot from the dropdown list and then press the Download button Depending on your browser settings you will either be asked wher...

Страница 21: ... Information To view detailed information about a connected sink s EDID select the preferred sink from the dropdown list and then press the Information button 3 Input EDID Click on one or more input buttons to open the EDID Table List window Select the new EDID source to use from the choices on the right and the change will occur immediately across all selected Inputs Note In most cases assigning ...

Страница 22: ...DR10 LPCM 2 0 HDR Multi CH 3840 2160p 60Hz 18Gbps Deep Color 8 10 12 bit HDR10 LPCM 7 1 Bitstream Note In some rare cases it is possible for custom or external EDIDs to cause compatibility issues with certain sources If this happens it is recommended to switch to one of the 8 default EDIDs for maximum compatibility Download To save the EDID currently in use by an Input press the Download button ne...

Страница 23: ... the Auto Power Control for the IR blaster associated with each input on the unit When enabled the unit will transmit the appropriate power button IR command from the associated input s IR blaster any time the unit is powered on or placed into standby mode Note The device specific power button IR command must be learned and stored in the unit for each input The IR transmission will be delayed by 1...

Страница 24: ...nsmitted 1 Source 1 4 Sink A Buttons Press the button of the Source or Sink that you wish to configure the IR commands for Note All settings below are individually set and stored for each Source or Sink APP Simulation Enable or disable simulating the app with the buttons below to allow for the convenient testing of learned codes When enabled pressing any of the remote buttons on this web page will...

Страница 25: ...r Sink are included in the file IR Configuration file Download The current IR device configuration including all learned IR commands may be saved as an XML file to a PC Click the Download button to save the current IR device configuration to your local PC Note Only the IR command settings for the currently selected Source or Sink are included in the file Normal Advance Extension Displays all avail...

Страница 26: ...R remote click the Learn button After selecting Learn you have 15 seconds to point the IR remote at the appropriate IR Receiver and press the remote button to learn After 15 seconds have passed the learned IR command if any will be displayed in the Command Data space To delete a previously learned IR command press the Delete button 3 Command Edit PLAY PAUSE Button Clicking on the PLAY PAUSE button...

Страница 27: ...nd press the remote button to learn After 15 seconds have passed the learned IR command if any will be displayed in the Command Data space To delete a previously learned IR command press the Delete button Pause Key the same with Play Key Enables or disables support for a single command PLAY PAUSE button When enabled only a single command is stored and transmitted when the PLAY PAUSE button is pres...

Страница 28: ...splayed in the Command Data space To delete a previously learned IR command press the Delete button 6 6 6 User Config Tab The WebGUI and Telnet username password are set on this page Two management levels are available Administrator and General User The usernames are pre defined as admin and user and cannot be changed Note The Administrator user has access to all tabs and can change all settings T...

Страница 29: ...unit s power state Control Press this switch to toggle the unit s power between ON and OFF standby mode Note While in standby mode the unit s WebGUI Telnet and RS 232 controls are still active Auto Standby Set the length of time in minutes to wait before automatically putting the unit into standby mode if there are no valid input signals detected Setting this to 0 will disable the feature 3 Keypad...

Страница 30: ...ay be saved as an XML file to a PC Click the Download button to save the current system configuration to your local PC 7 Restore Configuration Previously saved system configurations may be restored from a saved XML file Click the Choose File button to locate the saved XML file then click the Restore button to activate the selected configuration 8 Reset to Default Press the Reset Status button to r...

Страница 31: ...ned to buttons within the WebGUI regardless of the user s current location Note The exact appearance of the app s screens may vary depending on the OS of your mobile device and the resolution of the display Control App Overview After successfully downloading and installing the Control App connect the unit and your mobile device to the same active network and start the Control App Depending on your...

Страница 32: ...on Menu page The Selection Menu page provides a way to search for other units within the local network and provides information about the software version firmware version and manufacturer 2 App Data Refresh Icon Pressing this button will force the app to refresh the IR Remote button layout data from the unit 3 Input Identification Bar This informational bar at the top of the page identifies which...

Страница 33: ...e Pressing any of these buttons will send the defined IR command to the IR Blaster associated with the current input or local display Note If the Advance button set has been disabled in the unit s WebGUI for the current device this page will not be available Extension IR Remote Buttons These buttons are only available within the app and are defined within the unit s WebGUI under the Extension set ...

Страница 34: ...l show the IR Remote Control buttons that have been defined for the connected display Press the button a second time to return to showing the current input s IR Remote Control buttons Note Selecting Local TV will not change the currently selected input 2 Control Slider Right Set Power Icon Press this button to turn the unit on or place it into standby mode Audio Source Selection Pressing this butt...

Страница 35: ...ccessed by pressing the Menu Icon from the main page 1 Refresh Discovery Search Select this to search for additional units within the local network After selecting a new unit the details from that unit will automatically be loaded into the app 2 Info CYP Product Links to a web page with information about other products available from the company APP Version Displays information about the App versi...

Страница 36: ... not been changed previously This will connect us to the unit we wish to control and commands may now be entered directly Note 1 If the IP address of the unit is changed then the IP address required for Telnet access will also change accordingly Note 2 The default IP address is 192 168 1 50 and the default communication port is 23 6 9 Serial and Telnet Commands COMMAND Description and Parameters h...

Страница 37: ...e the front panel key lock Available values for N1 ON Lock front panel OFF Unlock front panel get keylock Show the current front panel key lock status set power N1 Power the unit on or place it into standby mode Available values for N1 ON Power on OFF Standby Mode get power Show the current power status set auto standby timer N1 Set the length of time to wait before placing the unit into standby m...

Страница 38: ...he interface supported by each input set in N1 name N2 Set the name of the specified input N1 1 4 HDMI Input N2 Name 32 characters max get in N1 name Show the current name of the specified input N1 1 4 HDMI Input set in N1 hdcp mode N2 Set the HDCP behavior of the specified input N1 1 4 HDMI Input Available values for N2 0 Disable HDCP 1 Refer to source 2 Refer to sink get in N1 hdcp mode Show the...

Страница 39: ...R Multi CH 9 User EDID1 10 User EDID2 11 User EDID3 12 User EDID4 13 Copy Output A get in N1 edid data Show the EDID currently used by the specified input as ASCII hex data N1 1 4 HDMI Input get in N1 edid information Show English readable details from the EDID assigned to the specified input N1 1 4 HDMI Input set in N1 power control N2 Enable or disable the auto power control feature for the spec...

Страница 40: ...he name of the HDMI output set out A convert N1 Set the 4K compatibility conversion behavior used by the HDMI output Available values for N1 0 Bypass no conversion 1 Convert the color space to YUV 4 2 0 2 Convert the resolution to 1080p 3 Automatic based on sink EDID get out A convert Show the current 4K compatibility conversion behavior used by the HDMI output get out A hpd Show the current hot p...

Страница 41: ...to the HDMI output N1 1 4 HDMI Input get zone A route Show the current input routed to the HDMI output set zone A auto route N1 Enable or disable the automatic routing function Available values for N1 ON Auto routing enabled OFF Auto routing disabled get zone A auto route Show the current automatic routing function state get user edid number Report the number of user EDID supported by the unit set...

Страница 42: ...MI input C HDMI output s ARC audio get analog audio route Show the current analog audio routing source set analog audio mute purpose N1 Define the functionality of the front panel and remote control s mute buttons Available values for N1 1 Mutes amplifier only 2 Mutes line out only 3 Mutes both get analog audio mute purpose Show the current analog audio mute button functionality setting set amplif...

Страница 43: ...nel s volume level N1 0 40 Volume increase in 0 5dB steps get amplifier left enhance Show the current left channel volume enhancement amount set amplifier right enhance N1 Increase the amplified audio output s right channel s volume level N1 0 40 Volume increase in 0 5dB steps get amplifier right enhance Show the current right channel volume enhancement amount set analog audio lineout mute N1 Enab...

Страница 44: ...kHz band 8000 8kHz band N2 10 10 Gain in dB get amplifier N1 eq gain Show the current audio equalizer level at the specified frequency band for the amplified audio output Available values for N1 64 64Hz band 125 125Hz band 250 250Hz band 500 500Hz band 1000 1kHz band 2000 2kHz band 4000 4kHz band 8000 8kHz band set ip mode N1 Set the IP address assignment mode Available values for N1 STATIC Static...

Страница 45: ...k set gateway N1 Set the unit s static gateway address N1 X X X X X 0 255 gateway address get gateway Show the unit s current gateway address set http port N1 Set the unit s WebGUI access port N1 0 65535 Network port get http port Show the unit s current WebGUI access port set telnet port N1 Set the unit s Telnet access port N1 0 65535 Network port get telnet port Show the unit s current Telnet ac...

Страница 46: ...settings to their factory defaults set ir N1 remote control name N2 Set a name for the IR remote control used to control the device connected to the specified input output port Available values for N1 1 4 HDMI Input device A HDMI Output device N2 Name 32 characters max get ir N1 remote control name Show the current name for the IR remote control used to control the device connected to the specifie...

Страница 47: ...2 Transmit the IR code stored in button N2 for the device located at IR blaster location N1 Available values for N1 1 4 IR output 1 4 A IR output 5 N2 1 60 IR button function number set ir N1 delete func N2 Delete the IR code stored in button N2 for device N1 Available values for N1 1 4 HDMI Input device A HDMI Output device N2 1 60 IR button function number set ir N1 advance mode N2 Enable or dis...

Страница 48: ...1 1 4 HDMI Input device A HDMI Output device Available values for N2 ON Extension mode on OFF Extension mode off get ir N1 extension mode Show the current Extension mode setting for the specified device s remote control Available values for N1 1 4 HDMI Input device A HDMI Output device set ir N1 default mode N2 Set the default mode screen to show in the app for the specified device s remote contro...

Страница 49: ...lay and Pause Available values for N1 1 4 HDMI Input device A HDMI Output device Available values for N2 ON Play Pause uses two commands OFF Play Pause uses a single command get ir N1 toggle mode Show the current Play Pause toggle mode for the specified device s remote control Available values for N1 1 4 HDMI Input device A HDMI Output device set ir N1 extension N2 name N3 Set a name for the speci...

Страница 50: ... Bypass disabled Note When IR Bypass is enabled unit generated IR commands will be delayed by 100ms to avoid conflict with the bypassed IR command get ir bypass Show the current state of the IR bypass mode setting set ir channel N1 Set the channel for the IR inputs to use N1 0 3 IR channel Note The IR channel of the unit and the dedicated IR remote control must match in order for the unit to be co...

Страница 51: ...he font used by the OSD banner Available values for N1 1 Black 2 White 3 Red 4 Green 5 Blue 6 Yellow 7 Cyan 8 Magenta get osd font color Show the current color of the font used by the OSD banner set osd background color N1 Set the color of the background of the OSD banner Available values for N1 1 Black 2 White 3 Red 4 Green 5 Blue 6 Yellow 7 Cyan 8 Magenta get osd background color Show the curren...

Страница 52: ...have a valid source Available values for N1 0 Disable freerun 1 Red 2 Green 3 Blue 4 Black 5 Color bars get osd freerun color Show the current freerun color set osd default Reset the OSD settings to their factory defaults Note Commands will not be executed unless followed by a carriage return Commands are not case sensitive ...

Страница 53: ...I IN HDMI OUT RIGHT 3 4 5 1 2 IR OUT 1 5m 60 1 5m 60 1 5m 60 1 5m 60 1 5m 60 Power Supply Stereo Output Amplified Stereo Output HDMI Inputs HDMI Output IR Output IR Outputs UHDTV with ARC Output Speakers Headphones Media Players RS 232 Equipped PC Network Switch RS 232 LAN ...

Страница 54: ... 2 0 Type A IR Frequency 30 50kHz 30 60kHz under ideal conditions Baud Rate 19200 Power Supply 24V 2 7A DC US EU standards CE FCC UL certified ESD Protection HBM 8kV Air Discharge 4kV Contact Discharge Dimensions W H D 219mm 43mm 156mm Case Only 219mm 54mm 163 5mm All Inclusive Weight 1172g Chassis Material Metal Steel Chassis Color Black Operating Temperature 0 C 40 C 32 F 104 F Storage Temperatu...

Страница 55: ... 50 720 576p 50 800 600p 56 60 72 75 85 848 480p 60 1024 768p 60 70 75 85 1152 864p 75 1280 720p 50 60 1280 768p 60 75 85 1280 800p 60 75 85 1280 960p 60 85 1280 1024p 60 75 85 1360 768p 60 1366 768p 60 1400 1050p 60 1440 900p 60 75 1600 900p 60RB 1600 1200p 60 1680 1050p 60 1920 1080i 50 60 1920 1080p 24 25 30 1920 1080p 50 60 1920 1200p 60RB ...

Страница 56: ...560 1600p 60RB 2048 1080p 24 25 30 2048 1080p 50 60 3840 2160p 24 25 30 3840 2160p 50 60 4 2 0 3840 2160p 24 HDR10 3840 2160p 50 60 4 2 0 HDR10 3840 2160p 50 60 4096 2160p 24 25 30 4096 2160p 50 60 4 2 0 4096 2160p 24 HDR10 4096 2160p 50 60 4 2 0 HDR10 4096 2160p 50 60 ...

Страница 57: ...igh Definition 8 3 2 Analog Audio Analog Output Amplified Max Power Level 20W 20W THD N 66dB 0dBFS 1kHz A wt SNR 100dB 0dBFS Frequency Response 3dB 20Hz 20kHz Crosstalk 80dB 10kHz Impedance 4 16Ω Type Balanced Analog Output 3 5mm Max Audio Level 2Vrms THD N 84dB 0dBFS 1kHz A wt SNR 104dB 0dBFS Frequency Response 0 5dB 20Hz 20kHz Crosstalk 76dB 10kHz Impedance 500Ω Type Unbalanced ...

Страница 58: ...Bandwidth Category Examples 1080p FHD Video Up to 1080p 60Hz 12 bit color Data rates lower than 5 3Gbps or below 225MHz TMDS clock 4K30 4K UHD Video 4K 24 25 30Hz 4K 50 60Hz 4 2 0 8 bit color Data rates higher than 5 3Gbps or above 225MHz TMDS clock but below 10 2Gbps 4K60 4K UHD Video 4K 50 60Hz 4 4 4 8 bit 4K 50 60Hz 4 2 0 10 bit HDR Data rates higher than 10 2Gbps ...

Страница 59: ...C Digital to Analog Converter dB Decibel DHCP Dynamic Host Configuration Protocol DVI Digital Visual Interface EDID Extended Display Identification Data Gbps Gigabits per second GUI Graphical User Interface HDCP High bandwidth Digital Content Protection HDMI High Definition Multimedia Interface HDR High Dynamic Range IP Internet Protocol IR Infrared kHz Kilohertz LAN Local Area Network LED Light E...

Страница 60: ...l THD N Total Harmonic Distortion plus Noise 4K UHD 4K Ultra High Definition 10 2Gbps max 4K UHD 4K Ultra High Definition 18Gbps max USB Universal Serial Bus WUXGA RB Widescreen Ultra Extended Graphics Array Reduced Blanking XGA Extended Graphics Array Ω Ohm ...

Страница 61: ......

Страница 62: ......

Страница 63: ......

Страница 64: ...CYPRESS TECHNOLOGY CO LTD www cypress com tw ...

Отзывы: