


10
DV160 Installation - English
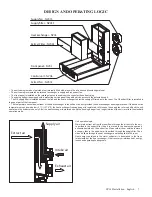
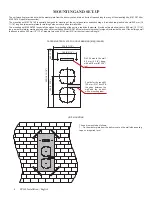
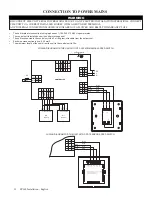
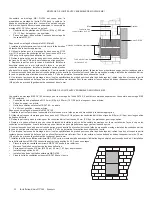
MOUNTING WITH THE MK1 DV160 MOUNTING SET
Wall
Outer ventilation hood
Round air duct
sloped down by 2-3°
Fasteners
DV160 unit
Round air duct sloped
down by 2-3°
The MK1 DV160 mounting set is designed to prepare a mounting
site for installation of the DV160 unit at general construction
stage. The set is not included into the delivery and is available
on separate order. The MK1 DV160 mounting set includes:
•
Plastic air duct Ø 125 mm (Ø 5’’), 500 mm (19 11/16’’) long
- 2 items;
•
Paper master plate - 2 items. Mounting sequence of the
MK1 DV160
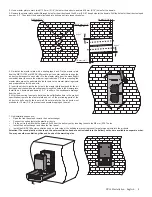
Mounting sequence of the MK1 DV160 set:
1. Fix the first master plate on the inner wall side with a sealing
tape at a required height.
2. Use the master plate to mark two Ø 130 (5 1/8”) mm holes for
the air ducts and two Ø 8 mm (5/16”) holes for the fixing dowels
of the unit.
3. Remove the master plate and drill through holes for the air
ducts and the holes, 60 mm (2 3/8”) deep for the dowels.
4. Re-install the first master plate with a sealing tape back. Fix
the second master plate on the outer wall side to align the air
ducts with respect to each other. Fix the second master plate
somewhat lower to ensure the minimum slope 3° for the air
ducts. Before installation of the master plate press the marked
perforated opening on the master plate and remove the master plate cut-outs.
5. Install the air ducts into the master plate holes and seal those with a mounting foam through the openings in the master plate. Install the air ducts sloped
down by 2-3° to enable the condensate drainage.
6. After the mounting foam gets hard (see the solidification time in the product specification) remove the master plate and cut the protruding parts of the
air ducts to be flush with the inner wall. On the outer wall side, the air ducts must protrude by 10 mm (3/8’’) to prevent condensate dropping on the wall.
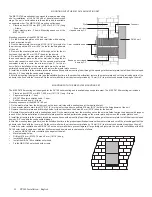
MOUNTING WITH THE MK2 DV160 MOUNTING SET
The MK2 DV160 mounting set is designed for the DV160 unit mounting and is available upon separate order. The MK2 DV160 mounting set includes:
•
Plastic air duct Ø 125 mm (Ø 5’’), 500 mm (19 11/16’’) long - 2 items;
•
Paper master plate - 1 item;
•
NB DV160 outer ventilation hood - 1 item;
•
8x40 screw and dowel - 4 items.
Mounting sequence of the MK2 DV160 set:
1. Fix the master plate from the delivery set on the inner wall side with a sealing tape at the required height.
2. Use a master plate to mark two Ø 130 (5 1/8”) mm holes for the air ducts and two Ø 8 mm (5/16”) holes for the fixing dowels of the unit.
3. Remove the master plate and drill through holes for the air ducts and the holes, 60 mm (2 3/8”) deep for the dowels.
4. Re-install the master plate with a sealing tape back. Fix the master plate from the mounting set on the outer wall side to align the air ducts with respect
to each other. Before installation of the master plate press the marked perforated opening on the master plate and remove the master plate cut-out.
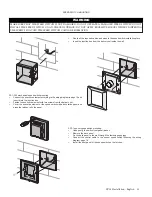
5. Install the air ducts into the master plate holes and seal those with a mounting foam through the openings in the master plate. Install the air ducts sloped
down by 2-3° to enable the condensate drainage.
6. After the mounting foam gets hard (see the solidification time in the product specification) remove the master plate and cut off the protruding parts of the
air ducts to be flush with the inner wall. On the outer wall side, the air ducts must protrude by 10 mm (3/8’’) to prevent condensate dropping on the wall.
7. Install the outer ventilation hood NB DV160 on the outer wall side to prevent ingress of large foreign objects into the air ducts. Installation of the NB
DV160 outer hood is carried out with four 8x40 screws and dowels and is carries out as follows:
•
Lean the NB DV160 outer ventilation hood against the wall;
•
Mark fastening holes;
•
Drill four Ø 8 mm (Ø 5/16”) holes, 40 mm (1 9/16’’) deep;
•
Install 8x40 dowels;
•
Install the NB DV160 ventilation outer hood;
•
Fix the NB DV160 outer hood with screws.
Содержание DV160
Страница 2: ...2 DV160 Installation English...
Страница 17: ...2 Installation d une DV160 Fran ais...