


INTRODUCTION
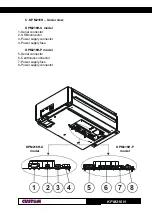
KPM216H
2
•
Do not introduce foreign objects of any kind into the printer as this could cause a short
circuit or damage parts that could jeopardize printer functioning.
•
Do not spill liquids onto the printer.
•
Be careful when working on the printer because the head area is ESD (electrostatic
discharge) sensitive.
•
Do not carry out technical operations on the printer, with the exception of the scheduled
maintenance procedures specifically indicated in the user manual.
•
Disconnect the printer from the electricity supply and have it repaired by a specialized
technician when:
A. The feed connector has been damaged.
B. Liquid has seeped inside the printer.
C. The printer has been exposed to rain or water.
D. The printer is not functioning normally despite the fact that all instructions in the
users manual have been followed.
E. The printer has been dropped and its outer casing damaged.
F. Printer performance is poor.
G. The printer is not functioning.
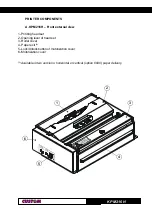
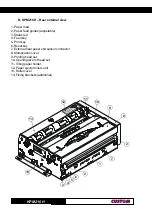
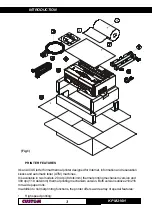
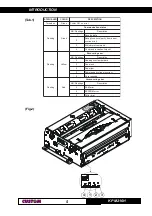
UNPACKING THE PRINTER
Remove the printer from its carton being careful not to damage the packing material so that it
may be re-used if the printer is to be transported in the future.
Make sure that all the components illustrated below are present and that there are no signs of
damage. If there are, contact Customer Service.
1.
Paper roll (216mm)
2.
Manual (or CD-Rom)
3.
Electrical supply cable
4.
Cable connection for near paper end sensor
5.
Additional fixing brackets
6.
Near paper end sensor
7.
Upper tray
8.
Printer
9.
Foam packing shell
10.
Box
•
Open the printer packaging
•
Remove the paper roll
•
Remove the manual (or CD-Rom)
•
Remove the cables of power supply and near paper end sensor connection
•
Remove the additional fixing brackets
•
Remove the near paper end sensor
•
Remove the upper tray
•
Take out the foam packing shell
•
Take out the printer and remove it from its plastic covering.
•
Keep the box, trays and packing materials in the event the printer must be transported/
shipped in the future.
Содержание KPM 216 H
Страница 6: ...KPM216H Blank page...
Страница 8: ...TABLE OF CONTENTS KPM216H ii Blank page...
Страница 14: ...INTRODUCTION KPM216H 6 Blank page...
Страница 82: ...4 TECHNICAL SPECIFICATIONS KPM216H 8 4 Blank page...
Страница 84: ...5 CHARACTER SETS KPM216H 2 5 Blank page...