


USING YOUR OVEN
Note: Your oven is equipped with two fans, one for convection baking, and one that acts as a cooling fan for the electronic
DISPLAY. Similar to a computer cooling fan, the sophisticated electronics need to be cooled during the cooking process.
The cooling fan does not circulate air within the oven cavity. The cooling fan will always be on during preheat and cooking
modes, and for a period of time after the oven timer has elapsed.
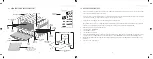
Plug your oven into a properly grounded wall outlet. The POWER button will illuminate and your oven will be in standby
mode.
Set MODE
Press the MODE button and then rotate the ADJUSTMENT DIAL to scroll through the 9 separate modes of your oven. You
will notice an arrow next to the selected mode.
Set TEMP
Press the TEMP button to set the temperature. Rotate the ADJUSTMENT DIAL until the desired temperature is selected.
Please note that you cannot set the temperature for TOAST, DEFROST and KEEP WARM modes.
Set TIME
Press the TIME button to set the cooking time. Rotate the ADJUSTMENT DIAL until the desired cooking time is selected.
Preheating Oven/Beginning Cooking Process
Once all the desired settings have been made, press the START/CANCEL button to begin preheating the oven. Please note
that the following modes do not require a preheat cycle: TOAST, BROIL, DEFROST, and ROTISSERIE.
Your oven will preheat for approximately 10 minutes depending on the selected temperature setting. Once the oven is
preheated, you will hear 3 short beeps and will see a READY indicator shown on the DISPLAY.
Once your oven has completed the preheat cycle and the READY indicator is shown on the DISPLAY. Press the START/
CANCEL button to start the countdown timer. The countdown timer will not start until the oven is preheated (except for
modes listed above.)
V.
1.
2.
3.
4.
5.
Adjusting MODE, TEMP, or TIME settings
You cannot adjust the MODE setting once you have started the cooking process. To change the MODE, you must first press
the START/CANCEL button until the END indicator is shown on the DISPLAY, then press the MODE button and select new
setting.
You can, however, adjust the TEMP and TIME settings during the cooking process by pressing either the TEMP or TIME
buttons. The selected setting will begin blinking on the DISPLAY. Rotate the ADJUSTMENT DIAL to the desired revised
setting. After approximately 10 seconds the revised setting will stop blinking.
NOTE:
Once the countdown timer has started, do not press the START/CANCEL button when modifying TEMP or TIME, as
this will cancel your settings. You will no longer see the READY indicator shown on the DISPLAY, as the preheat cycle has
already been completed
Turning oven off
When the countdown timer has elapsed, the heating elements will turn off and the END indicator will be shown on the
DISPLAY. To manually turn the oven off, press the POWER button and unplug the oven from the wall outlet.
The following bakeware will fit into the oven.
• 1/4 sheet tray
• Bundt Pan
• 6-cup muffin pan
• 12-inch pizza pan/pizza stone
• 11x7-inch baking dish with no side handles
• 8- to 10-inch square baking dish with no side handles
• 9x5-inch loaf pan
• 9-inch pie dish
6.
7.
8.
7
8
Содержание CSCOR0020
Страница 30: ...NOTES XXV 57 58 ...


