


Ed. 0521 - 70702820 REV00 Giorgione hood - Installation
13
Safety instructions
• Read this guide carefully before installing the
appliance, and keep it with care in an accessible
place for any future consultation by the various
operators.
• Moreover, the manual must always accompa-
ny the product through its life, even in case of
transfer.
• Before any movement or installation, check that
the room is suitable and systems comply with
the installation country standards and the speci-
fications indicated on the appliance rating plate.
• all installation, assembly and non-routine main-
tenance operations must be performed ex-
clusively by qualified technicians that are au-
thorised by the Dealer, in compliance with the
regulations in force in the user country, and with
the regulations on systems and work safety.
• unauthorised actions, tampering or modifica-
tions that do not follow the information provid-
ed in this manual can cause damages, injuries or
fatal accidents and null and void the warranty.
• It is forbidden to install the hood in environ-
ments at risk of explosion.
• Installation or maintenance that fails to comply
with the instructions in this manual may cause
damage, injury or fatal accidents.
• Persons not involved with the appliance installa-
tion may not pass through or stand in the work
area during appliance assembly.
• The serial plate provides important technical
information. This is vital in case of a request for
maintenance or repair of the equipment: please
do not remove, damage or modify it.
• failure to follow these regulations may cause
damage or even fatal injury, subsequently invali-
dating the guarantee and relieving the Manufac-
turer of all liability.
The company cannot be held liable for any print or transcrip-
tion errors, reserving the right to make changes where deemed
suitable without prior notice.
Partial reproduction without the Manufacturer’s consent is pro-
hibited. Measurements are purely indicative and not binding.
The original language used to prepare this manual is english:
the Manufacturer is not responsible for any translation/inter-
pretation or print errors.
Symbols used in the manual and on
the labels applied to the machine
Indicates that caution is required when performing
an operation described in a paragraph that bears this
symbol. The symbol also indicates that maximum
operator awareness is required in order to avoid
unwanted or dangerous consequences
Reference to another chapter where the subject is
dealt with in more detail.
Manufacturer’s tip
Indicates that the surfaces marked with this symbol
may be hot and must therefore be touched carefully
Dangerous voltage
The symbol identifies the terminals which, connect-
ed to each other, carry the various parts of a device
or system to the same potential (not necessarily the
earth potential)
Indicates that it is necessary to read carefully the
paragraph marked with this symbol before installing,
using and maintaining the equipment
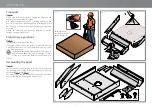
3
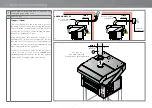
InsTaLLaTIOn


