


LIT-255
CUDA
®
SURGICAL
Rev. D
Page 9 of 128
(English)
4.
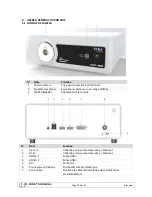
SETUP AND OPERATION
4.1.
CONSOLE SETUP
Place the camera console on a stable surface (cart, counter, stand, etc.).
WARNING: DO NOT
place console in an area where it can be exposed to liquids.
WARNING: DO NOT
use in any environment with explosive or flammable gases.
WARNING: DO NOT
obstruct the air vents of the camera console. The console should not be placed
in which its exhaust can interfere with other devices, nor should it be placed near any heat generating
devices.
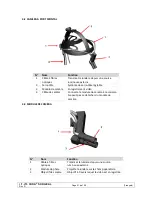
4.2.
CONNECTING CAMERA HEAD
CAUTION:
THE CAMERA CABLE SHOULD BE CONNECTED AND DISCONNECTED BY GRASPING FROM
THE RIGHT-ANGLE CONNECTOR ONLY. PULLING BY THE CABLE MAY DAMAGE THE DEVICE (THIS
DAMAGE IS NOT COVERED BY PRODUCT WARRANTY).
Connect the camera head to the console by first aligning the red dot located on the right-angle
connector with the red dot located on the console front panel receptacle. Insert firmly until the right-
angle connector is fully seated.
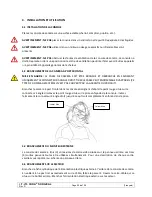
4.3.
CONNECTING EXTERNAL MONITOR
The camera console has (3) video output connections located on the rear panel. All (3) outputs may
be used simultaneously. Please refer to the rear panel diagram for a description of each output.
4.4.
CONNECTING MAINS POWER
Attach the barrel plug of the external power supply to the rear of the camera console. Run cable
through the cable retention clip, located on the rear housing, ensuring not to excessively strain the
cable. Connect the supplied external power supply to mains power.


