background image

                                                                                   CRESTRON                                                                                   

Operations Guide - DOC. 5712

SmartPresenter™: SP-1  

••

  15

Controlling a PC (Mouse and/or Keyboard)

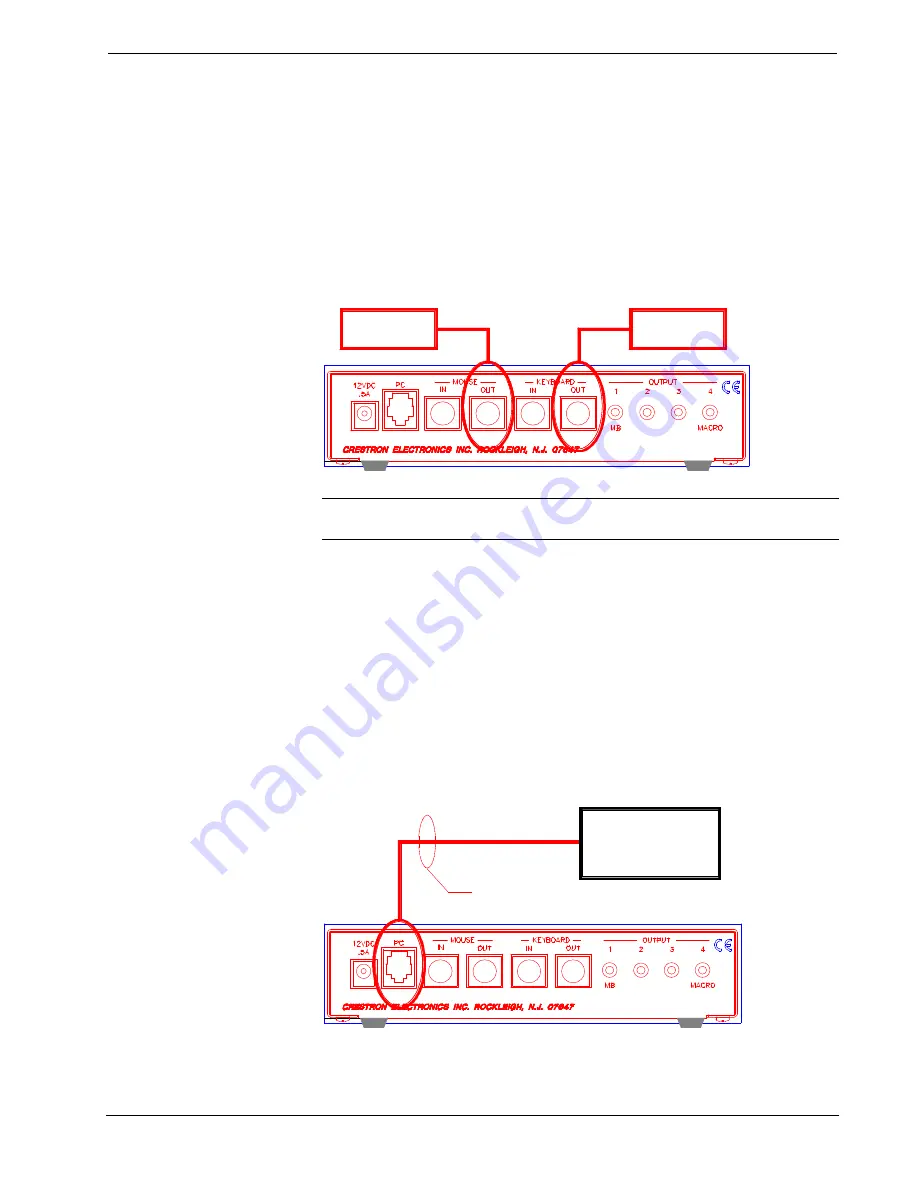
The mouse and/or keyboard of a PC can be controlled via the SP-1 ports labeled
MOUSE OUT and KEYBOARD OUT, respectively (refer to the illustration after
this paragraph). Assign the appropriate Q-Code as defined in “Q-Code
Assignment” on page 11 (i.e., the Q-Code to control all MS compatible mice is
111133). For other mice or keyboard Q-Codes, refer to the Crestron Q-Code list in
the latest revision of the SmartPresenter Quick Guide (Doc. 5742).

Hookup Connection for Controlling a PC

TO MOUSE

PORT ON PC

TO KEYBOARD

PORT ON PC

NOTE: 

 Some laptops only have a single mouse/keyboard port. In such an event,

choose to control either the mouse or the keyboard.

Controlling a RS-232 Projector or Switcher

A RS-232 projector or switcher can be controlled with the SmartPresenter only if
the the Q-Code is assigned to OUTPUT 4 on the SP-1. The SP-1 recognizes the Q-
Code as an RS-232 switching device and outputs commands for that device to the
PC port (rather than the OUTPUT 4 port). SmartPresenter cables (not supplied) are
required to connect the SP-1 to the switching device (refer to illustration below).
These cables are listed in the “SPS Cable Index” found in the latest version of the
SmartPresenter Quick Guide (Doc. 5742). For example, assign an Extron MX
Series switcher (Q-Code 124132) to OUTPUT 4. Use SPS-121 PC port cable to
connect the switcher to the SP-1.

Hookup Connection for Controlling a RS-232 Projector or Switcher

SMARTPRESENTER

CABLE

RS-232 SWITCHER

OR PROJECTOR

Содержание SmartPresenter SP-1

Страница 1: ......

Страница 2: ......

Страница 3: ...ecifications 7 Setup 8 SPS Equipment 8 Hardware Hookup 8 Match Transmitter ID to SP 1 10 Q Codes 11 IR Sprayer Usage 12 Macro Setup Linking a Device 13 Controlling a PC Mouse and or Keyboard 15 Controlling a RS 232 Projector or Switcher 15 Controlling a Fifth Non IR Device 16 Problem Solving 17 Troubleshooting 17 Further Inquiries 17 Return and Warranty Policies 18 Merchandise Returns Repair Servi...

Страница 4: ......

Страница 5: ...software SPS offers convenient fingertip control of your PC keyboard and mouse projector VCR slide projector and more SmartPresenter sets up in minutes perfect for the training room conference room or auditorium Setup is similar to that of a universal remote just choose your devices from our extensive database and go This is one powerful little professional presentation system No product available...

Страница 6: ...e RS 232 type device As an out of the box control system in both the rental and integrated system markets SPS has been specifically designed so that minimal setup is required on site No software or PC is required for the basic setup Refer to the illustration below for an out of the box application example The illustration demonstrates that the transmitter CNWM provides commands via RF to the SP 1 ...

Страница 7: ...AGE TRANSMITTER SPS SP 1 110V CNWM SPSI SPI 1 220V CNWM SPS L SP 1 110V CNWML SPSI L SPI 1 220V CNWML SPS UK SP 1 UK 220V CNWM UK SPS L UK SP 1 UK 220V CNWML UK Functional Description of the SmartPresenter The SP 1 has been designed to remain in the room with all of the controlled devices The unit has all the ports necessary to output IR and RS 232 commands to controlled devices IR probes sold sep...

Страница 8: ...on is required for operation in the United Kingdom and alike For purposes of this Operations Guide the term SP 1 is used interchangeably for both configurations except where noted The SP 1 shown after this paragraph is housed in a black enclosure with silk screened labels on the front and rear panels On the front of the unit there are six LEDs for indicating the unit s current status and four butt...

Страница 9: ...fy that it meets the required specifications and polarity as shown in the table and illustration after this paragraph AC Power Pack Specifications CRESTRON POWER PACK INPUT SPECS OUTPUT SPECS PW 1205 120V 60Hz 12VDC 500mA PWI 1210 230V 50Hz 12VDC 1000mA AC Power Pack Polarity PC Computer RS 232 This 6 pin 6 position RJ11 modular RS 232 jack is used for driver downloading system configuration and t...

Страница 10: ...r an IR probe STIRP sold separately slide projector via the Crestron slide controller SP SC sold separately or miscellaneous devices through relays SP RY sold separately A macro feature to link the function of a device such as a video projector or switcher assigned to SP 1 output 4 is available Refer to Macro Setup Linking a Device on page 13 for details ANTENNA This 50 ohm BNC connector attaches ...

Страница 11: ...ut antenna Weight 1 96 lb 0 89 kg As of the date of manufacture the unit has been tested and found to comply with specifications for CE marking NOTE This equipment has been tested and found to comply with the limits for a Class B digital device pursuant to part 15 of the FCC Rules These limits are designed to provide reasonable protection against harmful interference in a residential installation ...

Страница 12: ... Infrared Probe STIRP sold separately Infrared emitter that provides IR control signals sent by the receiver PC Port Cable SPC 121 sold separately Cable required to control RS 232 switcher devices PC Port Cable SPC 122 sold separately Cable required to control RS 232 switcher devices PC Port Cable SPC 124 sold separately Cable required to control RS 232 switcher devices PC Port Cable SPC 550 sold ...

Страница 13: ...r equivalent to SP 1 input power jack labeled as 12VDC 5A 5 Plug power pack into active outlet One or more of the feedback options occur then observe that the green PWR LED turns on All LEDs 1 through 4 flashing simultaneously three times indicates there is an invalid setting for one of the devices Refer to Q Code Assignment Error on page 12 for details LEDs 1 and 2 flash to indicate that that a v...

Страница 14: ...d hold recessed button 1 on the SP 1 for at least five seconds or until the RF LED flashes 3 Depress position A button on the transmitter while the RF LED flashes Observe that the RF LED stops flashing and remains illuminated for about four seconds An extinguished LED indicates a match of transmitter ID to that of the SP 1 If two or more SmartPresenter systems are operating in close proximity of o...

Страница 15: ...s for the printing of the entire list or a partial list defined by device category and or manufacturer Consult the help file that accompanies the SmartPresenter software for details Search on Print Database Adding Q Codes Implementing features of the User Database is an advanced feature of the SmartPresenter which requires the software Aside from the Q Codes supplied in the Crestron Database a Use...

Страница 16: ...Q Code sequence for the given output after the second button press Q Code Assignment Error When a device output on the SP 1 has been assigned an invalid Q Code all red device output LEDs 1 2 3 and 4 on the SP 1 flash three times The error signal can occur during one of the following situations Q Code assignment Q Code verification Saving routed settings Refer to IR Sprayer Usage on page 12 Upon po...

Страница 17: ...wise observe that the device output LED associated with the device that was not routed flashes when toggled 4 Repeat step 3 as necessary 5 Depress the recessed button labeled 1 on the SP 1 to save routed settings NOTE To route the IR signals for all device outputs to OUTPUT 1 on the SP 1 reapply power to the SP 1 while depressing with a blunt object e g paper clip the recessed button labeled 1 on ...

Страница 18: ...successfully complete this procedure Device Control Buttons A Through F on Transmitter 3 Depress with a blunt object e g paper clip the recessed device assignment button 4 on the SP 1 Observe flashing red device output 4 LED 4 Depress the SP 1 recessed device assignment button numbered 1 2 or 3 associated with a device to be linked Observe two flashing red device output LEDs 4 and the LED for the ...

Страница 19: ... such an event choose to control either the mouse or the keyboard Controlling a RS 232 Projector or Switcher A RS 232 projector or switcher can be controlled with the SmartPresenter only if the the Q Code is assigned to OUTPUT 4 on the SP 1 The SP 1 recognizes the Q Code as an RS 232 switching device and outputs commands for that device to the PC port rather than the OUTPUT 4 port SmartPresenter c...

Страница 20: ...can be controlled via the SP 1 port labeled PC refer to the illustration below Crestron recommends that the fifth device communicate via RS 232 and either be a switcher or video projector The Q Code for the device is assigned via the SmartPresenter software refer to the SmartPresenter software help file for details Search on Switching Device Hookup Connection for Controlling a Fifth non IR Device ...

Страница 21: ...the SP 1 is receiving power RF ID of transmitter is not recognized by SP 1 Refer to Match Transmitter ID to SP 1 in this Operations Guide SP MB is not properly placed Refer to IR Sprayer Useage in this Operations Guide IR probes are not properly placed Verify placement of STIRP over IR window of controlled device and that the 3 5 mm connector is properly inserted into the correct SP 1 output port ...

Страница 22: ... purchaser Disk drives and any other moving or rotating mechanical parts are covered for a period of one 1 year CRESTRON warrants all its other products for a period of one year from the defects mentioned above excluding touchscreen display components which are covered for 90 days Incandescent lamps are completely excluded from Crestron s Limited Warranty CRESTRON shall at its option repair or rep...

Страница 23: ......

Страница 24: ......

Отзывы: