background image

Snack / Refreshment Center Setup and Operator's Guide

Page 36

April, 1999

1670001

!"#$%&$'("$)*+$,-.$/0-#$%-0#

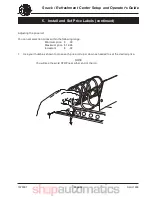
The column ID labels have already been attached to
the delivery door, and a set of self-adhesive price la-
bels are in the plastic bag that contained this manual.

1.

Stick the desired price label next to the column ID

number as shown.

COLUMN

ID LABEL

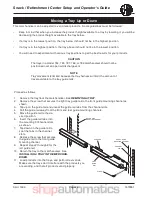
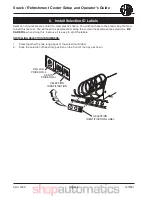
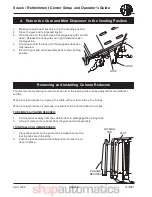
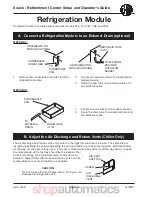
The gum and mint assembly is hinged to the delivery pan assembly and is
held in the vending position by two magnets.  The gum and mint assembly
is held in the loading position by a hook and a loop.  One end of the
hook is attached to the right side of the door.  The loop is mounted
on the right side of the gum and mint assembly.

1.

Use the loop as a handle and raise the gum and

mint magazine with your left hand.  With your right
hand, move the free end of the hook so it catches
the loop.  This will hold the magazine while you are
loading it with product, as shown.

LOOP

HOOK

AB&&9,.-177&!%*2$&K1T$7.

GB&&!)-&-4$&P)+&1,8&5*,-&E*.0$,.$%&*,&-4$&K"18*,D&!".*-",

Содержание 787E

Страница 1: ...Emiel Becquaertlaan 2 B2 51a 2400 Mol België 0493 11 46 83 www shopautomatics com automatics p 2 sh handleiding Crane 787E ...

Страница 2: ......

Страница 3: ...ANE NATIONAL VENDORS 784 787 797 798 A B C D E F G H J 1 2 3 4 5 6 7 8 9 Q 0 CRANE NATIONAL VENDORS A B C D E F G H J 1 2 3 4 5 6 7 8 9 Q 0 CRANE NATIONAL VENDORS 785 786 788 789 168 268 765 A B C D E F G H J 1 2 3 4 5 6 7 8 9 Q 0 CRANE NATIONAL VENDORS 167 267 764 A B C D E F G H J 1 2 3 4 5 6 7 8 9 Q 0 CRANE NATIONAL VENDORS 157P0004 ...

Страница 4: ... here You may notice some other books in your plastic bag too The Programming Guide is a reference for you to use later on after your machine is up and running Use the Programming Guide to use some of the ad vanced features included with your machine DON T THROW THIS BOOKLET AWAY Even though you finished with it today you may need to set your merchandiser up again In that case you ll wish you stil...

Страница 5: ...iser 25 Installing and Removing a Product Spacer 26 Load Trays With Product 27 Spiral Wall Retainer Usage 28 Product Pusher Usage 28 Return the Trays to the Vending Position 31 Install and Set Price Labels 32 Install Selection ID Labels 34 Set Up The Gum and Mint Unit 36 Install Price Labels 36 Put the Gum and Mint Dispenser in the Loading Positon 36 Load the Gum and Mint Dispenser With Product 37...

Страница 6: ...n 101 6 cm 40 in 90 cm 35 4 in 309 8 kg 830 lbs 786 183 cm 72 in 101 6 cm 40 in 90 cm 35 4 in 298 6 kg 800 lbs 787 183 cm 72 in 81 3 cm 32 in 90 cm 35 4 in 266 9 kg 715 lbs 788 183 cm 72 in 101 6 cm 40 in 90 cm 35 4 in 332 2 kg 890 lbs 789 183 cm 72 in 101 6 cm 40 in 90 cm 35 4 in 321 kg 860 lbs 797 183 cm 72 in 101 6 cm 40 in 90 cm 35 4 in 343 kg 757 lbs 798 183 cm 72 in 101 6 cm 40 in 90 cm 35 4...

Страница 7: ... CRANE NATIONAL VENDORS 784 787 797 798 A B C D E F G H J 1 2 3 4 5 6 7 8 9 Q 0 CRANE NATIONAL VENDORS A B C D E F G H J 1 2 3 4 5 6 7 8 9 Q 0 CRANE NATIONAL VENDORS 785 786 788 789 168 268 765 A B C D E F G H J 1 2 3 4 5 6 7 8 9 Q 0 CRANE NATIONAL VENDORS 167 267 764 A B C D E F G H J 1 2 3 4 5 6 7 8 9 Q 0 CRANE NATIONAL VENDORS 157P0004 ...

Страница 8: ...99 1670001 Model 168 Exterior View Models 167 764 765 have similar appearance CRANE NATIONAL VENDORS CREDIT DISPLAY INDICATOR SELECTION SWITCH PANEL BILL VALIDATOR INSERT COIN INSERT COIN SCAVENGER BUTTON DOOR HANDLE AND LOCK COIN RETURN CUP LEG LEVELERS DELIVERY DOOR ...

Страница 9: ...pearance DELIVERY PAN ASSEMBLY GUM MINT ASSEMBLY DOOR CHECK COIN RETURN CUP LOCK BAR SPIRAL TRAY BASE PLATE REMOVABLE PLATE FOR GETTING THROUGH A NARROW DOOR CASH BOX COIN MECHANISM POWER PANEL BILL VALIDATOR SERVICE KEYPAD MAIN CONTROLLER PCB ASSEMBLY INTERFACE BOARD LOW VOLTAGE SWITCH INTERLOCK SWITCH CABINET LIGHT ASSEMBLY ...

Страница 10: ...LY DOOR CHECK COIN RETURN CUP LOCK BAR SPIRAL TRAY BASE PLATE REMOVABLE PLATE FOR GETTING THROUGH A NARROW DOOR CASH BOX COIN MECHANISM POWER PANEL BILL VALIDATOR SERVICE KEYPAD MAIN CONTROLLER PCB ASSEMBLY INTERFACE BOARD LOW VOLTAGE SWITCH INTERLOCK SWITCH CABINET LIGHT ASSEMBLY CAN MODULE Model 797 Interior View ...

Страница 11: ... 110 130 volts ac for 120 volt 60 Hz locations or 220 240 volts ac for 230 volt 50 Hz locations Polarity Check Place the leads of a voltmeter across the LINE LIVE and GROUND ter minals of the wall receptacle The voltmeter should indicate 110 130 volts ac for 120 volt 60 Hz locations or 220 240 volts ac for 230 volt 50 Hz locations Noise Potential Check Place the test leads of a voltmeter across th...

Страница 12: ...en a selection is sold out and when vending is free inhibited or discounted The message display shows you what you are doing when you program the merchandiser and can show you what is wrong if there is a failure Free Vend Keyswitch optional This allows someone other than maintenance people to set the merchandiser to free vend without opening the door Selection Switch Panel The customer uses these ...

Страница 13: ...ism is not working check this fuse If the fuse is blown a bad coin mechanism solenoid could be at fault Main Controller PCB Display This display consists of two light emitting diodes LED mounted on the controller PCB POWER ON When lit this red LED indicates electrical power is applied to L E D 1 the controller PCB HEARTBEAT When flashing this red LED indicates that the controller PCB is L E D 2 ac...

Страница 14: ...the main power switch located on the power panel The power panel is on the right side of the merchandiser behind the monetary door WARNING Lethal voltages are present Unplug the merchandiser whenever you do one of the following tasks Change a fuse Change the fluorescent lamp Change the lamp starter Connect or disconnect a harness except a motor harness when the tray has been removed Failure to do ...

Страница 15: ... screws that secure each end of the panel to the cabinet 2 Pull the panel forward to remove it from the merchan diser REMOVE THE BOTTOM PANEL 1 Remove the screws that secure the panel to the cabinet 2 Pull the panel forward to remove it from the cabinet REMOVABLE PANEL FOR GETTING THROUGH A NARROW DOORWAY VIEW LOOKING INTO THE TOP OF THE CABINET REMOVABLE PANEL FOR GETTING THROUGH A NARROW DOORWAY...

Страница 16: ...9 797 and 798 merchandisers should be placed at least six inches away from the back wall This will provide adequate air circulation for the refrigeration unit The 764 765 787 788 789 797 and 798 merchandisers will operate more efficiently when placed in a shaded location There should be enough room in front of the merchandiser for the door to move freely WARNING This machine is only rated for inst...

Страница 17: ...785 786 788 789 Grab the booklet entitied HOT DRINK MODULE SETUP AND OPERATOR S GUIDE and follow the setup procedures contained in it After you have done that come right back here and proceed with the next step NOW IF YOUR MACHINE IS EQUIPPED WITH A CAN COLD FOOD OR FROZEN FOOD MODULE Grab the booklet entitied CAN COLD FOOD AND FROZEN FOOD MODULE SETUP AND OPERATOR S GUIDE and follow the setup pro...

Страница 18: ...own 2 Lightly push back on the tray with your palms This will release the tray latches on the sides of the tray 3 Push down on the tray latches with your thumbs 4 Pull the tray toward you until you hear and feel the rear tray rollers drop into a cut out in the top of the guide rail 5 Continue pulling the tray forward for another inch You will then be able to tilt the tray downward into the loading...

Страница 19: ...product steps return to the set up procedures above 1 Remove the tray from the merchandiser and place on a flat surface 2 Based on the size of the product you want to vend decide how many spiral positions it will occupy Please remember that the leftmost spiral in the group must have an even ID number 0 2 4 etc For example if a product is three spirals wide the left spiral will be ID number 0 and t...

Страница 20: ...ay slightly with your palms This releases the tray latches 2 Push down on the tray latches with your thumbs TRAY LATCH TRAY LATCH PULL TRAY LATCH TRAY GUIDE RAIL PC BOARD ATTACHED TO TRAY GUIDE TRAY GUIDE RAIL C D 1 1F 3 Pull the tray forward until you hear and feel the rear tray rollers drop into a cut out in the top of the guide rail 4 Unplug the tray wiring harness from the PC board mounted on ...

Страница 21: ...l and out of the merchan diser CAUTION When the cabinet door is not fully open use extra care in removing the bottom tray Failure to do so may result in damage to the tray or to the delivery pan assembly 5 Lift up on the tray and slide it toward the back No more than an inch should be needed 1 Push the column divider toward the back of the tray 1 2 Lift the column divider clear of the tray 2 3 Ins...

Страница 22: ...ment Center Setup and Operator s Guide Page 16 April 1999 1670001 1 1 81 2 4ABC DEFGFDE 2 23 031 C 82 3 H1 A 8 1I 8 1 8 1 1 81 2 J233 1 031 8 1 1 8 1 8 8 1 9 2 1 8233 I 1 81 8 1 8 2 3 K 198 28 J L 0 1 1 1F 8 4 5124 ...

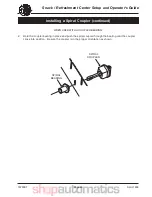
Страница 23: ...stall the spiral coupler See INSTALLING A SPIRAL COUPLER SPIRAL BEARING GEAR SPIRAL COUPLER BACKWALL OF TRAY CAUTION To avoid breaking the motor circuit board hold the header on the circuit board whenever connecting or disconnecting a motor harness DISCONNECTING A MOTOR HARNESS 1 Pull the harness connector away from the circuit board as shown 2 Tuck the unused part of the harness out of the way in...

Страница 24: ...t capacities Four of these are standard and four are options ITEM CAPACITY OF SPIRAL PART NUMBER CLIP COLOR CLOCKWISE RH COUNTERCLOCKWISE LH 6 Optional 1477104 1477102 Purple 11 Standard 1477027 1477024 Blue 13 Standard 1477033 1477030 Yellow 15 Standard 1477039 1477036 Red 20 Standard 1477045 1477042 White 25 Optional 1477051 1477048 Green 30 Optional 1477057 1477054 Black 38 Optional 1477063 147...

Страница 25: ...O INSTALL A SPIRAL 1 Pull the bottom of the retaining clip toward the front of the spiral 2 Lower the spiral into the tray column and insert the end of the spiral into the spiral coupler as shown 3 Release the retaining clip SHOULD I USE A CLOCKWISE OR A COUNTERCLOCKWISE SPIRAL 1 The type of spiral used is determined by the column position it will occupy in the tray 2 Refer to the figure below to ...

Страница 26: ... coupler See REMOVING A SPI RAL COUPLER 5 Lift the motor clear of the tray 6 Return the tray to the merchandiser See INSTALING A TRAY IN THE MERCHANDISER INSTALLING A SPIRAL MOTOR 1 Remove the tray See REMOVING A TRAY 2 Place the motor in the correct position at the rear of the tray as shown 3 Place a gear in position if required by this set up See INSTALLING A GEAR 4 Install a spiral coupler in t...

Страница 27: ...on WHERE ARE THE GEARS PLACED The gear is placed between the back of the tray and the spiral coupler HOW IS THE GEAR ORIENTED There are two possible orientations for the gear There are two rules to follow when orienting gears RULE 1 The gears for selections next to each other cannot use the same orientation RULE 2 All gears for a single selection must use the same orientation BACK WALL OF TRAY GEA...

Страница 28: ...until it clicks into position Be sure the spiral couplers are oriented as shown below NOTE The motor output shaft opening contains eight facets to allow the spiral coupler to be installed in any one of eight positions LEFT SPIRAL COUPLER RIGHT SPIRAL COUPLER AS VIEWED FROM FRONT OF TRAY ONE POSITION COUNTERCLOCKWISE FROM VERTICAL ONE POSITION CLOCKWISE FROM VERTICAL MOTOR SPIRAL COUPLER FRONT VIEW...

Страница 29: ... 1999 WHEN USED WITH A COUPLER BEARING 2 Hold the coupler bearing in place and push the spiral coupler through the bearing until the coupler clicks into position Be sure the coupler is in the proper orientation as shown SPIRAL COUPLER SPIRAL BEARING 9 177 D 1 L0 17 6 07 2 8 ...

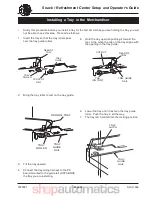
Страница 30: ...he tray guide rails Proceed as follows 1 Remove the tray from the merchandiser See REMOVING A TRAY 2 Remove the screw that secures the right tray guide rail to the front guide mounting channel as shown 3 Tap up on the guide rail and unseat the guide rail tabs from the channel slots 4 Pull the guide rail away from the front and rear guide mounting channels 5 Move the guide rail to the de sired posi...

Страница 31: ... up while pushing it toward the rear Stop when the tab on the tray aligns with the opening in the tray guide 6 Lower the tray until it rests on the tray guide roller Push the tray in all the way 7 The tray latch will fall into the locking position CUT OUT TAB ON TRAY REAR OF TRAY TRAY GUIDE RAIL TRAY ROLLER TRAY GUIDE RAIL REAR OF TRAY TRAY LATCH TRAY GUIDE RAIL TRAY ROLLER TRAY GUIDE REAR OF TRAY...

Страница 32: ...pins into the column divider as shown PRODUCT SPACER COLUMN DIVIDER MOUNTING PINS MOUNTING PINS REMOVING A PRODUCT SPACER Pull the product spacer mounting pins from the column divider ADJUSTING A PRODUCT SPACER With product loaded in the tray ro tate the product spacer up or down to keep the product upright as shown 9 177 D 1 8 C D 1 8 2 L012 ...

Страница 33: ...GE for spirals with capacity of 20 25 30 or 38 Begin loading products at the front of the tray and work toward the back Position the product so the package rests on the tray DO NOT force a product into a spiral If the fit is too tight or too loose change the spiral size See REMOVING AND INSTALLING A SPI RAL Be sure there are no empty positions between products in each spiral SPECIAL CONSIDERATIONS...

Страница 34: ...RIENTATION A DIVIDER ORIENTATION B To install a spiral wall retainer insert the retainer in the square slot near the front of the column di vider The spiral wall retainer must be removed in two cases I O P28IP 8 0 3 1 2 8 128 1 8 1 8J 2 8 282 8 J233 8 931 8 1 18 2 1 8 1 9 3 2 2 1 018J11 8 1 8J 282 I O 98 1 J233 9 89 18 2 1 2 PRODUCT PUSHER USAGE The product pusher will give the top of a product an...

Страница 35: ...cal position The right spiral coupler should be installed one position clockwise from the vertical position Replace the current spirals with six count spi rals These are available from the National Vendors parts department See REMOVING AND INSTALLING SPIRALS A pad can be installed in the bottom of the delivery pan to quiet and cushion product delivery This part is available from the National Vendo...

Страница 36: ...e adjacent positions on the tray NOTE The left most position in the group of three must be an even numbered position 09887 D 9 634 9 A7E Couple the left motor to the right motor See the Programming Guide Load the Top Shelf products as shown 1 REMOVE COLUMN DIVIDERS 2 REMOVE SPIRALS 3 LEAVE THIS MOTOR CONNECTOR ALONE 4 DISCONNECT THIS MOTOR CONNECTOR 5 MOVE CONNECTOR FROM THIS MOTOR TO THIS MOTOR 6...

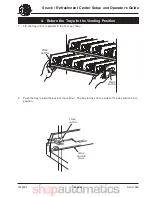
Страница 37: ... 1670001 April 1999 1 Lift the tray until it is parallel to the floor as shown 2 Push the tray toward the back of the cabinet The tray latches on the sides of the tray will lock into position TRAY LATCH TRAY LATCH PULL TRAY LATCH TRAY GUIDE RAIL RB 4 1F 4 M 8 D ...

Страница 38: ... this manual There are two types of price rolls installed Dollar roll 1 to 12 increments of 1 Cents roll 00 to 95 increments of 05 Remove the price rolls as required and install the appropriate one s for your currency INSTALLING PRICE LABELS There are three pairs of slots in the front of the can unit for each position Install per this example 1 Insert the dollar roll in the left most pair of slots...

Страница 39: ...ice roll You can set selection prices within the following range Minimum price 00 Maximum price 12 95 Increment 05 1 Use your thumb as shown to move each price roll up or down as needed to set the desired price NOTE You will see the word STOP near either end of the roll SB 9 177 1 8 L 2 K1T 7 2 8 ...

Страница 40: ...d to separate them along the scored lines between the selections BE CAREFUL when doing this because it is easy to split the labels INSTALLING SELECTION ID NUMBERS 1 Press together the two long edges of the selection ID label 2 Snap the selection ID label into position on the front of the tray as shown SELECTION IDENTIFICATION LABEL CENTS PRICE ROLL DOLLAR PRICE ROLL SELECTION IDENTIFICATION UB 9 1...

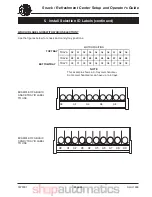
Страница 41: ...C CANDY TRAY ID LABEL TO USE WHICH ID LABEL GOES WITH WHICH SELECTION See the figures below for snack and candy tray positions MOTOR POSITION TOP TRAY TRAY A A0 A1 A2 A3 A4 A5 A6 A7 A8 A9 TRAY B B0 B1 B2 B3 B4 B5 B6 B7 B8 B9 BOTTOM TRAY TRAY C C0 C1 C2 C3 C4 C5 C6 C7 C8 C9 NOTE This example shows a 3 tray merchandiser Some merchandisers can have up to 6 trays UB 9 177 L 7 2 9E K1T 7 2 8 ...

Страница 42: ...the delivery pan assembly and is held in the vending position by two magnets The gum and mint assembly is held in the loading position by a hook and a loop One end of the hook is attached to the right side of the door The loop is mounted on the right side of the gum and mint assembly 1 Use the loop as a handle and raise the gum and mint magazine with your left hand With your right hand move the fr...

Страница 43: ...o may result in personal injury or in damage to the dispenser 2 Move the product pusher into the loading po sition A 33 0 9S 8 1 1 0 A 33 J 8 1 1 3 9S 8 1 8 32 1 2 8 282 3 Load the product A 8 1 98 J 0 T1 1 8 1 3 8 281 2 9 31813 1 8 1 98 18 2 2 32 WARNING Keep your hand on the product pusher until it comes to rest behind the last item in the column Failure to do so may result in personal injury or...

Страница 44: ...DUCER SLOT The two left most vending columns as seen from the loading side can be adjusted for two different widths When a column reducer is in place the width of the column will be 31 16 inches When a column reducer is removed the width of the column will be 37 8 inches TO REMOVE A COLUMN REDUCER 1 Pull the reducer away from the cabinet door to disengage the locking tabs 2 Lift up to remove the r...

Страница 45: ...G LEVELER SPIRIT LEVEL CRANE NATIONAL VENDORS 1 Place a spirit level on the top front edge of the cabinet with the door fully closed Adjust the front legs only until the cabinet is reasonably level figure 1 2 Hold the door open about 4 inches This relieves any stress the door may be placing on the cabinet WARNING Have an assistant hold the merchandiser while you adjust the leg levelers 3 Adjust th...

Страница 46: ...NDENSATE DRAIN TUBE TO CONDENSATE PAN NEW DRAIN TUBE ID REFRIGERATION MODULE HOUSING TO EXTERNAL DRAIN OR OVERFLOW BUCKET METHOD 1 CAUTION Do not close off all discharge vents Doing so can damage the refrigeration unit The air discharge and return vents are located in the right front and rear side wall The vents are ad justed by loosening the screw and sliding the air duct shutter up or down as re...

Страница 47: ...the two carriage bolts Tighten the carriage bolts and nuts 6 Loosen the right leg assembly hex screws to allow mounting the other base plate bracket 7 Secure the other base plate bracket to the right leg assembly using the two hex head screws Tighten the hex head screws 8 Insert the short arms of the slides into the hinged tabs of the base plate Position the slide so the notch near the short arm i...

Страница 48: ...h the cylinder into the cylinder receptacle in the lever The pin should snap into the square hole 5 If the cylinder pin does not seat in the square hole press against both ends of the lock cylinder Rotate the cylinder until the pin snaps into place 6 Leaving the door open test the lock mechanism with a key LOCK SPRING KEY LOCK CYLINDER LEVER SQUARE HOLE LOCK BAR SCREW NUT WASHER LOCK CYLINDER 1 Re...

Страница 49: ...RTER SWITCH 1 Open the cabinet door 2 Open the monetary door 3 Insert coins one at a time until each of the coin tubes has been filled 4 Inspect the tubes for shingled coins and correct if necessary QUARTER SWITCH POSITION ACTION LOW The coin mechanism will only store 6 quarters The rest are sent to the coin box Fewer quarters are available for change HIGH The coin mechanism will store 69 quarters...

Страница 50: ...s Enter custom display messages And much more 1 Press The display shows This display shows the maximum and minimum prices set in the machine 2 Press the number of the selection to be priced Example B1 The display shows Enter a price using the number keys The selection is now priced 3 Press another letter key or to price another selection NOTE Refer to your Programming Guide for other pricing optio...

Страница 51: ...problems perform the operational readiness checks begin ning on the next page 1 Press The display shows 2 Deposit coins and or currency to establish credit higher than the price of the selection The display shows XX is the amount of credit you established 3 Use the selection switch panel to enter the selection number you want to vend The display shows XX is the price of the selection The selection...

Страница 52: ...rocedures involve rotating spirals one position at a time until the product vends properly 1 Home all the motors see the Programming Guide 2 Remove the affected spiral 3 Is the coupler in the proper position I V 1 8 1 9 31 8 8 1 282 J 2 F 0 R 8 81 G I V 1 8 1 9 31 8 8 1 1 8 93 9SJ2 1 282 42 28W 2 8I 8 6 8 1 1 8 9 81 93 9SJ2 1 282 42 28W 31 8I 8 R 8 81 4 Replace the spiral 5 Perform a test vend see...

Страница 53: ... see the previous page 9 Did the product hang up I X W 1 2 2 1 K 82 1 8 81 8 1 8 1 1 2 2 131982 823 1 1 8 2 J S 2 8 G I R 8 81 DF 10 Did you previously move the left hand coupler to the next counterclockwise position I Y1 1 8 1 31 8 2 3 8 1 1981 2 8 1 31 8 2 3 9 31 8 8 1 1 8 9 81 I 93 9SJ2 1 282 Y18 8 81 G I Y18 8 81 M 2 8 1 1 82 3 1 2 1 9 19S 8 8 1 91 1 Z 8 1 8 1 9 31 2 1 Insert a 1 bill into the...

Отзывы: