background image

16

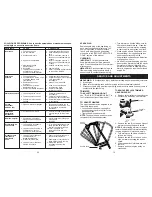
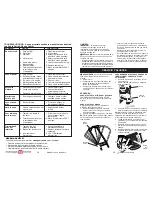
Does not start 

1.  Dirty air filter. 

1.  Clean/replace air filter.


2.  Out of fuel. 

2.  Fill fuel tank.


3.  Stale fuel. 

3.  Empty fuel tank and refill


  with fresh, clean gasoline.


4.  Water in fuel. 

4.  Empty fuel tank and refill


  with fresh, clean gasoline.


5.  Spark plug wire is  

5.  Connect wire to spark plug.


disconnected. 


6.  Bad spark plug. 

6.  Replace spark plug.


7.  Throttle control lever not 

7.  Move throttle lever to FAST


  in correct position 

  position. 


(if 

equipped).

Loss of power 

1.  Dirty air filter. 

1.  Clean/replace air filter.


2.  Buildup of grass, leaves, 

2.  Clean underside of trimmer 


  and trash under trimmer. 

  and trimmer head. 


3.  Too much oil in engine. 

3.  Check oil level.


4.  Walking speed too fast. 

4.  Trim at slower walking speed.


5.  Blocked spark arrestor. 

5.  Clean spark arrestor screen.


Excessive 

1.  Lines uneven or broken. 

1.  Check trimmer lines.

Vibration


2.  Loose nuts or bolts. 

2.  Check all hardware,


 including 

engine 

bolts.


3.  Damaged trimmer head. 

3.  Check/repair trimmer head.

Starter rope


1.  Bent engine crankshaft. 

1.  Contact a Sears or other

hard to pull


 qualified 

service 

center.

Loss of head


1.  Belt not driving. 

1.  Put belt on pulleys or 


drive 


  replace belt if broken.

Hard to push


1.  Handle height position not  1.  Adjust handle height 


right for you.  

  to suit.

Poor trimming 

1.  Trimmer line length is 

1.  If line is worn or broken to

performance


  too short. 

  half of original length,


 replace 

line.


2.  Throttle control lever not 

2.  Move throttle lever to FAST


  in correct position 

   position. 


(if 

equipped).

Trimmer head


1.  Trimmer line not 

1.  Follow instructions in

does not


 properly 

installed. 

 Maintenance 

section.

retain line 

2.  Broken line retainer clip. 

2.  Replace string carrier plate  


 assembly.


3.  Incorrect size of 

3.  Use .155 diameter


 trimmer 

line. 

 trimmer 

line.

NEED MORE HELP?

You'll find the answer and more on 

managemyhome.com – for free!

•  Find this and all your other product manuals online.

•  Get answers from our team of home experts.

•  Get a personalized maintenance plan for your home.

•  Find information and tools to help with home projects.

                                                                                       brought to you by Sears

PROBLEM CAUSE 

CORRECTION 

TROUBLESHOOTING - See appropriate section in manual unless directed 

to a Sears Parts & Repair Center.

29

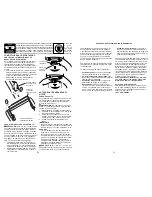
PARA REMOVER/AJUSTAR LA CORREA DE 

IMPULSIÓN DEL CABEZAL DE LA RE-

CORTADORA

1.  Remueva el tornillo en el frente de la cubi-

erta del chasis. 

2.  Gire la cubierta hacia arriba y a distancia 

de la recortadora. 

SERVICIO Y AJUSTES

  ADVERTENCIA: 

Para evitar lesiónes serias 

ntes de dar cualquier sercicio o de hacer 

ajustes:

1.  Pare el motor.

2.  Asegúrese que las líneas rotatorias y que 

todas las partes movibles se hayan de-

tenido completamente.

3.  Desconecte el alambre de la bujía y pón-

galo en donde no pueda entrar en contacto 

con ésta.

SEGADORA

PARA AJUSTAR LA ALTURA DEL RECORTE

Vea “PARA AJUSTAR LA ALTURA DEL RE-

CORTE” en la sección de Operación de este 

manual.

PARA AJUSTAR EL MANGO

El mango superior puede ser ajustado en 

diferentes posiciones de altura

1.  Afloje la perilla del mango lo suficiente  

para permitir que el mango gire hasta la 

posición deseada. 

2.  Apriete la perilla del mango de modo firme.

NOTA:

 La parrilla y la perno del mango pueden 

ser invertidos para las operaciones sobre el 

lado izquierdo.  

Manilla de 

mango

Mango 

superior

3.  Remueva los dos (2) tornillos de los lados 

de la recortadora que aseguran el blindaje.

AVISO:

 Antes de inclinar la recortadora para 

remover la correa de impulsión, drene el 

tanque de combustible haciendo funcionar el 

motor hasta que el tanque esté vacío.

4.  Ponga la recortadora en su lado con el 

carburador y con el tapón del combustible 

hacia arriba. 

5.  Remueva los dos (2) tornillos de la parte 

inferior de la recortadora que aseguran el 

blindaje.

6.  Desliza el blindaje hacia atrás y remuevalo.

7.  Remueva la correa de la polea del motor 

sobre el cigüeñal. 

Cubierta 

del chasis

Tornillo

Tornillos del blindaje

Polea 

del 

motor

LIMPIEZA

IMPORTANT:

  Para obtener el mejor 

rendimiento, mantenga la caja de la 

recortadora sin acumulación de césped y 

residuos. Limpie la parte de su recortadora 

después de cada uso.

 PRECAUCIÓN: 

Desconecte el alambre de la 

bujía y póngalo en donde no pueda entrar en 

contacto con ésta. 

• Haga descansar la recortadora en su lado. 

Asegúrese que el filtro de aire y que el carbura-

dor queden mirando hacia arriba. Limpie la par-

te inferior de su recortadora raspándola para 

remover la acumulación de césped y residuos.

•  Limpie el motor a menudo para evitar la 

acumulación de residuos. Un motor tapado 

funciona a temperatura más alta y se acorta 

su duración.

•  Mantenga las superficies limpias y las rue-

das sin gasolina, aceite, etc.

•  No recomendamos el uso de una manguera 

de jardín para limpiar la recortadora a menos 

que el sistema eléctrico, el silenciador, el 

filtro de aire y el carburador estén tapados 

para evitar que les entre el agua. El agua en 

el motor puede acortar la duración de éste.

Содержание 917.776741

Страница 1: ...d and follow all Safety Rules and Instructions before operating this equipment Owner s Manual WHEELED WEEDTRIMMER 675 Series Briggs Stratton Engine 22 Inch Cut Sears Brands Management Corp Hoffman Estates IL 60179 U S A Visit our Craftsman website www craftsman com Español p 18 ...

Страница 2: ...objects thrown into the eyes which can result in severe eye damage Always wear safety glasses or eye shields while operating your trimmer or performing any adjustments or repairs We recommend standard safety glasses or a wide vision safety mask worn over spectacles WARNING In order to prevent acci dental starting when setting up transport ing adjusting or making repairs always disconnect spark plu...

Страница 3: ... the area of objects such as rocks toys wire bones sticks etc which could be picked up and thrown by the spinning lines Be sure the area is clear of other people before trimming particularly small chil dren and pets Stop machine if anyone enters the area Wear appropriate clothing such as a long sleeved shirt or jacket Also wear long trousers or slacks Do not wear shorts Do not wear loose clothing ...

Страница 4: ...nt if you strike an object Repair if necessary before restarting Do not change the engine governor set ting or overspeed the engine Clean and replace safety and instruction decals as necessary Serial Number Date of Purchase Gasoline Capacity Type 1 6 Quarts Unleaded Regular Oil Type API SJ SN SAE 30 above 32 F SAE 5W 30 below 32 F Oil Capacity 15 5 Ounces Spark Plug Gap 020 Autolite 3924 Trimmer L...

Страница 5: ...nt of 10 from regular price of service and service related parts not covered by the agreement also 10 off regular price of preventive mainte nance check Fast help by phone phone sup port from a Sears representative on products requiring in home repair plus convenient repair scheduling Once you purchase the Agreement a simple phone call is all that it takes for you to schedule service You can call ...

Страница 6: ...ithtrimmer 2 Cut down two end corners of carton and lay end panel down flat 3 Remove all packing materials 4 Roll trimmer out of carton and check car tonthoroughlyforadditionallooseparts HOW TO SET UP YOUR TRIMMER TO UNFOLD HANDLE IMPORTANT Unfold handle carefully so as not to pinch or damage control cables 1 Loosen handle knob enough to allow upper handle to be unfolded from the shipping position...

Страница 7: ...PERATING YOUR TRIMMER Compare the illustrations with your trimmer to familiarize yourself with the location of various controls and adjustments Save this manual for future reference Starter handle Gasoline cap Air filter Trimmer head Handle knob Trimmer line Engine oil cap w dipstick Chassis cover Trimmer head control bar Engine brake control Trimmer head control lever Engine brake control used fo...

Страница 8: ...r Theoperationofanytrimmercanresultinforeignobjectsthrown into the eyes which can result in severe eye damage Always wear safety glasses or eye shields while operating your lawn mower or performing any adjustments or repairs We recom mendstandardsafetyglassesorawidevisionsafetymaskoverspectacles Use ear protec tors to a v o i d damage to hearing 37 CRAFTSMAN WEED TRIMMER MODEL NUMBER 917 776741 KE...

Страница 9: ...d gasoline with a minimum of 87 octane Do not mix oil with gasoline Pur chase fuel in quantities that can be used within 30 days to assure fuel freshness CAUTION Alcohol blended fuels called gasohol or using ethanol or methanol can attract moisture which leads to separation and formation of acids during storage Acidic gas can damage the fuel system of an engine while in storage To avoid engine pro...

Страница 10: ...55 inch diameter trimmer line Cut new trimmer line length to 18 3 4 inches After new line is installed on trimmer head check all lines so they do not vary more then one 1 inch in length This is important to make sure the trimmer head is balanced and will not vibrate abnormally 35 KEY PART NO NO DESCRIPTION 1 Engine Briggs Stratton Model No 103M02 0008 F1 See Breakdown 2 150406 Bolt Engine Mounting...

Страница 11: ... and insert folded end through carrier plate opening to back side of retainer clip 4 With folded end of line at back side of retainer clip pull line outward until line is fully seated under the retainer clip 5 Repeat on other side of carrier plate 6 Check all lines to be sure they are the same length 7 Reconnect spark plug wire to spark plug New trimmer line Chassis cover WRAP LINE AROUND End of s...

Страница 12: ...ual 6 Replace engine oil cap 7 Reconnect spark plug wire to plug AIR FILTER Your engine will not run properly and may be damaged by using a dirty air filter Replace the air filter cartridge every 100 hours of operation or every season whichever occurs first Service air cleaner more often under dusty conditions TO CLEAN AIR FILTER 1 Remove cover 2 Carefully remove cartridge 3 Clean by gently tappin...

Страница 13: ...ea de medida incorrecta recortadora de diámetro 155 inch PROBLEMA CAUSA CORRECCIÓN SOLUCIÓN DE PROBLEMAS Vea la sección apropiada en el manual amenos que esté dirigido a un centro de servico Sears 13 TRIMMER TO ADJUST TRIMMING HEIGHT See TO ADJUST TRIMMING HEIGHT in the Operation section of this manual TO ADJUST HANDLE The upper handle may be adjusted to dif ferent height positions Loosen handle k...

Страница 14: ... pintura picada use una lija antes de pintar MANGO Usted puede plegar el mango de su recorta dora para el almacenaje Afloje la perilla del mango lo suficiente para permitir al mango superior ser plegado hacia adelante IMPORTANTE Cuando doble el mango para el alacenamiento o el trasporte asegurese que lo doble segun se muestra o puede danar los cables de control MOTOR SISTEMA DE COMBUSTIBLE IMPORTA...

Страница 15: ...esarios 15 STORAGE Immediately prepare your trimmer for stor age at the end of the season or if the unit will not be used for 30 days or more TRIMMER When trimmer is to be stored for a period of time clean it thoroughly remove all dirt grease leaves etc Storeinaclean dryarea 1 Cleanentiretrimmer See CLEANING in theMaintenancesectionofthismanual 2 Lubricate as shown in the Mainte nance section of t...

Страница 16: ...ta hacia arriba y a distancia de la recortadora SERVICIO Y AJUSTES ADVERTENCIA Para evitar lesiónes serias ntes de dar cualquier sercicio o de hacer ajustes 1 Pare el motor 2 Asegúrese que las líneas rotatorias y que todas las partes movibles se hayan de tenido completamente 3 Desconecte el alambre de la bujía y pón galo en donde no pueda entrar en contacto con ésta SEGADORA PARA AJUSTAR LA ALTURA...

Страница 17: ...es como el keroseno no se deben usar para limpiar el cartucho Pueden producir el deterioro de éste No aceite el cartucho No use aire a presión para limpiarlo o secarlo 4 Instale el cartucho luego vuelva a poner la cubierta Envase Oreja Cartucho Cubierta del filtro de aire Ranura BUJÍA Cambie el bujía al comienzo de cada tempo rada de siega o después de cada 100 horas de operación lo que suceda pri...

Страница 18: ...ualquier recortadora puede hacer que salten objetos extraños dentro de sus ojos lo que puede producir daños graves en éstos Siempre use anteojos de seguridad o protección para los ojos mientras opere su recortadora o cuando haga ajustes o reparaciones Recomendamos gafas de seguridad o una máscara de visión amplia de seguridad usada sobre las gafas productos químicos conocidos en el Estado de Calif...

Страница 19: ...a puede esconder obstáculos NO No recorte cerca de pendientes zanjas o terraplenes El operador puede perder la tracción en los pies o el equilibrio No recorte cuestas demasiado inclinadas No recorte en hierba mojada La reducción en la tracción de la pisada puede causar resbalones III NIÑOS Se pueden producir accidentes trágicos si el operador no presta atención a la presencia de los niños A menudo...

Страница 20: ...ual quier acumulación de hierba Mantenga la superficie del motor alrededor del arranca dor despejado y limpio de recortes Esto facilitará el flujo de aire de motor y alargará la vida del motor Para mejores resultados y una línea du radera utilice los extremos de la línea para hacer el corte Esto se puede hacer con facilidad al mover lentamente través de las malas hierbas Utilizar el lado izquierdo...

Страница 21: ...ste situado en una de las seis 6 posicio nes de la altura PARA ACCIONAR EL CABEZAL DE CORTE Barra de mando del cabizal de la recortadora Palanca de control del cabezal de corte CÓMO UTILIZAR SU RECORTADORA La operación de cualquier recortadora puede hacer que salten objetos extraños dentro de sus ojos lo que puede producir daños graves en éstos Siempre use anteojos de seguridad o protección para l...

Страница 22: ...a la barra del control del cabezal de la recorta dora al mango superior El mango de su recortadora puede ajustarse según le acomode para recortar Refiérase a AJUSTE DEL MANGO en la Sección de Servicio y Ajustes de este manual INSTALACIÓN DEL CORDÓN ARRANCADOR 1 Afloje una manilla T 2 Mueva la palanca de control del freno de motor a la posición de MARCHA RUN 3 Lentamente tire el cordón arrancador d...

Отзывы: