


9
ASSEMBLY
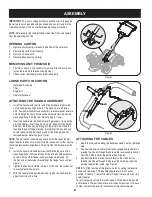
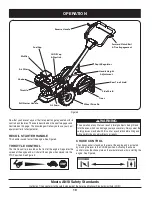
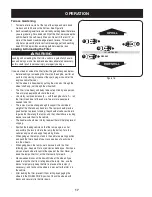
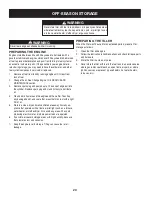
Figure 4
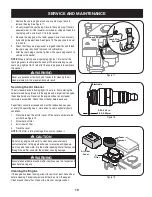
Figure 5
Click Pin
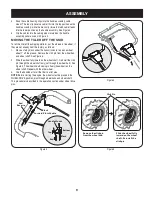
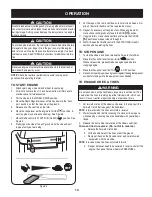
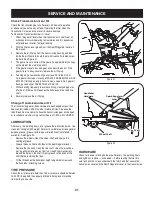
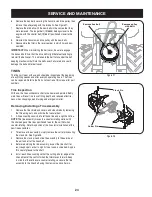
Snap the cable housing clips into the handle assembly cable
4.
mount. The red clip (reverse cable) fits into the top position on the
handle assembly, while the black clip (forward/clutch cable) feeds
into the lower position on the handle assembly. See Figure 3.
Clip the cables into the cable guides located on the handle
5.
assembly panel as seen in Figure 4.
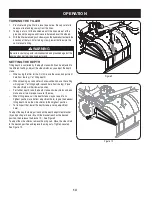
MoVing The Tiller off The SkiD
To roll the tiller off the shipping platform, put the wheels in freewheel, if
they are not already from the factory, as follows:
Place a sturdy block under the transmission to raise one wheel
1.
about 1” off the ground. Remove the click pin from the wheel hub
and wheel shaft. See Figure 5.
Slide the wheel fully inward on the wheel shaft . Reinstall the click
2.
pin through the wheel shaft only (not through the wheel hub). See
Figure 4. The wheel should now spin freely (freewheel) on the
wheel shaft. Repeat with the other wheel.
Use the handlebar to roll the tiller to a flat area.
3.
NOTE
: Before starting the engine, the wheels must be placed in the
WHEEL DRIVE position (pins through wheel hubs and wheel shaft).
This procedure is described in the operation section under wheel drive
pins.
remove the click pin
from the wheel hub
slide the wheel fully
inward on the wheel
shaft . reinstall the
click pin
Figure 3
Black
forward/Clutch Cable
red
reverse
red
Black
Handle Mount
top
Bottom


