


12
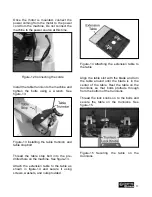
Install the table insert in the center of the
table and the table lock pin to the end of the
table slot as shown in figure-16.
Figure-16 Installing the table insert and
table lock pin
Attach the dust port to the machine and
secure it using screws provided. See figure-
17.
Figure-17 Installing the dust port
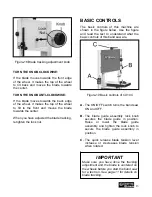
BLADE TRACKING
ADJUSTMENT
The blade tracking refers to where blade
rides on the upper and lower wheels. The
blade should always be centered on both
wheels.
Although the blade tracking of this band
saw is factory set, you should check it again
to make sure that the blade is centered on
the wheels. The blade tracking can be
controlled by adjusting the upper wheel tilt
lock knob. See figure-18.
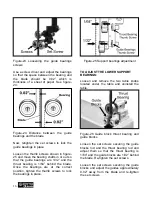
TO CHECK AND ADJUST THE BLADE
TRACKING:
Disconnect the machine from the power
source and open the upper wheel cover.
Rotate the upper wheel by hand slowly and
see how the blade rides on the wheel.
If the blade is not properly aligned and
needs to be adjusted, loosen the lock nut
shown in figure-18 and turn the knob.
IMPORTANT
In very rare cases if the blade tracking is
not adjusted by tilting the upper wheel,
then you will have to make minor
adjustments to the angle of tilt of the
lower wheel. Loosen the four hex bolts
and rotate the sleeves to tilt the lower
wheel to get the proper angle of tilt and
tighten the bolts back. Remember, this
adjustment is done only if the blade
tracking is not adjusted by tilting the
upper wheel.
Содержание CX104
Страница 1: ...CX104 14 WOOD BAND SAW User Manual ...
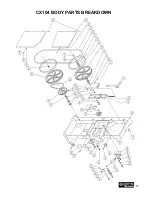
Страница 25: ...25 CX104 BODY PARTS BREAKDOWN ...
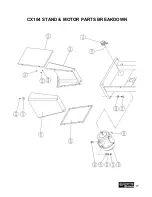
Страница 27: ...27 CX104 STAND MOTOR PARTS BREAKDOWN ...
Страница 29: ...29 CX104 TABLE PARTS BREAKDOWN ...