Copland DRC205 Скачать руководство пользователя страница 7


3

'


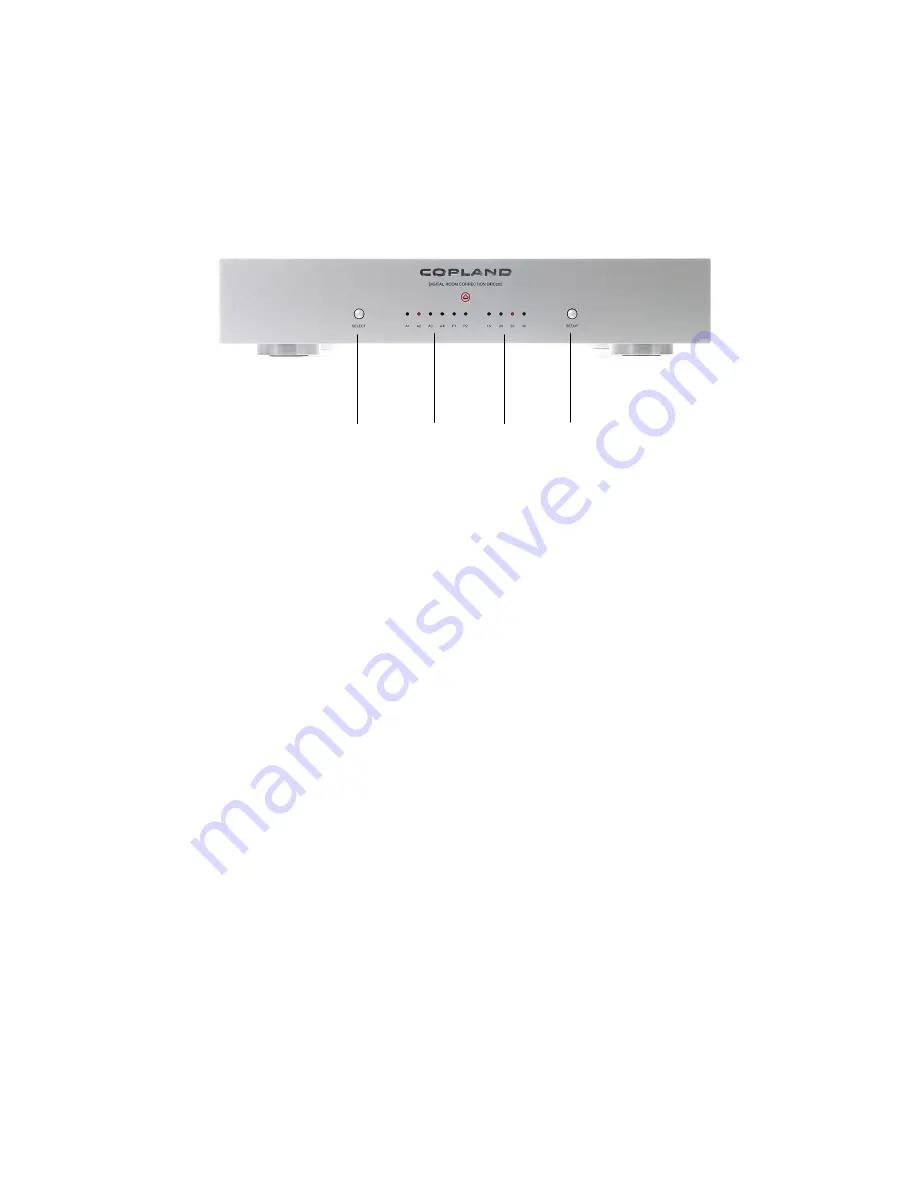
The following description of the front panel may help you locating the operation features of 

the unit. 

Note that all functions are disabled on the front panel when the DRC205 is operated via a 

Windows compatible PC/Computer! 


 1                  2                3              4 


' '

'4 &

By pressing this button, the unit will be switched between the 6 (six) different 

playback programmes. 

Each time the key is pressed the programme is switched cyclically between A1, A2, A3, A4, P1 

and P2 programmes. Detailed information about the programmes can be found on following 

sides of this user guide.


The [Select] key changes the tonal characteristic of the calibrated audio system 

according to the programmes A1, A2, A3, A4, P1 and P2. 


The [Select] key may be pressed upon desire during playback. 


The [Select] key should not be activated during set-up and calibration! The [Select] 
key is only for playback operation. 


42

$

'

&

  LED indicator lamps will light when [Select] of A1, A2, A3, 

A4, P1 or P2 is selected for playback mode. 


Detailed information about the playback modes can be found on the following sides.


+

2

%

'

5 '

&

LED will light for the selected cut-off frequency for 

the subsonic protection filters (controlled by the [High-Pass] key on the rear-panel of the unit). 


The subsonic protection filter is only active during set-up and calibration of the unit. 


See more details about the recommended settings of [High-Pass] key on rear-panel of the unit 

below! 


.

'

% '4 &

 By pressing this button continuously for at least 3 (three) seconds,  the 

automatic set-up and calibration function of the unit is activated. 


Do not press the [Setup] key during normal playback !  


Содержание DRC205

Страница 1: ...1...

Страница 2: ...ust below the AC Power inlet This may cause fire hazard damage to equipment or personal hazard Dangerous voltage inside Do not open the cabinet There are no user serviceable parts inside Repairs shoul...

Страница 3: ...The DRC205 is supplied in either 110 120 Volt 50 60 Hz versions or 220 240 Volt 50 60 versions Only use a version compliant with your wall outlet voltage Do not connect the AC Power to the mains sock...

Страница 4: ...need to be connected to the unit during normal playback operation However the Windows compatible PC computer can be used to control the DRC205 if desired This is an advantage during manual set up of P...

Страница 5: ...EFAULT at Position 3 Important note Do NOT change the default setting to a lower value unless you are sure that your loudspeaker as minimum fulfils our recommendations Important note Copland cannot be...

Страница 6: ...be impaired Dynamic range will be impaired Connect the DRC205 Inputs to the Outputs of the TAPE MONITOR connection of your amplifier Alternative operation If no TAPE MONITOR is available Connect the...

Страница 7: ...ct key may be pressed upon desire during playback The Select key should not be activated during set up and calibration The Select key is only for playback operation 42 LED indicator lamps will light w...

Страница 8: ...ristics The playback modes determine the tonal balance of the compensated audio system Pre programmed playback mode A1 changes the overall sound characteristics to the below frequency response The bas...

Страница 9: ...ferences of musical sound characteristic rather than technical sound characteristics 10Hz 50Hz 100Hz 500Hz 1kHz 5kHz 10kHz 20kHz 0dB 4dB 8dB 12dB 16dB 4dB 8dB 12dB 16dB 20dB 20dB T ARGETCURVE BRIT IS...

Страница 10: ...characteristic rather than technical sound characteristics A3 suits most classic designed high fidelity loudspeakers 10Hz 50Hz 100Hz 500Hz 1kHz 5kHz 10kHz 20kHz 0dB 4dB 8dB 12dB 16dB 4dB 8dB 12dB 16d...

Страница 11: ...aging to your system Do not operate the Copland DRC205 before the following basic set up has been carefully and correctly done The Copland DRC205 must be set up to match your loudspeakers bass capabil...

Страница 12: ...ing performed the Operational set up then the Copland DRC205 is ready for room acoustics analysis and automatic systems calibration The following describe the analysis and calibration when operated di...

Страница 13: ...urements will start in five seconds giving you time to take the microphone to the listening position 5 Hold the microphone as steady as possible in your preferred listening position during the measure...

Страница 14: ...isplay the playback mode selected Select the desired playback programme and enjoy your audio system s performance with room compensation applied Explanation The audio signal is muted for a moment when...

Страница 15: ...05 via a computer the software on the following CD ROM must be installed on a Windows 98 ME 2000 XP compatible PC computer Connect the USB cable to the Computer connector on the rear panel of the Copl...

Страница 16: ...e on the menu Note On this revision of the Copland DRC205 only ENGLISH language is available After having selected your preferred language please press Next on the above menu The following menu will a...

Страница 17: ...then installation software suggests installing the software in C programs DRC205 as default software directory Note If so desired you may install the Copland DRC205 in another directory by inputting t...

Страница 18: ...s The installation software suggests setting up a program folder called DRC205 which will contain access to the Copland DRC205 software Note If so desired you may install the Copland DRC205 in another...

Страница 19: ...top for quick access to the Copland DRC205 software on your PC computer Please select Yes or No for setting up icon s on your desktop Note Quick Launch Toolbar is not available on present revision of...

Страница 20: ...install the Copland DRC205 software on your PC computer Press Cancel if you do not wish to copy and install the software After having pressed Next the installation software automatically copy and ins...

Страница 21: ...program launch menu The Copland DRC205 must be connected and operational If the Copland DRC205 is not connected to the PC computer or is not powered up the software will display a warning of no connec...

Страница 22: ...are This is done by the roll down menu on the upper right corner of the below screen COM port roll down menu Connect Change the COM port setting to another available COM port in the COM port roll down...

Страница 23: ...ame when using the Copland DRC205 software E g microphone operation and handling is similar to operating the unit from the front panel Important note Refer to operation from front and rear panel for g...

Страница 24: ...ency response that are dependent upon position Furthermore the human ear is insensitive to narrow band dips so leave the narrow band dips as they are The Copland DRC205 has already optimised for best...

Страница 25: ...ation and manual analysis of the stereo systems performance before and after applying Copland DRC205 room compensation Unlike some other room compensation systems the Copland DRC205 shows the genuine...

Страница 26: ...ide some tips in regard to usage of the Target Curve filters Filter types used to tweak the tonal balance of the stereo system Peaking Filter The Peaking Filter has basically the same function as any...

Страница 27: ...to the other loudspeaker driver units in the loudspeaker system Important note Respect the guidelines provided in the previous section for optimum usage and results To use the Shelving Low filter sel...

Страница 28: ...your loudspeaker Copland has already increased insufficient SPL by the automatic DDRC algorithm On the Bi Quad graph the resulting response of the Shelving Low Filter may be observed and the resulting...

Страница 29: ...le SPL Hereby no risk of overloading your amplifier or loudspeakers may occur The only change required may be that the volume control of your amplifier may have to be turned a little upwards to result...

Страница 30: ...ut box Select the Q bandwidth so the desired transfer function appears for Low pass Filter Low Q below 0 7 results in filters with smooth roll off and high Q above 0 7 results in filters that overshoo...

Страница 31: ...High pass filter will roll off frequencies above the selected Fc and it used to limit the lower frequency of a system Otherwise similar to the Low pass filter An example of a 1000 Hertz Shelving High...

Страница 32: ...be done by pressing SEND after having changed a filter parameter Important note In case audible distortion occurs after having pressed SEND then change the settings back to a Target Curve where no di...

Страница 33: ...ppears Press Yes for uninstalling all Copland DRC205 software from the PC computer Press No to cancel uninstall In case uninstall has been selected the uninstall dialog box see below will occur showin...

Страница 34: ...number is located on the Rear panel 7 Important note Your Copland DRC205 is loaded with the DDRC V2 dual module engine by delivery and does only work with dual module compliant upgrades Downloading a...

Страница 35: ...alog box when updating the firmware IMPORTANT Always make sure that the power connection to the wall is switched ON and that the power cord is securely attached both to the wall outlet as well as the...

Страница 36: ...MS Factory set Jumpers for 2 0V and 3 0V Output Analogue RCA 2 4V RMS Microphone Input 3 5mm Jack Calibrated to featured microphone Power consumption 7 W Nominal voltage 115V or 230V factory set for d...

Отзывы: