8
8. Getting Started
8.1 Switching the
G2
On
To switch your
G2
on by pressing the Power ON/OFF button, which is located at the back of your
G2
, and 2 “beep” sounds
will be heard. Power will automatically be turned off if there are no user actions for 60 seconds. Alternatively, the power
can be turned off manually by pressing the Power ON/OFF button again.
Ensure all images have been process correctly
before switching off.
When you turn the power on, the Red LED will light when your
G2
is ready to take an image. If the memory is full, the Red
LED will remain on even though the Status LCD will indicate that the power is on. The LCD will display the number of images
that have been taken.
8.2
G2
Controls
Your
G2
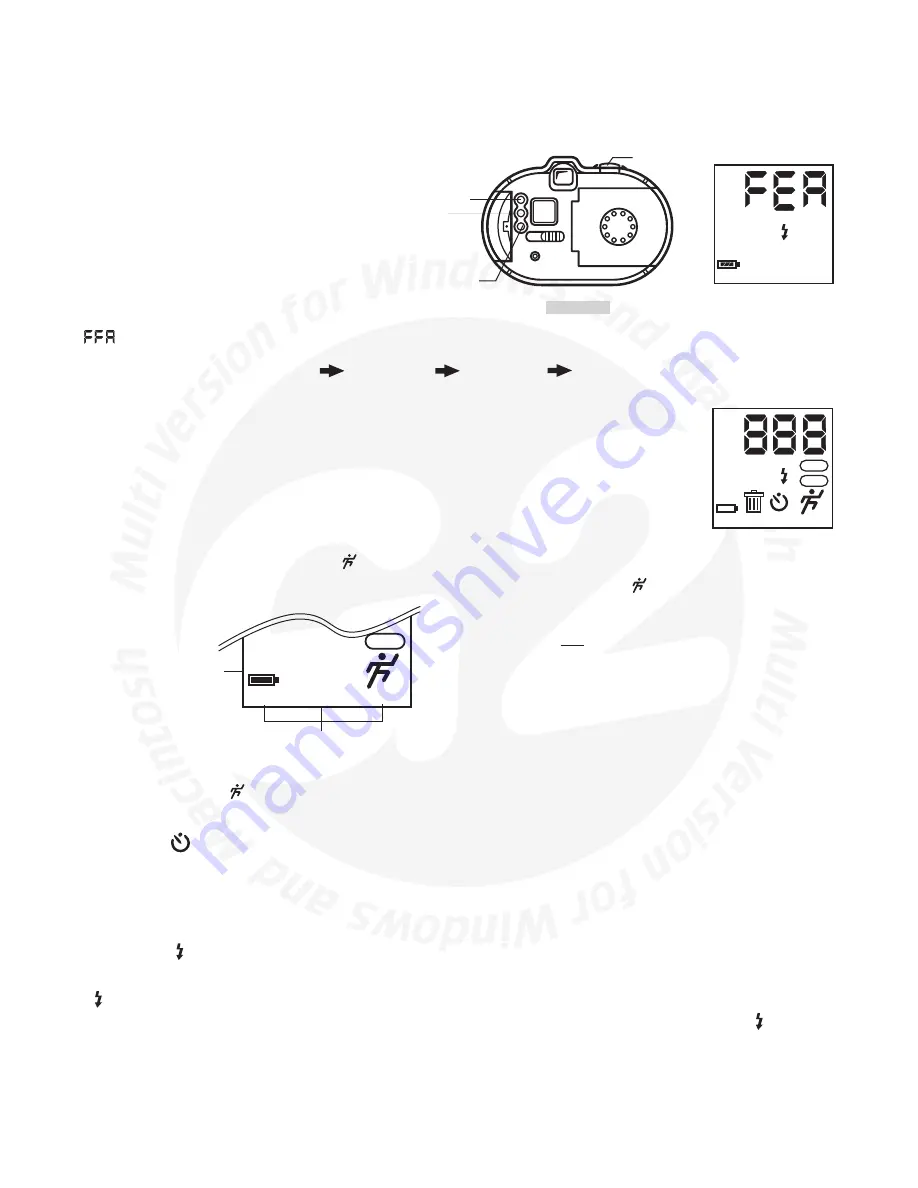
contains 4 buttons and a LCD display.
Back View
Shutter Button
Feature Button
Power ON/OFF
Feature Change &
Self-timer ON/OFF Button
HIGH
• Feature Button
Pressing the Feature Button will enter the Feature
Setting Mode and will cause only one of the LCD
Feature icons to be displayed. Pressing the Feature
Button cycles through which Feature is currently
selected. Pressing the Feature Change Button (same
as Self-Timer ON/OFF) changes the setting of the
selected feature. While in the Feature Setting Mode,
will appear on the LCD.
Pressing the Feature Button moves through the features in this sequence:
Image Setting
Auto-Flash
TV Format
Delete All Images
Feature Mode can be exited by any of these methods:
• pressing the Feature Button again after the last feature in the sequence.
• a 10 second period with no button presses
After Feature Mode is exited, your
G2
will be ready for image taking.
• Status LCD
The Status LCD contains several useful items of information. It can be used to monitor the status of
your
G2
or it can be used to change your
G2
’s settings through use of the Feature Button
.
2X
HIGH NORMAL LOW
PAL
NTSC
Using the Feature and Feature Change Button:-
The first feature is the Image Setting. After pressing the Feature Button, depending upon the current
G2
setting, either
HIGH
/ NORMAL / LOW, 2X
(Digital Zoom), or icon will be displayed. Pressing the Feature Change Button will rotate between
the various settings for the Image Quality Feature.
The
HIGH / NORMAL / LOW and 2X
settings are all used for capturing still images. The icon setting is used for captur-
ing QuickTime motion movie clips.
2X
HIGH NORMAL LOW
NTSC
Resolution
Digital Zoom
Normal
High
JEPG 70
Low
2X Diigtal Zoom
Movie
JEPG 90
JEPG 90
Sequential 90
1280 x 960
(software enhanced)
640 x 480
320 x 240
160 x 120
640 x 480
Image Setting
Compression
Resolution (Pixels)
In Low Resolution settings, the entire image is sub-sampled down to the indicated resolution. In the 2X Digital Zoom setting
the central portion is cropped from the image, to simulate zooming in with a lens of twice the focal length.
When the Movie setting is active,
G2
will capture motion movie clips at 160 x 120 resolution, in the form of .MOV files.
Once Image Setting is at the desired choice, press the Feature Button to move to the next feature or press the Feature Button
again after the last in sequence or wait 10 seconds with no button presses for the
G2
to set to image taking mode.
• Self-Timer
After exiting the Feature Setting Mode press the Feature Change/Self-Timer Button to switch between Self-Timer On or Self-
Timer Off.
To capture an image using the self-timer, press the
Shutter Button
to initiate the countdown. The 12-second delay is
indicated by the Power On LED (Red) flashing.
The Self-timer is automatically reset to Off after each image capture. You need to set the Self-timer on each time you want
to use it.
• Flash Mode
• Flash Off -- The Flash is disabled no matter what the ambient brightness of the surroundings are.
• Auto Flash -- Your
G2
fires the flash when insufficient light is measured when the shutter button is pressed.
For automatic flash, press the Feature Button twice then Feature Change Button to turn on the Auto-Flash icon on the LCD
display.
While the flash is charging, the Green LED is off. When the Green LED is permanently on, the flash is ready to fire.
When the flash is turned on and the Shutter Button is pressed, the sensor reads the level of available light, and the flash is
automatically fired only if there is insufficient light for good exposure without it.
When the automatic flash is turned on, it will be enabled for all subsequent images until one of the following occurs:
• Press the Shutter Button again in a light area, then the flash would not be activated.
•
G2
Feature Settings are changed to capture movie clips instead of still images.
•
G2
power is turned off.


