


Copyright 2021, Snap One, LLC. All rights reserved. Snap One and its respective logos are
registered trademarks or trademarks of Snap One, LLC (formerly known as Wirepath Home
Systems, LLC), in the United States and/or other countries. 4Store, 4Sight, Control4, Control4 My
Home, SnapAV, Mockupancy, NEEO, OvrC, Wirepath, and Wirepath ONE are also registered
trademarks or trademarks of Snap One, LLC. Other names and brands may be claimed as the
property of their respective owners. Snap One makes no claim that the information contained
herein covers all installation scenarios and contingencies, or product use risks. Information
within this specification subject to change without notice.
Troubleshooting
Reset to factory settings
Caution!
The factory restore process will remove the Composer project.
To restore the controller to the factory default image:
1
Insert one end of a paper clip into the small hole on the back of the controller
labeled
RESET
.
2
Press and hold the
RESET
button. The controller resets and the
ID
button changes
to solid red.
3
Hold the button until the
ID
flashes double orange. This should take five to seven
seconds. The
ID
button flashes orange while the factory restore is running. When
complete, the
ID
button turns off and the device power cycles one more time to
complete the factory restore process.
Note:
During the reset process, the
ID
button provides the same feedback as
the Caution LED on the front of the controller.
Power cycle the controller
1
Press and hold the
ID
button for five seconds. The controller turns off and back on.
Reset the network settings
To reset the controller network settings to the default:
1
Disconnect power to the controller.
2
While pressing and holding the
ID
button on the back of the controller, power on the
controller.
3
Hold the
ID
button until
ID
button turns solid orange and the Link and Power LEDs
are solid blue, and then immediately release the button.
Note:
IDuring the reset process, the
ID
button provides the same feedback as
the Caution LED on the front of the controller.
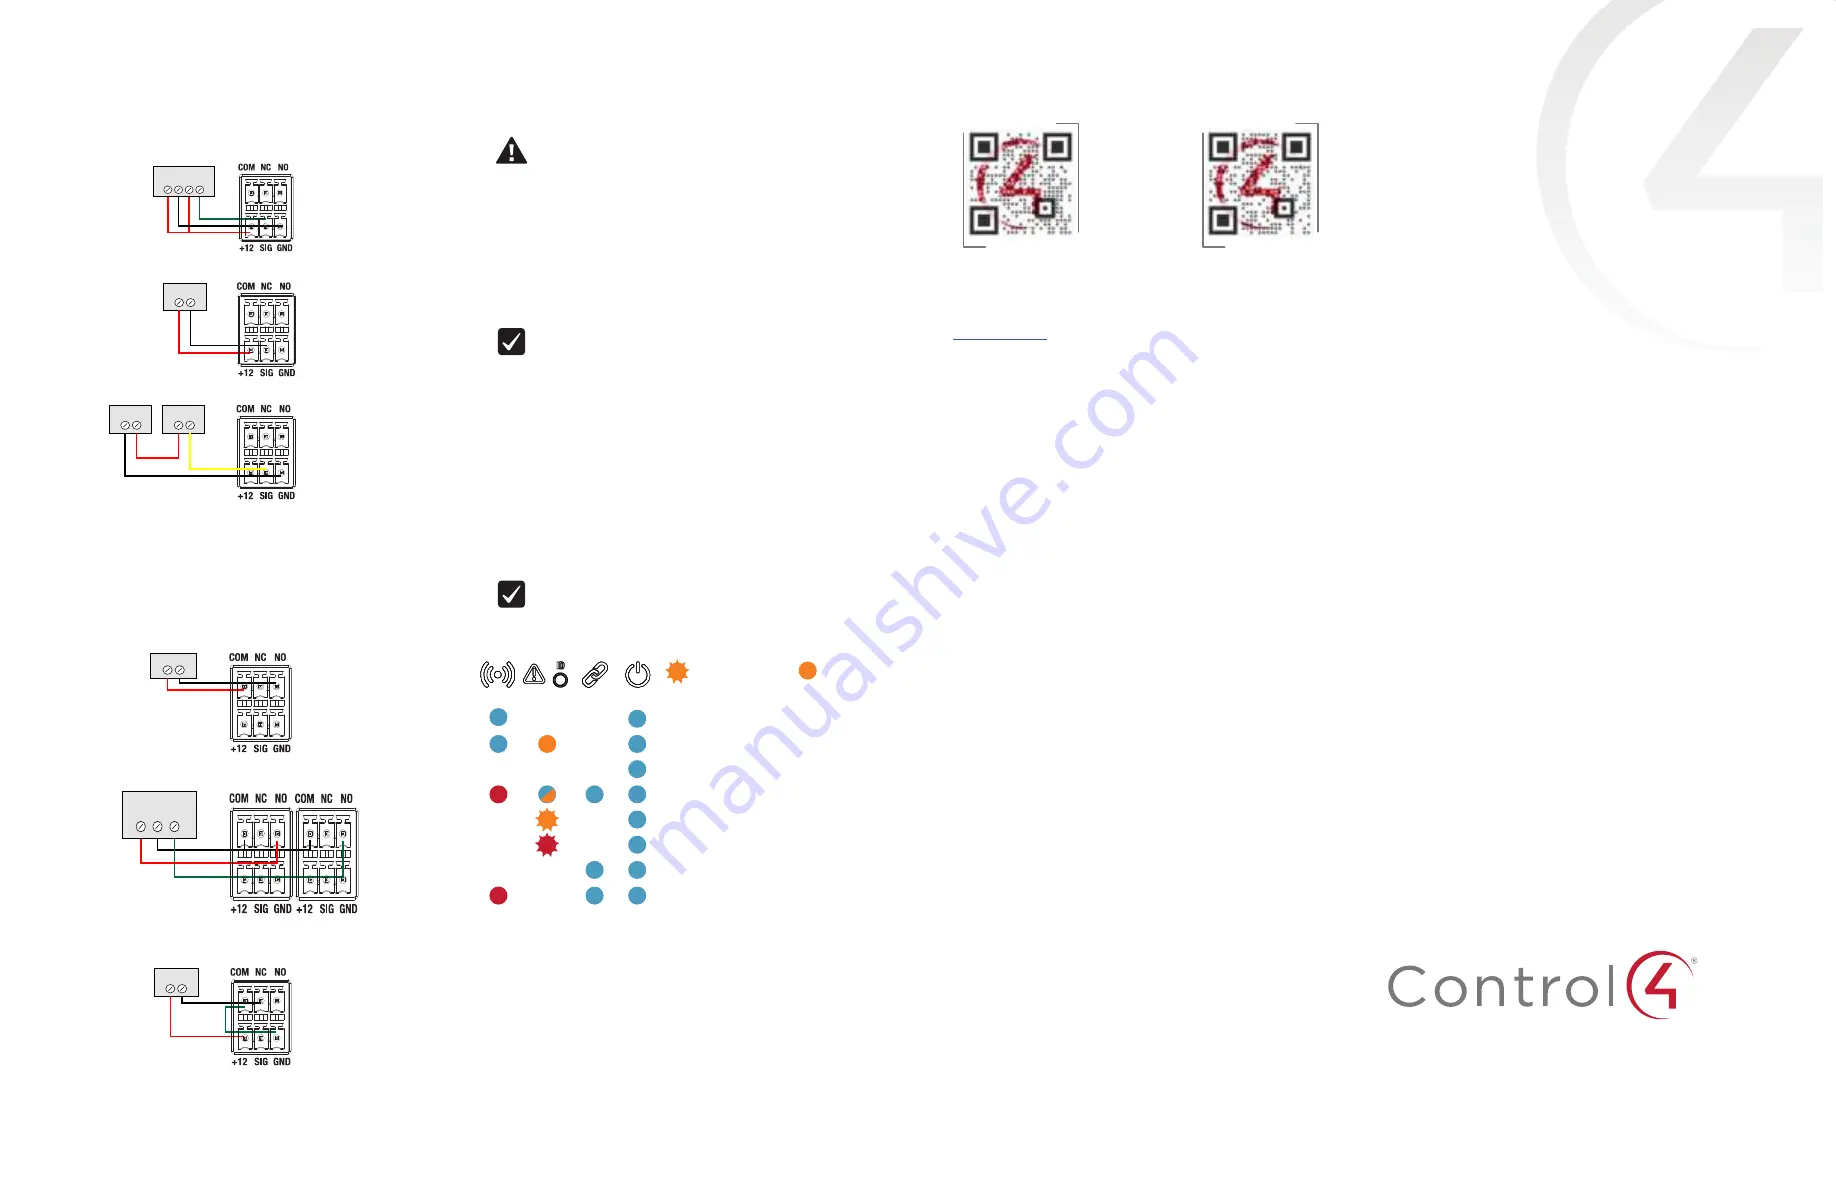
LED status information
Just powered on
Bootloader loaded
Kernel loaded
Network reset check
Factory restore underway
Factory restore fail
Connected to Director
Playing audio
—Flashing LED —Solid LED
More help
For the latest version of this document and to view additional materials, open the URL
below or scan the QR code on a device that can view PDFs.
Legal, Warranty, and Regulatory/Safety information
Visit
snapone.com/legal
for details.
MOST RECENT VERSION
ctrl4.co/
core3-ig
MORE INFO ON CORE CONTROLLERS
ctrl4.co/
core
200-00725-A
2021-10-21 DH
A
Connecting the contact port
The CORE-3 provides one contact port on the included pluggable terminal
block (+12, SIG, GRD). See the examples below to learn how to connect various
devices to the contact port.
Wire the contact to a sensor that also needs power (Motion sensor)
Wire the contact to a dry contact sensor (Door contact sensor)
Wire the contact to an externally powered sensor (Driveway sensor)
Connecting the relay port
The CORE-3 provides one relay port on the included pluggable terminal block.
See the examples below to learn now to connect various devices to the relay
port.
Wire the relay to a single-relay device, normally open (Fireplace)
Wire the relay to a dual-relay device (Blinds)
Wire the relay with power from the contact, normally closed (Amplifier trigger)
Motion Sensor
+12V 0V COM NO
Dry Contact
Driveway
Sensor
External
12V Power
Fireplace
Dual-Relay Blind
UP
COM DOWN
Relay 1
Relay 2
12V Trigger
Activity
Caution
Link
Power
control4.com | 888.400.4070


